Products made from natural materials such as leather, fur will never go out of fashion. Even in ancient times, people covered their bodies with animal skins, and nowadays, in the wardrobe of every fashion-conscious person, there are fur products. Fur coats, hats, fur vests, capes - this and much more women dream of having at home.
Currently, people have learned not only to sew from fur, but also to knit. Moreover, things made of fur look very original and stylish. It's also a great way to make a new vintage item out of an old worn fur coat!
Fur products
The first who came up with do-it-yourself knitting from fur was Canadian fashion designer Paula Lishman. It was thanks to her imagination that models began to appear on the catwalk in stunningly beautiful knitted products from mink and rabbit fur. She revolutionized the fur industry. Now knitting from fur has become very popular!
We make fur yarn
The first thing we need to do to start knitting from fur is to prepare the material itself. Surely everyone in the house has an old fur coat, hat or vest, which is no longer willing to wear, but it's a pity to throw it away. We offer you to make a completely new and incredibly fashionable item out of it with your own hands. To do this, take fur, such as a mink, and cut it into thin strips 5 millimeters wide. Use a utility knife to avoid damaging your valuable fur. In no case should you use scissors. It is better to cut the fur in a spiral, so the width of the strip will be longer. But there is no strict rule on how to cut a fur fabric, so cut it as you like.
We make fur yarn
To make the ribbons even, first draw the incision on the skin. You need to cut along the side of the flesh, pulling and lifting the skin a little. If you follow these tips, fur trimming will not give you much of a hassle.
Sometimes the strips are not long enough, then they can be sewn together with an ordinary thread of a suitable color, monofilament, or glued together with special glue. After the fur is cut, we proceed to the manufacture of the thread itself. We take the first 50 centimeters of the thread, lower it into the water, squeeze it well and fix it with a bracket for any base. Then, we begin to twist the fur ribbon, similar to how a woolen thread is twisted on a spindle. In order for this process to go faster, you can use any available devices, for example: a drill, mixer or screwdriver.
The density of the twist is approximately 5 turns per 1 centimeter of fur thread. That is, it is quite dense. We fix the twisted section and continue to twist the rest of the thread, do not forget to moisten it thoroughly before that. We do such manipulations with absolutely the entire fur strip. After the thread is twisted and fixed, it must be dried with a hairdryer and combed a little. The strip will immediately become fluffy before your eyes. Leave the thread in this taut position until it dries completely. Then unfasten the staples and wind the resulting yarn into a ball. That's it, the thread is ready for knitting fur knitwear! Mink looks best in knits, but any other fur can be used.
Another way
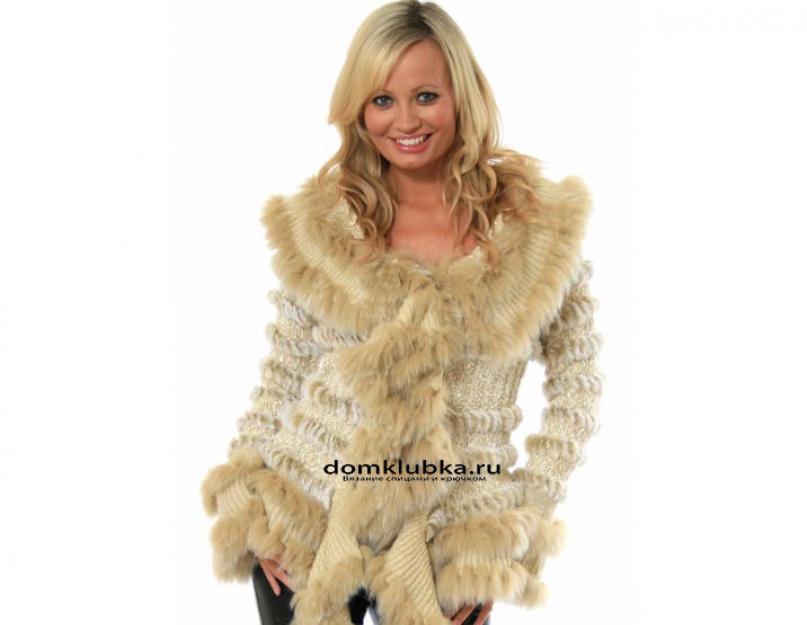
 Knitted fur jacket
 Another method, although less common, but also quite original, is based on the fact that the thread is twisted around the frame thread and then sewn together. Thus, it becomes possible to adjust the twist density and the thickness of the thread. You can use any yarn for the frame thread, but the main thing is that it is not too thin and matches the color with the fur. And the fur must be fluffy, you can use, for example, mink. This method is more economical and makes it possible to obtain fur yarn of greater length than in the first method. The yarn obtained in this way will be less fluffy, but very strong. In this method, you will have to twist the fur ribbon by hand.
For such yarn, you can use the skin of almost any animal, but the most popular is mink. Although recently, thanks to the dressing, products from beaver, fox, rabbit, sable fur look no worse. For fur knitwear, sheared or plucked fur is perfect.
We start to knit from fur
Based on the amount of fur yarn that you get, decide on the product. If you have never tried to knit their fur on your own, then you can learn how to do it on a hat. The work is not very difficult, but the thing is always relevant and necessary. There are several ways to knit from fur.
Knitting
The easiest way is to knit from fur with knitting needles. For this method, many fashion designers use mink fur. Since it looks like it is actually very expensive and stylish. They knit in the same way as from yarn, only a fur strip is used instead of a thread. Sometimes two threads are folded together: fur and regular yarn to match. For such knitting, fairly thick knitting needles are needed. They can be bought at any specialty knitting store or ordered online.
 Knitting process from fur yarn
 By the way, some needlewomen crochet their products. But with tight knitting, too much fur consumption goes away, so it is much more expedient to knit with knitting needles. This method of knitting fur is perfect for large things, capes, vests, jackets. Since the canvas turns out to be very soft and insanely pleasant to the touch. This method will definitely not leave you indifferent. But there are also disadvantages to such a product: it will be blown by the wind very much, since it is not very dense, therefore, such a thing definitely needs a lining that you can sew with your own hands.
Threading fur into a mesh - the basis
For this method, you need a mesh, which you can buy at a fabric store or knit yourself. To do this, it is better to use a hook and any thread to match the fur. The essence of this method is that fur ribbons are threaded into a mesh fabric in a certain order, as if wrapping around it, thereby creating a "knitted effect". For this method, fur yarn does not need to be twisted, it is enough just to cut it into ribbons. Hats tied in this way look very impressive! First, a hat is knitted - a mesh, and then fur ribbons are wound on it, like on a frame. It turns out very nicely. You can decorate such a hat with a flower made of leather or pin a beautiful brooch.
 Knitted fur hat
 If you do everything carefully, the hat will look no worse than in the store, and maybe even better. Moreover, it will be quite cheap! For manufacturing, you need only a small piece of mink or silver fox fur and less than one skein of thread of a suitable color. However, you can take any other fur, but this particular fur is ideal for hats. When making things in this way, it should be borne in mind that the product will not keep its shape well and will be very soft and elastic. It may be necessary to seal the frame with something, for example, to make a lining of dense rigid fabric.
Strapping
This is one of the favorite methods of knitters and it consists in the fact that fur threads are tied with ordinary yarn. You can work with both crochet and knitting needles. But crocheting is still more convenient. When crocheting, the threads are knitted into the fabric at a certain distance. For example, when knitting a hat, you can move in a spiral and knit a fur thread in the same way. You can knit fur in each row or after a certain number of rows. It all depends on whether you want the knitted fabric to be visible. The product, knitted in this way, turns out to be even and dense. Only it is impossible to tighten the fur, especially the mink, it is better to knit it more loosely. Since the yarn stretches, but the fur does not, and if you knit too tight, there is a chance that you simply will not pull the product over yourself. With such knitting, the product keeps its shape perfectly and turns out to be very dense and warm.
Sewing fur to a knitted garment
A very easy way! Suitable for those who are just learning to work with fur. You will need knitting needles and fur ribbons. For this method, the fur strips also need not be twisted. The product is knitted with an English elastic band - the basis. The skin is cut into strips from 0.5 centimeters wide and carefully sewn along the line of the convex part of the knitted fabric. In the finished product, the base will not be visible. This method is ideal for hats. They are voluminous, fluffy and very warm! This method, due to its simplicity and good aesthetic appearance, is very fond of the craftswomen.
Thus, if you wanted a fur hat or jacket, and the family budget is not provided for this, then you can always knit a new thing with your own hands from the remnants of a mink, silver fox or any other fur. Knitting with fur is a fairly simple activity and even a beginner knitter can do it. Provided that she is familiar with the basics of knitting or crocheting. In addition, things connected in this way look no worse than those that are sold in stores for fabulous money.
Knitted fur products have been very popular for several seasons and are not going to give up their positions. Having mastered this technique of making things and learning how to knit with fur, you can surprise those around you with interesting, exclusive models of hats, snoods, sweaters or stoles. Knitted fur is soft, light and warm. The service life depends on the intensity of wear and ranges from 2 to 5 seasons.
What kind of fur to choose for knitting
It is important to remember that the external beauty and durability of the future product depends on the quality of the source material. Therefore, preference should be given to fluffy, shiny, beautiful fur.
The most acceptable is mink skin. Since her fur is warm, fluffy and of medium length (it will not wrinkle when knitted). Fox, arctic fox and rabbit wool are suitable for making threads.
Where to get fur for knitting
- you can buy a ready-made fur tape or thread in a specialized store or online. There you should also pick up a mesh and the necessary tool for knitting with fur;
- make it yourself. New skins can be purchased. And also, for this, fur things that are out of fashion or products with slight abrasions (for example, in the places of contact of the bag) are suitable.
What to choose: a fur tape from a thread?
 Depending on the chosen model of the future product, you will need either a fur tape or a thread. Before proceeding to the manufacture of ribbons and threads from fur, you should select a special tool:
- furrier knife;
- marker;
- thread of suitable thickness (more on that below);
- furrier's needle;
- spray.
The most popular for knitting is a fur ribbon. Below is the sequence of steps for its manufacture. So it follows:
- prepare skins for work... Open the item that is no longer needed, and from the inside, clean the surface with a brush from dirt and dust. It is desirable that the flesh (the inside of the skin) be soft. It can be softened by sprinkling with water, but on old substrates this can lead to skin exfoliation. Next, hem small holes, glue them with an adhesive cloth. Sort out the worn fur pieces, select the best preserved parts;
- purchase a furrier's knife. In principle, a clerical knife is also suitable for cutting the skins. Attention! When cutting, you need to try not to damage the base of the villi so that the finished thing turns out fluffy. You should not use scissors, as there will be an intensive sprinkling of the fur and the seams will be noticeable on the finished product;
- measure the distance 3 - 5 mm from the edge of the skin with a ruler, make marks with a marker. The thicker the tape, the stronger and warmer the item will be. To sew as few pieces as possible, the skin is cut in a spiral. In this case, the tape will turn out with the pile directed in different directions. But, perhaps, cut each skin into many strips and sew them together. With this option, the pile will be located to one side;
- the elements must be sewn together with a overcasting seam, the pile should be placed in one direction. There is no need to leave any allowances, since the joints will not be visible under the fur. When sewing, the fur located at the edges of the strip is tucked inward. It should be noted that thread # 80 is suitable for sewing pieces of fox or arctic fox fur, for a rabbit - # 60, for the rest - # 50 or # 40;
- wind the resulting fur tape onto a bobbin.
To make fur thread you will need:
- drill with drill
- board from 70 cm
- spray
- brush.
So, you should unwind 70 cm of fur tape and fix it on the board with the fur down. Moisten the surface slightly, stretch. Then fasten one edge to the drill and twist the tape into a bundle at low drill speeds. We do the same with the rest of the tape. After that, you should comb the resulting thread and wind it into a ball.

Fur knitting technique
Knitting fur ... A simple option for lovers of needlework. In order to knit the selected product, the fur thread must be connected with woolen yarn of a similar color. To increase the wear of a thing, attention should be paid to its strength. In the work, you can use knitting needles No. 3, 4, 5. Use a solid front satin stitch or garter stitch (but then the canvas will turn out thicker). The principle of operation is as follows:
1. The first row is knitted from a regular woolen thread.
2. Second row. You need to add fur thread. One loop is knitted from yarn, the next from yarn and fur. If the work is carried out with a fur tape, then the flesh is from the wrong side of the product.
3. After each tied row, the grabbed villi are straightened to the front side.
The finished thing is lightly combed and fluffed with a hairdryer (a few minutes). If a lining was conceived, then a dense, soft fabric is selected, sewing it with blind seams to the thing;
Knitting fur on a mesh ... Ready-made options for nets in a large assortment are presented in knitting stores. However, by crocheting crochet stitches, you can get a mesh with the desired mesh size. It will perfectly match the fur tape and the size of a particular item. Step-by-step instructions for knitting fur on a mesh:
- prepare the mesh (buy or knit);
- attach a pin to the edge of the tape. In the first vertical row, through one cell, we begin to drag the tape (this must be done in the direction of the pile);
- reaching the edge, cut off the tape and fasten with a thread at the top and bottom of the product;
- re-attach the pin to the tape;
- in the second row, you also need to drag the tape through one cell, but in a checkerboard pattern in relation to the first row;
- then you should repeat all the steps mentioned above;
- the finished thing needs to be combed out in the direction of wool growth.
Knitting fur crochet ... This technique is applicable if you want to trim a dress or poncho. First, crochet the base from woolen threads of medium thickness. The first row - air loops, the second row - single crochet, the third row - extended loops 1.5 - 2 cm long for pulling the fur (the first loop in such a row is usual). Then, again a row of single crochets, and so on, until you get a strip of the desired width. Then, the fur thread or ribbon is pulled in the manner described above.
Products made from natural materials such as leather, fur will never go out of fashion. Even in ancient times, people covered their bodies with animal skins, and nowadays, in the wardrobe of every fashion-conscious person, there are fur products. Fur coats, hats, fur vests, capes - this and much more women dream of having at home.
Currently, people have learned not only to sew from fur, but also to knit. Moreover, things made of fur look very original and stylish. It's also a great way to make a new vintage item out of an old worn fur coat!
Fur products
The first who came up with do-it-yourself knitting from fur was Canadian fashion designer Paula Lishman. It was thanks to her imagination that models began to appear on the catwalk in stunningly beautiful knitted products from mink and rabbit fur. She revolutionized the fur industry. Now knitting from fur has become very popular!
We make fur yarn
The first thing we need to do to start knitting from fur is to prepare the material itself. Surely everyone in the house has an old fur coat, hat or vest, which is no longer willing to wear, but it's a pity to throw it away. We offer you to make a completely new and incredibly fashionable item out of it with your own hands. To do this, take fur, such as a mink, and cut it into thin strips 5 millimeters wide. Use a utility knife to avoid damaging your valuable fur. In no case should you use scissors. It is better to cut the fur in a spiral, so the width of the strip will be longer. But there is no strict rule on how to cut a fur fabric, so cut it as you like.
We make fur yarn
To make the ribbons even, first draw the incision on the skin. You need to cut along the side of the flesh, pulling and lifting the skin a little. If you follow these tips, fur trimming will not give you much of a hassle.
Sometimes the strips are not long enough, then they can be sewn together with an ordinary thread of a suitable color, monofilament, or glued together with special glue. After the fur is cut, we proceed to the manufacture of the thread itself. We take the first 50 centimeters of the thread, lower it into the water, squeeze it well and fix it with a bracket for any base. Then, we begin to twist the fur ribbon, similar to how a woolen thread is twisted on a spindle. In order for this process to go faster, you can use any available devices, for example: a drill, mixer or screwdriver.
The density of the twist is approximately 5 turns per 1 centimeter of fur thread. That is, it is quite dense. We fix the twisted section and continue to twist the rest of the thread, do not forget to moisten it thoroughly before that. We do such manipulations with absolutely the entire fur strip. After the thread is twisted and fixed, it must be dried with a hairdryer and combed a little. The strip will immediately become fluffy before your eyes. Leave the thread in this taut position until it dries completely. Then unfasten the staples and wind the resulting yarn into a ball. That's it, the thread is ready for knitting fur knitwear! Mink looks best in knits, but any other fur can be used.
Another way
Knitted fur jacket Another method, although less common, but also quite original, is based on the fact that the thread is twisted around the frame thread and then sewn together. Thus, it becomes possible to adjust the twist density and the thickness of the thread. You can use any yarn for the frame thread, but the main thing is that it is not too thin and matches the color with the fur. And the fur must be fluffy, you can use, for example, mink. This method is more economical and makes it possible to obtain fur yarn of greater length than in the first method. The yarn obtained in this way will be less fluffy, but very strong. In this method, you will have to twist the fur ribbon by hand.
For such yarn, you can use the skin of almost any animal, but the most popular is mink. Although recently, thanks to the dressing, products from beaver, fox, rabbit, sable fur look no worse. For fur knitwear, sheared or plucked fur is perfect.
We start to knit from fur
Based on the amount of fur yarn that you get, decide on the product. If you have never tried to knit their fur on your own, then you can learn how to do it on a hat. The work is not very difficult, but the thing is always relevant and necessary. There are several ways to knit from fur.
Knitting
The easiest way is to knit from fur with knitting needles. For this method, many fashion designers use mink fur. Since it looks like it is actually very expensive and stylish. They knit in the same way as from yarn, only a fur strip is used instead of a thread. Sometimes two threads are folded together: fur and regular yarn to match. For such knitting, fairly thick knitting needles are needed. They can be bought at any specialty knitting store or ordered online.
Knitting process from fur yarn By the way, some needlewomen crochet their products. But with tight knitting, too much fur consumption goes away, so it is much more expedient to knit with knitting needles. This method of knitting fur is perfect for large things, capes, vests, jackets. Since the canvas turns out to be very soft and insanely pleasant to the touch. This method will definitely not leave you indifferent. But there are also disadvantages to such a product: it will be blown by the wind very much, since it is not very dense, therefore, such a thing definitely needs a lining that you can sew with your own hands.
Threading fur into a mesh - the basis
For this method, you need a mesh, which you can buy at a fabric store or knit yourself. To do this, it is better to use a hook and any thread to match the fur. The essence of this method is that fur ribbons are threaded into a mesh fabric in a certain order, as if wrapping around it, thereby creating a "knitted effect". For this method, fur yarn does not need to be twisted, it is enough just to cut it into ribbons. Hats tied in this way look very impressive! First, a hat is knitted - a mesh, and then fur ribbons are wound on it, like on a frame. It turns out very nicely. You can decorate such a hat with a flower made of leather or pin a beautiful brooch.
Knitted fur hat If you do everything carefully, the hat will look no worse than in the store, and maybe even better. Moreover, it will be quite cheap! For manufacturing, you need only a small piece of mink or silver fox fur and less than one skein of thread of a suitable color. However, you can take any other fur, but this particular fur is ideal for hats. When making things in this way, it should be borne in mind that the product will not keep its shape well and will be very soft and elastic. It may be necessary to seal the frame with something, for example, to make a lining of dense rigid fabric.
Strapping
This is one of the favorite methods of knitters and it consists in the fact that fur threads are tied with ordinary yarn. You can work with both crochet and knitting needles. But crocheting is still more convenient. When crocheting, the threads are knitted into the fabric at a certain distance. For example, when knitting a hat, you can move in a spiral and knit a fur thread in the same way. You can knit fur in each row or after a certain number of rows. It all depends on whether you want the knitted fabric to be visible. The product, knitted in this way, turns out to be even and dense. Only it is impossible to tighten the fur, especially the mink, it is better to knit it more loosely. Since the yarn stretches, but the fur does not, and if you knit too tight, there is a chance that you simply will not pull the product over yourself. With such knitting, the product keeps its shape perfectly and turns out to be very dense and warm.
Sewing fur to a knitted garment
A very easy way! Suitable for those who are just learning to work with fur. You will need knitting needles and fur ribbons. For this method, the fur strips also need not be twisted. The product is knitted with an English elastic band - the basis. The skin is cut into strips from 0.5 centimeters wide and carefully sewn along the line of the convex part of the knitted fabric. In the finished product, the base will not be visible. This method is ideal for hats. They are voluminous, fluffy and very warm! This method, due to its simplicity and good aesthetic appearance, is very fond of the craftswomen.
Thus, if you wanted a fur hat or jacket, and the family budget is not provided for this, then you can always knit a new thing with your own hands from the remnants of a mink, silver fox or any other fur. Knitting with fur is a fairly simple activity and even a beginner knitter can do it. Provided that she is familiar with the basics of knitting or crocheting. In addition, things connected in this way look no worse than those that are sold in stores for fabulous money.


Braiding of the base mesh with fur thread.
To braid the mesh fur thread, we do this. First, we need a grid. It can be crocheted by itself and in different shapes, for example, a beret or a hat or a bandage, if you want a fur knitted hat or beret, and so on. The netting can also be bought, but this is a bit problematic because the netting for tapestries is not suitable, as it is rigid and its cells are not fixed. So it is better to knit by yourself, crochet, with double crochets, while immediately having the desired shape, the main thing is to make the cells at least 5-7 mm.
You will not need patterns to cut a canvas from a purchased mesh. Fartherfur thread entwinedcolumns of cells with a pin or a tapestry needle. The number of skipped cells depends on the type of fur - the longer the pile, the less frequent and "airy" weaving. We braid, we make sure that the fur is on top, we fix it where necessary. After completing the work, we will go through the comb - both from the face and from the inside. After all, we get a two-sided thing. By the way, you can even take your own ready-made and, perhaps, even worn thing, knitted with large knitting, and braid this thing fur thread... You can braid completely, but you can only braid the edges, or somewhere in the middle. In general, we turn on the imagination - and go!
Good to know!
When weaving along the mesh, leave 2 cm free around the perimeter of the cut part (in addition to sewing allowances). You braid the whole detail, then sew, and braid these 2 cm - then there will be no sharp seam-joint (this is very important in the armhole of the sleeve, otherwise it can bulge, etc.) The bottom can be immediately tucked up and braided to the bottom.
Start fur thread at first we do not fix it in any way - then we attach the thread to it in order to braid the "seams", at the end also - put the seam in a braid, then at the very end we sew the ends to the mesh.
Fur thread unfold at the end of the row - take it out to the wrong side and transfer it to the next column. If braided vertically - "pigtails" on one side and "small stripes" on the other are obtained with short fur. Both that and that side can be done with the front - whoever likes what, but it is "accepted" with pigtails.
V knitting with fur, the more direct the model, the better; it is better to cut out the shelves and backrests with a whole canvas without side seams. And braid it entirely, first bending the bottom and straps, where there will be hooks, buttons, buttons.
Braiding of the base mesh with a fur tape.
If there are different pile heights along the skin and on different strips, knit with fur can be either mixed or alternately. For example, a scarf. First, we will knit the base mesh with woolen or cotton threads. Now let's start braiding with fur. First, we braid the middle of the scarf with the abdomens with the shortest pile and weave in one direction, and then in the other with these abdomens. Then we start up the stripes from the sides, again, in both directions.
Then the backs, and at the end, stripes from the ridge, - a smooth transition of the pile height is obtained. And at the ends, if we have tails, you can make brushes from the tails, it will be very beautiful.
You can weave it on an English elastic band, then the fur will be only on the front side, practically, on the wrong side only a little. But then the product turns out to be more voluminous, denser. If it is a hat, then it must be tied tightly over the head, because when braided with fur, it will stretch.
Simply indescribably beautiful things can be obtained by combining two well-known materials, yarn and fur. The most elementary simple styles and not complicated patterns with the addition of fur look just magical.
They connect fur with yarn in 2 ways: knit a fur "thread" directly during knitting or thread it with a crochet hook into a ready-made fabric, knitted in a certain way. If we talk about knitting with fur, then here are the basic techniques.
Basic fur knitting techniques
Crochet or knitting from fur thread
The fur or fragments are cut into "threads" and sewn together. The direction of the pile is the same for all threads. The thread is twisted, as in the old days - with a spindle. Nowadays, the technology is simpler - the end of the thread is attached to a long drill and the thread is twisted with a drill. The thread is knitted or crocheted.
Braiding with a fur thread of a mesh fabric
The fur skin is cut into thin strips. They are pulled into the mesh in a specific order. The canvas can be used ready-made or knitted. The disadvantage of such a product is that it does not hold its shape well. The spiral braid gives a more stable result.
Crocheting or knitting fur thread
Thin strips of fur thread are crocheted or knitted. When knitting a product, fur strips are attached in a certain sequence. This type of knitting from stripes gives a good stable appearance of the product.
See for inspiration. Pictures are clickable
How the product shown above is made can be seen in the wonderful MK of the master from the Kemerovo region. Natalia Starodubova. You can also sew on thin strips of fur on knitted with an elastic band 2 × 2, things as below


The fur thread is cut with a very sharp blade, approx. 6 mm. In no case should you cut with scissors - the fur will crumble. When knitting a fur thread, and especially when sewing on, you need to follow the direction of the pile, otherwise the finished product will look sloppy. So far I tried to sew thin strips of fur to the hat with a knitted elastic band. The fur was old and not everything worked out, but the experience is valuable and I can start working with normal skin without fear, it's not scary and understandable anymore. Therefore, I recommend that before taking the tug, train on cats on old, unnecessary skins.
Preparation for cutting.
In order to make it more convenient to cut, the skin is ruled, that is, it is sprayed with water from a spray bottle and stretched. But it is better to rule not with water, but with a special solution - grease, this will give elasticity to the skin and shine to the pile. There is such an American drug Elbomor, it is divorced as follows:
- if the skin is thundering - 1: 3 (elbomor and water),
- if normal dressing and natural skin, then 1: 5.
- the dyed skin does not stretch well, so we also use 1: 3.
There is also a German drug called furalastic.
This means they wet it with a spray bottle, but slightly so that the skin is not wet. We rolled up the skin, put it in a plastic bag and let it sit for 30 minutes, or maybe a little more - for the painted skin. Next, we rule with pegs-studs or a stapler. We rule on a plank board, you can take chipboard or some other similar material. After we have fixed at the muzzle and rump with staples or pegs, we correct the ridge, punching it. It is better to set the ridge near the skin with a special wheel before dressing, then everything is visible from the side of the skin, and then it is convenient to work when cutting strips. Further, after the ridge, we fix the rump part, evenly stretching the sides, so that the symmetry is preserved, then we punch the cross, this is the worst stretch in the skin. And then we rule the same way from the rump to the sides. After that, they removed the ridge, since the skin is already full and we do not need the punched ridge line. We are waiting for it to dry. It's 8-10 hours.
Now you can draw stripes on the skin with a special helium rod or a simple pencil.
If the skin is old, then before opening it can be greased with the following composition: whipped egg white from one egg, mixed with 1 tbsp. spoon of glycerin.
If it's a good soft skin, you don't need to edit at all. Just fasten the skin and cut. If the stripes are wide, it is better, nevertheless, to draw lines. And if you cut in strips of 3 mm, then you can cut without lines, it's more convenient. It is better to cut with a clerical knife, the tip of a blade.
How to cut
To make the fur ribbons longer, they are cut in a zigzag or in a spiral, according to this scheme, due to the different direction of the hair, the knitting is fluffier. But other options for cutting strips are also possible. After all, we do not always need a long strip, in some cases it is more convenient to connect fur ribbons already in the process of knitting with fur, because working with long ribbons is inconvenient, for example, when pulling ribbons or braiding them.
What does it mean to cut in a zigzag? Cut across the skin, not cutting to the edge through one line by 0.5 cm. Whether or not it is convenient to knit with a ribbon cut in this way is a moot point. I think this option is suitable if you make a fur thread, that is, then twist this tape. And if you stretch the fur tape through the cells, then it is better to cut into even strips.
There is such information that it is convenient to cut a whole skin with a "stocking" in a spiral, because then a long thread will turn out - the very thing for knitting with fur and the pile will be all in one direction. But in fact, it turns out that cutting this "stocking" is not at all convenient, so I would not recommend this option to you. However, see for yourself.
The fur thread is cut with a clerical knife or a blade by hand, and the blades need to be changed often, because they quickly become dull. A knife, in my opinion, is much more convenient and safer.
There is such information that, ideally, the skins are cut along the ridge, then they take strips from the ridge from all the skins for work, then the backs from all the skins, then the abdomens from all the skins - then knitting is smooth-smooth along the difference in the size of the fur. On my own I want to make some adjustments. When you knit with fur on a large scale, this may work for you. But when you just start learning how to knit with fur, it is unlikely that you will buy many skins at once, moreover, of the same type and even! one color. Therefore, most likely, you will have only one skin. So, in order for you to get fur ribbons from one skin with uniform, fluffy fur, you need to cut not along, but across the skin.
If we have a whole skin, it is better to cut across the skin, and if there are pieces of fur, then there is little choice, we will have to cut how it works so that the stripes are longer.
But if you work with scraps, then you just need to sort by the length of the pile at least by eye.
Twisting the fur thread
If we plan to knit with fur, namely, with fur thread, then our cut fur ribbon needs to be prepared, that is, twisted.
If we cut in a spiral or zigzag, then we have long ribbons. And if they were cut in short strips, then now we are faced with the problem of how to connect the strips before twisting. We connect simply. There are two ways: stitching or gluing.
It is advisable to moisten the cut fur before twisting, that is, not the fur itself, but the skin.
Moisten with this composition: 3-4 tbsp. spoons of water + 1 tablespoon of vinegar 9%. What will it give? The fur thread will become smoother, stretch a little, and, thanks to the vinegar, will not unwind. And when worn, the product will then be better able to withstand adverse weather conditions. You can dry it by wrapping stools around the legs. After drying, roll up into balls.
How to curl? You can use a drill, or you can take a base thread and wind a fur strip around it. A special tool is also used for this purpose; it is used for tying flies for fishing.
Concerning the options for joining pieces of fur ribbons, on the subject of which option is better - opinions are divided. It is better for some to sew, they say that gluing is a laborious task, and there is little sense - everything will fall apart, but in general the thread and the needle save better and more reliably in further work. Others like to stick it together more, and what is sewn, they say, often crumbles. So here you have to choose what you like best. But if you glue, then you need to pick up a good glue. They say that a good glue is German furacol, special for fur. But it can also be glued with ordinary leather glue or even super glue. You just need to prepare the ends of the fur tape. We leave one end as it is, and at the other end we slightly cut off the fur. To glue, as well as to sew, we will overlap. To do this, cut off the fur. They cut off the fur, smeared it with glue, quickly applied another tape, glued it on. The place of gluing should be small so that it is invisible, and the glue should be strong so that it does not come off. If we sew, then the sewing site also needs to be prepared, cutting off the fur on one side, and this place should also be small, and the threads strong.
Some people like knitted mink.
For example, if you have mink trimmings, cut them into very narrow ribbons. Glue several ribbons together with leather glue. Then you twist them with a special tool, it is used for tying flies for fishing, but you can think of something else. Then you roll it into balls. It turns out mink yarn, of course, not always uniform in thickness, but in knitting it looks very much even nothing. Knit with woolen thread. This is a long business, winding mink threads, but worth it.
Actually, you can cut fur ribbons from any scraps of fur, not just mink. Fur trims can be bought by weight much cheaper than whole pelt.
Knitting with fur by the "knitting" method
If we have chosen such an option for knitting with fur, in which the fur is knitted, we do so. We knit the product with a crochet. To begin with, it is advisable to knit a couple of rows of the sample, then we take a strip of fur and knit it into an overlay, that is, the strip should be located, as it were, from the face of the product, and we tie it in the seamy row.
Knitting options.
1) You can knit fur in each row. At the same time, the yarn is practically invisible, the product looks completely furry.
a) We start knitting, as usual, with a row of air loops (or a ring).
And we repeat the next rows all the same.
b) Again we start with air loops.
We repeat the second row.
c) Air loops again. Two lifting loops, a column with a crochet, again crocheting in front of the fur tape. And so we knit to the end of the row. Subsequent rows are exactly the same.
This knit wraps the fur very tightly.
d) Well, you understand that there are again air loops. Again, two lifting loops, a column with two crochets, crocheting the front of the fur tape, 1 air loop. We repeat to the end of the row. And the following rows are the same. This knitting with fur turns out to be looser, more airy.
So, you have noticed that the number and type of columns can be different, it all depends on the thickness of the yarn and on the state of the flesh (soft or not). The worse the flesh, the tighter we tie the strip of fur.
2) You can knit fur not in every row, but through a row.
In this case, the yarn will definitely be visible. The product will be more elastic. This option, it seems to me, is more suitable for hats. The product turns out to be both fur and very plastic and elastic.
You can knit, for example, like this:
1 row of air loops,
2nd row is just a half-column with a crochet,
3 row of half-crochets with a crochet, with knitting in a strip of fur.
Knitting with fur by the "braiding" method
Braiding of the base mesh with fur thread.
In order to braid the mesh with fur thread, we do this. First, we need a grid. It can be crocheted by itself and in different shapes, for example, a beret or a hat or a bandage, if you want a fur knitted hat or beret, and so on. The netting can also be bought, but this is a bit problematic because the netting for tapestries is not suitable, as it is rigid and its cells are not fixed. So it is better to knit by yourself, crochet, with double crochets, while immediately having the desired shape, the main thing is to make the cells at least 5-7 mm. You will not need patterns to cut a canvas from a purchased mesh. Further, the columns of cells are braided with a fur thread using a pin or a tapestry needle. The number of skipped cells depends on the type of fur - the longer the pile, the less frequent and "airy" weaving. We braid, we make sure that the fur is on top, we fix it where necessary. After completing the work, we will go through the comb - both from the face and from the inside. After all, we get a two-sided thing. By the way, you can even take your own ready-made and, perhaps, even worn thing, knitted with a large knit, and braid this thing with fur thread. You can braid completely, but you can only braid the edges, or somewhere in the middle. In general, we turn on the imagination - and go!
Good to know!
When weaving along the mesh, leave 2 cm free around the perimeter of the cut part (in addition to sewing allowances). You braid the whole detail, then sew, and braid these 2 cm - then there will be no sharp seam-joint (this is very important in the armhole of the sleeve, otherwise it can bulge, etc.) The bottom can be immediately tucked up and braided to the bottom.
At first we do not fix the beginning of the fur thread in any way - then we attach the thread to it in order to braid the "seams", at the end also - put the seam into the braid, then at the very end we sew the ends to the mesh.
We unfold the fur thread at the end of the row - take it out to the wrong side and transfer it to the next column. If braided vertically - "pigtails" on one side and "small stripes" on the other are obtained with short fur. Both that and that side can be done with the front - whoever likes what, but it is "accepted" with pigtails.
In fur knitting, the straighter the pattern, the better; it is better to cut out the shelves and back with a whole canvas without side seams. And braid it entirely, first bending the bottom and straps, where there will be hooks, buttons, buttons.
Braiding of the base mesh with a fur tape.
If the fur is cut along the skin and on different strips of different pile heights, you can knit with fur either mixed or alternately. For example, we knit a scarf with fur. First, we will knit the base mesh with woolen or cotton threads. Now let's start braiding with fur. First, we braid the middle of the scarf with the abdomens with the shortest pile and weave in one direction, and then in the other with these abdomens. Then we start up the stripes from the sides, again, in both directions. Then the backs, and at the end, stripes from the ridge, - a smooth transition of the pile height is obtained. And at the ends, if we have tails, you can make brushes from the tails, it will be very beautiful.
You can weave it on an English elastic band, then the fur will be only on the front side, practically, on the wrong side only a little. But then the product turns out to be more voluminous, denser. If it is a hat, then it must be tied tightly over the head, because when braided with fur, it will stretch.
Fur tricks
LEAF UPDATE AND MEDRA SOFTENING
For starters, I advise you to use a freezer that maintains -24 degrees. The old skin should be placed in such a chamber, turned upside down, and put in a canvas bag or in a cotton pillowcase. The skin should lie there for a week, from the frost the skin will thicken. When I did this for the first time, after pulling out the package of their refrigerator, I immediately began to pull it out and unfold it. It's good that I noticed in time that it was just splitting at the folds. I left it to thaw so that the skin would come into equilibrium with the microclimate in your apartment. Half a day is enough. This is the first step. Also, when moths appear, place the fur in the freezer for a couple of days.
Second. If there is a fur production in the city, there is always (usually in cans) all kinds of chemical impregnation for leather and measuring gauges. For a small fee, you will always be poured and told how to use it. If this option is excluded, go to the pharmacy for glycerin. 1-1.5 tablespoons for 1 glass of water. Soak the menzdra and put the skin aside for a couple of three days. Some of the girls have already described this method. (Use this option carefully, because - “When I ripped through the lining, it turned out that the flesh was barely alive and in some places it just fell off from the seams, and the hairline was very greasy with glycerin.)
And then it’s simple. To avoid leakage of skins from the seams. After cutting the fur, made of poor quality calico (cheap and rare material, be sure to wash before use to shrink) we cut the same details, only with allowances for the seams. Sew the chintz to the fur with large slanting stitches. We connect the parts at once through 4 layers - fur + chintz and chintz + fur.
Why should the chintz be of poor quality? It is loose, i.e. full of holes. Therefore, menzdra will breathe freely. But then we are just starting to treat such fur as usual, but still a little more gentle. Gently moisturize (along with chintz beauty) the menzdra, I usually use not a damp sponge for this, but a spray bottle, and stretch it (without fanaticism, gently) on the sewn. After drying, we comb the pile and understand ... the fur is still good, it will still serve
comb it and let it lie down to breathe, then you can walk with a cloth moistened with a solution of vinegar (1 teaspoon per glass of water) - just smooth it, do not wet it too much - the guard pile so that it straightens and shines


and finally, a little from the magazines


I would be glad if someone uses my selection of materials.