You can crochet not only clothes, but also interesting toys, interior decorations, and funny souvenirs.
Crocheting baskets made of cord or thick yarn is very popular today. This useful accessory is convenient for storing various small things that need to be kept at hand: keys, lighters, hairpins, etc. Don’t rush to go to the Ikea store - you can create a basket with your own hands.
DIY knitted basket
The basket is an indispensable accessory in everyday life and a bright interior accent. In addition to aesthetic pleasure and the realization of your creative potential, you will get a lot of benefits with it:

Amateur summer residents can use a wicker basket for collecting berries, and mushroom pickers can use it for quiet hunting. However, in this case, it is necessary to cover the bottom with fabric or thick paper, otherwise the item will quickly get dirty and will no longer be as elegant as before. It is best to take such a basket for collecting berries or fruits that are hard and do not wrinkle (for example, apples, pears or gooseberries). But you shouldn’t use it for currants or raspberries.
A knitted or wicker basket will look great in a kitchen decorated in Provence style (the so-called “rustic style”), combined with lace curtains, embroidered towels and other homemade textiles. It will make the kitchen cozy and beautiful.
What you need for work
A wicker basket can be made from thick rope (for example, using the macrame technique), and a knitted one can be made from good quality yarn. Before reading the crochet master class, you need to prepare materials for the basket. Woolen threads can be of different colors, it all depends on the desire of the craftswoman. If the basket has a round shape, it is more convenient to use circular knitting needles. Also for work you need to prepare:

You can use other materials for weaving or knitting. The main thing is that they are sufficiently dense and durable. The material of the handle must be especially reliable so that the basket can be carried.
Step-by-step master class
 Knitting is now at the peak of popularity, so there are many suitable patterns on the Internet. The basket can be of any shape: oval, semicircular and even rectangular. Of course, knitting such a product is much easier than a jacket or scarf. However, it is better for novice craftswomen to choose the simplest scheme with a detailed description. Then you can easily knit the desired item and avoid mistakes. For crocheting or knitting a basket, it is best to look for a pattern and description on specialized Internet sites. Schemes presented in women's magazines often contain errors or typos that significantly complicate the work. So, to make a basket, you need:
- Knit the bottom of the basket according to the pattern. If the item is not intended for decoration, but exclusively for practical purposes (storing things, collecting crops in the country or mushrooms), the bottom can not be knitted, but made of thick fabric or plywood and then millet attached to the knitted base;
- Next, start making the walls. The easiest way to do this is using the circular knitting technique;
- The finished walls and bottom are connected to each other. If the bottom is also knitted, it is sewn to the walls by hand, using threads to match the yarn. If the bottom is made of another material, it can be “planted” with glue;
- The handle is knitted. The most convenient way to do this is to crochet. The handle should be of medium length. Too long will easily tear, and too short will make using the basket inconvenient. The length must be such that the product can be easily transported from place to place and used for its intended purpose;
- The handle is securely sewn to the basket with a hidden seam - threads to match the fabric.
Stages of creating a basket


How to decorate the finished product
Here are several options for decorating a knitted or wicker basket:

Other basket options
 You can weave an original basket from old newspapers, cut into strips and coated with a special varnish. It can be of any shape, for example, square or rectangular. A man who loves to craft will willingly weave baskets from willow twigs. You can also try crocheting from multi-colored garbage bags cut into strips (the technology will be approximately the same as crocheting rugs in the traditional “grandmother’s” way).
A decorative basket-box will be made from strips of colored cardboard- even a child of primary school age can cope with such work. Such a product will look especially impressive if you take cardboard strips of two contrasting colors and intertwine them in a checkerboard pattern.
Straw weaving is developed in Belarus. Before work, it must be thoroughly dried, trimmed and processed. Such products do not need to be coated with varnish or paint, since the straw is beautiful in itself.
Basket weaving is a unique creative activity: there are no limits to your imagination. Once you get comfortable with simple patterns, you will be able to create more complex ones, for example, using the amigurumi technique, and become a true master of this craft! Good luck!
Attention, TODAY only!
Nowadays, all kinds of baskets and crocheted basket bags are at the peak of popularity. The basket is made of any braid, rope, spaghetti, ribbon, knitted or t-shirt yarn. You can take any cotton or synthetic yarn in 3 folds. An original basket for all sorts of little things is especially relevant for the garden. With knitted handles, the product turns into a basket bag.

A hand-knitted basket will add coziness to your home. What’s especially good about this work is that you can knit from anything. You can cut up an old T-shirt, jumper, or just a piece of any fabric. The basket can be plain, with colored inserts, or colorful - as you like. We start work with the amigurumi ring. To understand how to make an amigurumi ring, let's look at the picture:

This will make it easier for us to understand where the work begins. Legend:
VP - air loop, RLS - single crochet, SSN - double crochet, SSBN - connecting single crochet.

To work you will need:
- Ribbon yarn, maybe from old T-shirts, 2 colors.
- Hook 10 mm.
- Scissors.
- Needle.

We start knitting with an amigurumi ring. Fasten the loop:

We knit 8 single crochets from the loop.

1st row: we close them with a connecting half-column. And now we use the thread that we have left to tighten the base.

2nd row: make increases in each loop formed. Add 8 loops. We make 1 chain stitch (CH) to lift the row, 2 single crochets (SC), 2 SC, and so on until the end of the row. We finish with a connecting single crochet (SSBN). In total there are 16 loops.

3rd row: increases not for each braid, but every other one. 1 VP for raising a row, 1 sc, 2 sc, 1 sc, 2 sc, and so on until the end of the row. We are finishing SSBN. Total 24 loops.

4th row: we make increases. 1 VP, 1 RLS, 1 RLS, 2 RLS, 1 RLS, 1 RLS, 2 RLS, and so on until the end of the row. We are finishing SSBN. Total 32 loops.

For the next rows we make increments with increasing steps. 8 loops are added. Total 40 loops.

Add 8 more loops. Total 48 loops.


We knit sc in the round. Insert the hook into the upper VP of the beginning of the circle.

Take yarn of a different color and knit RLS.

1 VP and RLS in a circle. We close the row with a single crochet. We knit another row.

We begin to knit the handles. We make 2 ch, then 10 double crochets (dc). We make 5 VP, skip 7 P, then knit 17 DC. We make 5 VP, skip 7 P and knit a DC to the end of the row. We close the row of sc.


To work you will need:
- Knitting yarn - 400-500 grams.
- Hook 15 mm.
- Scissors.
The basic pattern is knitted like this: single crochets (SC) in circular rows. We start each next circular row with 1 air loop (VP) lifting. We finish with 1 connecting stitch (SS) into the first single crochet (SC).
Let's get started:
First you need to knit the bottom of the basket. We knit a chain of 5 VPs, then we need to close it with a SS into a ring and knit with the main pattern. We make circular rows.
- 1st row: knit 8 sc.
- 2nd row: double each loop, that is, knit 2 loops into 1 base loop. You will get 16 loops.
- Row 3: Double every second stitch. You will get 24 loops.
- 4th row: double every third stitch. You will get 35 loops.
- 5th row: double every fourth loop. You will get 40 loops.
- 6th row: double every fifth row. You will get 48 loops.
- 7th row: knit without additions.
- 8th row: double every sixth. The result will be 56. This is where we finish making the bottom of the basket. Next, we knit without any additions.
After 21 rows from the very beginning of work, we begin to make handles for the basket. We knit two circular rows in this way: 11 RLS, skip the next 7 rows by knitting 7 VP, 11 RLS, skip the next 7 rows by knitting 7 VP, 21 RLS, skip 7 rows by knitting 7 VP, 11 RLS. After 2 circular rows we knit the last row and finish the work.
Knitted baskets are stylish, useful elements of interior decor. They are great for storing any small items, craft items and more. This material presents a basket using a hook, step-by-step interesting diagrams and descriptions in different versions for every taste. Any beginning needlewoman can knit such a product, and the work will take very little time.
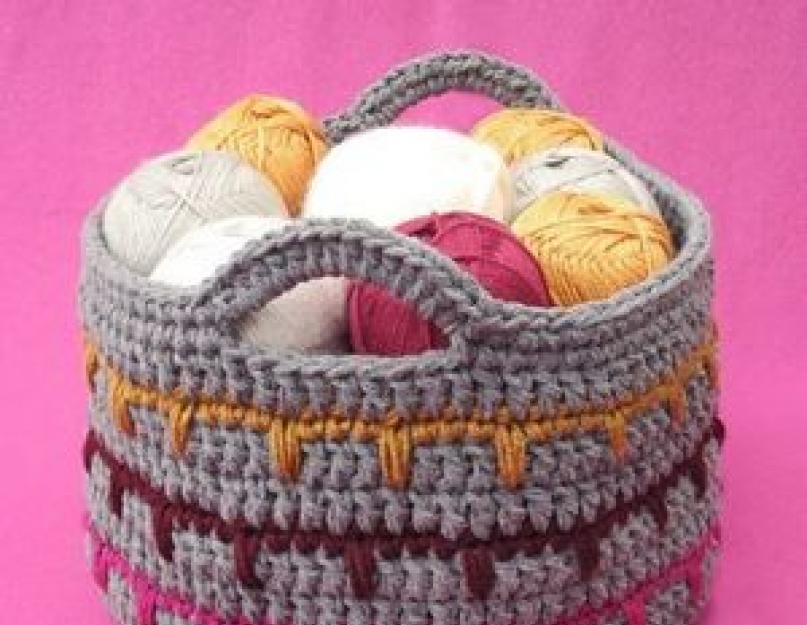
We crochet a round basket from knitted yarn: diagram and description
For this master class you will need knitted yarn from strips about 1 cm wide in three colors, in our case - burgundy, peach, vanilla. In addition, you need hooks: No. 6.5 for the main crochet and No. 8 for the handle.
We start knitting from the bottom of the basket with a 6.5 crochet hook. We roll the yarn into a ring, make 1 air lifting loop and knit 6 single crochets into a ring. We tighten the ring at the opposite end of the thread and knit a connecting stitch into the first air loop. The first row is ready.
From the second row we begin to add loops, knitting 2 stitches into each stitch of the previous row, in the second row there will be 12 of them. For beginners, it is recommended to use markers (they can be replaced with any paper clips, contrasting threads), they are much more convenient for counting stitches.
In each next row we add 6 columns. Having knitted 12 stitches, between the last stitch and the lifting loop you can see another one, which does not need to be knitted. We tie the connecting column exactly into the column with the marker. If you make a mistake, the lifting loops will deviate to the side, forming a diagonal line across half of the bottom.

We start the third row with a lifting air loop, then add through one loop: 2 single crochets in one column of the previous row, 1 single crochet in the next - alternating until the end of the circle. It turns out to be 18 single crochets, then a connecting stitch and move to the 4th row. In the fourth row there is an air loop for lifting; we continue to make similar additions with a shift. This can be seen in the diagram:
Having knitted 5 rows, we move to the walls of the basket; to do this, we knit a row of stitches through the back loop. We knit the walls with similar single crochets, we do not increase them. Having knitted 2 rows of the wall, we change the color of the yarn. To do this, we begin to knit a stitch, but we pull the loop from another ball. Then we knit in the same way. In order to make elongated loops, we draw the hook under the column of the previous row. We alternate loops with regular stitches.
We knit 2 rows and move on to the next color, also alternating elongated loops with regular stitches.
We knit another round row. You can stop here or make a handle for the basket. To do this, we knit a connecting stitch, add a peach thread to the white thread, and use a No. 8 crochet hook to knit 16 chain stitches. We connect a chain of knitted yarn to the opposite edge of the basket.

We knit a connecting post, an air loop, and tie the chain in the opposite direction. In this case, the hook passes under the rear rim of the post. You can add a cord with a core and tie it around the entire handle.
How to properly and quickly tie a rope basket?
For this craft rope basket you will need any thin rope or yarn of similar structure and volume, thick wire for the handle frame and a hook. The hook size may vary depending on the thickness of the material.
knitting begins with an amigurumi ring, we knit 7 single crochets into a ring of thread and tighten it from the opposite end of the thread. Next we knit the loops behind the back wall. In the first row - 2 columns in each loop. In the second row we increase through one loop. In the third row – add (knitting 2 stitches in one loop) through 2 loops. In the 4th row again through 2 loops.
In the 5th-8th rows we knit in the same way, adding after 2 loops. The bottom is ready.

We knit the ninth row without increases, the basket gradually rounds out. In the 10th row we knit every 7th and 8th loops together. 11th row - no additions or decreases. Similarly, we knit 12-20 rows of walls. We finish knitting the straight walls with a connecting stitch.
Next, we make 3 air loops for lifting and knit double crochets, knitting 2 in every 7th loop. At the end of the row there is a connecting loop. In the next row there are again lifting loops, double crochets without increments, a connecting loop at the end. Fold the last 2 rows outwards and knit a handle.
The handle is knitted with an amigurumi ring (8 single crochets). We knit rows behind the back wall, without increasing or decreasing, to the desired length. We insert the wire inside the bundle and cut off the excess.

Sew the pile to the basket. This is the job done! You can experiment with materials and make such a basket from twine.
We are trying to make another version of a basket from bags
To knit a basket you will need bags rolled into rolls, you can choose multi-colored ones. We carefully cut off the side seams from the bags, without touching the adhesions, cut into 4 cm rings. We connect the resulting rings together into a thread:

We wind the thread into a ball, and you can start knitting a basket with your own hands. We use hook number 4.
We close the first 5 air loops into a ring. We knit 8 single crochets in the center of the ring. In the next row we knit 2 single crochets in every second loop, alternating with 1 single crochet. In the third row we also increase through one loop. In the fourth row we double every third loop, resulting in 24 stitches. In the fifth row we double every fourth loop, we get 30. In the sixth row we double the 2nd loop, then every 5th, we get 36. In the next row, we double every 6th loop. In the 8th row - every 7th, it turns out 48. In the next row - every 8th, then - 4th and every 9th, it turns out 60. We knit this way until the desired diameter of the bottom. After this, we knit the walls of the basket without adding to the required height.

The trash bag basket is ready! You can knit the lid in the same way. If you knit the last row with single crochets from the inside, the lid will be rounded inward.
Video on the topic of the article
Do you have a lot of skeins of yarn, but still can’t organize them? Then today's master class is for you! Today we will learn how to literally crochet an original basket in just a couple of hours, which will serve as an organizer for knitting tools and leftover yarn, and will also decorate the interior of your room, making it truly warm and cozy.
Decorative basket for beginner knitters
For work we will need:
- thick yarn “Lanoso Verde” (40 meters per 100 grams);
- hook No. 9.
Dimensions of the finished product: 15 cm in height, bottom diameter – 21 cm.
Crochet basket: job description
Bottom
First you need to tie a slip knot, after which we perform 2 in. p..
1 row: 8 s. without n. in the 2nd century. p. from hook = 8 p..
2nd row: knit 2 half double crochets in each loop, ss. = 16 p..
3 row: 2 in. p., 1 half double crochet in the joint loop, 1 half double crochet in the next loop, *2 half double crochet in 1 loop, 1 half double crochet in the next loop*, from * to *, ss. = 24 p..
4 rows: 2 in. p., 1 half double crochet in the joint loop, 1 half double crochet in the next 2 loops, *2 half double crochets in 1 loop, 1 half double crochet in the next 2 loops*, from * to *, ss. = 32 p..
5 rows: 2 in. p., 1 half column with/throwing over the connection loop, 1 half column with/throwing over the next 3 loops, *2 half columns with/throwing over 1 loop, 1 half column with/throwing over the next 3 loops*, from * to * , ss. = 40 p..
6 rows: 2 in. p., 1 half column with/throwing over the connection loop, 1 half column with/throwing over the next 4 loops, *2 half columns with/throwing over 1 loop, 1 half column with/throwing over the next 4 loops*, from * to *, ss. = 48 p..
Walls
1 r.: we will need to knit half-stitches with/throw over, grabbing the loops that remain when knitting half-stitches with/throw on the reverse side of the knitting (do not confuse with the front and back segments of the loop!). As a result, we will get both walls of each pet. and after knitting the 7th row, we will have 2 parallel tracks along the bottom of the basket.
7 p.: 1 c. p., 1 p. without n. in the 1st stitch from the reverse side of the knitting, knit the remaining stitches in the same way. With. without n., ss. = 48 p..
8 p.: 2 v. n., 48 half-columns with/throwing, ss. = 48 p..
9 p.: 1 c. p., 48 p. without n. behind the back wall, starting from the connecting pet., ss. = 48 p..
10 r.: 2 v. n., 48 half-columns with/throwing, ss. = 48 p..
11 p.: 1 c. p., 48 p. without n., starting with connecting stitch, ss. = 48 p..
12 p.: 2 v. ., 48 half-columns with/throwing, ss. = 48 p..
13 r.: 1 c. p., 48 p. without n., starting with the connecting stitch. and grabbing the loops at the back wall, ss. = 48 p..
Pens
14 r.: 2 c. p., 8 half-columns with/throwing, 7 in. p., skip 5 loops on the basket, after which you need to knit another 19 half-stitches with/throw, 7 in. p. and again skip 5 loops, then 10 half-stitches with/throw over and ss. = 52 p..
15 p.: 1 c. p., 8 p. without n., starting with the connecting stitch, after that we proceed to tying the first handle with the 8th s. without n. (do not insert the hook into the loop, tie it over the handle), 19 pp. without n., now the second handle - 8 s. without n., 10 s. without n. = 54 p..
All we have to do is cut the thread, fasten it and our crochet basket is ready!
Crocheted basket: video master class
DIY small items basket
We will need:
- purple yarn Rowan Kid Classic (140 meters per 50 grams), 3 skeins;
- lemon-colored yarn Rowan Kid Classic (140 meters per 50 grams), 1 skein;
- hook No. 4.5.
Finished product size: 12 cm in height, bottom diameter – 26.5 cm.
Pine cone: knit a cone, leaving the last stitch of each s. s/n. on the hook, perform further 5 s. s/n. in the next stitch, perform nak. and pull the thread through all 6 loops on the hook, if necessary pushing the “bump” to the front side.
Important! The basket is crocheted with a thread in two folds!
The bottom is made of a continuous spiral. Mark the first point of the circular r. (with a marker for loops or a contrasting thread), we move it during the knitting process.
Crochet basket: description
Bottom
With the purple thread folded in half we want a sliding loop.
1 p.: 6 s. without n. to the center of the ring. Gently pull the loose end of the thread to tighten the hole.
2 p.: 2 s. without n. in each point of the base = 12 s. without n..
3 p.: *1 p. without n. in the upcoming paragraph of the base, 2 s. without n. in the upcoming base paragraph *, from * to * another x 5 = 18 s. without n..
4 rubles: *2 s. without n., 2 p. without n. in the upcoming buttonhole of the base *, from * to * another x 5 = 24 s. without n..
5 p.: *3 p. without n., 2 p. without n. in the upcoming buttonhole of the base *, from * to * another x 5 = 30 s. without n..
Row 6: *4 s. without n., 2 p. without n. in the upcoming buttonhole of the base *, from * to * another x 5 = 36 s. without n..
Row 7: *5 p. without n., 2 p. without n. in the upcoming buttonhole of the base *, from * to * another x 5 = 42 s. without n..
8th row: *3 p. without n., 2 p. without n. in the upcoming buttonhole of the base *, from * to * another x 5 = 48 s. without n..
9th row: *7 p. without n., 2 p. without n. in the upcoming buttonhole of the base *, from * to * another x 5 = 54 s. without n..
10th row: *8 s. without n., 2 p. without n. in the upcoming buttonhole of the base *, from * to * another x 5 = 60 s. without n..
11th row: *9 p. without n., 2 p. without n. in representation base buttonhole*, from * to * another x 5 = 66 s. without n..
Row 12: *5 s. without n., 2 p. without n. in representation basic buttonhole, 5 p. without n.*, from * to * another x 5 = 72 s. without n..
13th row: *11 s. without n., 2 p. without n. in representation base buttonhole*, from * to * another x 5 = 78 s. without n..
Row 14: *12 s. without n., 2 p. without n. in representation loop basics*, from * to * more x 5 = 84 s. without n..
Row 15: *13 p. without n., 2 p. without n. in representation loop base*, from * to * another x 5 = 90 s. without n..
16th circle: *7 s. without n., 2 p. without n. in representation loop grounds, 7 p. without n.*, from * to * another x 5 = 96 s. without n..
17th circle: *15 s. without n., 2 p. without n. in representation loop base*, from * to * another x 5 = 102 s. without n..
18th circle: *16 s. without n., 2 p. without n. in representation loop base*, from * to * another x 5 = 108 s. without n..
19 lap: *17 s. without n., 2 p. without n. in representation loop base*, from * to * another x 5 = 114 s. without n.. Half column without n. into the next base stitch.
Walls
We unfold the knitting clockwise, holding the thread behind the work, with the wrong side facing us, and we tie the sides as described below.
1st row: knitting only the front wall of the loop, perform 1 s. without n. in a half-column without ac., 1 s. without n. in each subsequent loop of the base, half-column. without nac. in the 1st s. without n., turn the knitting clockwise (holding the thread as you work) with the front side facing you.
2nd row: knit 1 s on both walls. without n. in a half-column without ac., 1 s. without n. in each subsequent loop of the base, half-column. without nac. in the 1st s. without n.. Turn.
Rows 3-6: repeat row 2. x 4. We switch to lemon yarn when making semi-stitches without yarn. at the end of the 6th row.
Cut the purple yarn.
Row 7: Use lemon yarn to knit 1 s. without n. in a half-column without yarn over, 2 p. without n., *bump from 5 s. without n.*, from * to * to the last 3 s. without n., p. s/n., 2 s. without n., half-column. without cape. in the 1st s. without n., turn.
8-10 row: repeat 2nd row. x 3. Switch to purple yarn when making half double crochet stitches. at the end of the 10th p.m.
Cut the lemon string.
Rows 11-14: repeat 7-10 rows with purple thread. and move on to the lemon string, performing a half-column. without cape. at the end of the 14th row.
Cut the purple thread.
Rows 15-18: Using lemon yarn, repeat rows 7-10. We switch to purple yarn when making a half single crochet stitch. at the end of the 18th...
Cut the lemon thread.
Rows 19-22: repeat p. 2 x 4.
We fasten the thread and hide the ends, weaving them into the loops. If desired, you can also strengthen the sides and sprinkle them with starch.
Square basket: video mk for beginners
Selection of schemes


Crochet flowers. Master class with step-by-step photos
Handicraft master class. Volumetric flowers made of yarn, crocheted.
DIY holiday gift. Crocheted basket with flowers.
Elena Vladimirovna Grigorieva, teacher of technology and fine arts at the Municipal Autonomous Educational Institution of Secondary School No. 4 in the city of Malaya Vishera, Novgorod Region.This master class is designed for children 11-14 years old who have mastered the initial techniques of crocheting, as well as for all those who love to knit.
Purpose: making a gift for the holiday of March 8 or the birthday of mother, grandmother, decorating the interior of the house.
Target: teach how to crochet voluminous flowers from yarn.
Tasks: teach crochet techniques; develop creativity, attention, memory, imagination, fine motor skills; cultivate neatness, aesthetic taste, and interest in work.
The history of crochet has deep roots in the distant past. The Arabs were recognized as the best knitters, and the most complex patterns were invented before our era. In the 12th century, crocheting became widespread in Italy, France, Scotland, Spain and England.
In Russia, peasant women have long knitted mittens, socks, stockings, and boots. On holidays, knitted items were decorated with colorful ornaments.
In the 13th century, all of Europe was absorbed in crochet. Later, knitting even became homework. Crochet has become quite a lucrative industrial niche. Hats, gloves, stockings, and umbrellas were knitted. Initially, only men were engaged in knitting, and Parisian hosiery workers refused to hire women. Male craftsmen competed with women for superiority in crocheting skills.
At the end of the 19th century, crochet symbols were unified and divided into two notation systems: American and British.
Thus, throughout the history of crochet, crocheted items have been very popular, in fashion, an indicator of wealth and very highly valued.
Today we will learn how to crochet flowers.
On holiday we will give
Tulips for mom -
Slender, beautiful,
Like a mother's smile!
On holiday we will give
Snowdrops for grandma -
Strict and kind
Like grandma, gentle!
On holiday we will give
Crocuses for all the girls -
Naughty, bright,
Like in baby doll costumes!
On holiday we will give
Flowers to all aunties,
After all, the eighth of March -
Celebration of beauty!
Materials:
- yarn (yellow, blue, lilac, green).
- hook No. 2, 4
- sticks for stems
- hot melt adhesive
- beads
- flower basket

Step-by-step work process:
1. For flowers, you can use yarn of different shades. We cast on 5 air loops with crochet number 2.

2. Chain v.p. close it into a ring with a connecting loop

3. We tie the ring with single crochets

4. We begin to knit the first petal. We collect 4 air loops

5. We knit a double crochet stitch into the same loop of the ring

6. In the next loop of the ring we knit 3 tbsp. with three crochets

7. In the next loop of the ring we knit 1 tbsp. with three crochets

We make 3 air loops.

We knit a connecting loop into the loop of the ring, where st. from 3 n. and dial 3 v.p. for the second petal. We received the first petal.

8. We begin to knit the second, third, fourth and fifth petal in a similar way.


Using crochet number 4 we knit flowers that are larger in size.
9. Take a stick for a stem 20 cm long. We wrap it with green or brown yarn, securing it with glue at the top and bottom.

10. Use hot glue to secure the flowers to the stem. We decorate the middle of the top flower with beads.

11.We make “clothes” for the basket. Take yellow and green yarn and twist the handle.

12. We knit “clothes” for the basket from the bottom up. We collect air loops along the diameter of the bottom of the basket and close them into a ring. We knit the first circle: 5 air loops, skip two loops of the ring and so on in a circle.

13. We knit the second row. We cast on 5 vp, knit under the arch with a single crochet. We knit all subsequent rows in the same way, adding 1 ch. from the fourth row.

We put a cover on the basket.
14. We knit leaves.

Glue them to the stems.

15.The basket with flowers is ready.