New Year is coming soon. And the rush for gifts will begin again. And again we will reproach ourselves for not taking care of it earlier and buying everything we can get our hands on along the way. Sometimes thinking that I could do this myself. So isn't it better to think about gifts now? And decide what to buy and what to make yourself.
Last year I decided not to buy gift boxes for my grandchildren, but to make them with my own hands. I made Christmas trees from candies, but not just any Christmas trees, but with a surprise.
I did it for the first time, but it turned out not bad. Not only children, but also adults liked the gifts.
I took some pictures while I was making it, I’ll try to show you how I did it.
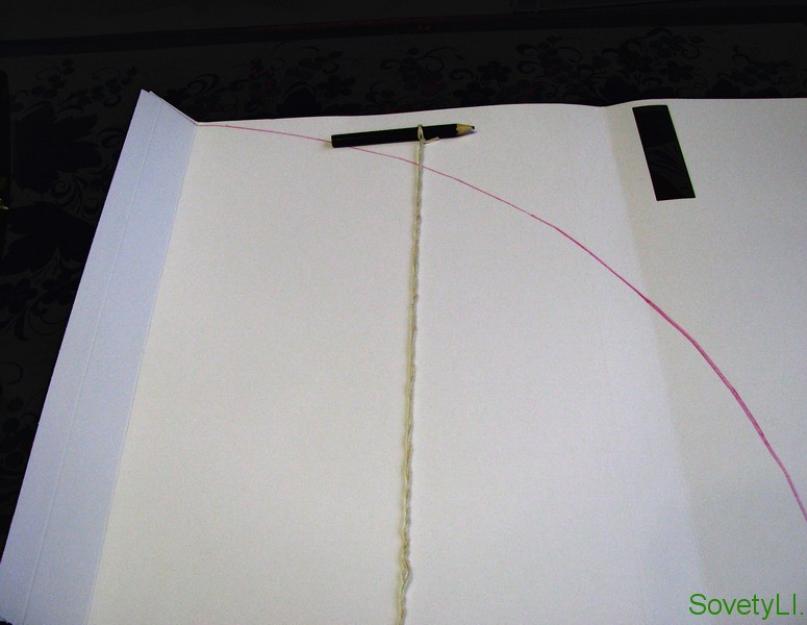
The most difficult thing for me was making a cone for the future Christmas tree. Well, it didn’t turn out smooth for me and that’s all. I thought for a long time, and still remembered how in the good old days we managed without a compass. This method was just useful to me.

I took a sheet of cardboard. The height of this leaf became the height of the tree. I folded the edge of the cardboard to make it easier to glue the cone. I took a pencil and tied a string (thread) to it, equal to the height of the sheet. And starting from the bend, I drew a semicircle. I cut it out, glued it together and it turned out like this cone (see video). The most important thing is that it’s even.
 You don't have to buy cardboard or whatman paper, I used regular candy boxes. And it’s good that they are colored, the gaps won’t be so noticeable when you glue on the candies.
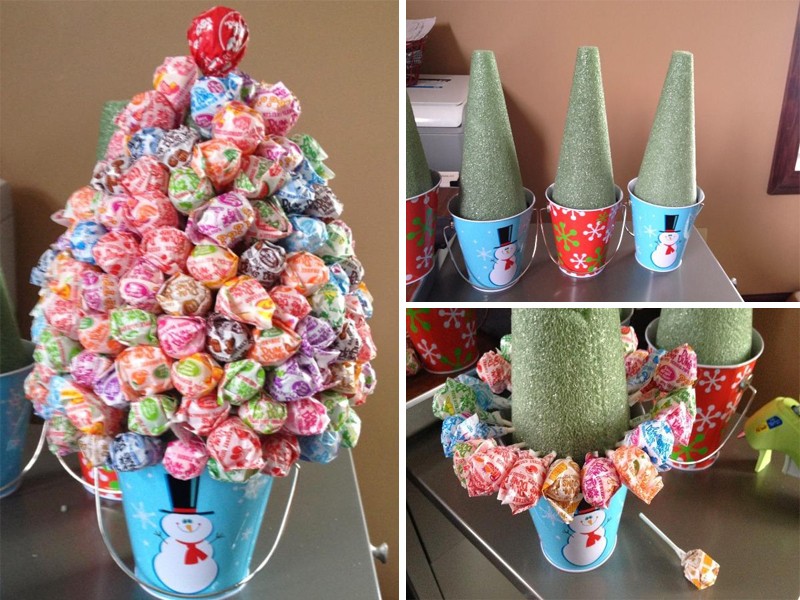
Since my Christmas trees had a surprise, I also made a bottom with sides. Here is the procedure for working with the bottom.


I placed a toy in this bottom. You can put anything there, as long as the volume of the cone allows.

The bottom with the toy was covered with a cone. To prevent the bottom from falling off, I secured it with tape.
The surprise is ready, it's up to the Christmas tree. I covered the bottom of the tree with green foil strips. Squares are cut, I have 10x10, you can have smaller or larger ones, at your discretion.


It is easiest to glue the corner together; it is easiest to work with a hot gun.


We make such blanks and begin to form the future Christmas tree, gluing pounds and candies. My bottom row is made entirely of pound cakes. It turned out to be such a green skirt.

And then everything depends on your imagination and the number of sweets. You can alternate sweets and pounds. I decided to cover it with candies only; after all, children are more interested in candies, not pieces of paper. And it seems I was not mistaken. Most often, Christmas trees are made from candies of one type, but it seems to me that this is only for beauty. I have different candies and everything is mixed. You could say that the sweet gift from the box moved to the Christmas tree. These are the Christmas trees I got.

Don't worry if the candy is not tight and there are gaps. They can easily be filled with pieces of tinsel; this will only make the tree more attractive. The most important thing is that the whole sweet gift is in plain sight. No need to pour candy out of the box, spin the Christmas tree and tear off the candy you like.
The top of the tree is decorated with tinsel, and there is a caramel star on the top.
For a gift, I needed 2 trees, I made 3, and put the third tree on the New Year's table. Very original, instead of a vase with candies, there is a candy tree.

Christmas tree made from a champagne bottle
I got so carried away that I made Christmas trees for adults too. This is the Christmas tree made from a bottle of champagne and sweets. Candies and foil are glued onto corrugated paper.

Here I alternated sweets with pound cakes and tinsel. It's just that the color combination let me down. The candies were in dark-colored wrappers and were “lost” in the foil. Next time I will choose candies in light-colored wrappers. The rose is made of liquid porcelain, also by hand.
What would New Year be without sweets and candy?! We've been good all year, so on the last day of December we look forward to some sweet treats to make the coming year as sweet as these candies.
However, candies in the New Year can be used not only as a sweet treat, but also as decoration, for example, you can use them to make an original New Year tree. By the way, a DIY candy tree can completely replace the usual forest beauty, and after the holidays are over, you don’t need to think about how to put it away :) In addition, a candy tree will be a wonderful themed gift for friends and family, and the fact is that a handmade gift will certainly please the recipient.
When making a Christmas tree from candies, you can use sweets of your choice: these can be either chocolates or lollipops. You shouldn’t ignore soft gelatin candies: they will make a very original Christmas tree. If you are preparing a Christmas tree as a gift for an adult, you can make it using a bottle of champagne!
However, there are plenty of ideas, all that remains is to find the time and realize your potential!
#1 New Year tree made of candies and tinsel
The easiest option for a New Year's tree made of candies is to combine candies with New Year's tinsel. To make such a Christmas tree you will need candy, a thick sheet of paper, glue or tape, and tinsel.
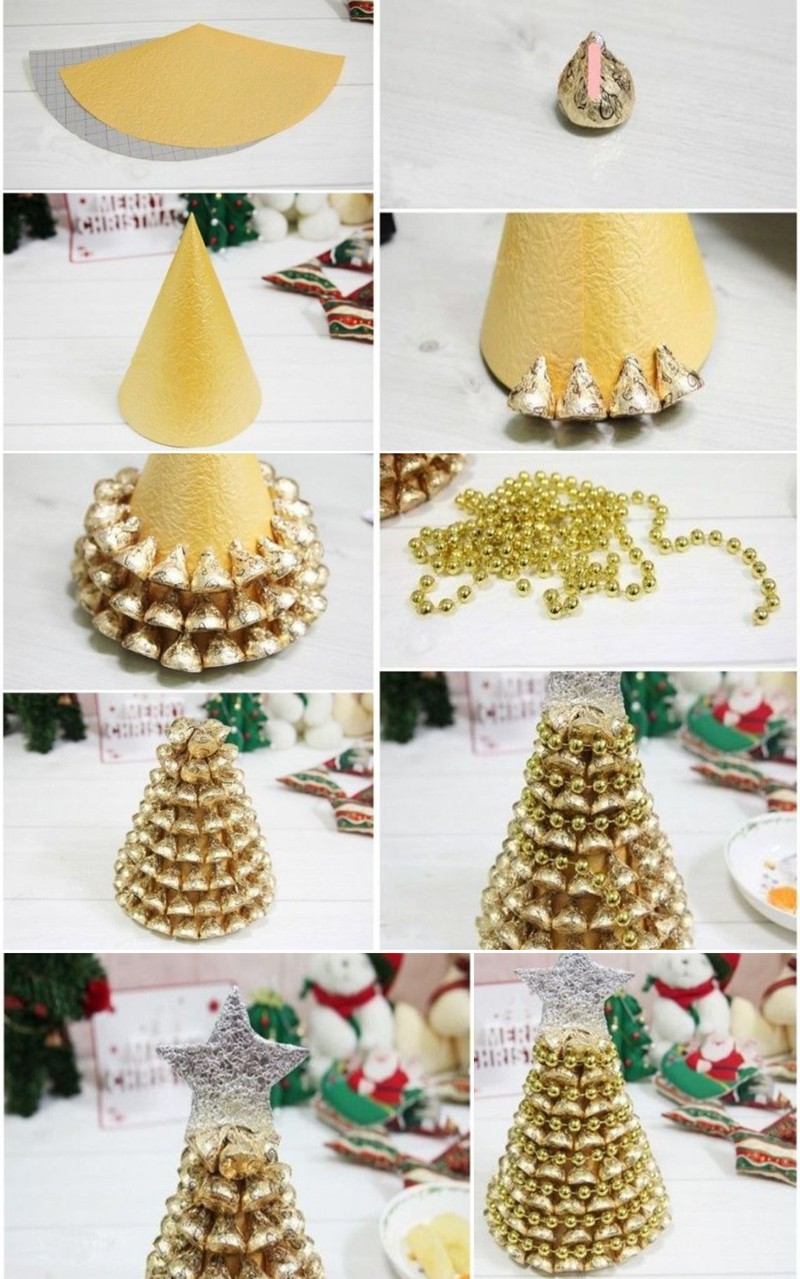
#2 Golden Christmas tree made from candies
The Christmas tree is magical and doesn’t have to be green. Although in the winter season any tree in a green robe looks magical! But we will create our own magic - a golden Christmas tree. For this we will need: candies in gold wrapping, a thick sheet of paper, glue or tape, beads on a string for decoration.
Making this Christmas tree depends on whether you want to give it as a gift or simply use it as a decorative element. If the New Year tree is being prepared for a gift, then the bottle must be full, otherwise it won’t turn out very well... In any case, you will need: a bottle of champagne, candy, tape, ribbon for decoration.

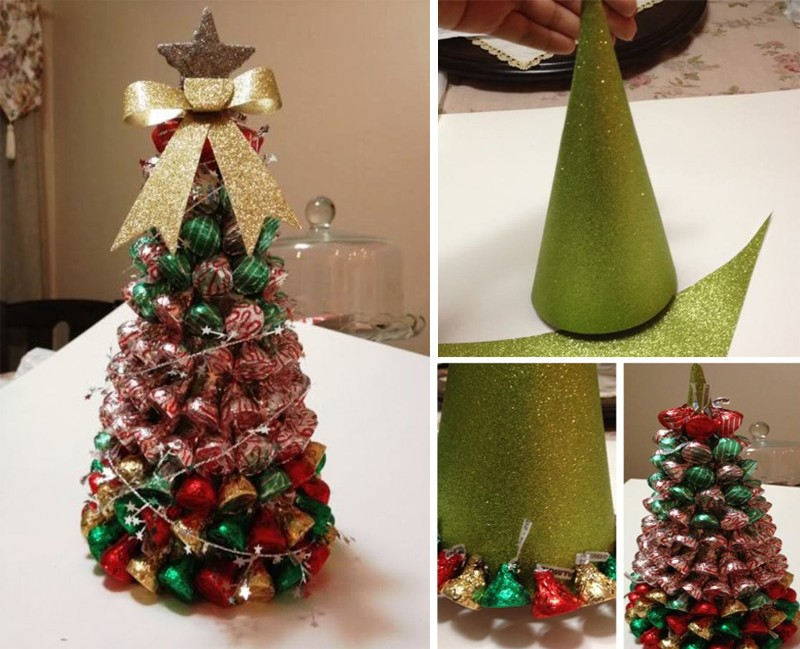
#4 Christmas tree made from chocolates
You will need thick paper or cardboard to create the base cone, chocolates, tape or glue, and ribbon or bow for decoration.
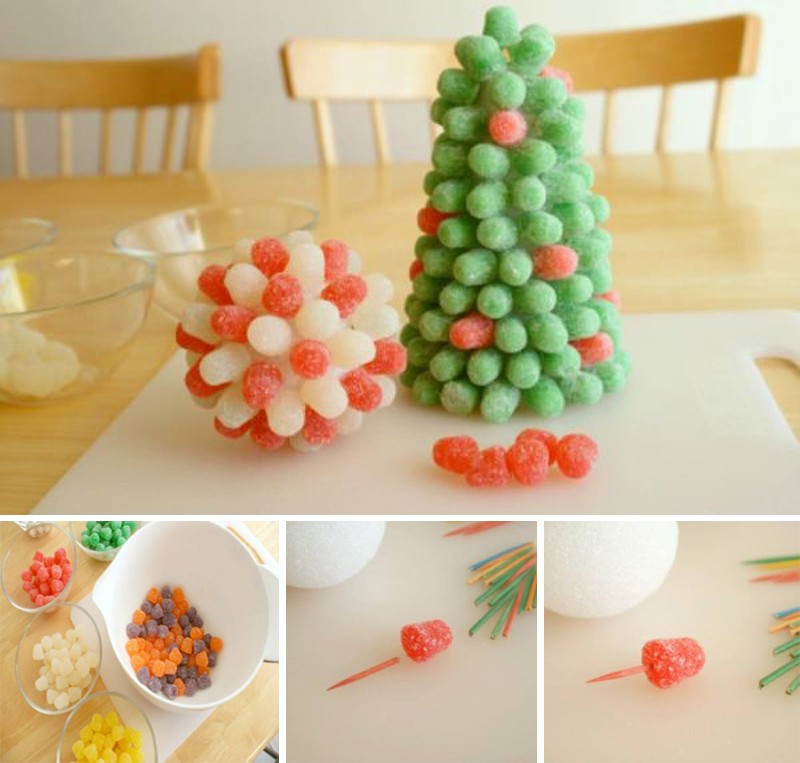
#5 Christmas tree made from gelatin candies
A Christmas tree made from soft gelatin candies will be original. You will need: foam for the base cone, gelatin candies, toothpicks.
#6 Christmas tree made from Candy Cane candies
No less interesting is the idea of creating a New Year tree from candy canes in the shape of a stick. In our country, such candies are not usually associated with the New Year holidays, but in American films you can often find them. However, the idea is quite original, so if you want, it’s worth a try. You will need: a lot of lollipop sticks or Candy Canes, a foam cone, glue or you can melt some candy and glue it on.

#7 Christmas tree made from lollipops
For such a Christmas tree you will need a foam cone, lollipops (for example, lollipops), and any decorative elements.
#8 Christmas tree made from candies in original packaging
You can make a Christmas tree from candies in a variety of ways, including packing candies in a box in the shape of a Christmas tree. An excellent decoration for the table and a wonderful gift for loved ones!

Now that the technology for making a Christmas tree from candies with your own hands is clear to you, all that remains is to turn on your imagination and make a unique Christmas tree that will fill the holiday with joy and add a little miracle to it.
Well, we have selected for you 10+ more ideas for New Year trees made from candies, looking at which you can be inspired to create a new masterpiece. And who knows, maybe next year the entire Internet will be talking about your incredibly cool DIY Christmas tree.


In the fall, you increasingly begin to think about the coming of the New Year with its festive mood, meetings with friends and family and, of course, gifts. In addition, since childhood, we have all associated the New Year with the Christmas tree! That's what we'll talk about)
Fortunately, people are increasingly thinking that it is not worth cutting down a live Christmas tree for the sake of a few holidays. Krestik and I fully support this decision and believe that a DIY Christmas tree is much more interesting and humane! In addition, these are excellent options for those who have nowhere to put a large Christmas tree (for example, there is no free space, or there is an active small child in this free space).
We bring to your attention a large selection of master classes on creating a decorative Christmas tree with your own hands, which will serve as a wonderful decoration for your home and an original gift for a wonderful holiday!
Christmas tree made of pine cones
You can make a very original Christmas tree with your own hands from pine cones. But we will not use the whole cones, but will use only their scales so that the tree is not too bulky.

So, first, let's separate its scales from the cone. This can be done with a sharp knife, wire cutters or pruning shears.

Be careful, take care of your hands!

The next step is to make a cone from thick paper or cardboard, which will be the base of our Christmas tree. We roll the paper into a cone, glue it on the sides and cut off the excess at the base.


Then we simply take the scales in our hands and glue them in a circle, starting from the base of the cone.

You can glue each new row in a checkerboard pattern, or, like here, on top of each other.

You can glue a clove to the top of the tree (such a spice))

After the glue has dried, you can start painting our beauty. To do this, you can use spray paint or regular acrylic paint.
If you choose acrylic paint with a metallic effect, your Christmas tree will look much more impressive.

Then we cover the ends of the “twigs” with PVA glue and sprinkle glitter on them.


This is the beauty that results from these simple actions:

Using exactly the same principle, you can decorate the cone with chains and beads, decorative cords, ribbons, braid, etc.

Another very popular way to make artificial Christmas trees with your own hands is to weave them from beads. This is perhaps the most painstaking method, but for lovers of beadwork nothing is impossible!
The detailed process of weaving Christmas trees from beads cannot be contained in one article, so we are sharing with you links to master classes previously published on Krestik.


Christmas tree made of paper and cardboard
If you have nothing to do at work) or just want to add a little holiday to the office, make a Christmas tree out of paper. What's easier?)

And this tree is very similar to a designer one, don’t you think? It’s all because of colored designer cardboard, which is so beautiful and bright that you don’t even need to decorate the Christmas tree with anything else), which simplifies the process of making a Christmas tree with your own hands.


Secondly, to make a designer Christmas tree, you can use threads that are wound on a paper cone using the technology of making openwork balls.

Thirdly, flower net and bouquet net.

The technology for making these three Christmas trees is very similar, so the process of creating them is shown in one master class.
Feather Christmas tree
Yes, they do too! Feathers can be bought at hardware stores, or maybe you have supplies of bird feathers? For brightness, they can be painted with food coloring. It looks original, beautiful and so airy!

Christmas tree made of candies
A Christmas tree made from candies is not only beautiful, but also delicious! This New Year's gift will be appreciated by everyone: both adults and children! Watch the video master class from Kateryna Bay and create!
Dear amateur needlewomen! I present a new Master class “DIY Christmas tree step by step photo”. Here I tried my best to show and tell you in detail how I made one of my favorite Christmas trees, “Green Apple” with incredible delicious jelly candies!
As you have already noticed, there have been a lot of changes on my website lately... This is the first Master class that I am posting under my new Ermilova Decor logo! This was a real new turn for me and I hope it will inspire me to continue my creative work...

So what we need:
Stand for the Christmas tree, it can be a saucer for a flower pot
Floral mesh and organza (felt can be used)
Toothpicks
Double sided tape
Glue gun, scissors, pliers, floral tape, stapler
Various New Year's decorations
To begin, glue the base of our cone to the stand strictly in the center. Preparing the candies.

I will show you using one candy as an example, but you can do these steps for a dozen candies at once. Take a toothpick and wrap double-sided tape on it. Cut off the excess candy wrapper (if the tail is too large). 
Lightly unwind the tail of the candy and insert a toothpick with the adhesive end. Secure tightly with tape. 

I wanted to combine two materials: floral mesh and organza. To do this we cut strips and then into squares. 
Now we connect the squares as follows: 
After piercing the material, insert a toothpick into the center of the squares, wrap it around the candy and secure it with a stapler. 
We immediately do this with a dozen candies. The size of the squares depends on the level of their location. At the lower level we will need more squares, the higher - the smaller.

Now we prepare small New Year's balls. We remove the hanging mount, apply glue and stick a toothpick inside, wait for the glue to harden.

We secure it with tape and wrap it in material just like candy. 
We take pliers and stick our candies alternately with the balls into the cone. 
We do the next row in a checkerboard pattern. Cover the empty areas between the candies with pounds. Can you remember again 
Our DIY Christmas tree is ready! I hope the step-by-step photos helped you make your own unique New Year's beauty!
We will need the following materials:
Candies;
Corrugated paper;
A sheet of thick paper;
Glue gun;
Stapler.
The main thing in materials is to choose tinsel and candies so that they match. The photo master class will be from different Christmas trees that I made.
We start with the base for the Christmas tree.
Take a sheet of thick paper, roll it up and secure it with glue and a stapler.

We level the bottom of the cone by trimming the bottom. Periodically we put it on the table and see if our Christmas tree is wobbly.

When our cone is ready, trace the bottom on thick paper.

We add allowances to our bottom to glue it to the tree.

This turns out to be the bottom.

We stuff our Christmas tree with newspapers to make it more stable and easier to decorate. We stuff it very tightly with newspapers. You can fill it with polyurethane foam, if you know how to work with it. Or you can take a ready-made foam cone.

We insert the wire into the top of our base and secure it with a glue gun.

We bend the edge the way we like.

We repeat the bottom from corrugated paper, I like it to be beautiful everywhere.

We glue our beautiful bottom made of corrugated paper.

This is what it looks like when you glued the bottom.

For our Christmas tree, approximately 50 cm high, we will need two strips of 60 cm, 5 cm wide (one division on corrugated paper). We wrap our base with these stripes, so that if gaps appear somewhere between the tinsel, everything is beautiful everywhere!

We paste the base of the tree with cut strips in a spiral. You can glue it to our base using a glue stick, or you can use a glue gun. I glued it with a glue stick.

Let's move on to the most interesting stage!
We glue our bottom tier of the tree onto a glue gun. Advice, do not try to glue the entire circle at once, glue 7-10 cm at a time, it will turn out more neatly.

When the first tier of tinsel is glued, we glue the candies onto the gun. I have 4 pieces in the lower tier, stacking them opposite each other.

Field of a row of candies, repeat the row of tinsel, trying to ensure that there are no “bald patches” between the rows.

Glue the next row of candies in a checkerboard pattern.

We continue to alternate a row of sweets and a row of tinsel. Moving to the top of the tree, we reduce the number of candies in the rows.

We reach the place where the wire begins. You can attach tinsel to it in two ways:
We continue to glue the tinsel in a spiral;
We glue the tinsel first in a strip along the convex edge, then along the inner edge.
It all depends on how much tinsel you have left.

You can decorate with a bow and a Christmas ball or bell. I have a bow with wire around the edges.

If there is very little tinsel left, you can finish the edge like this.

These are the beautiful bottoms we got:

This is such a beauty we have. Sorry, I can't rotate the photo.

We admire our Christmas trees.
I hope that the master class will be useful to you.
Happy New City and Merry Christmas!