Tartan is a pattern that always comes back into fashion. It can have hundreds of options and dozens of colors: noble and extravagant, bright and delicate, strict and playful. But the basis is always the same - contrasting threads intersect, drawing multi-colored cells on the fabric. How to weave such a tartan yourself?
The easiest way to weave such baubles is with oblique weaving. It is called oblique because the rows in it are not located strictly under each other, but as if offset by half a knot. The node of the bottom row is placed between the two nodes of the top - and this is how the entire pattern is built. Another difference from direct weaving is that here you do not need to weave additional threads into the pattern if you want to add another color. Threads of all colors are woven from the very beginning and go to the very end.
To master oblique weaving of baubles and learn to understand patterns, let’s take this simple example.
Getting started
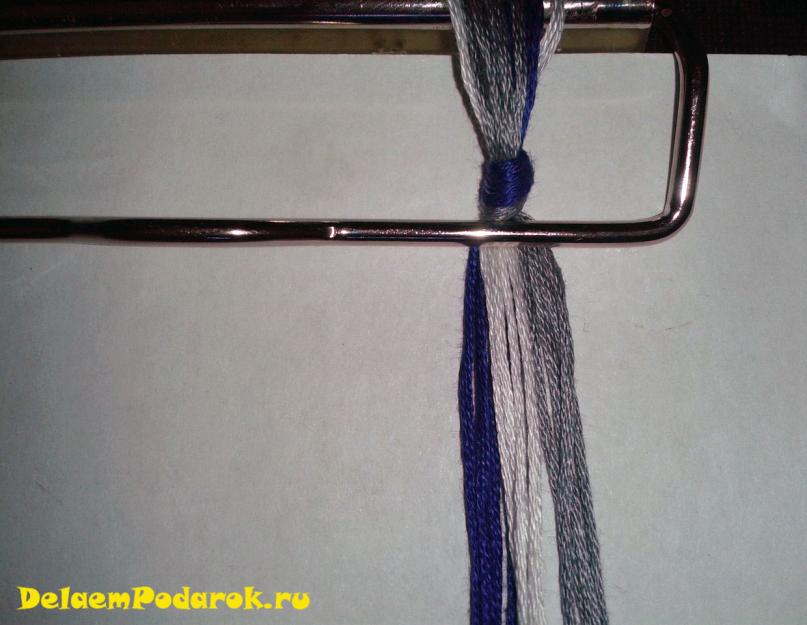
For this bauble, we will need four meters of thread of each color - this is only half a skein of floss (as a rule, there are eight or ten meters for one skein). To begin, tie three blue, three gray and three white meter threads together and secure the knot to a clip or pin. We arrange them by color.

Now we tie the first row of knots. We tie two pairs of blue threads together, and then we make four more white knots from pairs of gray and white threads. To make the knot white, you need to bring the white thread to the top, and then tie two knots on the gray thread, one on top of the other. The white threads will go to the right, and the gray threads will go to the left.

In the next row, the leftmost (blue) and rightmost (white) threads will remain loose. We tie the second blue thread from the left with the neighboring one, from the second pair, and then we make 4 more gray knots in the same way. To make the knot gray, you need to bring the gray thread to the top and weave two knots on the white thread. The weaving method will be mirrored in relation to the first row.

Now let's go back to straight weaving again and make three blue and three white knots, as shown in the diagram. In this row, all the threads will again be braided into knots.
We continue to make the pattern

We continue to weave according to the pattern, not forgetting to pay attention to the arrows - they show us in which direction the knot should be tied. In even rows (second, fourth, sixth, and so on), the outer threads, regardless of color, will remain free; in odd rows (first, third, fifth, etc.) - all threads will be knitted in pairs.

There is nothing complicated about how to weave baubles with oblique weaving. Just follow the pattern and watch your drawing grow before your eyes. If the pattern suddenly breaks and you don’t understand what to do next, just look carefully at how the stripes move on the pattern. On our bauble, for example, rows of four identical knots in every second row are shifted by one knot. Just look in which direction the row is moving, and what colors should follow - to the right and to the left. Continue this movement until the drawing “meets” the diagram again.


Ready!
This cute bracelet was made using our little design. Since now you know how to weave baubles with oblique weaving, you can take on a more complex pattern - then the bauble will be wider and more colorful. There are a huge number of options. The main thing is don’t be afraid to practice and take on new patterns, dare and come up with new bold combinations!

Text and photo (c)
In the 90s of the 20th century, everyone was fond of weaving bracelets from knots - “baubles” - both boys and girls.
For children and adults weaving baubles from floss, patterns from fashion magazines seemed like the greatest treasure. Elegant jewelry made from bright threads was given to best friends.
While a friend ties a bauble on the wrist of its owner, he must make a wish. When the bracelet wears out and breaks, the wish will definitely come true.
A little history of “baubles”
This interesting, bright decoration was invented by Indians from the North American continent - it was from them that the tradition of giving a wicker accessory on the wrist to friends came from. Initially, the decoration symbolized friendship and the name had the corresponding: “friendship bracelet” - friendship bracelet.
The tighter the product was woven, the longer it stayed on the hand of its owner, the more inextricable the friendship ties between the people who gave and the people who received were considered. If someone independently removed the bauble from their hand, this meant that the friendship was over, and was considered a strong insult.
In the 60s and 70s of the last century, the bauble became one of the attributes of the popular hippie movement. Not only bracelets, but also hair ribbons began to be woven from threads. To the meaning of “friendship” inherent in this wicker accessory, the meaning of “peace” was added. Along with the popularization of the hippie movement, a real “baubles mania” took over the planet.
Since no special tools are needed to create baubles, Russian children are very fond of bright and easy-to-make “friendship bracelets.” Nowadays, thread weaving has given way to even easier-to-use lumigurumi techniques, but adherents of traditional thread weaving still remain.
First steps to creating baubles
To create a bauble from floss, an oblique weaving pattern will be sufficient, but there is no limit to perfection. A bracelet made from floss or iris threads is much more durable than the same thin, multi-colored rubber bands that are so easy to tear and lose.
Tools and materials for work
For those who have decided to create their first bauble, weaving patterns should be the simplest. Gradually improving your skills, you can take on more complex patterns and even invent your own patterns.
To weave baubles we will need:

Most often, to begin work, the threads are tied into one large knot, which is then pierced with a safety pin. The pin is subsequently attached to any suitable object to hold the threads in tension. For some it may be a sofa cushion, while others attach a pin to their jeans. Some manage to weave baubles even in long-distance transport, attaching the work to the soft back of the seat located in front of them.
Terminology to understand the process
To weave and understand the patterns of floss baubles, you need to know some of the terms used by craftsmen. This will make it much easier to study the progress of work on the products.
- working thread is the thread with which the pattern is made.
- background or warp thread - the thread on which the working thread is wound.
- regular knot: double knot, when the working thread is wound twice onto the background thread in the same direction (with this design, the threads are swapped). It can be left or right.
- tatting: the working thread is wound onto the background thread once in one direction, the second time in the opposite direction (the threads do NOT change places!). Can also be left or right.
How to choose thread length

Usually, for weaving, a thread is taken that is four times the length of the finished product. This is quite enough for the knot weaving technique. The main thing is that the threads do not twist or get tangled with each other.
However, if the work is large-scale, then the thread can be selected at a length convenient for the craftsman. This solution is suitable if you don’t want to bother with skeins or balls, which are twisted from excessively long tails of floss to simplify the work.
How to connect two fragments of floss to each other if the working thread is shorter than desired?
- the finished thread is placed on the wrong side of the product (its tail should be sufficient to form a knot);
- a new thread of the same color must be applied to the product from the wrong side;
- if the working thread is being extended, it is simply tied around the warp thread with the knots required by design;
- in the case of increasing the warp thread, the working thread is wrapped around it;
- the remaining tip of the new thread is tied to the tail of the old one.
Oblique weaving patterns
Oblique weaving of baubles is the easiest option for beginners. It's a good introduction to making friendship bracelets from floss.
For the first bauble, oblique weaving patterns are perfect: they are simple and understandable.
Ordinary oblique braid
Making the simplest version of the bauble does not require much understanding: all you need to do is arrange the threads in pairs and learn how to make a left-handed regular knot.
To simplify the work, you can start with eight strands of floss or iris in four colors (two strands of each color, respectively). They are arranged in pairs by color, then tied around a safety pin or taped to the table. At first, you will need to carefully monitor the order of the threads. Then, with proper operation, the tips themselves will neatly arrange themselves in the desired sequence.
To perform a regular knot to the left The working thread is considered to be the left one, and the warp thread is the right one. The working one is placed on top of the main one, then it is pulled under the warp thread, brought out into the resulting window and pulled to the right side. Then the same turn is repeated. Thus, the leading thread ends up on the left, which is why the resulting knot got its name - left.
 Weaving a regular oblique bauble begins with the leftmost thread. It is twisted in turn around the remaining threads with a regular left knot. After it has become the rightmost thread in the row, the next leftmost thread becomes working.
The result of this work is neat rows of knots, sloping from left to right. Weaving must be continued until the finished “mosaic” of knots becomes the length required by the master.
Even such a simple bauble looks very elegant and cute. Having mastered it, you can move on to the next stage of mastering oblique weaving of baubles.
"Arrow" or "fishtail"
To create this very simple type of bauble, you will need to use not only the left simple knot, but also the right one. It is performed by analogy with the left one, its mirror image, that is, the working thread is taken from the right side of the work and pulled to the left side.
Material for this bauble- 10 threads of floss or iris (5 pairs of different colors). They are arranged symmetrically by color, that is, a thread of the same color is first and last, of the second - second from the left and penultimate, and so on. In the middle there remain two threads of the same color.

To begin with, the working thread is considered to be the thread on the far left, by analogy with the previous version of the bauble. The row of left knots ends when the middle of the fabric is reached (the last left knot is tied around the first of two adjacent tips of the same color).
Then the leading thread becomes the far right one: it is knitted with a right-hand ordinary knot to the middle of the fabric. As a result, it turned out that both working threads of the same color are now in the weave next to each other.
The resulting pattern is repeated several times: the workers pull the left and right threads with corresponding knots to the center. A pattern of arrows formed by knots appears on the canvas, stretching down towards the end of the weaving.
This bauble is a good gift for a friend who loves neatness in everything: the design of the “friendship bracelet” turns out to be pleasantly symmetrical.
Learning Straight Weave
Baubles made with direct weaving are much more complex than the previous options. The main thing you need to learn when studying this technique is the ability to clearly separate the working thread and the warp threads. In most schemes the former should be much longer than the latter.
When creating a bauble from floss, direct weaving patterns may seem complicated to beginner craftsmen. However, with due patience, they can be mastered.
It’s better to start getting acquainted with straight weaving with two-color baubles: one color for the background, the other to form the pattern. Symmetrical patterns, such as, say, diamonds, are easier to weave, so you should try them for the first time.
The trick is to thread the working thread (background thread) from left to right, then back - from right to left with the usual left and right knots, respectively. The pattern is formed by the warp threads: in the place where it is assumed by the pattern, the warp thread is tied around the leading one, and not vice versa.
Subsequently, having learned to read diagrams and correctly positioning the warp and leading threads, you can create patterns of any complexity. It is enough to find weaving patterns suitable for the desired bauble on the Internet or draw it on checkered paper.
Friendship Bracelets Decoration
A hand-woven bauble should not be a shame to give as a gift - after all, that’s what it was created for. To do this, you should carefully shape its ends so that it is convenient for the owner to tie the bracelet on his hand. The easiest way is to tie the tails of the threads into one or two braids, decorating them with knots at the beginning of the weaving and at the end.

To give the accessory a more sophisticated look, you can weave it into thread braids. glass or wooden beads, placing them between two knots so that they do not slip off. Eccentric girls even thread small bells into the ends of the threads of their baubles, which can be bought in craft stores. However, it is unlikely that you will be able to wear such a bauble without taking it off.
Now that the world of amazing and bright baubles made of multi-colored threads has become closer and clearer, it’s time to start creating your first friendship bracelet. Undoubtedly, the friend who receives, along with the bauble, a piece of the master’s soul invested in it, is the most worthy of the people on earth.
Attention, TODAY only!
Lesson from the series “baubles for dummies” =)for those who don’t want to understand how to read diagrams.We will weave according to this pattern. It is light and has all 4 knots used in weaving baubles. Pictures A and B have the same diagram. This is done simply so that you get used to both types, because schemes are found in both forms.

So. Let's look at the picture
As you can see from the picture, we need 6 threads of white and 2 threads of red.
Cut the threads (for this fenni you will need white threads 90 cm each and red threads 130 cm each)
We fasten them, as it is convenient for anyone, in the order in which they are indicated in the diagram, leaving 10 cm ends for future ties.
We tie the threads in a pin (to the side that opens)
So, let’s look at the diagram and what we have attached to the pin. 3 white, 2 red, 3 white. Everything is correct.

N We start weaving from the left edge in the direction shown by the arrow.
We make the first node as shown in the figuretry to tighten the knots more tightly so that holes do not form on the fennie.

We make the second node as shown in the figure.
You have mastered two main nodes. Moving further along the diagram, we make two more nodes in the same way.

You have mastered two main nodes. Moving further along the diagram, we make two more nodes in the same way.

Let's start weaving the second row. Now we are moving in the opposite direction, from right to left.
We make the first node as shown in the figure.
We make the second node in the same way as we did before.

We make the next node as shown in the figure.
Congratulations! You have completed the second row and mastered all 4 knots that are used when weaving baubles


When you reach the end of the diagram, start again. Weave until the fringe is the length you need. Then remove the fringe from the pin, make braids on both ends of the fringe, and secure the ends of the braids with knots. Fenka is ready!
It’s customary to give your first successful fenya as a gift =)
Help Wanted! Please comment after the article.
How to make a wide bauble from threads? Maybe I'm just taking the wrong threads....sheI still get it very narrow
The best way to brighten up your look is to use jewelry. Recently, various bracelets have become especially popular. They can be made not only from gold and silver, but also from other materials. So you can weave an original bauble bracelet from floss threads.
If baubles used to be a fashionable attribute of hippies, now almost everyone wears them. A few years ago, the fashion for a large number of bracelets on hands returned. As a result, baubles fit perfectly into this trend.
They are made very simply. You will need floss threads of bright colors and pins. Usually, during weaving, baubles are attached to some horizontal surface so that the bracelet fabric does not twist. Therefore, it is better to think in advance about what to attach the bauble to. Many people pin them to the surface of upholstered furniture or tie them to the back of a chair. You can also attach the bauble to the table surface with tape.
Baubles are woven in 2 ways. 1st - oblique weaving, the simplest. For him, it is enough to master tying a knot, which must be repeated in each row. More complex weaving is straight. With its help you can make not only a plain bracelet, but also a canvas with a pattern.
How to weave baubles with oblique weaving: techniques for beginners
- First, let's decide on the length of the threads. To do this, measure the circumference of the wrist and multiply the resulting number by 4. This will be the length of each thread when weaving. Take multi-colored floss threads and cut 12 to the required length. Every 2 threads should be 1 color. We fasten the threads so that there is a tail for the ties. The easiest option is to set aside 7-9 cm from the ends of the threads and stick them with tape to the table and tie them in a knot. We place the threads in a mirror manner - the same color at the beginning and end of the row.
- We start weaving with the leftmost thread. We start it first over the next thread. A loop has formed to the right. Both threads are shaped like a four. Then we place the end of the thread under the 2nd thread. We bring it into the loop on the left, which we did earlier. Tighten the knot. We continue to tie the remaining threads with the first thread to the end of the row, tying a knot on each.
- After reaching the end, the weaving changes direction. Take a thread of the same color as the first one and begin to weave a row from right to left. Just like in the 1st row, we place the 1st thread on the right on the previous one. A loop forms on the right. Both threads form a figure resembling a mirrored four. We bring the thread under the previous thread and pull it into this loop. Tighten the knot. We continue weaving until the end of the row.
- Then we change direction again and weave from left to right with the outermost thread of a different color. We continue to weave according to this pattern until we get the desired length of the floss bauble with oblique weaving. At the end, all the threads are tied with one knot. Tie ponytails are left loose or braided into a simple braid.
Schemes for oblique weaving of baubles: description

Baubles with oblique weaving can be made in such a way that a certain pattern is obtained. Patterns of oblique weaving of baubles are quite varied. Most often they are presented in a simplified form. The nodes are depicted schematically, so it is important to be able to decipher the drawing. Reading the diagrams will allow you to diversify oblique weaving with new patterns. Typically, nodes are indicated on diagrams by arrows.
An arrow drawn from left to right is the so-called straight knot. Performed using 2 left knots. To do this, the thread located in front of the next one is placed on it. A loop is formed on the left. The tip of the left thread is brought under the next thread and brought into the loop. The knot is tightened. Using the same left thread we make another similar knot.
An arrow drawn diagonally from right to left down is a reverse knot. The thread on the right is involved in weaving. We weave from right to left. We place the right thread on the previous one. A loop forms on the right. We bring the right thread under the left and pull it through the loop. Tighten the knot. In the same way, we perform the same knot with the working right thread, braiding the previous left loop.
A zigzag arrow, depicted from the upper left corner to the lower left corner, is performed using left loop knots. To begin, we place the left thread on the next one. There is a loop on the left. We pull the thread under the next thread of floss into this loop. Tighten the resulting knot. We swap the threads - now the working thread is located on the right. With this thread we now make the right knot. To do this, we throw it onto the previous thread from above. On the left we form a loop. We drag the working thread under the main thread, and tighten this loop.
A zigzag arrow, depicted in the direction from the upper right corner to the lower right, is also performed by changing the weaving directions and 2 knots. We throw the right thread over the previous one, pull it under the thread into the loop formed on the right. We swap the threads - now the working thread moves to the left, in front of the main one. We perform a left knot - we throw the working thread over the main thread from left to right, and pull it under it into the resulting loop on the left. Tighten the knot.
In order not to get confused in the images of the nodes, just look carefully at the diagram. Pay attention to the color of the circle on which the arrow is depicted. It usually matches the color of the working thread. Then look at the placement of the thread of the same color. If it is depicted to the left of the main one, then, accordingly, the weaving will go from left to right. Finally, look at the image of the arrow. If it is without kinks, then you need to make 2 knots of the same type with the main thread in the right direction.

Baubles made from oblique floss can be made not only from floss threads. If you don’t have them on hand, you can use thin cotton threads like Iris. Their advantage is that they are cheaper than floss threads - they have a fairly large yardage. Another plus is convenience. Typically, floss threads need to be divided into pieces of equal thickness. Cotton threads are easier to cut.
Also, baubles with oblique weaving can be made from other materials - narrow ribbons and strips of colored leather. By the way, a bracelet made of leather will last much longer than one made of thread. You can cut the leather yourself into narrow strips or use colored leather strands for weaving, which are sold for creating pendants.
The patterns are a universal thing, suitable for both beaded baubles and classic thread baubles. However, many needlewomen have difficulties with weaving according to patterns: even if it is clear whether the knot should be left-handed or right-handed, the patterns do not always reflect which threads should be used at what moment. But, despite this, as in any business, learning to weave baubles according to patterns for beginners is possible only with the help of constant practice, starting with relatively simple patterns and ending with complex weaving. So how to use diagrams?
Basic types of knots for weaving baubles When weaving baubles according to patterns, two main types of knots are used: from left to right (left-handed or left-handed) and from right to left (right-handed or right-handed). To weave a left knot, the left thread in the pair is placed on top of the right one and pulled from below into the resulting loop. To weave the right one, the right thread in a pair is placed on top of the left one and pulled from below into the resulting loop. The color of the knot is determined by the thread, which stretches upward when the knot is tightened.
 How to weave baubles using straight weaving patterns?
You can learn to make any straight baubles after two or three woven baubles with words - then the principle is simply repeated. For a straight weave bauble you will need:
- 7 blue threads for the base and for future letters approximately 100-110cm;
- 1 black thread for braiding the bauble and creating a background;
- scissors;
- insulating tape.

- Distribute the threads as shown in the diagram, with the background thread on the left. Tie the first left double knot, moving to the right. The movement of the thread can be understood by the direction of the arrows in the diagram.


- Tie the entire first row with a black thread like this.

- We turn around and begin to weave the first double right knot. We tighten it.

- The diagram shows that the letter begins with the second node, and this node is shown with an arrow down. Take the blue thread and tie it with the black one using the left knot. To avoid confusion, remember one simple rule: each knot of a different color in a row is tied in the opposite direction of the row. That is, if you weave a row from right to left, knots of a different color will be tied from left to right, and vice versa.

- This is what a bauble looks like with three knots tied.

- We complete the letter according to the diagram and tie the last knot in the row with black thread from right to left. The first row is ready!

- We begin to weave the second row. Here there will be only one blue knot, on the fifth thread from the left. We tie it from right to left, and then weave a row with black thread from left to right.

- We weave the third row in the same way - here the colored knot will be on the fourth thread from the left.

- We finish the first letter and weave a space with black thread.

- All other rows are woven in exactly the same way - for example, the second letter is woven. Let's continue by analogy.

- So, you've finished the last letter - it's time to add the last space.

- We divide the remaining threads into three parts and braid an ordinary braid.

- Fenechka is ready. Of course, it turned out to be very small - when weaving according to patterns, calculate the required length to place the pattern in the middle. To do this, you will have to braid more background rows with black thread.

With oblique weaving, you can make baubles of unprecedented beauty - narrow, wide, with ornaments, gradients, etc. However, you still need to learn to read the diagrams of wide baubles, so it is better to start with a simple baubles diagram of four threads, but with both types of knots. For weaving you will need:
- 3 dark threads (in this case turquoise) for the background;
- 1 light thread for the pattern;
- scissors;
- insulating tape.

- Distribute the threads as shown in the diagram: let the light thread for the pattern remain on the left. Secure with electrical tape, separate the two left threads and tie the first left knot with a light thread. Don't forget that all knots must be double.


- Braid the same left knot on the right side with a third green thread on the fourth.

- Now use a light thread to tie a left knot on the two middle threads.

- Tie the third row with the same knots - separately on the left, separately on the right.

- Separate the two middle green threads and use the right thread to tie a right knot around the left one. But on the fifth row, the knot on the left will be left-handed, and on the right – right-handed.

- The sixth row is a right-hand knot tied with a light thread.

- On the seventh row, tie a green thread with a light thread with a right-hand knot, and tie a regular left-hand knot on the right. Tie the two middle threads with a left knot. Weaving according to the pattern is completed. Now repeat steps 1-7 until the bauble reaches the proper length.

- On the finished bauble, all that remains is to braid the braids.