AUTHOR OF TOYS AND MK:katerina12
Many of you have little mischievous children who are difficult to keep in place! And this Parsley rattle toy is primarily for them! And also for parents!
This story began at an exhibition in Moscow five years ago. Mom bought a similar toy for my sister. Since then, Masha grew up, and Petrushka lay in the attic, along with many unnecessary things. And it’s so interesting in the attic! So I found this toy. I looked at it and decided to sew such a toy for my neighbor Anyuta and her sister Mashenka, who turns two years old in August!
So, let's begin!
Necessary materials:
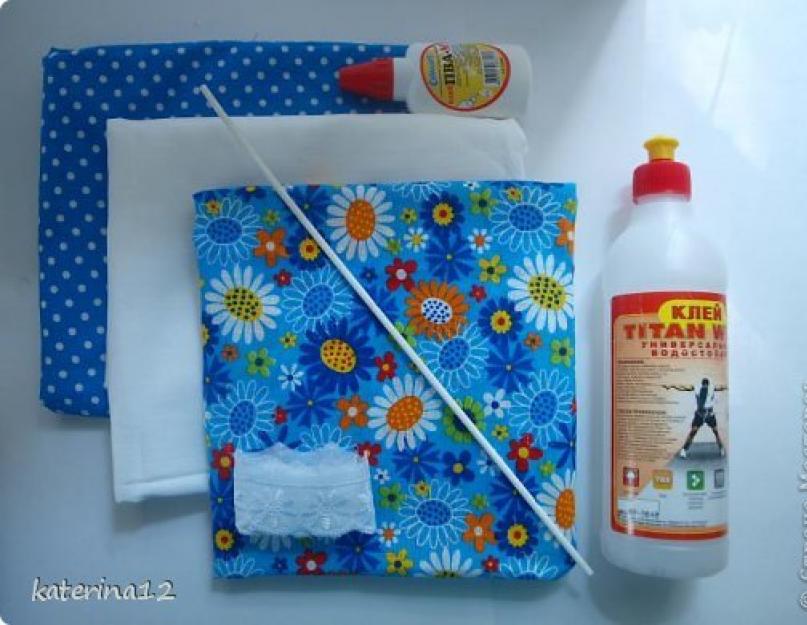
1. piece of fabric white(for the head), and bright colors (for the shirt, cone and cap).
2. cardboard
3. a stick for attaching the structure (I used a plastic one from a flowerpot, but you can also use a twig)
4. Titan glue or other strong glue, as well as PVA
5. a piece of felt for hands, beads for eyes, nose and mouth
6. braid, lace for decoration
Time spent on making a toy max. 3 hours.

We cut out a semicircle with a radius of 14 cm from strong cardboard and form a cone with a diameter of 7-8 cm.

We cover the cone with fabric, wrapping it inside the cone.

Making a shirt pattern. (All my sizes are approximate). Important: the size of the bottom of the shirt (+ 2 cm for allowance) is equal to the diameter of the cone!

We sew the head of the future Parsley: square 6 * 6. We sew a shirt, leaving holes for the neck, palms and for attaching to the cone. We assemble Parsley by first inserting a stick into the head, fixing it with padding polyester, and tightening it with threads at the base. Then we put the shirt on the stick and sew the shirt to the neck. Poor Petrushka!

We make hair for Parsley (I used yarn), sew a cap from a triangle, glue beads, sew on gloves and decorate.

Apply strong glue to the inside of the edges of the cone, approximately 2 cm in height. And glue Parsley’s shirt to the cone. Important: the size of the bottom of the shirt matches the radius of the cone. I ended up with a very short shirt because I made the diameter of the cone incorrectly when gluing. And I had to lower Parsley lower into the cone! Please don't repeat my mistake!!!
Introduction
“The Parsley Theater” is a theater whose puppets are put on three fingers of the hand - like a glove. The birth of the Petrushka Theater dates back to 1589. This beginning was made in Florence, gradually spreading throughout all states. Parsley is moving to our country. The comic figure of Petrushka was born in Russia in the 17th century.
Throughout the world, entire “actions” have been established for a long time, which in ancient times gave magical meaning. With the help of dolls, they influenced the gods so that they would send a rich harvest and help in the fight against the elements.
In Russia, everyone is familiar, for example, with the ritual of burning a straw effigy - this symbolizes the arrival of spring, where a doll also participates. Each nation had its own rituals, its own games, in which dolls took part. Before baptism, there was idolatry and paganism in Rus', and all kinds of buffoonery were prohibited in order to avoid “sacrilege.” And playing with a doll was, according to the church, a great sin. And only at the end of the 17th century, under the humane rule of Tsar A.M. Romanov was allowed at court and buffoons to perform with Petrushka.
But years passed and Petrushka was again removed from the stage - the tsarist government banned it. But no amount of persecution or terrible decrees could destroy the people’s love for the puppet theater. The persecuted Petrushka became folk hero. That’s probably why he always wears a red cap on his head and wields a baton.
Nowadays, there are a lot of puppet theaters, especially in large cities. Honored Artist of the Puppet Theater S.V. Obraztsov laid the foundation for this great work.
Puppets can be of various types: marionettes, cane puppets and shadow theater, but the simplest one for children is the glove puppet. You can make such a doll yourself or together with your parents.
How to make a parsley doll yourself
Where to begin?
The simplest doll consists of a body - a shirt, a head and arms. The body - the shirt is cut according to the hand of the puppeteer from matter (Fig. 1). The head can be made of different materials: wood (it is best to use linden), bread or plasticine, or a plastic ball. But usually the head is made from papier-mâché. Not everyone can cut a head out of wood; here you need to have the skills of a professional carver.
Balloon head
Any plastic ball or ball will do. You just need to cut a hole so that the ball can easily be put on the index finger of the puppeteer’s hand (Fig. 2).

The head is molded
You can sculpt a head from bread or plasticine. This can be not only the head of a person, but also the face of a dog or fox. Children sculpt all sorts of animals very expressively.
A cardboard cartridge is attached to the head so that the puppeteer’s index finger can easily fit into it. Such a head is put on a body - a shirt. Handles for dolls are made of fabric or leather, such as the Dog in Figure 3.

Paper head
Making a paper head is the fastest and easiest way. Thick paper is cut into strips and rolled onto the index finger of a hand wearing a glove or a glove-shaped shirt. A strip of paper is wound in several layers to form a cylinder head (Fig. 4). Each layer of paper must be glued, and the tip of the strip must be secured to the back side with glue. A cap or wig is made from thread, foam rubber or paper onto the cylinder (Fig. 5). The head is painted; this is Parsley himself, then the nose is glued on (Fig. 6). Then the head is painted with paints or felt-tip pens and appliqued with colored paper.


Papier-mâché head
To make papier-mâché you need to have:
Flour paste and PVA;
Wrapping and newsprint;
White calico;
Board with a peg.
The doll’s head, molded from plasticine, is fixed on a board with a peg (Fig. 7).
Coat your head with Vaseline and begin to cover it with small pieces of paper, alternating layers of newsprint and thick wrapping paper.
The first layer is laid without glue from newspaper soaked in water. The pieces are placed in small strips so that the edges of the strips are on top of each other.
The second layer - made of wrapping paper - is also placed in small pieces, but already soaked in paste.
Usually there are six layers, but more can be done for strength. For the papier-mâché head to dry, you should wait a day.
The dried head is divided into two halves: the front and the back of the head. Mark a line with a pencil and cut the papier-mâché with a sharp knife. Carefully remove the halves from the plasticine mold, if necessary, using sharp knife, and glue them together with strips of calico. PVA glue is used for gluing.
Pieces of calico are cut into even strips 4-5 cm long and 1 cm wide. These pieces are glued together from the inside of the mold along the edges occipital parts so that the strips come together “into a lock” when folding the halves, like the fingers of two hands (Fig. 8). When the glue dries, you can cover the head with calico and applique it.

Head applique
Applique of a human or animal head is an artistic and very responsible work: the image of a doll is born.
Figure 9 shows the general shape of a person, but who is a girl or a boy, or maybe an old grandmother? It all depends on the artist’s imagination, who he wants to create. Let's say it's a boy's doll. Then the head should be covered with light-colored knitwear Pink colour. Applique the hair from light velvet. Choose blue buttons for the eyes. Mark the lips with a scarlet ribbon. You will get a face like in Figure 10. We dress the boy in a blouse - the doll is ready. Thus, a human doll is created. Now let's move on to animals. Let's try to make a fox.
To work you need:
Prepare the head from papier-mâché;
Sew a calico glove for the body;
Stock up on red and white fabric (velvet or fur, any fleecy fabric will do);
For the muzzle you need to take buttons (eyes), pieces of black velvet, strips of white satin, for the nose - pieces of black leather.

II order of work
The papier-mâché head is mounted on a loom with a peg and covered with white calico. If the fox is dressed in a bright sundress, then its entire face is appliquéd with orange or red fabric. The nose is covered with leather or black satin. The main thing is the expression of the eyes. To give the eye expressiveness, it is necessary to place a gasket under the eye buttons. Cut out the eye pads from paper and attach them to the muzzle - this way the desired size is determined. Eye pads made of white fabric are glued onto black satin - this creates a black border around the white eye pad. This gives the eye clarity and expressiveness.
The shape of the eye is very important: a round eye is stupid, a narrow eye is crafty, an elongated eye is naive (Figure 11). Instead of buttons, you can use leather, then paint it with varnish. The skin is convenient because you can cut out the pupil of any shape and size. When working on the make-up of the head of an animal, try to “humanize” it. For example, for a wolf, arrange the braids on his head in such a way that it looks like a hairstyle. The bear may have sideburns and eyebrows - it will resemble an old man. The “humanization” of animals in puppet theater is a common occurrence, because they speak like people. The little bear's naive children's eyes and forelock make him look like a boy. For a fox to make its muzzle more expressive, black is added to the tips of the ears, and white to the forehead and chest.

Head on gapit
The dolls mentioned above (“Upcoming” dolls) are usually made without legs. They are called "Glove". The backbone of such a doll is three fingers of a human hand. On the finger is the doll's head, and the thumb and middle fingers are the doll's arms or paws. If the head is small, then controlling the doll with three fingers is very easy. But a papier-mâché head, and even a very large one, like, for example, a bear’s, will not rest on a child’s finger, even if you use a paper cartridge. Gapit comes to the rescue. This is a wooden rod with a comfortable rounded handle. It is easy for the puppeteer to hold the doll on such a gap (Figure 12). But the paws of such a large doll are not controlled by the fingers, but, stuffed with cotton wool, simply dangle on the sides of the body.

Conclusion
As already said. Parsley can be made from any material you have on hand. This includes paper, various rags, cotton wool, leather, wool, etc.
The desire to play is inherent in the child from the very beginning. Overwhelming a child with beautiful foreign toys is good, but it’s not enough. There is a simple doll wrapped in a blanket that is more expensive than any luxurious doll.
Thus, having this material at hand, you can teach your child to make parsley dolls himself and put them into action, that is, perform on a screen with a performance in a circle or at home, improvising in front of parents or acting out fairy tales.
Bibliography
1. Ablynin, B. Director of amateur theater [Text] / B. Ablynin. – M., 1991.
2. Belyushkina, I.B. Theater where children play [Text] / I.B. Belyushkina. – M., 2001.
3. Demeni, E. Theatrical puppet and its device [Text] / E. Demeni. - L., 1991.
4. Karamanenko, T.N. Puppet theater for preschoolers [Text] / T.N. Karamanenko, Yu.G. Karamanenko. – M., 1982.
5. Pereverten, G.I. Homemade products from textile materials [Text] / G.I. Turn around. – M., 1990
6. Smirnova, N.I. And the dolls come to life [Text] / N.I. Smirnova. – M, 1982
7. Smirnova, I. Amateur theater [Text] / I. Smirnova. - M., 1995.
8. Solomonik, I.M. Dolls take the stage [Text] / I.M. Solomonik. – M, 1993
Department of Education of the Konstantinovsky District Administration
Amur region
Municipal educational institution additional education children
"Center for Extracurricular Activities"
Nomination: Development of a master class
Topic: Making a glove doll “Parsley”
Chuprakova Olga Ivanovna,
additional education teacher
Municipal Educational Institution "Center for Extracurricular Activities"
8-961-954-71-85
With. Konstantinovka
2015
Table of contents
Introduction 3
1. Main part 4
1.1 Organizing time 4
1.2 Parsley's story 5
1.3 Tools and materials 5
Preparation of papier-mâché mass 6
1.5 Head sculpting 7
1.6 Sewing a suit 8
1.7 Head painting 9
1.8 Making hair 10
1.9 Connecting doll parts 10
Conclusion 11
2. List of used literature and sources 12
3. Applications
3.1 Pattern of a suit and hat 13
3.2 Scheme of glove puppet 14
3.3 Glossary of theatrical terms 15
3.4 Safe work practices 16
3.5 Dolls made using papier-mâché technique 17
Introduction
Puppet theater is one of the most favorite shows for children. It attracts children with its brightness, colorfulness, and dynamics. In the puppet theater, children see familiar and close toys - only they came to life, moved, spoke and became even more attractive and interesting. The extraordinary nature of the spectacle captivates children, transporting them to a very special, fascinating world, where everything unusual is possible.
A parsley-type glove puppet, or, as it is often called, a hand puppet, is the most common and easiest to make and manage type of puppet for a puppet theater, available to children, which was the reason for the development of this master class.
This development is a guide to organizing and conducting a master class withstudents of creative associations of institutions of additional education, general education organizations, teachers of additional education, teachers implementing puppet theater programs.
Before conducting this master class, it is necessary to first have a conversation about the types of puppets for the puppet theater, the history of the glove puppet using a presentation, and show a scene using glove puppets made using this technique by senior students.
This technique for making a glove puppet is less labor-intensive (than suggested in many sources: making a mold from plasticine, pasting it with paper, cutting and gluing), the dolls are strong and light, so they can be used repeatedly, changing only the costume. Students in grades 3-4 who study in a creative association can easily cope with this technique puppet show First year.
This master– it is advisable to conduct the class in two stages, because It takes time to dry the product parts, the optimal course is 2 days. The doll's hair can be sewn by hand using a "back needle" stitch or using a sewing machine under the guidance of a teacher.
Goal: making a glove puppet “Petrushka” for the puppet theater
Tasks:Educational:
-
acquaintance with the history of the emergence of the Parsley doll;
- formation of artistic skills in making dolls.
Educational:
Fostering a caring attitude towards Russian traditions and the historically established respect of the Russian people for the theater.
Educational:
Development of creative abilities, imagination, fantasy;
Developing interest in creativity and theater.
1.Main part
1.1 Organizational moment
V. Berestov “The Hand is an Artist.”
The hand turns
Either into a kitten, or into a puppy.
So that the hand becomes an artist
You need very, very little:
Special gloves,
Intelligence, talent - and everything is in order.
During our master class, you will get acquainted with the techniques of creating a theatrical puppet from scrap materials, make a glove puppet with your own hands, guess which one:
My beautiful cap
Pushed dashingly to the side.
I funny toy,
And my name is... (Petrushka)

Well, of course, Petrushka.
1.2 The story of Parsley.
It was with Petrushka that the puppet theater in Rus' began its existence. The first puppet theater was born a long time ago, back in Ancient Rome. The main character of his performances was the cheerful, cheerful Pulcinella. Folk puppet heroes who knew how to express feelings ordinary people, appeared in other countries. In France, Polichinelle became the audience's favorite, and in England - Punch, in Turkey - Karagöz, and in Germany - Hanswurst.
In terms of character, courage, audacity, and mockery, they are all relatives of our Parsley. What they could not, the men did not dare to say out loud
working people shouted dolls loudly in squares and fairs. What will you do for Petrushka? Performances by traveling puppeteers were prohibited. The wooden stages and screens were removed. But, the next day, Petrushkin’s screen appeared in the neighboring village and the doll again boldly and boldly, loudly, expressed the secret thoughts of the assembled spectators.
Petrushka's appearance is by no means Russian: he has an exaggerated big hands and head, hypertrophied facial features. Parsley got her big eyes and huge hooked nose from the Italian Pulcinella. Many people mistakenly believe that Parsley’s wide-open mouth is a smile, but this is not so; being a negative character, Parsley constantly stretches his lips in a grin.
You and I will make a kind, cheerful Parsley. The doll consists of two parts: the head and the body (gloves, which is why the dolls are called glove dolls).
We will make the head from papier-mâché. Papier-mâché, translated from French, means “chewed paper” - it is an easily moldable mass obtained from fibrous materials (paper, cardboard), usually with the addition of adhesives.
1.3 Tools and materials, necessary for work:

For the head: egg containers, PVA glue, newspapers, masking tape. For painting: water-based primer paint, acrylic paints, brushes, cardboard, stapler, glue gun.
For the body (gloves): fabric (pink fleece for palms, for a suit - two different colors), threads, scissors, needles, hair yarn, patterns (see Appendix No. 1), doll diagram (see Appendix No. 2).
1.4.Preparing the papier-mâché mass.
Grind the egg container, put it in a container, fill it with hot water, leave for 10 minutes to soften, then knead the mass with your hands until it takes on a mushy state.

Then strain through cheesecloth, squeezing out excess water. Add PVA glue at the rate of: 3 parts mass, 1 part glue, mix well.

Having examined the diagram of the doll, we see that there should be a recess in the head for a finger, so it is necessary to make one cartridge for the head and two for the hands (see Appendix No. 3). To do this, strip cardboard with a width equal to the length index finger wrap it around your finger and secure it with a stapler or glue.

1.5 Head sculpting.
We crumple the newspaper and wrap the cartridge loosely, forming a ball (two newspapers are enough), secure the newspaper with masking tape.


We paste the paste over the workpiece, smoothing it with our fingers.
Apply additional pieces of the mixture to the forehead, nose, cheeks, chin and lips. For the eyes, make indentations with your fingers.

Smooth out the entire workpiece. Leave to dry for 2 days by inserting a stick into the cartridge.

1.6 Sewing a suit
Safety briefing (Appendix No. 4).
Let's start making the body - the gloves.
To do this, trace your hand on paper, bending the middle and ring fingers.

We measure the circumference of the head, divide it in half (26:2), draw a triangle with a side of 13 cm, cut out the patterns.
We lay out the patterns on fabric folded in half (one layer of one color, the second of a different color).


We trace the patterns and cut them out. We cut the parts of the body in half and lay them out, combining halves of different colors. We sew the parts together using a buttonhole stitch.


We draw a palm - a mitten, along the wrist of the suit on paper. Cut out the pattern. Trace the pattern onto pink fabric, cut it out and sew it with a buttonhole stitch.


Place a piece of padding polyester in your palms and insert cartridges, securing glue gun. Glue the palms to the suit.


1.7 Painting the head.
We prime the doll's head with water-based paint. Let it dry, in the meantime we dilute flesh-colored paint (white + red + yellow) and cover the workpiece.


We mark the place for the eyes, draw eyes, eyebrows, lips with a brush, and use foam rubber to blush the cheeks.

And cheerful Petrushka is already smiling at us!
1.8 Making hair
For hair, we wrap the threads around a cardboard frame and stitch them in the middle.


Remove from the frame, cutting along the edge. Glue the hair around the circumference of the head.


1.9 Connecting parts
Glue the cap and body with a glue gun.


You can additionally decorate the suit with buttons and a hat with a tassel.
Our Petrushka is ready to perform!
Conclusion
Using this technique, you can make various characters for puppet shows. (see Appendix No. 5)
A doll created with your own hands is of great importance in creative development child and is not only the result of labor, but also a creative expression of his individuality. The main thing here is not the end result, the process itself is much more important: creating and realizing your own image, reflecting the individuality of the author. This is where the child’s artistic experience begins, thanks to which an interest in creativity arises.
Reflection.
Well done! You did well today.
Look closely at the table. Here you see two dolls: Mashenka and Kaprizulya. They don't just stand here with baskets. If you liked the master class and everything is clear, then you take indicators of your mood (see Appendix No. 6)(emoticons: smile, joy and sadness) Andput them in baskets.
You put in Masha’s basket:
Smile emoticon - I liked the lesson and everything is clear.
"Joy" emoticon – the activity interested me and lifted my spirits.
And in the basket Caprizuli:
Smiley "sadness" - nothing has changed in my mood, I don’t understand anything.
Dear guests, we kindly ask you to leave your opinion in the form of emoticons.
Thanks everyone for your attention!
2. List of used literature and sources
Alyansky Yu. L. ABC of theater: 50 short stories about the theater. – “Children’s Literature” 1990.- 159 p.
Gukasova A.L. Extracurricular work for work. – “Enlightenment”, 1981.
www.olesya-emelyanova.ru
Appendix No. 1
Pattern of a suit and hat
Appendix No. 2
Glove puppet diagram

Appendix No. 3
Glossary of theatrical terms
Hanswurst - hero of the German folk drama theater and puppet theater. His name means "Hans the Sausage". Having appeared in the 16th century, Hanswurst gave way to a new national hero, Kasper, who, however, inherited some of his features.
Karagöz (Black Eye) is the hero of the Turkish folk shadow puppet theater. He was famous for his salty jokes and active hatred of those in power.
Delineator – a tube that is glued or sewn into the doll’s neck and arms. The cartridge allows you to attach the doll's head and hands to the puppeteer's fingers.
Punch - a popular hero of the English puppet theater. Among the puppet heroes different countries gained fame as a hooligan and brawler. Punch is always accompanied by his wife Judy. Punch and Judy performances were extremely popular in England and are still preserved to this day. Their repertoire is an example of folk English humor and evil satire
glove puppet (otherwise called parsley, named after the hero of the Russian folk puppet theater Parsley). The term “glove puppet” more accurately reflects the method of controlling the puppet, which is most often placed on three fingers of the puppeteer’s hand: one finger in the doll’s head, two fingers in the doll’s hands.
Pischik - the simplest instrument with the help of which Petrushka’s high, piercing voice was born, which was one of its most characteristic features. The pischik was made of two thin metal plates, tied together with thread so that a gap formed between them. The puppeteer pronounced the text of Parsley with a squeak in his mouth.
Pulcinella, a character from an Italian comedy.
- hero of the French puppet theater. It arose in the middle of the 18th century. Is in direct connection with Italian , but Polichinelle acquired two humps - in front and behind. As they say, the hump on the front was caused by gluttony. By nature, Polichinelle is a cheerful fellow and a bit of a cynic.
Organ organ - an ancient musical instrument, which was accompanied by the performance of Parsley. The principle of the barrel organ is the same as that of music boxes.
Appendix No. 4
Safety precautions when working with scissors:
1. Maintain order in the workplace, do not stuff scissors with paper or other materials.
2.Be attentive while working, do not get distracted and do not distract others.
3. When working, the scissors are on the right, with the rings facing you.
4.The blades of the scissors must be closed when not in use.
5.The blades of the scissors must be sharp.
6. Scissors should be passed only rings forward with blades closed.
7. You cannot hold the scissors with the ends up.
8.When working with scissors, you must pay attention to the direction of cutting and the fingers of your left hand that support the material.
9. You cannot cut while moving, turn, or bend towards the floor.
10. Scissors should only be used while sitting at a table.
11.The scissors are put back in their place every time after work.
Safety precautions when working with needles and pins:
1. Place the needle on the magnet and the needle bar on the table to the right, with the sharp end facing away from you.
2.Pass sharp objects with the sharp end away from you.
3. When working with a needle, use a thimble or a magnet.
4.Do not stick needles or pins into clothing or random objects.
5.The broken needle should be given to the teacher.
6. Do not put needles, threads, buttons or other objects in your mouth.
7. It is advisable that the needle always has a thread with a knot tied at the end.
8. Every time after work, sharp objects are put back in their place.
Good evening, Country of Masters! Today I decided to show my first Master Class! Many of you have little mischievous children who are difficult to keep in place! And this Parsley rattle toy is primarily for them! And also for parents!
This story began at an exhibition in Moscow five years ago. Mom bought a similar toy for my sister. Since then, Masha grew up, and Petrushka lay in the attic, along with many unnecessary things. And it’s so interesting in the attic! So I found this toy. I looked at it and decided to sew such a toy for my neighbor Anyuta and her sister Mashenka, who turns two years old in August!
So, let's begin!
Necessary materials:
1. a piece of white fabric (for the head), and bright colors (for the shirt, cone and cap).
2. cardboard
3. a stick for attaching the structure (I used a plastic one from a flowerpot, but you can also use a twig)
4. Titan glue or other strong glue, as well as PVA
5. a piece of felt for hands, beads for eyes, nose and mouth
6. braid, lace for decoration
Time spent on making a toy max. 3 hours.

We cut out a semicircle with a radius of 14 cm from strong cardboard and form a cone with a diameter of 7-8 cm.

We cover the cone with fabric, wrapping it inside the cone.

Making a shirt pattern. (All my sizes are approximate). Important: the size of the bottom of the shirt (+ 2 cm for allowance) is equal to the diameter of the cone!

We sew the head of the future Parsley: square 6 * 6. We sew a shirt, leaving holes for the neck, palms and for attaching to the cone. We assemble Parsley by first inserting a stick into the head, fixing it with padding polyester, and tightening it with threads at the base. Then we put the shirt on the stick and sew the shirt to the neck. Poor Petrushka!
We make hair for Parsley (I used yarn), sew a cap from a triangle, glue beads, sew on gloves, decorate and sew a fishing bell onto the cap.

Apply strong glue to the inside of the edges of the cone, approximately 2 cm in height. And glue Parsley’s shirt to the cone. Important: the size of the bottom of the shirt matches the radius of the cone. I ended up with a very short shirt because I made the diameter of the cone incorrectly when gluing and therefore Parsley doesn’t quite hide! So I had to lower Parsley lower into the cone! Please don't repeat my mistake!!!

Now attention! Holding the cone with your hand, raise and lower the stick. And you will see what will happen! I promise it will be very interesting for you and your children!
The heroes of the Russian puppet theater are known to children from the very beginning. early age. One of these is Petrushka - a peculiar and characteristic jester with a cheerful character and good disposition. He was originally created in the form of a glove-type puppet, whose movements own hand could be given an active character. 


 We connect the manufactured parts and get the most expressive of folk dolls- Parsley.
How else can you do it?
If the papier-mâché head can remain the same in other versions of the doll, then the clothes can be knitted. On doll models such things look especially touching and original. You can also tie your head. This hero is made by crocheting in the round using single crochet stitches.  The people's favorite doll can be sewn entirely from fabric using special patterns. Having cut out each part, we sew at the places where they are connected. Then we fill the inner cavity of the head with something soft, for example, foam rubber, cotton wool, or holofiber. There is no need to fill your shirt.
  This is a convenient place for the hand that controls the doll's movements. Legs made in a similar way can be sewn to the bottom of the shirt. Then, when you revive the toy with hand movements, they will swing funny, giving the image special expressiveness. Don’t be afraid that it won’t work! Sew and see how exciting and tempting this business is. And the hero that results from such interesting work will not only be cute and cute, but also warmed by the warmth of your soul, which he will generously share with children.
Comments
Related posts:
DIY glove doll, parsley, Pinocchio, grandfather, fox, patterns / DIY toys, patterns, video, MK Do-it-yourself Tilda ballerina doll, master class / DIY toys, patterns, video, MK Do-it-yourself fabric doll, photos, ideas, master class, video / DIY toys, patterns, video, MK Do-it-yourself Bereginya Northern doll, description, photo, video / DIY toys, patterns, video, MK