Palette name Info(Info) comes from the word Information(Information). Indeed, for a user who knows how to read the data of this palette, it is an indispensable assistant in their work. So, let's look at the structure and features of this window in order.
To see the palette Info(Info), press the key F8, or go to the menu (Window - Info). Your eyes will see a palette that looks something like this.

Let's look at the options displayed in the palette window.
The upper left corner shows the color values at the point where the cursor is in the image. Which color model the colors will be displayed in depends on how you configure the palette. The default model is RGB.

The color values are also displayed at the top right, but you can select a different color model or option. To make a selection, you need to left-click on the eyedropper near the color symbols and select the option you need from the drop-down list. Knowing the meaning of colors is very important for correct image correction, especially if you are working on an uncalibrated monitor, but want your photos to look adequate on other monitors and when printed. In this case, so-called memorable colors are used, which I will talk about in one of the following lessons.
Also, information about color at different points in the image is very important when preparing images for catalogs, where the color must absolutely exactly match the original (usually the PANTONE color library is used in printing). As a rule, when preparing images for printing, a color model is used CMYK.

The cursor coordinates and dimensions of the selected area are displayed below. They are convenient to use when cropping an image, since you can immediately see the proportions of length and width. To configure display units for dimensions and coordinates, left-click on the plus sign next to the coordinate values and select the ones you need from the drop-down list.

In addition, if control points are placed on the image, the color values at these points are also displayed in the palette Info(Info).
You can place four control points in different areas of the image.

Let me remind you that this is done with a tool (Pipette Tool / I Key) while holding down the key Shift. To move points, you need to have the tool " Pipette» hold Ctrl. To delete a point, you need to move it outside the image. You can change the color model of each control point.
Control points are needed to track color changes in different parts of the image when performing color correction.
Also in the palette Info(Info) other parameters may be displayed. To customize the appearance of the palette, left-click on the upper right corner of the palette, where there is a small triangle.

Click " Panel Options» (Panel/Palette Options). A dialog box will appear where you can make the necessary settings. For beginners, it will be very helpful to show tooltips, and if you want to know the time spent on a session working with an image, check the timing option. It is often necessary to know the color profile of an image, especially for those who print photographs or prepare them for publication.
That's it for introducing the palette/panel/window Info(Info) can be considered complete.
⇐ . (previous page of the textbook)
. (next page of the textbook) ⇒
This article is devoted to how to obtain a set of samples of color shades from a specific image to create your own collection of the required color scheme. Considering that many Photoshop users have to work with different clients and each of them prefers a certain design in specific color shades, this article will help you make your own set of colors quite easily and quickly.
An example of a picture for a future color palette
Nothing can combine colors as harmoniously as nature. At any time of the year, various landscapes are full of the most unique shades that not every person will be able to convey. Therefore, to create your own color palette, you can use an ordinary photograph of a landscape and take color samples from it. This lesson will also provide step-by-step instructions on how you can restore the standard set of default colors and how you can apply the created palette with pre-selected shades.
10 steps to creating your own set with the color tones you need
First of all, you need to decide on the photo from which you want to take the shades, and then launch Photoshop.
Swatches panel
The standard set of colors presented in the Swatches panel needs to be cleared so that you can easily create your own palette. However, there is no reason to doubt, since the deleted set can be easily returned back. The area of interest to us with samples is located next to the “Color” and “Styles” panels.
To delete a set, you will have to work with each sample separately; the program does not have such a function as “clear all samples”. Therefore, to delete one color, you need to press the Alt (Win) or Option (Mac) button and, with the mouse cursor hovering over it, delete it with a simple click. There are 122 samples in total, you will have to click the same number of times. Ultimately, after the operation is completed, the panel should remain empty.
Eyedropper tool
First, let’s load a pre-selected image from which we decided to take the color shades. Next, go back to the work panel and select the Eyedropper tool. There is a faster way to get to this element: just press the I key.
First color swatch taken from image
As soon as you select the eyedropper, move the mouse cursor to the image element from which you need a color sample and click on this area. The selected color is displayed in the toolbar, so you can see exactly what shade is obtained, and it will be considered the main one.
It should be noted that to simplify the color selection procedure, you can hold down the left mouse button and smoothly move the cursor over the image area. When you hover your cursor, you can see each individual color in the toolbar, giving you the opportunity to get a closer look at a color tone before selecting the one you want. As soon as the required color is found, release the mouse button.
Selecting the desired color for the palette using a pipette
Add color to the Swatches panel
At this stage, having received the first color sample, it must be placed in the “Swatches” panel. To do this, move the cursor to an empty area inside the panel with future shades, as a result of which it will take the form of a bucket of paint, and when clicked, the previously selected color will be converted into a sample. After this operation, the program will display a dialog box where you will need to enter a name for the resulting color. In principle, you don’t have to enter the name, since the program itself installs them by default. After you name a color, it immediately appears in the Swatches panel.
Creating a set with color shades
To collect the full palette of necessary colors, you should repeat the previous couple of steps several times:
Select the desired color and click on the empty area in the swatches panel;
We save the color as a sample, giving it a name if necessary.
The number of saved samples can be unlimited, it all depends on your desire. Ultimately, after the steps taken, a set with the necessary color shades will be assembled on the panel with samples.
Ready new palette
Saving samples in a separate set
Once the required colors have been added, the resulting set must be saved so that it can be used in the future. To do this, click the button in the upper right corner located on the samples panel to go to the context menu, where from the presented list of commands you should select the “Save samples” item. When saving, you will need to give the set a name. After these steps, the set will be saved in the same folder as the others created by default, which makes it much easier to find the set if necessary.
Restore default color swatches
If you need to return the standard palette of color shades after you have cleared all the colors, go back to the context menu of the swatches panel and select the “Restore Swatches” command. In the dialog box that appears, the program will ask you whether to replace the current set with a standard one. Here you can either replace color shades or simply add to current samples without deleting them. With this simple method you can restore the standard set with color samples.
Loading a color set
We return to the created set of samples to see how to apply the specified colors. To do this, you need to go back to the Swatches panel menu. In its lower part there is a list of sets with samples; they can also be used, since they are initially included in the program. Since all new sets created are saved in the same place as the standard swatches, a previously created set of shades can be easily found in this list. All sets in the program are arranged in alphabetical order, which greatly simplifies the search. After this, a dialog box will pop up again asking you to replace existing samples with new ones. In this case, click the button with the “Replace” command. The selected color palette will be immediately loaded onto the work panel, and color samples can be used.
Palettes and color samples
Selecting a foreground color in the Swatches panel
The main positive thing about using color swatches is that there is no need to periodically refer to the color palette specified by the program to find the right color. After all, they are all displayed on the panel with samples, making it very convenient to find the desired color. To select a specific shade, just hover your mouse cursor over it, which will immediately take on the appearance of an eyedropper, and left-click. The desired color is selected. An icon with a primary color will appear on the tool area.
Setting the background
To set the background, you need to decide on a color. Then press and hold the Ctrl (Win) or Command (Mac) key and click on the desired color in the panel. As a result, the entire working area of the program will acquire a background. Next, all the selected colors from your own set can be used at your discretion, it all depends on your imagination. Using Photoshop tools, you can design posters in a specific color scheme.
Thus, this article allows you to create your own set with the necessary color shades in Photoshop. If you follow the step-by-step instructions provided, this operation will not take too much time.
Product mockup using a previously created custom color palette
Have you heard the expression “The numbers don’t lie?” This old adage also applies to color correction in Photoshop: by working with numbers, you eliminate the element of your personal guesses and assumptions. Instead of relying on your tired eyes, you can turn to numerical color values to correctly adjust the colors in your image.
In order to see the color values of pixels, you need to use palette "Info"(Info).
Palette Info is your command center containing general information about the image you are working with. The palette shows information about the color (numeric) values of individual pixels (it is important here not to be confused with), the location of the mouse pointer, the size of the current document and some other useful information.
To open the palette, select the command:
Window - Info(or hotkey F8)
Palette Options
Click on the top right button of the palette, as shown in the image above, and select the command Panel Options..., a dialog box will open containing interesting settings.

About what it is First and Second color model I wrote a little further down the text. Let's dwell on information about the status of the current document. This information duplicates what is shown at the bottom of the program interface.
By default, the checkbox is only for Document volume- Displays the approximate print size of the image (left) and the saved image size (right).
- Adobe Drive connects to Version Cue servers. This is a complex and abstruse thing. (For your reference, according to Wikipedia, Version Cue- allows users to easily track and manage file metadata that stores information about a file's history, and you can see a new version of a file among relatively old ones. Version Cue also automates the document development process for a team of authors. However, Photoshop CS5 does not use Version Cue.
- Document Profile indicates the color profile of your image.
- Document Size displays the width and height of the image.
- Measurement scale in Photoshop CS5 shows the scale in pixels compared to other units of measurement. For example, microscope imaging may measure objects in microns, and each micron may equal a certain number of pixels.
- Working volume lets you know how much memory and hard drive space is used to open and view your images.
- Efficiency allows you to find out whether the Photoshop program performs tasks as quickly as possible. A value of this parameter below 100% indicates that the speed of the program, depending on the amount of free disk space, is extremely low.
- Timing shows how much time it took Photoshop to complete the last task.
- Current instrument displays the name of the tool currently in use.
How to use the Info palette
So, once you open the palette, you can move the mouse pointer over the image (no matter what tool is currently active) to see (in the upper left part of the palette) the numerical values for the pixel over which the mouse pointer is currently located. Try moving the mouse pointer over the image and watch how the channel values of the pixel over which the pointer is positioned change in the palette.

For images in RGB mode, channel values will be displayed R, G And B; CMYK mode will display values WITH, M, Y And K; in Lab mode - L, a And b and so on.
In RGB mode, which is where you work most of the time, these values are measured on a scale from 0 to 255. Depending on the color of the area over which the mouse pointer is located, the value of one channel may be greater than the values of the others.
For example, if you hover your mouse over the yellow-orange background in the image above, you will see that the numerical difference between the channels R And G not that big, and we already know that the red and green channels make up the color yellow. Blue channel B participates less in color formation and therefore its value is much less.
What else is useful for the Info palette?
Search for an undesirable shade.
For example, if you hover your mouse over the white cat, you will see that the blue channel value is too high. This means that the problem is concentrated in the blue channel. If the value of the green channel goes off scale, then the problem in color correction should be looked for there.
Find the darkest and lightest pixels when using a Levels or Curves adjustment layer.
You should not choose shadows of pure black and light of pure white as reference points, since they do not contain detail. If you hover your mouse over an area you're unsure about, you'll see whether it's really pure black (0, 0, 0) or pure white (255, 255, 255).
Prevent loss of detail as a result of over-correcting the image.
For example, you can make sure that the pixel colors in the desired parts of the image do not reach the values (0, 0, 0) and (255, 255, 255) during correction. Here, the Color Reference tool is used in conjunction with the Info palette to track the original and corrected values.
If you notice an error in the text, select it and press Ctrl + Enter. Thank you!
When creating a web design, perhaps the most important thing is the ability to choose the right colors. This can be difficult and sometimes time consuming, so today we have prepared a small selection of resources that will make this task easier.
A little theory
Colors for the web are made using combinations of red, green and blue, this method of combining colors is called RGB (Red Green Blue).
Each color is represented by an integer from 0 to 255, and each color has a value for red, green, and blue. Black, for example, has no hue, and in RGB it is designated as 0, 0, 0. The first number always means the value of red, the second - green and the third - blue.
Since there are 256 varieties of each shade, there are 16 million possible RGB color combinations. Most computers today can accurately display all 16 million colors. There are so-called “safe colors”; we have already written about the need to use them.
When specifying a color, you can use the RGB value or the hexadecimal HEX system. HEX colors are represented by six digits preceded by a # sign. HEX consists of a combination of numbers and letters; 0 is the smallest value, FF (255) is the highest. Each of these six characters in HEX corresponds to numbers in RGB encoding. Black color has the value HEX #000000.
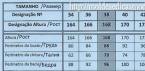
147 colors are defined by name for HTML and CSS according to w3schools.com. There are 17 standard colors - aqua, black, blue, fuchsia, gray, grey, green, lime, dark burgundy ( maroon), dark blue (navy), olive (olive), purple (purple), red (red), silver (silver), blue-green (teal), white (white) and yellow (yellow). Each color has its own specific RGB and HEX value. Dark burgundy, for example, has an RGB value of 128, 0, 0 and a HEX value of #800000; for silver - 192, 192, 192 or #C0C0C0.
Creating a palette
Sometimes creating a palette seems easier than it actually is. Some experienced designers can create a palette from scratch; others get inspiration from other sites or external sources (looking at the colors on a bag of chips at the hardware store or finding the right solutions in nature).
Palettes are designed in a variety of ways, depending on the designer's thought process. Some people have such a keen eye that they can match colors on the fly while looking through a color book or looking at a photograph. When creating a palette, make sure to make color combinations for each element of your website.
![]()
To use colors you found elsewhere, take a digital photo and open it in a graphics editor, such as Adobe Photoshop. Zoom in until the pixels are clearly visible and use the Eyedropper tool to select the shades you like, then write down their values.
Useful resources
You don't have to reinvent the wheel. There are many free online tools that allow users to create, download and import color palettes within minutes. Palettes can be created based on a single color or by using a photograph or other image. Here are some simple services for this purpose.

A tool for creating a palette of six colors, which designers can download in .atc format for Photoshop, .epc for Illustrator, or send by email. Set the hue for each color using the slider or specify its value yourself.

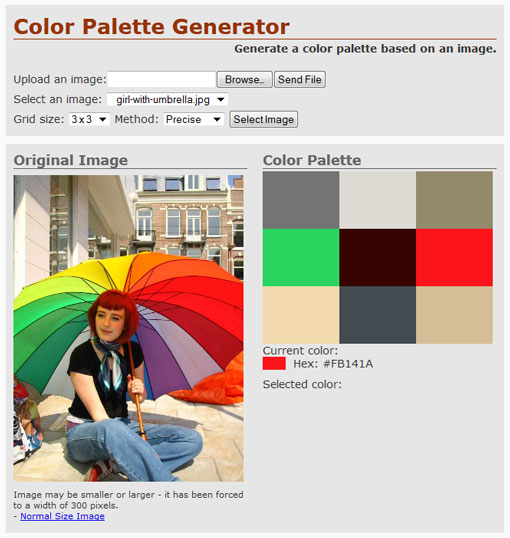
We have a large library of ready-made color combinations from five color systems. You can use the Eyedropper tool to define a color. There are many possibilities (preview colors along with text, generate website templates with selected colors, etc.). Using this service you can also determine the colors of the website you like (just enter its url).
Color Palette Generator
Comments
- Serg
February 24, 2012 at 9:33 pmExcellent and useful collection. On my own behalf, I can mention colorschemedesigner.com, which, among other things, has various presentation modes for people with color perception disorders. You can check, for example, how people with tritanopia will see your work)
- Konstantin
February 25, 2012 at 8:47 amA typo at the very beginning - RGB (Read Green Blue) - Read Green Blue)))
Elena17 Answer:
February 25, 2012 at 3:30 pmThanks;), already fixed it.
- Irina
February 25, 2012 at 10:55 pmTo the creators of the site!
I really love your site and constantly read new posts..
For some reason, recently Kaspersky (license) began to swear and block your page!
I draw your attention to this..
Im Answer:
February 26, 2012 at 7:51 pmThank you, we'll figure it out))
- Elena
February 26, 2012 at 11:50
Hello needlewomen!
Once, at the request of the “workers,” she promised MK a transparent bag. I showed it in one of my last posts.
I started making a bag like this for educational books. My branded packaging;)))
I’m not sure that anyone brave would take such a bag for every day)) Everything is too “transparent”! But you never know... Maybe some of the children will find it useful as a folder for notes in the music book or... September 1st is just around the corner?!)
PVC (colorless transparent film) comes in different densities, and its price depends on this.
I buy it at a store that sells upholstery fabrics for furniture. At least I got it there. I don’t know where else it might be, but you can definitely find it in online stores))
So, here we go:
Firstly(I write in letters because the numbers jump to the photo and are not visible on the new line)
We cut out the blanks.
- Decide on the size of the bag you need. I will have 33*30 cm in finished form (33 cm is the width of the product).
- Cut out a PVC rectangle 33*60 cm. It is most convenient to cut with a roller knife under a ruler, check that the corners are all strictly 90`.
We make a fabric blank for the top of the bag. (throat of the bag)
- 2 identical rectangles 33*17 cm. Pre-compact with non-woven fabric or double-lined material.
- Iron the folds on both sides along the wide side, 1 cm each. Then bend them so that one part is 1 cm larger, i.e. 7+8cm

Secondly
Sew on the fabric part of the top of the bag. Inner side.
1) apply one side of the film to the very bend of the fabric part. Short half (7 cm) on top. It will be inside the bag. Align the sides. They must match!!!
2) we chop off only the upper (7 cm) half to the film in several places. You can first secure the fabric part to the PVC with double-sided tape so that the film does not slip during operation. The larger half is not secured.
3) make a line 2 - 3 mm from the edge.
Repeat the same with the second edge of the bag (opposite side)

Third
Sew on the fabric part of the top of the bag. Outer side
1) this is how the internal parts should be ironed
2) turn it over. We chop off the front fabric part (8cm) to the film - the base of the bag. We make a line at a distance of 2 - 3 mm from the edge.
We repeat the same with the second part of the throat of the bag.
P.S. if you want to sew in some ribbons, straps, tags, labels, etc., then this can be done now.
Fourth
Sew the sides.
1) bend the finished fabric in half. The fabric piece on top should be the one that is longer. Align the edges so that the neck lines clearly coincide and the bottom is without any distortions. We make a line with a LARGE stitch at a distance of 4 - 5 mm from the edge
2) cut out a bias tape or a straight one (I have a straight one). Carefully iron in 4 parts.
We pin both sides of the binding directly to the side of the product.
3) machine stitch the bindings. You need to try so that the entire binding is stitched in one fell swoop.

Fifth
Sew on the handles
I don’t stop how to make handles. You can sew a rectangle by folding it 4 times. It’s even easier to take a belt.... it’s all up to your imagination).
- be sure to center, be sure to measure so that the handles are the same length))
I sew it with a square, then with a cross.

The bag is ready.

Can be complemented with decor, keychains, etc., etc....

P.S. Points 4 and 5 can be swapped. If you sew the handles before sewing the sides, it will be even more convenient; the film won’t get wrinkled as much. In addition, it is easier to turn the machine under the presser foot.
_________________________________
There are still a few days of summer left.) What are you planning to do during these warm days (besides getting the kids ready for school)? You need to do something else so you don’t regret it later)
P.S. Thanks to everyone who left their tips for gifts for orphans in the previous post. Girls, thank you! I'm already starting to collect and prepare)