I made changes to the pants pattern:
- At the bottom of the legs I removed the cuffs, adding length accordingly.
- I widened the legs at the bottom.
- I made the belt one-piece from the main fabric.
Seam allowances.
I sewed the parts on an overlocker, so I made seam allowances for the width of the overlock seam of 0.7 cm.
- for processing a zipper - 1.5 cm;
- for the hem of the sleeves, the bottom of the sweatshirt and the bottom of the legs - 2 cm;
- on the waistband of the pants - 2.5 cm.
Overlock is best suited for sewing knitwear. If you don't have an overlocker, you can use an elastic stitch for knitwear or a narrow zigzag stitch. The edges of fleece products do not need to be processed; fleece is not a “free-flowing” material.
Step 1. Cut out the details.
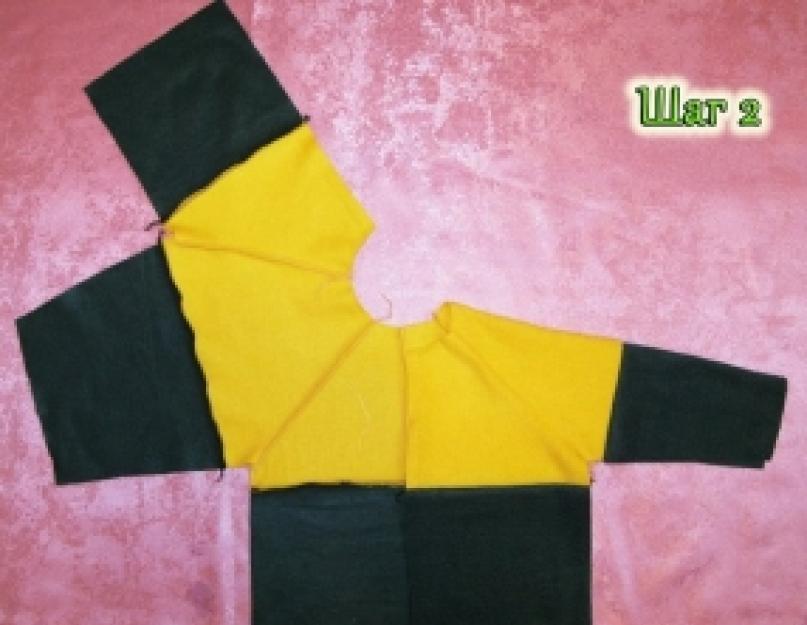
Step 2. Sew down the yellow and green parts of the front, back and sleeve halves. We connect the sleeves with the front halves and the back. Attention: do not mix up the sleeves! We sew the sleeves along the raglan lines.

Step 3. Iron the seams. Attention: the iron should not be too hot, otherwise the fleece will stick to the iron!

Step 4. Connecting side seams and sleeves and sew them with one line.

Step 5. Cut out the collar. The collar consists of 2 rectangles, the lengths of which are equal to the length of the neck of the finished product, the width of the lower collar (made of yellow fleece) is 9 cm, excluding seam allowances, the upper collar (made of green fleece) is 10 cm, excluding seam allowances. When finished, the collar width is approximately 9.5 cm.

Step 6. Sew the top and bottom collars along one long side.

Step 7. Apply the collar to the neck of the product, aligning front side sweatshirts with the front side of the top (yellow) collar. We pin or baste, then grind. The bottom edge of the lower (green) collar does not need to be overlaid, but I overlaid it just in case.

Step 8. Measure out the zipper. We retreat 2 cm from the bottom - this is the lower limit of the zipper location. The end of the top (yellow) collar is the top border. My zipper was longer, so I had to cut it off.

Step 9. Baste the hem at the bottom.

Step 10. We baste the zipper, applying it to the very edge.

Step 11. We sew the zipper, and the seam should be laid at a distance of approximately 2 mm from the teeth.

Step 12. Unscrew the clasp and sew out the edge, bend the lower (green) collar and baste it on the sides to the clasp. At this stage, it is advisable to install eyelets on the hole for the cord at the bottom of the sweatshirt (but I did not do this, so then I had to pick up the running seam and install the eyelets).

Step 13. Baste the top of the collar, baste the bottom of the collar to the neckline.

Step 14. Iron all running seams.

Step 15. Place a seam near the zipper. Sew off the top of the collar. Watch the color of the threads: we sew green fleece with green threads, yellow fleece with yellow threads, it is better to leave the bottom thread in the machine green.

Step 16. We sew a seam along the neckline, thereby securing the collar.

Step 17. At this stage I installed eyelets, supports, as I already said, running seams. It is more convenient, of course, to do this earlier.

Source:
http://blog.t-stile.info/
I'll share personal experience for sewing knitwear.
Indeed, the complexity of processing depends on the composition of the fabric. I noticed that the more natural fibers (cotton, wool) there are, the more manageable the fabric is, and it’s easier to handle seams and knots.
But I also found my own way of pacifying the “stubborn” knitwear. In magazines, authors give the following recommendations - for sewing non-stretch seams (for example, shoulder seams), place bias tape under the seam, but this is not always acceptable.
I do this - I leave at least 0.5 cm for allowances (of course, this is after trying on and making the necessary changes to the product), then I make a line with small oblique stitches along the allowance (the fabric will definitely not move or stretch) with threads of the same tone that I sew .
Then I overlock the seam with an overlocker and next to it (almost line to line), I lay a regular machine stitch. There is no need to remove threads from oblique stitches, they are not visible. The seams turn out beautiful, not stretched, neat. When I studied at a sewing school, the teacher constantly repeated to us, “The back of the product should be cleaner than the face.”
I use this method for knitwear with high stretch, which I pre-determine small piece fabrics.
This processing method is suitable for products where you need to maintain their shape. If the fabric is problematic, then I use it on the entire product. It just seems like a long time, but in reality, once you get the hang of it, it doesn’t matter. It may take more time, but the result is pleasing, and this is the most important thing :)
Nice fleece fabric. And the products made from it are soft and cozy.
In the store, the samples all seem to be similar in structure and price, but in reality they are different in quality, although they do not seem to be different in appearance.
Now I’m sewing a sweatshirt for youth, everything is fine. But I had some minor problems with the fleece coat - the straight stitch just didn’t want to fit (the fabric starts to stretch a little while working), there were huge (1.5 - 2 cm) gaps. No matter how hard I tried to eliminate this problem, I changed the thread tension, changed the needle, put threads of different thicknesses in the shuttle and on top, talked to the machine, the result was zero.
The following helped - I cut thin (2 cm) strips of adhesive (you can use special adhesive for hemming the bottom of products, it is sold in approximately this width), and glued it onto the seam allowances with an iron, capturing the place where the stitching seam would go. Here it is! Eureka! Happened!
In another product, the stitching seams lay perfectly, but the loops were throwing around with huge gaps, I remembered the previous situation - I glued pieces of glue to the places where the loops were marked and everything worked out!
I don’t have any special knitting equipment))))))), my “arsenal” is a hand sewing machine about 60 years old (an irreplaceable thing), sw. mash. "Podolsk 142", sw. “AstraLux” machine (15 programs) and a 3-thread overlog, a bunch of all sorts of “attachments” for the machine, such as a ruler for buttonholes, different presser feet, etc. I do a great job with all this, everything suits me)))))
The processing method depends on the specific situation. For example, I sew cotton knitwear like regular fabric, i.e. stitching - overcasting.
And also, for dressmakers who do not have a professional education, I hope a couple of tips will be useful - when you baste and sew in a sleeve, do it from the sleeve side, shoulder and waist items are basted and stitched from the back side.
With the onset of autumn, it's time to warm up our children, and ourselves. Fleece clothing is great for this. And so I will tell you more about it. About its qualities and properties, how to cut and sew from it, what can be made from fleece, where to buy it, and how to care for it. Let's start in order.
What is fleece
This is a felted non-woven synthetic material. It is 100% polyester, which means it is synthetic. But here it is important to understand. Modern synthetics are far from the shooting cream of our grandmothers :). Today, synthetic fabrics are not that inferior in hygienic properties natural fabrics, and sometimes even surpass! And this fully applies to fleece. Therefore, even babies can safely sew from it.
How to get fleece
The material is based on a “knitted” fabric, fluffy on both sides. And inside the “edge” there are air bubbles - they serve as an excellent heat insulator. That's why fleece is so warm.
The price of fleece varies depending on the quality and manufacturer. For example, Polartek is produced in America, so it costs more than fleece (transportation costs). And fleece is produced in Europe, so it is cheaper.
How is fleece better than natural fabrics?
Now let's talk about the most important advantages of fleece.
The synthetic fibers that make up fleece, unlike natural ones, do not absorb moisture, but conduct it. Thus, fleece wicks moisture away from the body, keeping the skin dry and warm. And at the same time it dries very quickly.
In general, fleece was created as an alternative to wool. Therefore, it is indeed very warm. And what’s great is that it retains heat even when wet! And when wet it feels much nicer than, say, cotton or wool. But it is quite difficult to wet fleece, since water does not rise through it like cotton.
It is a breathable material, soft and very pleasant to the touch. Despite the fact that it consists of synthetic fibers, it does not cause allergies. It is very light in weight, wear-resistant, and durable. Fleece is stronger natural materials, that's why it lasts a long time.
How to Wear Fleece
 As I said, fleece is thin and warm. And this makes it very convenient. It does not restrict movement at all, as knitted sweaters and sweaters. Elastic, but over time, with active use, it can stretch (elbows, knees). Therefore, it is better to choose loose-fitting models.
With one thin bottom layer (eg tights and T-shirt), fleece can be worn up to +8°. And with one more additional layer - up to 0.
It is important to remember that fleece conducts moisture. And it will easily let the rain outside. And since it is breathable, it is easy to blow through. Therefore, in windy and rainy weather you need to wear a windbreaker over it.
For sling mothers, fleece is convenient because it is kind of “clingy,” that is, the baby will not slip out.
And one more thing - fleece shrinks well to small sizes. It is convenient for travel, sports and travel wear.
How to cut and sew from fleece
Cutting from fleece is also not difficult. It cuts easily, does not warp or shift. Since this is a non-woven material, you can make some deviations from the direction. Especially when cutting toys. There you can cut lengthwise, crosswise, and diagonally.
If the fleece has a long pile, then it is directed downwards.
Sewing from fleece is also not difficult. Even beginners can do this. You just need to remember a few things.
Before sewing the parts together, it is better to pre-baste them or pin them together. Because fleece is elastic. And under the presser foot, the top layer can stretch and shift.
Fleece is easily pierced with a needle. Due to elasticity, it is better to increase the stitch width slightly (up to 3-3.5 mm) to avoid “chewing” it under the foot. And when sewing, do not pull additionally.
The sections do not need to be processed, as they do not crumble.
You can sew with a regular needle No. 90-100, or a knitted needle of the same numbers. It’s better to first try sewing on a piece of fleece and see which needle gives the best stitch.
Fleece cannot be ironed and no adhesives are used.
What can you sew from fleece?
 There are truly enormous application possibilities here:
Children's clothing (overalls, walking suits, slippers, booties...)
Adult clothing (dresses, sweatshirts, travel clothes...)
Clothes for winter/spring/autumn (hats, scarves, mittens, underwear, jackets, lining of insulated clothing...)
 - sling-mothers (sling scarf, sling overalls, sling pocket...)
Toys (educational, soft...)
Decor and interior elements (holiday souvenirs, pillows, blankets, rugs...)
Where to buy fleece
The easiest way is in regular fabric stores. But the choice in them is often very limited, especially in small towns and villages.
You can also buy in specialized tourist stores, in those enterprises that themselves produce sportswear. The materials there are of higher quality, but there are no children's colors.
Well, all that remains is to buy online. Sections on forums, VKontakte groups, online stores. Here there is already a huge selection of different colors, including children’s ones, and there is plenty to choose from.
Caring for fleece items
How to wash fleece. At t - no higher than 30-40°, in a gentle gentle mode, with powder without bleaching agents, and without the use of conditioning balms. There is no need to overload the machine.
Do not use bleaches, solvents or dry cleaning! Otherwise, the color of the material will not be preserved.
Wring out the fleece at 800-1000 rpm. At hand wash You cannot twist the product or wring it out, but it is better to simply straighten it, hang it on a hanger or rope, and let the water drain. Or simply lay it out on a horizontal surface until dry. And fleece dries very quickly.
Do not additionally dry with hot air or use machine drying, dry on heaters and radiators. Heat the item will be damaged and it will no longer be possible to wear it.
And let me remind you once again that you cannot iron fleece! Yes, and there is no need for this, since it is never wrinkled :)
What else is important to know
Fleece can wrinkle, and the quality of heat retention depends on its thickness and airiness. Therefore, you need to treat fleece with care. And the pellets formed on the fleece also make it of less quality.
That's all I wanted to tell you about fleece :). Sew with pleasure!
Right now you can start sewing baby fleece overalls:


In modern stores you can buy almost any fleece toy. They are all very beautiful, but, as a rule, they are of the same type, very expensive and not of good quality. Parents seeking to provide their baby with unique and high-quality toys make Stuffed Toys with your own hands. Working with fleece fabric does not require mastery of sewing techniques and is accessible even to novice craftsmen.
Required materials and tools
Before starting work on creating soft toys, a novice craftsman needs to prepare everything necessary materials and tools for work. The sewing process and the final result depend on their correct selection.
Fabric selection
Fleece is the most common material used for sewing toys. This is explained by the large number positive qualities of this material:
- low price;
- brightness and variety of color palette;
- unpretentiousness at work;
- ease of fabric care.
 It should be noted that for the manufacture of toys it is necessary to choose high-quality material with a density of at least 200 mg/m2. The downside of some fleece fabrics is their tendency to pill.
Filler material
An important component of a handmade soft toy is its filling. The main criteria when choosing it are its safety and suitability for the baby’s age.
 The most common types of filling for toys and crafts intended for children of all ages are padding polyester and holofiber. For beginners and on a limited budget, it is acceptable to use cotton wool for stuffing. small crafts. It should be taken into account that this type of filler can form into dense clumps during use and after washing.
In educational toys, calcined cereals are often used as a filler. They act as a weighting agent and help develop tactile sensations in babies. When playing with such crafts, it is important to strictly monitor the integrity of the toy and prevent small parts from accidentally getting into the respiratory tract of small children.
Decorative elements
Toys should be bright, interesting and attract the attention of children from the first minutes of playing with them. For this finished goods decorated with ribbons, lace, applique. They dress them in clothes made from remnants of fabric used in other works. To give the craft a finished look, buttons, beads, and seed beads are often used.
Tools needed
If we sew toys from fleece with our own hands for personal use, then we can do without sewing machine. You should consider purchasing it if you are making crafts for commercial purposes.
Before you start working on soft toys, you should prepare:
- needles;
- scissors (large and small);
- threads of various colors and shades;
- sewing pins;
- measuring tape;
- a piece of soap or marker.
Creating a pattern
Creating custom patterns is a rather complex and time-consuming process that is not always quickly mastered by novice craftsmen. When starting to create toys from fleece, you can look for patterns for them in several sources.
- The Internet, where you can find not only patterns, but also recommendations for choosing fabric, filling and decor.
- Specialized printed publications on needlework and sewing, which contain patterns and instructions for them.
- Kits for sewing soft toys, which are sold in art and craft stores.
- The source of the pattern can be an old toy. It can be ripped open and disassembled into parts, the silhouettes of which are transferred to new fabric.
Separately, it is worth paying attention to the material for making templates for patterns. The most suitable material for them is cardboard. The silhouette from such blanks is easy to transfer to fabric. They do not require additional fastening and are more durable compared to templates made of paper or tracing paper.
Fleece crafts for beginners
Having prepared all the necessary materials and tools, you can proceed to creating toys. What can a novice craftsman sew from fleece? You should start getting acquainted with the world of fleece crafts with simple toys, consisting of 1-2 parts.
Cat pillow
This toy consists of only 2 paired parts: a body and a tail. To sew it, you will need:

The pattern of this toy is quite simple, and you can draw it yourself on a sheet of paper of a suitable size.
The fabric must be folded in half with the right side facing inward. Place the pattern on it, which, if necessary, is secured to the fabric with pins. Outline the silhouette of the cat's body and its tail, leaving 5-7 mm for seams. Carefully cut out the details of the craft.
 Place the paired pieces right sides facing each other and stitch. If we sew a fleece toy by hand, then the parts should be sewn together with a loop stitch, leaving a small area for stuffing the toy.
The sewn parts are turned right side out and filled with filler. The degree of filling should be adjusted based on your own preferences. The main thing is that the filler is evenly distributed throughout the product. To make it easier to fill the tail with padding polyester, it should be rolled up like a stocking and unfolded as it is filled.
Having filled the tail part, its end is stitched and sewn to the body with hidden stitches. To complete the pillow cat, cut out a nose from a piece of red fabric and sew it on with a blanket stitch. The arcs of closed eyes, the muzzle and mustache are embroidered on the body with black threads, and the ears and tummy are indicated.
Even with small children who can hold a pencil in their hands, you can make crafts from fleece with your own hands. Patterns for such crafts should be small and consist of one piece. Such a joint toy could be a small bear decorated with a bow. To complete it you will need:

Work on a fleece bear begins by transferring the pattern onto the fabric. This work can be entrusted to a child. To work together with your child in the size of the pattern, you must initially set seam allowances, increasing them to 1 cm, so that cutting inaccuracies can be hidden.
 You can also entrust cutting out parts for a craft to a child who knows how to use scissors.
The next step in creating a soft toy is finishing with decorative details. A nose is cut out of a piece of black fleece and carefully sewn onto the front part of one of the parts. Small black buttons are sewn just above the nose. These will be the bear's eyes. The mouth and cheeks are embroidered with black thread. Colored buttons are sewn vertically in the middle of the body. Their color depends on the imagination of the authors.
After finishing the decoration, both parts are folded right sides inward and stitched, leaving a hole for stuffing. The toy can be stuffed by a child with the help of an adult, who regulates the degree of stuffing of the product and helps to evenly distribute the padding polyester inside the craft. The stuffing hole is sewn up with a hidden seam.
The finished toy is decorated with a narrow satin ribbon tied in a bow.
Multi-piece fleece toys
Having mastered the technique of sewing simple fleece toys consisting of 1-2 parts, you can move on to the next level - sewing multi-part toys from fleece with your own hands. Master classes describe in detail the necessary materials, decorative elements and progress of work.
Ladybug
All children like bright toys. And if my mother sews it with her own hands, then she will remain loved forever. long years. The soft ladybug is quite easy to sew. For it you will need:

Work begins with decorating one of the red parts. Pinned in the middle of the front side of the red circle black stripe. Small black circles are placed on both sides of it, fixing their location with pins. Then all the overlay parts are sewn to the base using an overlock stitch.
Large black circles are applied to both red parts. The parts must be folded with their right sides facing each other. The touching parts of the figures are sewn together with a loop stitch. The color of the threads at this stage of work does not matter, since they will be inside the craft.
 The black parts are turned away. Both blanks are folded with their right sides inward and the black elements are sewn together.
From satin ribbon making legs for a bug. A piece of tape is cut into 6 small strips. They are folded in half and sewn together with a few stitches. After that, they are placed between two red parts, three pieces on each side.
The red parts with the paws inserted between them are sewn together. The resulting workpiece is turned right side out through the filling hole. The figure is stuffed with padding polyester and the hole is sewn up with a hidden seam. On the head ladybug The eyes are attached using glue.
A bright toy is ready to delight kids.
Soft doll
Small soft doll, made of fleece fabric, will become a faithful playmate for the little princess in daytime games and will protect night sleep babies. For a beautiful baby in a sundress you will need the following materials:

Making a soft stuffed doll begins with making a pattern, which can be downloaded from the Internet or drawn by hand on cardboard. The product consists of 3 parts: body and legs, head, arm.
The fleece material is folded in half with the right side inward, the part templates are distributed on it and outlined, leaving the necessary seam allowances. The hand template is traced twice, marking two mirror parts.
Having fastened the fabric with pins, the parts are cut out along the marked lines.
 Eyelashes are embroidered onto one of the blanks for the head and eyes are glued on. The two pieces are then placed right sides together and stitched together, leaving an opening for stuffing. Having filled the part with padding polyester, the hole is sewn up with a hidden seam.
The hands of the future doll are sewn and stuffed. The stuffing hole is sutured. The packing should not be very dense.
The finished parts of the arms are inserted between two blanks for the body and secured with pins. The body is stitched and carefully turned right side out. The part is filled with padding polyester, evenly distributing it inside the figure, and the hole is sewn up.
The next step is to fasten the head and body blanks. The doll's head is fixed with pins and sewn to the main part with a hidden seam.
Beautiful pigtails for the doll are made from yarn. Bundles of yarn of the same length are sewn onto the head of the craft, starting from the forehead and ending approximately in the middle of the back of the head. You need to sew the curls of thread as close to each other as possible using small stitches. The finished hair is collected into two ponytails or braids and tied with small elastic bands.
You can dress the doll in a bright sundress with ties. It is easy to sew from two rectangular pieces of fabric. Having folded them facing each other and secured them with pins, we cut out two trapezoids according to the size of the doll. We sew all sides of both parts and sew the side seams. We fold the bottom of the dress and sew it with a hemming stitch. Sew four pieces of ribbon to the top. We put the dress on the doll and tie the ribbons with bows. The front of the dress can be decorated with a satin bow or beads.
Sewing soft toys from fleece with your own hands is interesting and exciting activity, to which even small children can be involved. A craft made together with mom will become a baby’s favorite toy for a long time.
Attention, TODAY only!