A bow tie for boys is an indispensable accessory at all times of life. Matinees in kindergarten, formal functions at school, university awards, weddings - each of these occasions deserves a special outfit, which must be complemented by an original men's accessory.
This article will give several master classes on making a bow tie with your own hands from satin ribbon and fabric. There is also educational material on crocheting an accessory.
Making a double butterfly for a boy from ribbons
A very easy to make elegant bow tie for a little boy made of satin ribbons.
You will need:
1) Satin ribbons different widths;
2) Scissors;
3) Lighter;
4) Needle and thread;
6) Hooks.
Step-by-step instruction:
1) Cut two pieces from the tape. The length of one is 20 cm, the other is 30-40 cm. We take one of the blanks and sew the ends together slightly overlapping.
3) Cut out a thin base from satin for attaching a bow tie, as well as a small jumper. We process all the details with a lighter.
4) Attach a small bow on top of the large one. We apply a tying tape on the back side, but do not glue it. We hide it all with a jumper.
5) Lastly, we attach special hooks that will serve as a clasp.
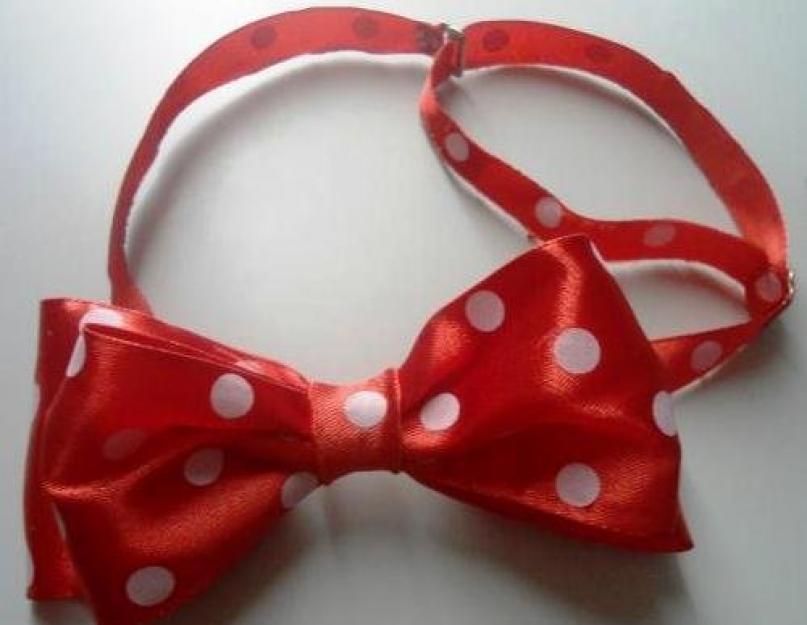
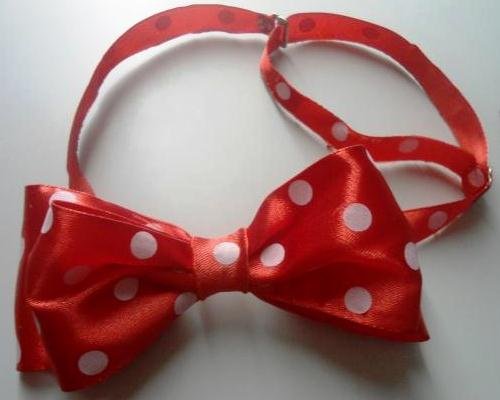
This is the kind of red polka dot butterfly you might end up with!
Let's try to make a men's accessory quickly and easily from fabric
This master class will tell you how to make a chic double-sided butterfly with your own hands. This accessory will take some work, but the result is worth the effort!
You will need:
1) Scraps of fabric in two colors;
2) Needle and thread;
3) Scissors;
4) Chalk or soap;
5) Sheet of paper;
6) Ruler;
7) Thin dublerin (if required);
8) Accessories (hook and adjuster).
Pattern:

Step-by-step instruction:
1) Cut out a short and a long piece from both fabrics. The selected blue fabric is thinner than red, so it is better to glue it with double tape. To do this, we cut out the adhesive material, the size of which will be slightly smaller than the colored part.
2) We seal the blue parts with doublerin, securing them with adhesive material.
3) Use pins to pin short and long pieces together. Then we sew with medium stitches, retreating from the edge by 0.5 - 0.7 mm.
4) We grind on a machine along the marked lines, not forgetting to leave a hole in the “tail” so that the workpiece can be turned out.
5) We trim the corners and places of curvature of the workpieces so that after turning them out they have the required form. We shorten the narrow part of the parts

6) Turn the pieces inside out, straightening all the edges and corners. We sew again with a regular seam around the perimeter and smooth it out. After this, the threads can be removed and ironed again.
7) We sew up the holes through which the blanks were turned out with a hidden seam.
8) We pass the short piece through the hook, fold the edge to the wrong side and secure with invisible stitches. We put the regulator on a long piece. Then we make a second loop (see photo below). And we sew the ends.

Checking the functioning of the fastener. If you can adjust the length of the butterfly, you're done.
Tutorial on crocheting a butterfly. Method one.
An easy way to crochet a cute butterfly. Perfect for beginner needlewomen.
You will need:
1) Fine yarn;
2) Hook 1.2 mm;
3) Scissors;
4) Needle.
Manufacturing stages:
1) First we dial a chain of forty air loops. Its length should be about 14 cm.
3) Close the open ends of the workpiece connecting posts without a crochet.
4) Make a small jumper for the bow. To do this, we knit a chain of 10 chain stitches, also close it into a ring and knit 16 rows in a circle with single crochets. The jumper should be about 5–6 cm long.
5) Fold the bow blank in the middle, attach a jumper and sew it up from the inside out. You also need to make a few stitches along the edges of the jumper so that it holds tightly and does not slip.

And now a tutorial on knitting a butterfly with knitting needles.
You will need:
1) Wool blend yarn;
2) Stocking needles;
3) Scissors.
Scheme:

Stages of work:
1) First, cast on 12 stitches and knit with a garter pattern. The first edge stitch in the row should be removed without knitting. Knit the last one purlwise.
2) Decrease 1 stitch on both sides three times in every fourth row. There will be 6 loops left that should be knitted without changing 8 rows.
3) Add 1 loop on both sides. This can be done by knitting a loop next to the edge behind the front and back walls. Such increases should be made two more times in every fourth row.
4) The next 8 rows go without changing the number of loops. Next, remove one loop from both sides again, repeating this three times in every fourth row. There will be 4 loops left, which we knit unchanged until a segment is obtained, the length of which is equal to the circumference of the neck plus 3 cm.

5) Again we knit 1 additional loop on both sides, which we also repeat three times in every fourth row. Then - 8 rows without changes.
6) Next, decrease the loop and repeat this twice in every fourth row. Again 8 rows without changes. Then add 1 loop and repeat twice in every fourth row. Next - 3 rows without changes with closing loops.
7) We knit 4 loops without changing them, achieving the length of the narrow segment equal to the one already knitted. Add 1 loop on both sides, repeating this three times in every fourth row. Next - 8 rows, without changing.
8) Decrease 1 stitch at a time. We repeat this twice every fourth row.
10) Make three more rows without changes, closing the loops.
The result is a blank, which all that remains is to tie it correctly around the neck, decorating it with a bow.

Video on the topic of the article
Add a little edge to a regular shirt with a knit tie or bow tie from Susie Jones. The tie and bow tie are crocheted with a large 5 mm crochet hook, so you need to choose a thicker yarn (it is best to use cotton).
The crochet pattern for a tie and bow tie has been translated into Russian by Handcraft Studio at the request of readers.
Knitted tie and crochet bow tie
How to crochet a tie and bow tie: diagram and description
You will need: yarn of the required color, 5 mm hook, tie/bow clasp, tapestry needle.
Abbreviations:
ch = air loop
RLS = single crochet
PSN = half single crochet
CH = double crochet
2 sc together = knit 2 sc together
Dimensions:
Butterfly: approximately 6 cm x 16 cm.
Tie: approximately 7cm (at widest point) x 160cm.

Knitting a tie:
Crochet 5 mm green yarn, 16 ch
Row 1: 2 sc in the second st from the hook, 1 sc in the next st. 6 sts, skip 1 ch, 1 sc in next. 6 loops, 2 sc in last stitch.
Row 2-11: ch 1 (does not count as a separate loop), 2 sc in first sc, 6 sc, skip 2 sc, 6 sc, 2 sc in last sc.
Row 12: ch 1, 7 sc, skip 2 sc, 7 sc
Row 13-17: ch 1, 2 sc in first sc, 5 sc, skip 2 sc, 5 sc, 2 sc in last sc.
Row 18: ch 1, 7 sc, skip 2 sc, 6 sc
Row 19-23: ch 1, 2 sc in first sc, 4 sc, skip 2 sc, 4 sc, 2 sc in last sc.
Row 24: ch 1, 5 sc, skip 2 sc, 5 sc
Row 25-29: ch 1, 2 sc in first sc, 3 sc, skip 3 sc, 2 sc in last sc.
Row 30: ch 1, 4 sc, skip 2 sc, 4 sc
Row 31-35: ch 1, 2 sc in first sc, 2 sc, skip 2 sc, 2 sc, 2 sc in last sc.
Row 36: ch 1, 3 sc, skip 2 sc, 3 sc
Row 37: ch 1, 2 sc in first sc, 1 sc, skip 2 sc, 1 sc, 2 sc in last sc.
Repeat row 37 until you run out of green yarn or work reaches half the required length (about 80 cm)
Cut the green yarn and add the cream yarn.
Repeat row 37 until the required tie length is obtained.
Next row: ch 1, 1 sc in first sc, 1 hdc, 2 dc, 1 hdc, 1 sc in last sc.
Next row: ch 1, 1 sc in first stitch, 1 hdc, 2 dc, 1 hdc, 1 sc in last stitch.
Trim yarn and bind off last stitch.
Product assembly
Hide the ends of the threads. Iron the tie through a damp cloth.
Knitting a butterfly
Bow loops
Please note: at the end of each row the work must be turned over.
Crochet 5 mm red yarn, ch 6
Row 1 (front side): 1 sc in the second loop from the hook, 1 sc in each stitch to the end of 5 loops
Row 2-4: 1 ch (does not count as a separate loop), 1 sc in each sc in the previous row
Row 5: ch 1, 2 sc in first sc, 3 sc, 2 sc in last sc, unfold. 7 loops
Row 6-8: ch 1, 1 sc in each sc in previous row
Row 9: ch 1, 2 sc in first sc, 5 sc, 2 sc in last sc. 9 p.
Row 10-19: ch 1, 1 sc in each sc in previous row
Row 20: ch 1, 2 sc together over first two sc, 5 sc, 2 sc together over last two sc, 7 loops
Row 21-23: ch 1, 1 sc in each stitch of previous row
Row 24: ch 1, 2 sc together over first two sc, 3 sc, 2 sc together over last two sc 5 loops
Row 25-31: ch 1, 1 sc in each stitch of previous row
Rows 32-55: Repeat rows 5-28 once.
Cast off the last stitch.
Bow tails
Please note: at the end of each row the work must be turned over.
Crochet 5 mm red yarn, ch 10
Row 1 (front side): 1 sc in the second loop from the hook, 1 sc in each stitch to the end of 9 sts.
Row 2-4: ch 1, 1 sc in each stitch of previous row
Row 5: ch 1, 2 sc together over first two sc, 5 sc, 2 sc together over last two sc, 7 loops
Rows 6-8: Repeat rows 2-4 once.
Row 9: ch 1, 2 sc together over first two sc, 3 sc, 2 sc together over last two sc 5 loops
Row 10-18: ch 1, 1 sc in each stitch of previous row
Row 19: ch 1, 2 sc in first sc, 5 sc, 2 sc in last sc. 7 loops
Row 20-22: Repeat rows 2-4 once.
Row 23: ch 1, 2 sc in first sc, 5 sc, 2 sc in last sc. 9 p.
Row 24-27: ch 1, 1 sc in each sc in previous row
Central loop
Crochet 4 mm red yarn, ch 5
Row 1 (front side): 1 sc in the second loop from the hook, 1 sc in each stitch to the end of 4 loops
Rows 2-12: ch 1, 1 sc in each stitch of previous row. Cast off the last stitch.
Neck strap
Crochet 4 mm red yarn, ch 4
Row 1 (front side): 1 sc in the second loop from the hook, 1 sc in each stitch to the end of 3 loops
Row 2-64: ch 1, 1 sc in each stitch of previous row. Cast off the last stitch.
Product assembly
Insert the tail into the tapestry needle and sew the two short ends of the bow loops together. The seam runs down the back center. Then carefully sew on the bow tails, stitching through all layers. Sew a neck strap in the center. Wrap the center loop around the center of the tie and sew the ends along the short side at the back. Thread one end of the neck strap through the buckle and then through the hook. Pull the end of the tie through the buckle again and secure the end with a needle and suitable thread. Thread the other end of the strap through the other hook, unroll that end and secure.
.
<
In order for this butterfly to keep its shape well, you need to choose a light yarn and knit more tightly (or take knitting needles half the size recommended for the selected yarn)
When knitting narrow long pieces with the same pattern on both sides, it is convenient to use stocking needles different color for quick orientation in facial and purl rows.
We carefully study the diagram and photographs
We cast on 12 loops and knit with a garter pattern ( facial loops in the front and back rows), while we remove the first edge loop in the row without knitting, and we knit the last one with a purl.
In each 4th row we decrease 1 loop on both sides 3 times. We knit the remaining 6 loops 8 rows without changing. Next, add 1 loop on both sides, for which we knit the loop next to the edge loop behind the front and back wall. We make increases 2 more times in every 4th row. Next we knit 8 rows without changing the number of loops. And again, on both sides we decrease one loop and repeat the decreases 3 more times in every 4th row.
We knit the remaining 4 loops unchanged until the length of the narrow segment is equal to the circumference of the neck plus 3-4 cm. Next, we add 1 loop on both sides and repeat the increases 3 more times in every 4th row. We knit 8 rows without changes.
Decrease 1 stitch and repeat decreases 2 more times in every 4th row. We knit 8 rows without changes, add 1 loop on both sides and repeat the increases 2 more times in every 4th row. We knit 3 more rows without changes and bind off the loops.
We knit the remaining 4 loops unchanged until the length of the narrow segment is equal to the circumference of the neck plus 3-4 cm. Next, we add 1 loop on both sides and repeat the increases 3 more times in every 4th row. We knit 8 rows without changes. Decrease 1 stitch and repeat decreases 2 more times in every 4th row.
We knit 8 rows without changes, add 1 loop on both sides and repeat the increases 2 more times in every 4th row. We knit 3 more rows without changes and bind off the loops. 

Girls, hello!
Below is free crochet bow tie pattern.
MATERIALS:
- hook 2.5 mm
- yarn bright color(I have 100% Diva Plik Natural Cotton)
- sewing needle
- scissors
LEGEND:
- dc - double crochet
- sc - single crochet
- VP - air loop
- runway - air lift loop
- kr - circle
- pr - increase
- dec - decrease
DESCRIPTION OF THE SCHEME:
For knitting bow tie I took 100% cotton (100 gr./200 m). The threads are quite thick, so the butterfly turned out to be voluminous. You can also use threads of this thickness, or you can use any others to your taste. But be careful - when choosing more thin threads the butterfly will be smaller too!
Exemplary size butterflies 10.5 cm in width and 5 cm in height when using the specified yarn and hook. You can experiment depending on the thickness of your hook and yarn.
Let's start knitting according to the diagram below.
First we knit a chain from 25 ch, and at the end of the row we knit another 1-2 runways (27)
1st row: 25 dc, in the last column we knit 2 runways and turn the fabric over (27)
2nd row: 25 dc + 2 runway (27)
3rd row: 25 dc + 2 runway (27)
4th row: 25 dc + 2 runway (27)
5 row: 25 dc + 2 runway (27)
6th row: 25 dc + 2 runway (27)
This is the basis we have!

Now, in order for it to look neat, we tie it along the contour with ordinary single crochets.

After our canvas is completely ready, we make the middle of the tie. In order to find the middle exactly, we bend the base in half and mark the location of the center. Fold the butterfly in half lengthwise and sew it with threads of the same color.

To make the butterfly look even neater, wrap the middle with threads of the same color.
That's it, our butterfly is ready!

Write about what you did! I will be happy to see your result.
Use #anyamiro_done
This will make it easier for me to find your work.
Good luck! Using this scheme, you will definitely succeed!
With love between the lines, your Anya.
And love yourself! Always.
 I
I
Knitted bow tie for stylish men from Vogue Knitting Early Fall 2014.
Size 14 x 7 cm.
For knitting you will need: Cascade Yarns Heritage Silk yarn (85% merino wool, 15% wool, 400 m/100 g); Two pairs circular knitting needles 2 mm long 60 cm, hook 2.25 mm for preliminary cast-on, auxiliary thread contrasting color, wide elastic band of a suitable color.
Knitting density: 48 p. and 56 r. = 10 cm in basic knitting needles 2 mm.
Preliminary set of loops.
Using an auxiliary thread, crochet a chain of the required number of loops + a few additional ones. Cut the thread and pull it through the last loop of the chain. Raise on a knitting needle working thread the required number of loops on the back side of the chain. Subsequently, undo the preliminary cast-on chain and carefully transfer the open loops to the knitting needle.
Note.
When changing colors in a design, cross the threads on the wrong side of the work.
Knitting a tie.
Main detail (butterfly).
Using color A thread, first cast on 32 stitches. Purl 1 row and 1 row facial loops. Carefully unravel the auxiliary thread of the preliminary row and transfer the loops to the second knitting needles. Join in circle = 32 stitches on each pair of circular needles (64 stitches in total).
 1st round: knit according to the counted pattern and repeat 8 loops 8 times in the round.
Complete all 24 rows, then repeat rows 1-24 2 more times. Cut thread C and knit 1 circle with thread A using knit stitches. Hide the remaining threads on the wrong side. Cut thread A leaving a long tail and with front side close the loops with a knitting needle. Lightly steam the finished tie piece.
Central part (node).
With thread A, cast on 18 loops and knit 1 row and purl 1 row (slip the 1st loop without knitting in each row). Then knit according to the counted pattern as follows:
1st r. (RS): Slip 1 stitch, then knit 8 stitches according to the pattern 2 times, k1.
2nd r. (IS): slip 1 st, 8 stitches according to pattern 2 times, purl 1.
Continue in this way until the 24th row. Then knit 1 row with thread A and purl 1 row (slip the 1st loop in each row). Cast off all the loops, leaving a long tail and sew along the strip.
Guided by the image, form a loop from the central part and thread the main part into it. Sew the edges of the central piece from the wrong side. Sew on an elastic band.
Note! The rules of the Domosedka club prohibit the posting of site materials on third-party resources in their entirety. Only announcement is allowed ( short description), photo and direct link to the source. For personal use, you can print any page. Seal sign on top.
The material was prepared and retold from in English Homebody.
Tags: