Knitted rugs sound amazing, but the products turn out to be very funny and attractive. For example, putting a knitted item on the floor yourself helps solve the problem of not having a rug that matches the design of the room. Similar knitted products They look advantageous and cozy in bathrooms and children's rooms. Moreover, the benefits of knitting a floor rug include the ability to get rid of old things - T-shirts, knitted dresses and simply pieces of already useless fabric. Old curtains in in capable hands can quickly turn into figurative motifs.
If you are eager to knit a rug, you should know that a denser fabric is obtained by using a crochet hook. To learn how to crochet rugs yourself, it is suggested complete instructions some models for beginner needlewomen and for experienced craftswomen. Study, fantasize, implement!
About yarn
You should give several recommendations from experts in their field in choosing yarn. In order for the product to last a long time and retain its original appearance, you should give preference to synthetic types of yarn - this is the famous acrylic, but you can also use natural cotton (although it will not retain heat).
It is also necessary to clarify that for crocheting rugs it is better to use thicker threads - this will allow you to create a thicker fabric that is not inferior in retaining heat to hundred
standard fleecy products. For thick thread, hooks No. 5-8 are suitable. It is easy to determine the size of the fabric - it is recommended to knit a sample with a 10x10 cm square from the selected yarn, iron it or wash and dry it. The dimensions of the finished sample are measured and the required number of loops for further knitting.
For knitting, you can use any napkin pattern - using your imagination will turn a simple pattern into an excellent design option.
You can also see:
Models for Beginners
If previously your crocheting was limited to simple scarves or snoods, then you are recommended to start implementing a more useful item with a simple model. There are several models of simple crocheted rugs with diagrams and descriptions.
Square or rectangle
To begin with, it is recommended to use a simple mat shape - a square or rectangle. They can be linked in one piece or using the technique of knitting with motifs - the assembly of motifs determines the final result and design. The following selection of rugs and patterns for their implementation is given:
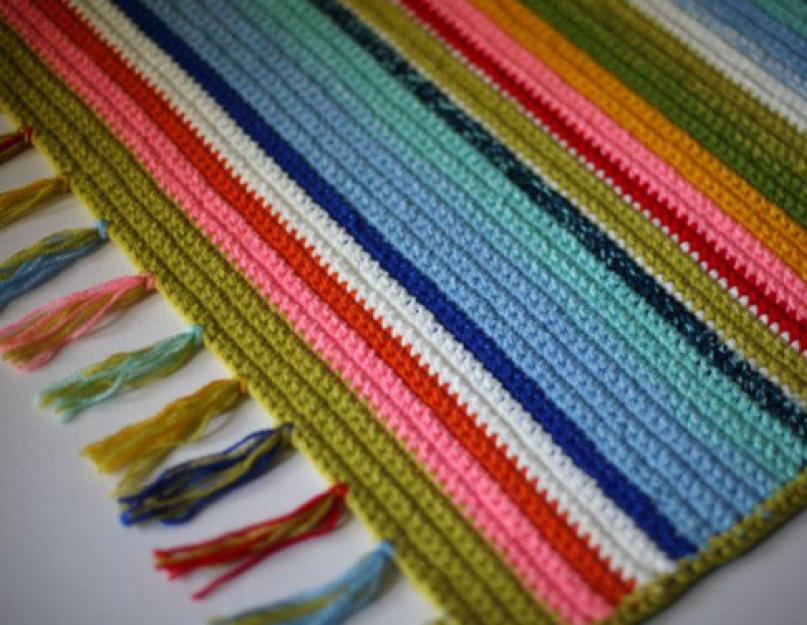
1. , tied by posts without crochet, alternating colors. At the end, the fabric is simply tied with a series of single crochets, tassels are made from the same threads that were used for knitting.
 A track made from leftover yarn is knitted in a similar way - both melange and plain threads are used here. The paths look attractive in the hallways - right at the entrance, that homely and somewhat “country” comfort is created.
  2. Rectangular crochet rugs can be created from simple squares of different colors, which are then simply sewn together with a needle. This is also an excellent product model for beginners, which even experienced knitters can use in the case of quick knitting.
  3. Mat, crocheted double crochet. Individuality and attractiveness are represented by changing colors in a diagonal and staircase sequence. Such products fit perfectly into children's rooms.
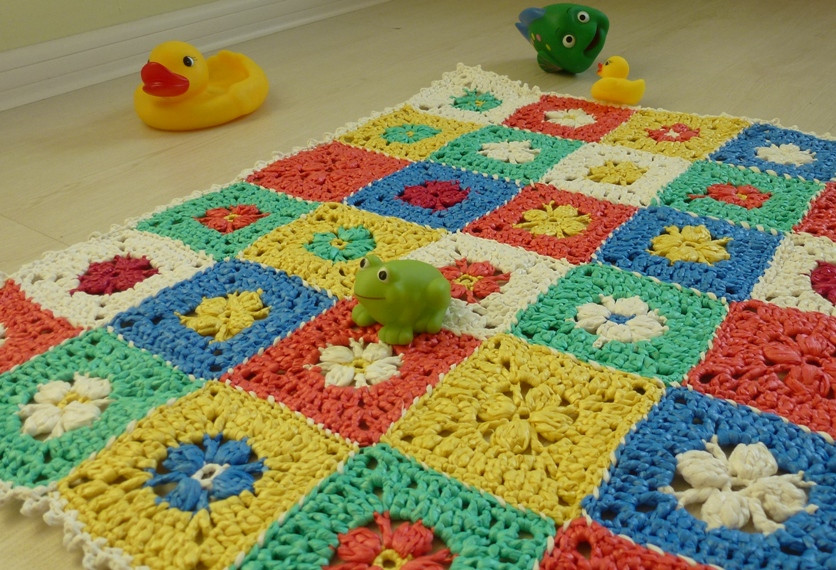
  4. Rugs with motifs using the “granny square” technique - these simple squares, with the replacement of threads of different colors, turn into unique and designer items when you show your imagination. To make crochet rugs using the presented technique, below is a knitting pattern.

 For beginners, there are a huge number of models of rectangular or square products - it is only important to choose a model in accordance with the design of the room.
Round rugs
 Look great in bedrooms near beds. You can also implement a designer model for the kitchen - this is convenient for maintaining cleanliness in the room (you can wash products regularly without fear of fading and damage). Round rugs can be divided into two types - solid and openwork.
Solid rugs round shape- this is knitting a circle more simple pattern, as a result of which the canvas is continuous and rational for its intended use. Here you can also distinguish two subtypes - knitting with simple double crochets or knitting cones. It turns out two completely various options.
Simple fabrics with double crochets are represented by the following selection of products and patterns with descriptions. 


 with cones are more suitable for children's rooms, as well as living rooms, since they are textured and retain heat longer. The following selection of schemes is proposed.


Now we should talk about openwork rugs, which look more like an advantageous design solution. They are easy to implement if you have already been connected before openwork napkins and other similar products. To knit rugs, use the following patterns. 


Today we will learn how to crochet a round rug from old T-shirts with our own hands. Creating such a rug does not require any special skills, so it is suitable for beginners, and the diagram and step by step description The photo will show you how to proceed.
Tools and materials Time: 5-6 hours Difficulty: 6/10
- hook 15 mm;
- 85 g (11 meters) of t-shirt yarn dark blue(cut the clothes into strips 5 cm wide);
- 145 g (23 m) cream T-shirt yarn;
- 200 g (31 meters) of bright blue T-shirt yarn;
- 220 g (37 meters) of yarn from a gray T-shirt;
- 355 g (44 m) of orange t-shirt yarn.
Step-by-step instructions with photos
Looking for a cool crochet rug pattern that is both practical and beautiful? You are on the right track! In our master class you will learn how to crochet a round rug for your home in just six steps. To do this, you only need a large hook and several old T-shirts in different shades.

Notes: to make a rug, select plain T-shirt models - this will make it look much more interesting and cut them into strips strictly of the same width - 5 cm, otherwise your rug will come out crooked.
Abbreviations:
- v.p. – air loop;
- connection st - connecting column, half single crochet;
- dc - double crochet;
- s2n – double crochet stitch.
Step 1: knitting the middle
Start with dark blue yarn. 5 ch, conn. st. in the first ch, join into a circle. 2 v.p. (count as the first double crochet), 9 d2h in the ring (10 loops).

Step 2: knit the second row
2 ch, d2n in base ch, 2 d2n in each loop of the circle (20 loops).

Step 3: change the thread color
Connect cream colored yarn.
- 2 ch, d2n in base ch. 1 d2n in next stitch, *, repeat* 8 times. Connection Art. for joining (30 loops).
- 2 ch, d2n in base ch. 1 d2n in each of the next two loops, *, repeat* 8 times, conn.st. for joining (40 loops).

Step 4: Add Blue Yarn
Switch to a bright blue yarn.
- 2 ch, d2n in base ch. 1 d2n in each of the next 3 stitches, *, repeat* 8 times, conn. st for joining (50 loops).
- 2 ch, d2n in base ch. 1 d2d in each of next 4 stitches, *, repeat* 8 times, join st to join (60 stitches).

Step 5: take orange color
Switch to orange.
- 2 ch, d2n in base ch. 1 d2d in each of next 5 sts, *, repeat* 8 times, sp to join (70 sts).
- 2 ch, d2n in base ch. 1 d2d in each of next 6 stitches, *, repeat* 8 times, join st to join (80 stitches).

Step 6: make the gray edging
Create gray borders.
- Ch 1, dc in base ch, 1 dc in each of next 7 stitches, *, repeat* 8 times, conn. Art. for joining (90 loops).
- Ch 1, dc in base ch, 1 dc in each of next 8 stitches, *, repeat* 8 times, conn. Art. for joining (100 loops).
Fasten off the yarn.

A wonderful crocheted round rug is ready! All you have to do is place it at the front door next to your boots or slippers.
We hope you liked our master class with diagram and description? And if you have any questions or suggestions, write to us in the comments and we will be happy to answer them! We wish you good luck!

Soft rug for home
There is a difference between a house and a dwelling. It happens that you have bought stylish furniture and modern appliances, but there is no feeling of Home, with a capital H. A special atmosphere, a cozy and warm aura, helps to create things dear to the heart. Crafts have a special charm hand made. Here, for example, are rugs: stores are full of an abundance of all kinds of rugs.
But it’s much cheaper and more interesting to make an attribute of home warmth and comfort with your own hands. Creative craftswomen have invented many ways to make such functional products, from classic knitting crochet to experimenting with old things. We offer several interesting lessons on how to knit a rug with your own hands.
Almost every girl, thanks detailed lessons from experienced needlewomen, can learn to knit carpets with his own hands. The science is not at all complicated, but it requires perseverance and patience. A rug crocheted or woven from old T-shirts will become a “highlight” of your home interior. The product can be knitted from any yarn, knitted ribbons, many even use a strong clothesline. There are several ways to make rugs, the most popular technique is crocheting. We offer interesting master classes for beginner craftswomen.
 You can knit this rug yourself
 Simple round rug
A beautiful one-piece product can be placed as a welcome addition at the doorstep, in the bathroom, living room or children's room. To make it easier for a beginner to cope with the job, it will take a little basic knowledge, crochet skills and the ability to create simple elements.
 Children's rug in the shape of a bear
 Let's get started:
- We collect three air loops, from which we form a central ring-base. The yarn is selected according to this principle: the thinner the thread, the more you will need air loops for the base. We use a connecting loop to close the ring, which will be the center.
- Moving on to the second row, we will knit two stitches in each loop. If we knit stitches without a crochet, the structure of the product will be more rigid and dense, with a double crochet it will be looser, but knitting in this way is much faster. The choice of technique remains with the craftswoman; it depends on how she sees the future product.
- In the third row, you need to knit two stitches in the first three loops, then one in the next loop. A similar algorithm continues until the end of the row.
- In the fourth row, using a similar technique, we knit two stitches in the first two loops, then one, and so on. In this way, we can achieve a perfectly round, uniformly expanding shape.
- When the knitting process is completed, fasten the working thread and then iron it from the wrong side. This way the rug will not bulge.
Round rugs for home


IN the simplest technique The product is knitted not only round, but also oval, square or any other shape. To make the rug look more elegant, you can decorate the edge with thread pompoms or fringe.
Knitting a round rug
Star rug
Figured rugs bring coziness to the interior, make it more aesthetically pleasing, and emphasize the refined and refined taste of the hostess - the keeper of the hearth. To create curly crocheted floor mats with your own hands, you will need yarn and a hook.
 Star floor mat
 Many people use several shades of yarn at the same time, so the product will have a bright and original look.
We crochet a rug in the shape of a five-pointed star:
- We will start working from the center of the circle. A chain consisting of five air loops is assembled, which is closed into a ring. Then we move on to knitting each individual row.
- We knit the first one according to this pattern: three chain stitches, then two double crochets over the first loop, then two chain loops, three double crochets, finishing with two chain crochets. We knit in a similar way five times and the result is a pentagon.
- The second row is knitted according to the algorithm: we cast on three chain stitches, two double crochets over the first stitch, then two chain loops, three double crochets, and complete the row with one chain crochet. Using a simple technique, the product “grows” in breadth, taking on the shape of a regular pentagon.
- The remaining elements are knitted according to the standard pattern in the round until we get the product of the size we need. We tie each tip of the star separately at the end.
Such an unusual rug can be knitted for a nursery, living room or bedroom, or you can get creative by using this technique to make not only a rug, but also an elegant bedspread and decorative pillow.
How to crochet a rug
Creative ways to make rugs
For everyone who does not know the art of crocheting, there is good news: you can make an unusual rug from knitwear, scraps or threads using loin mesh. The material for production can be old knitted items, unnecessary scraps of fabric, or fleecy yarn. We offer several lessons on making wicker rugs.
 Crocheted knitted rug
 Rug-pigtail
Dense, with unusual texture The rug will decorate any room in a country house or in a city apartment. If you make a backing for it from a water-repellent material, you can safely lay it in a bathroom, bathhouse or shower room. Let's take knitwear in two different colors, scissors, a sewing machine and pins.
 Cable braided rug
 Work algorithm:
- First of all, let's make yarn from knitwear. The material for knitting yarn can be not only old T-shirts, but also sheets or simply pieces of fabric. To do this, simply cut into ribbons and stretch them a little in length so that the flap curls into a tube.
- From the stripes different colors let's weave a lot of braids. Using different color combinations you can achieve any effect and create an unusual pattern. The braids should be the same length.
- For the base, take a thick fabric, fold it in half, sew it on the side and turn it inside out. We lay out the braids one at a time on top and sew each one with a zigzag seam. We try not to stretch the braids, otherwise the rug may eventually become deformed.
- We fix the edges of the work with straight lines and trim off the excess. It turned out simple and original rug with a cheerful design.
By playing with color, fabric texture, types of braiding and yarn thickness, you can create practical and original home comfort attributes with your own hands from the simplest materials.
Wicker rug
To weave a beautiful path for the corridor, you need to make a wooden frame and put nails on the sides. To work, you only need yarn, preferably from knitwear. The brighter the shades, the more fun and cheerful the rug will be.
 A rug made from old things
 The operating instructions are as follows:
- We stretch strips of material along the frame. It is better to use yarn of a neutral shade, this will be the basis.
- We begin to weave working threads across the main threads. The principle of weaving is simple - first we pull the thread above the warp, and then under it, and so on until the end of the row.
- At the end of the row, we pull the thread under the warp, turn it and move in the reverse order.
Variety of floor mats


As you can see, weaving is the simplest. As we work, we move the finished rows up to make the weaving more dense. If working thread ran out or need to add new color, just tie one end to the other and hide the knots on the wrong side. We remove the finished product from the frame, smooth it out and determine its place in the interior. In this way, you can knit a long path for a corridor by simply sewing identical elements together. In a similar way, you can make a carpet from durable yarn or clothesline.
There are many techniques for creating carpets at home. These are complex openwork, crocheted, and the simplest patchwork technique, and original japanese knitting. Choose yours and get creative by decorating your home and your daily life original, warm and stylish hand made crafts.
Knitted rugs sound amazing, but the products turn out to be very funny and attractive. For example, putting a knitted item on the floor yourself helps solve the problem of not having a rug that matches the design of the room. Such knitted products look advantageous and cozy in bathrooms and children's rooms. Moreover, the benefits of knitting a floor rug include the ability to get rid of old things - T-shirts, knitted dresses and simply pieces of already useless fabric. In skillful hands, old curtains can quickly turn into cozy rugs with figured motifs.
If you are eager to knit a rug, you should know that a denser fabric is obtained by using a crochet hook. To learn how to crochet rugs yourself, we offer complete instructions for some models for beginner needlewomen and experienced craftswomen. Study, fantasize, implement!
About yarn
You should give several recommendations from experts in their field in choosing yarn. In order for the product to last a long time and retain its original appearance, you should give preference to synthetic types of yarn - this is the famous acrylic, but you can also use natural cotton (although it will not retain heat).
It is also necessary to clarify that for crocheting rugs it is better to use thicker threads - this will allow you to create a thicker fabric that is not inferior in retaining heat to standard fleecy products. For thick thread, hooks No. 5-8 are suitable. It is easy to determine the size of the fabric - it is recommended to knit a sample with a 10x10 cm square from the selected yarn, iron it or wash and dry it. The dimensions of the finished sample are measured and the required number of loops for further knitting is determined.
For knitting, you can use any napkin pattern - using your imagination will turn a simple pattern into an excellent design option.
Models for Beginners
If previously your crocheting was limited to simple scarves or snoods, then you are recommended to start implementing a more useful item with a simple model. There are several models of simple crocheted rugs with diagrams and descriptions.
Square or rectangle

To begin with, it is recommended to use a simple mat shape - a square or rectangle. They can be knitted in a single fabric or using the knitting technique with motifs - the assembly of motifs determines the final result and design. The following selection of rugs and patterns for their implementation is given:
- A simple rectangular rug crocheted in single crochets in alternating colors. At the end, the fabric is simply tied with a series of single crochets, tassels are made from the same threads that were used for knitting.
 A track made from leftover yarn is knitted in a similar way - both melange and plain threads are used here. The paths look attractive in the hallways - right at the entrance, that homely and somewhat “country” comfort is created.
- Rectangular crochet rugs can be created from simple squares of different colors, which are then simply sewn together with a needle. This is also an excellent product model for beginners, which even experienced knitters can use in the case of quick knitting.

- Rug crocheted with double crochets. Individuality and attractiveness are represented by changing colors in a diagonal and staircase sequence. Such products fit perfectly into children's rooms.

- Rugs with motifs using the “granny square” technique - these simple squares, with the replacement of threads of different colors, turn into unique and designer items when you show your imagination. To make crochet rugs using the presented technique, below is a knitting pattern.


For beginners, there are a huge number of models of rectangular or square products - it is only important to choose a model in accordance with the design of the room.
Round rugs

Round crochet rugs look great in bedrooms near beds. You can also implement a designer model for the kitchen - this is convenient for maintaining cleanliness in the room (you can wash products regularly without fear of fading and damage). Round rugs can be divided into two types - solid and openwork.
Solid round rugs are knitting a circle with a simpler pattern, resulting in a continuous and rational fabric for its intended use. Here you can also distinguish two subtypes - knitting with simple double crochets or knitting cones. It turns out two completely different options.
Simple fabrics with double crochets are represented by the following selection of products and patterns with descriptions. 


Rugs with cones are more suitable for children's rooms, as well as living rooms, because they are textured and retain heat longer. The following selection of schemes is proposed. 


Now we should talk about openwork rugs, which look more like an advantageous design solution. They are easy to implement if you have previously knitted openwork napkins and other similar products. To knit rugs, use the following patterns. 


Oval rugs
Oval crocheted rugs are crocheted for elongated rooms, as well as for living rooms where coverage is needed in the seating area. For knitting, you can use the following selection of patterns.


From T-shirts
Knitted T-shirts often accumulate in huge quantities - it’s a shame to throw them away, but they are no longer suitable for further wear, or are simply tired of them. To get rid of the T-shirt stock, women's tunics and other things, you can resort to knitting rugs. To do this, old things are simply cut into thin strips and tied together into a long thread.
To crochet rugs from T-shirts, you can use any of the above patterns. In the absence of a large amount of household material, you can purchase a special knitting thread. Sometimes craftswomen simply purchase knitted fabric of a suitable color and cut it into thin strips - this creates an interesting and very economical design solution.


Japanese crochet rug


Japanese rugs only look complex in appearance, but upon careful analysis of the crochet technique, it turns out that this is the usual knitting of hollow circles that are connected in a certain sequence. For more simple option it is enough to use a model of 4 circles, which were later “filled” with a canvas of double crochets. 

You can also resort to knitting such a carpet - a simple circle is crocheted in the middle, and then a chain of hollow circles characteristic of the Japanese motif is sewn to it, which in turn are connected to each other by a standard weave. Attaching the chain can be done with a needle and thread - it is only important to constantly try on the length of the chain to the initially specified middle circle. 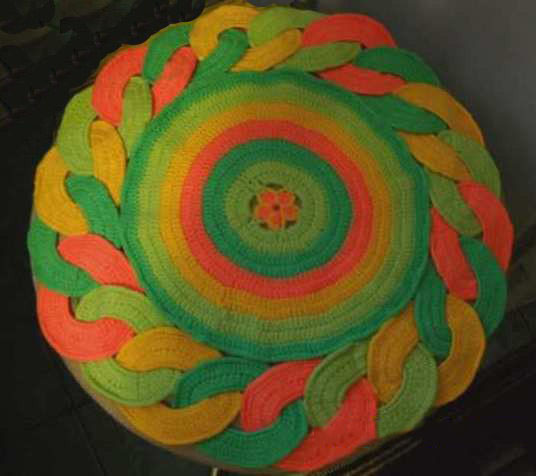
For experienced craftswomen
Experienced craftswomen can choose to crochet more complex patterns and variations, where most techniques use stitches that are difficult to knit. It should also be noted that complex patterns are compatible - pineapples are connected to cones, and cones are connected to floral motifs and so on. But you should still present several models for crocheting rugs yourself.
Rug based on the "Grand" napkin

You can easily make carpets from crocheted napkin patterns, and here, if necessary, you can increase the size of the future canvas by combining or “wedging” several rows with certain patterns. So the “Pineapple Song” napkin inspired experienced craftswomen to knit based on the existing pattern of the rug, called “Grand”. New model fits perfectly into the interior design of Provence, Rococo, Baroque, Classicism, more luxurious gothic style or empire style There is nothing complicated in knitting it - the main thing is to use the given patterns with descriptions:

The presented model is recommended for independent execution in white, but if necessary, more attractive shades of thread that suit the color scheme of the room are also taken into account. The finished rug is simply soaked in cool water and laid out on a cloth - or directly on the floor until completely dry.
Pineapple openwork

Next, the rug in question becomes convenient for implementation by those craftswomen who cannot independently enlarge the patterns to the required dimensions of the canvas. An openwork rug with additional pineapples can be knitted in two ways.
The first method involves starting knitting immediately according to pattern 2, where the required number of air loops is cast, but taking into account the proposed rapport. Further knitting is carried out according to the pattern without deviations. 
The second method involves increasing the size of the rug - they start knitting according to pattern 1 by the required amount, and only then move on to pattern 2, presented above. It turns out that openwork “fans” from a chain of air loops smoothly transition to double crochets in the middle part. In this way, you can “adjust” the dimensions of the finished canvas. 
Simple but attractive blue lace

An openwork rug can be knitted using a simpler pattern - here it is only important to correctly arrange the petals from ordinary double crochets. So, it is proposed to use the following diagram, which will help to create a very attractive and versatile crochet rug model - change the shade, and you will get a completely different version of the fabric.
Rugs from bags


Rugs from bags are knitted using the same technique as from T-shirts and knitted fabrics. Here you will also need to cut long strips from bags and use a simpler pattern for crocheting a rug. It is not recommended to use openwork pattern, because the joints of packet threads may become accessible to the public.
Of course, rugs made from bags are not used everywhere - they can be laid in the countryside, since such use will eliminate the hassle of cleaning the room from dirt and garden soil. But skilled needlewomen easily use bundled threads to knit a rug for the hallway of an apartment - it’s both convenient and stylish. Below is a full video of a master class on knitting a similar product.
Children's variations
 Children prefer their own rooms with appropriate furnishings - everything should be bright and fabulous. Therefore, the task of parents is to take into account every little detail. If you previously did not take care of purchasing furniture or textiles for the children's room with appropriate prints, then today you can easily correct the situation:
- First, buy curtains with a child's pattern for your child's room.
- Secondly, replace the existing dark blanket on the bed with a bright one children's version.
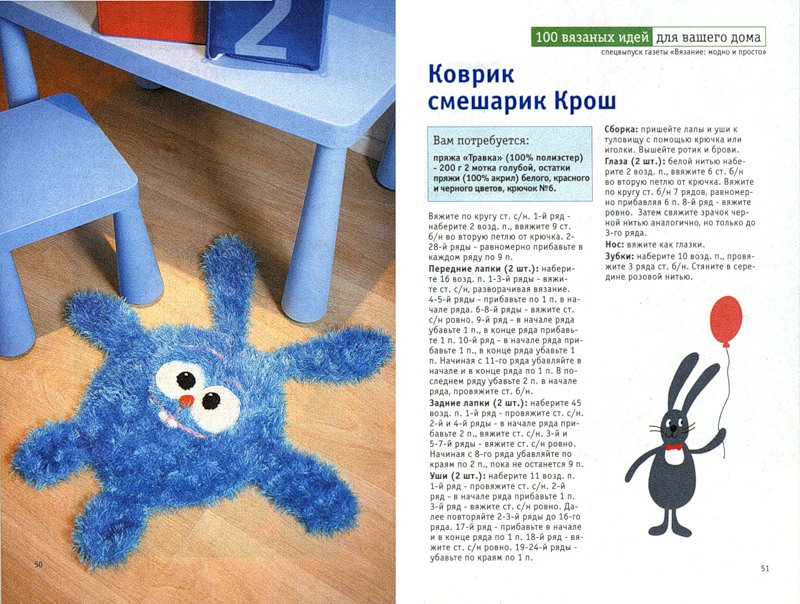
- Third, tie the rug! But not a simple one, but a special one - in the form of an animal.
Do you think knitting rugs in the shape of animals is a difficult task? Not at all - here only circles, ovals, squares, hexagons, rectangles and other individually connected figures are correctly assembled into a single composition
.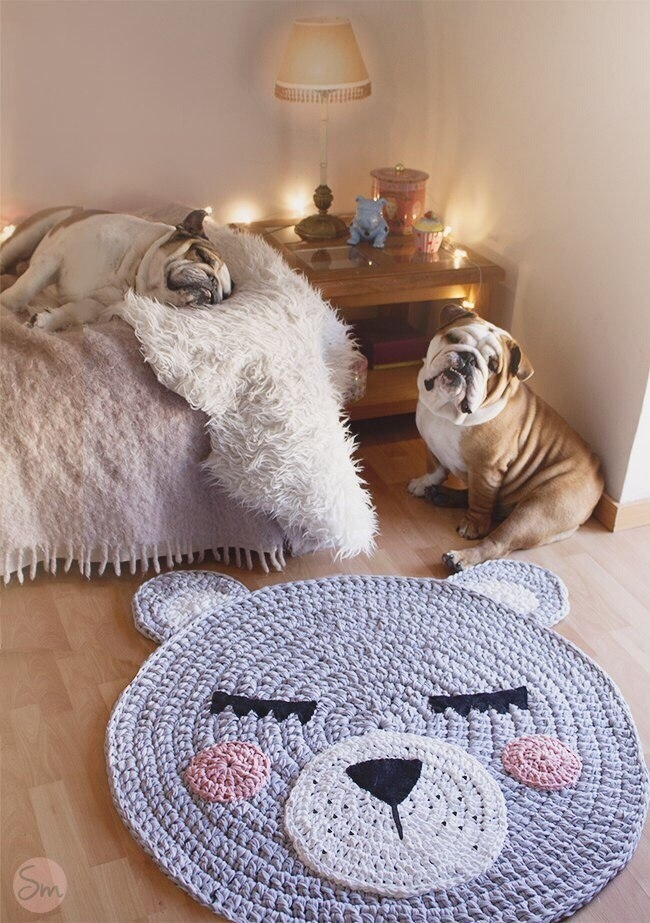
For example, you can see how to knit a simple rug in the shape of a bear:
- tie a bear's face - a simple circle suitable size gray shade;
- bear ears – 2 semicircles of white and gray;
- bear's nose - circle white, and the triangle is cut out of black suede (later it will be sewn on);
- bear cheeks – 2 circles of pink shade;
- eyelashes - 2 suede parts, which are also later sewn on in the designated places.
The rest of the children's rugs are knitted using the same principle - use your imagination and don't look for complications in the patterns! Everything ingenious is simple!


Bathroom rugs
A crocheted bath rug can be the key point of the entire design. So, a set of a rug in the toilet, in the bathroom, a “seat” for the toilet and an “organizer” for toilet paper can outshine expensive tiles or a super functional bathroom. Moreover, similar knitted rugs for the bathroom and toilet become a great gift for housewarming. Below we offer the most interesting crocheted rugs for the bathroom and toilet.
Whale

A knitted bathroom rug can be made in the shape of a whale, which is knitted quite simply:

Finish knitting the whale by knitting and attaching the eye, as well as the line of the waterfowl's mouth. You can separately give the whale a bow and splashes - let it be soft and cute.
Owls


Enough interesting option- This is a crocheted owl bath mat. Such products attract craftswomen with their extraordinary design, especially if a whole set is knitted, as well as ease of implementation. Here you should follow the following sequence:

You can use a slightly different option for tying owls for the toilet and bathroom. A complete knitting pattern is also provided. 

For knitting rugs in the bathroom and toilet it is better to use natural species yarn Adding synthetic materials can cause the rug to slide on your bathroom tiles. The same fact does not allow you to create a bathroom rug using a crochet hook made from bags - it is dangerous.
Below is a selection of sets of crocheted rugs for the bathroom and toilet - simpler variations for beginners and experienced ones. Simple circuits contribute to the formation of a masterpiece. 


Crocheted rugs are not only simple and beautiful, but also stylish, fashionable, enchanting! Yes, yes, all the invited guests will be delighted - after all, it’s not always possible to see a lace fabric on the floor. And if the rug is a decorative element, then be prepared for it to take on all the admiring glances and dominant notes.
Recently, it has become fashionable to make decorations with your own hands. Such works are always exclusive, fit perfectly into the interior, and also create a cozy atmosphere. Crocheting floor rugs is not only a pleasant activity, but also creates chic products for your home. These rugs are very beautiful and easy to make. They can be made not from yarn, but from scraps of fabric, rope or even ordinary bags.
Simple crocheted rugs for beginner needlewomen
Girls who are just learning to knit can already create their first masterpiece. To do this, you need to prepare thick yarn, for example wool blend, acrylic or cotton, and a hook with the corresponding number.
A rectangular floor product can be knitted using the following pattern:
1st row. We make double crochets on a chain. Their length should match the length of the rug. Next, the product needs to be turned over to the wrong side.
2nd row. We make single crochets under the front wall of the loop. Turn the canvas over again.
The 3rd row should be knitted under both walls of the loop with and without a crochet.
We perform the 4th row in the same way as the 2nd.
The 5th row is knitted with double crochets under back wall loops.
Next, the pattern is repeated from the 2nd to the 5th row.
A round floor rug can be crocheted using the following pattern. Knitting consists of stitches under the back wall of the loop.
Openwork rug (55 cm): video master class
Round crocheted fabric rugs or “grandmother’s rug”
To create this product we will need old knitted or linen items. The color scheme can be very diverse. For example, different tones of the same color or several bright colors. Before starting work, we need to make yarn. To do this, we cut things into strips approximately 3 cm wide. The strips need to be sewn together or tied, and then rolled into a ball. The hook must be twice as thick as the thread itself. The pattern of this rug is suitable for both experienced needlewomen and beginners.
First you need to cast on 3 air loops and connect them in a circle. Then knit 6 single crochets into these loops. After this, the circle needs to be divided into 6 parts and in each row add 6 single crochets. You will get the 1st row - 6 columns, 2nd row - 12 columns, 3rd row - 24 columns, etc. To make the rug embossed, the posts need to be knitted through the back wall of the loop. Below is a diagram of the relief knitting method.
The finished rug can be placed on the floor.
Openwork oval rug: video master class
Crocheting a Japanese-style round floor mat for beginners
This type of rug is easy to make and has excellent results. The yarn should not be very thick and should be crocheted No. 6-8. Color range It's better to choose a brighter one. First you need to knit the round part of the product. To do this, we collect a chain of 6 air loops, and then close it into a ring.
Then we knit 7 stitches with 2 double crochets, each of which starts with 3 air loops for lifting. The 2nd row should consist of 5 unfinished stitches with two double crochets knitted together, between which you need to make 3 air loops. The number of air loops can be adjusted depending on the thickness of the thread. In the 3rd and 4th rows we knit 2 stitches of four unfinished double crochets, knitted together under the chain loops of the previous row. The 5th row is a chain of air loops, which must be attached to the previous row with a half-column.
Next we need to knit rings of any size. We collect air loops in a chain and close the ring with a half-column. The diameter of the ring is equal to the length of the chain. Then we tie the ring with a double crochet stitch. The first ring is ready. We immediately begin knitting the second one. To do this, we need to collect a chain of air loops, thread it into the first ring and only then connect the first and last loops with a half-column. Below are diagrams where this is clearly depicted. The next ring will be threaded into the second circle, etc. The last ring must be connected to the second to last and to the first. Rings can be sewn to the circle or attached while knitting.
Ring connection diagram
Children's rug made of squares: video master class
Crocheted rug made from plastic bags
This unusual use of simple bags became a real discovery for housewives. Linens made from bags are usually placed on the floor of a bathroom, kitchen or toilet because they are moisture resistant. If water gets in, just shake it off and dry the product. Knitting such a rug is very simple and it will not be a problem even for beginners. So, you need to take about 4 dozen garbage bags and cut them into strips about 3 cm wide. The strips need to be sewn together or glued together with a warm iron, ironing them through the fabric. Roll the finished thread into a ball. Knitting must be done with crochet number 4.
We collect 12 air loops and 3 lifting air loops. From the 4th loop from the edge of the chain, knit 5 double crochets. Then from each chain stitch, knit 1 double crochet 10 times. Turn the product and knit the other side in the same way, thereby forming an oval. The series should be closed connecting post. The second and subsequent rows must be knitted according to the pattern. The result will be an oval canvas. Its central part will be straight, and the edges will widen and be rounded, because they made increases on semicircles.
Asterisk: video master class
Loin mesh floor mat for beginners