How to refresh a boring suit, make something made from ordinary fabric exclusive, or turn a standard dress into a couture outfit that arouses interested glances?
For many centuries, embroidery on clothing has remained popular among people of different social status. Styles change, new technologies appear, but embroidered products never go out of fashion. Today we will tell you how to decorate new things and refresh old ones with the help of embroidery, and we will also teach needlewomen to turn their work into designer models, even without their own embroidery machine.
What technique is relevant for embroidering clothes?
You can count dozens of embroidery techniques - from cross stitch and satin stitch to cutwork and gold embroidery. It is impossible to say which one is the most relevant; the choice depends on the design direction and type of fabric. For example, a cross would be appropriate on a summer sundress made of cotton or linen, but an office suit and evening dress will require other techniques.

It is easier to embroider with your own hands on cotton, linen or wool fabric with a simple weave. The most difficult thing to work with is knitwear and other elastic materials. To decorate clothes you can use threads, soutache, beads, ribbons, and rhinestones.
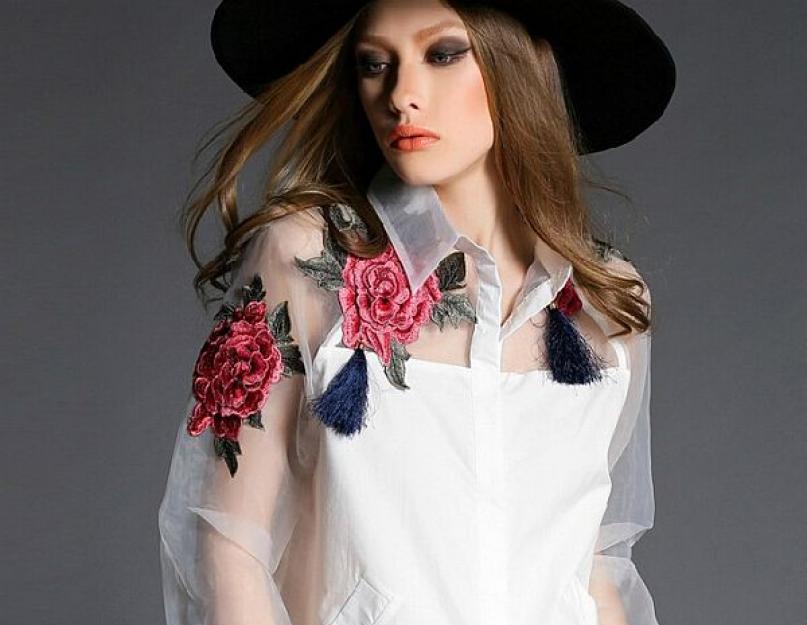
Even the most boring white blouse, decorated with an embroidered flower or leaf, is transformed and turned into a new one, in which colleagues are unlikely to recognize last year’s purchase at a sale. With the help of embroidery, you can update an item, change its design, and even significantly increase the initial cost.

Embroidery of flowers, floral patterns, abstract patterns, and national motifs on clothes is always in fashion. If we are talking about children's clothing, then fairy-tale characters, animals, recognizable figures - the sun, a flower, a ball - are appropriate here. You can take the baby's name as a basis, this will help you learn the letters.
Handmade, of course, is valued, but today few people would agree to spend several weeks creating a pattern, unless, of course, this is a favorite hobby. Small patterns can be embroidered with beads or thread, but large patterns and complex images are increasingly trusted to machines. This is ten times faster.


Machine embroidery – quick results and a new trend
Embroidery machines were invented a long time ago, but whereas previously they were controlled by people, today patterns on fabric appear under the watchful control of computer programs. Smart machines create realistic three-dimensional pictures in which it is difficult to find flaws.
Machine embroidery on clothes from afar can be mistaken for an image, obtained by weaving during the fabric production process. The realistic thread pattern remains unchanged after many washes and does not fade.

Embroidered decor can be used on literally any clothing. It will decorate:
- business suit;
- casual clothes;
- evening dresses;
- wedding dress;
- coat, jacket;
- children's clothes.
Fashionable embroidery is appropriate not only on clothes, but also in accessories - embroidered bags, belts, and hats look stylish. There is a huge scope for using machine embroidery in the interior - curtains, pillows, paintings, bedspreads, tablecloths, bed linen.


Unlike photo printing and other methods of applying an image, embroidery can be used to decorate almost all types of fabrics, including knitwear.

A trick for seamstresses - how to create a designer item
If you know how to sew, but do not have the skill of a professional to bring a very complex style to life, adopt this little trick. If even before sewing decorate details machine embroidery, the item will turn out unique, even if you choose the simplest model of a skirt, dress or poncho.
You can decorate the main and small details of clothing with embroidery elements: collars, pockets, cuffs or sleeves of a blouse. A shirt with embroidered fronts looks impressive. Dresses and skirts enlivened with embroidered patterns are always in fashion.

Handmade does not suit all design styles. You can order embroidery on fabric or cut in a workshop that has embroidery machines in its arsenal. With the help of such machines, the drawing is neat and realistic. You can take anything as a motive - your photographs, pictures from magazines, images drawn with your own hands.

Embroidery on details is often used by professional seamstresses and novice craftswomen. Buy a piece of denim, cut it into a simple skirt or bag, decorate it with embroidered motifs - and now you have an exclusive item that passers-by will admire with admiration.
If you sew to order, then develop your logo and decorate things with it - soon your brand will be “recognized by sight.” You can order many logos in advance and simply sew them onto your work from the inside out. This will increase your status among customers.

Where to embroider clothes beautifully and quickly
Infected by the idea of owning an exclusive item, but don’t have time to sit with a needle and hoop? Then you need to contact a company that does custom embroidery on clothes. To get an idea of what services such workshops provide, we contacted the Golden Thread Production and Commercial Company.
What services can you get?
We have been specializing in high-quality computer embroidery of any complexity for 10 years - from simple logos to luxurious paintings. From us you can order embroidery and appliques on clothes for adults and children, bed linen, bedspreads, curtains, pillows. We are ready to decorate any textile with realistic and high-quality embroidery. We have a huge selection of images for every taste!

What if the client wants his own picture or wants to make changes to the template you have chosen?
Please! We will take your picture as a basis - computer embroidery machines can cope with any complexity. We have designers who will advise and help you decide on the motive.

What do customers order most often today?
Embroidery on everyday clothes is in great demand - they decorate ready-made outfits and cut details. Over the past year, the number of brides wanting to get married in an embroidered dress has increased. Embroidery of family coats of arms is gaining popularity, connecting all things in the house - linen, bathrobes, slippers, napkins, tablecloths. They often order embroidery on sofa cushions, paintings for themselves and as gifts.
Companies order branded T-shirts, caps, and jackets. We embroider appliqués for needlewomen, which they then sew onto their products.
They often ask save an expensive item. For example, a stain does not wash off or a “catch” has formed in a visible place. A little imagination of the designer and the deficiency won’t even leave a trace on clothes or home textiles!

And how long do embroidered items last?
We use threads that do not fade or fade in the sun, so the lifespan of clothing depends only on the source material and its overall quality. Items can be washed in a machine - this will not affect the embroidered motifs in any way.
As you can see, all are appropriate for clothing decoration. Even on the most formal suit there is room for an embroidered motif, don’t be afraid of variety and experimentation!
Clothing decorated with embroidery takes on a completely different elegance, significance, and high class. You can create such decor not only with your own hands, but also with the help of modern sewing equipment with special programs. This unique technique allows you to transform the design you have chosen and adapt it to be applied to fabric. But our article is more devoted to handmade work, so you will learn how embroidery appears on clothes, how to embroider with a cross or satin stitch. It is also easy to prepare diagrams and drawings for this with your own hands.
Embroidery on clothes using satin stitch
Now we will tell you in more detail how to do do-it-yourself satin stitch embroidery on clothes.
Important! It is better to use a knitted sweater as an example. The appliqué method is ideal for this purpose and goes well with this embroidery method.
First of all, find a suitable circuit or make it yourself.
To work you will need the following:
- Fabric for applique embroidery.
- Pencil for creating designs on fabric.
- Floss threads, the color of which must match the indicated shades in the pattern.
- Scissors.
- Hoop.

Perform embroidery according to these instructions:
- First, print out a drawing of your circuit.
- Now transfer this design onto the fabric. It is best to use bottom lighting for this. Place the diagram on the glass and place the fabric on top. Place the lamp under glass and transfer the diagram onto the material using a marker.
- Stretch the finished pattern using a hoop, then secure it.
- Depending on the desired volume of the pattern, insert the required number of threads into the needle.
- Embroider the design using satin stitch, following each line and all the outlines of the prepared pattern.
- Perform a one-sided satin stitch so that the volume is obtained on the front side, and only the stitches are visible on the back.
- After completing the work, remove the hoop and cut off the excess fabric. Be sure to leave a strip to make it easier to connect the applique to the garment along the edge using wide stitches.
Important! It is better to embroider appliqués with floss threads, because they withstand repeated washings well due to pre-treatment.
This embroidery method is ideal directly for bulky knitted items, because doing such work on knitwear will be inconvenient. An applique sewn to a sweater will really decorate and transform it. Summer items do not require the use of appliques, since they are made from thin fabrics, so it is enough to take a ready-made item or fabric and embroider the design you like using a pattern, threads, or a hoop.
Cross stitch embroidery on clothes
If you are wondering how to do cross stitch embroidery on clothes, then keep in mind that its implementation requires compliance with certain rules and nuances. It is customary to embroider with a cross specifically on summer clothes, in particular on sleeves, pockets, and collars. For this purpose, light ornaments are chosen, parts of which are repeated from time to time.
Important! Be sure to wash the fabric before cutting to prevent warping and shrinkage. It is better to start embroidering on clothes at the moment when there are already patterns and cutting lines on it.
You will need to follow these steps to get original cross stitch on your favorite jeans:
- Prepare a diagram for embroidering a dragon, all the necessary materials and tools. We will use white threads and canvas.
- Baste the canvas to the jeans, embroider with white thread according to the pattern.
- Place the embroidered design in water for a while, leave it in it for 10 minutes so that the canvas dissolves and only the threads remain.
Important! There is another version of the canvas - an invoice. It is made from thick threads and is distinguished by stiffer and larger cells arranged in a strict order. It is also basted to the fabric, then the design is embroidered, and it is removed using tweezers.
Clothing with cross stitch looks very stylish, elegant, fashionable, and is in great demand.
Embroidery of floral pattern with ribbons
Now you will learn how to do ribbon embroidery on clothes with your own hands. The master class given in this section is devoted to the use of silk ribbons to decorate the necks of knitted clothes.
But before you get started, read some useful tips:
- Ribbon embroidery should be neat on both sides.
- Transitions cannot be made using ribbons. That is, if you have embroidered one flower, then immediately fasten the ribbon and only then secure the ribbon separately for the new flower.
- When finished, be sure to cover the backside with lining fabric.
Important! Do not forget that products with such decor can only be washed inside out.
Also, before doing embroidery on clothes, prepare the necessary tools and materials for work:
- Schemes. If desired, they can be enlarged and even divided, this is especially true in cases where the embroidery will be done on clothes with a round neckline.
- Beautiful silk ribbons in green, olive, pink, sand, peach, blue, light blue.
- Sharp scissors.
- A regular needle and a needle with a wide eye.
- Beads in several shades of pink.
- Monofilament.

- Enlarge the diagrams to the required size, cut them, and transfer them to clothing.
- First of all, embroider large flowers, which will consist of 6 petals. Use pink ribbon for this and make loop stitches. Using beads, additionally secure the petals.
- Embroider ruffled flowers in light blue. Take a blue ribbon and mark it with floss. As soon as the assembled ribbon reaches the desired length, pass it to the wrong side, and on the front side, fix the required arrangement of the petals with thread.
- Create a core from the peach ribbon using French knots.
- Next, make small inflorescences with a sand-colored ribbon. Make three loops, then decorate them with French knots in one twist.
- Take a white ribbon and make loose French knots of different sizes, that is, with two and three twists.
- Decorate the core of large flowers with small pink knots.
- Make stems from the green ribbon using straight stitches, and leaves from ribbon stitches. Make a few stitches to create a charming openwork branch.
- Now make small flowers and buds from the blue ribbon. Use a stitch called “lazy daisy” for this. The flower will consist of five stitches, the bud - of one, two or three.
- Don't forget to make cups for the buds using the same stitch and olive-colored ribbon. Use twisted stitches to make the stems.
- Decorate your clothes with branches of roses. The flowers are made from French knots of pink and peach ribbon, the stems from twisted stitches in green.
Do-it-yourself embroidery on clothes (patterns)
Embroidery on clothes has not lost its relevance for many centuries. It didn’t matter what class a person was, everyone was sure to have clothes with embroidery. And particularly skilled craftswomen decorated the outfits of the rich class with their own hands, while remaining in modest embroidered clothes themselves.
True, initially hand embroidery not only decorated clothes, it was also given protective significance, but over the years the aesthetics of perceiving clothes with embroidery came to the fore. Embroidered clothing, regardless of whether it has a brand label or logo on it or not, is always original. And it doesn’t matter what technique your outfit is decorated with - cross stitch, satin stitch, stem stitch, cutwork... - the main thing is how it’s done. 


First steps in embroidery
Decide on clothes. Practice your skills. For example, with a cross on cotton T-shirts, pants, shirts... They are convenient for the first work experience and are not the most expensive.
Select the decoration area. If this is a shirt, this is the best place for a personal logo (embroidery can also be regarded as a sign of your exclusive work):
- gate;
- cuffs;
- pocket;
- pockets;
- belt.
Select a drawing. When looking at diagrams, give preference to those that show patterns with a repeating pattern. They are easier to follow, especially at the initial stage of work.
When we improve our skills, we can cross-stitch complex logos and patterns: on the chest, and on the sleeves, and on the back of the product. Like in these photos: 


What to do next - step two
We wash what we decorate. This way you will insure yourself against shrinkage of the fabric and distortion of the design, and check whether the clothes with embroidery are fading or not. Otherwise, it will be very disappointing if your handiwork and the hopes associated with it disappear during the first wash.
We also check the threads for color fastness: wet them, wrap them in white fabric and see if it has stained. If so, do not rush to get upset, but treat the threads by heavily soaping them with laundry soap (winding them, for example, on a clothespin) and immersing them in very hot water for 15 minutes. Rinse thoroughly in cold water and soak in a solution of vinegar and salt for several minutes. Then rinse again with your hands, wrap in a white cloth and iron. If there are stains again, it is best to boil the threads for about five minutes in a vinegar-salt solution. After this, they will definitely not shed, but will only delight you with their colors.
For the anti-molting solution:
- 1 glass of cold water;
- 1 tbsp. l. 9% vinegar;
- 1 tbsp. l. salt.

After ironing the clothes, attach the canvas in place of the design or logo, having previously ironed it.
It is better if it is a little larger than the figure on the diagram.
You need to secure the canvas tightly, smoothing out wrinkles with your hands, using pins or a stitching stitch. That way she won't squirm.
In order for the embroidery on clothes to be neat, there should be no noticeable punctures around the design, so the needle should have a small eye. And another tip: when cross-stitching in squares, try not to pierce the threads of the canvas itself, otherwise it will be difficult to remove. If you do everything correctly, it is easy to remove the canvas threads with your hands by alternately (!) pulling out its horizontal and vertical rows.
The patterns we offer in the photo (which are cross-stitched) can be perfect for the first experience of decorating clothes on your own for adults and children, or they can become your personal logo: 


Having “stuffed” your hand, you can use more complex patterns and embroidery patterns in clothes, giving them a special chic with your own hands, using the patterns in these photos: 


Basics of satin embroidery
If you prefer satin stitch embroidery on clothes, you don’t need to use canvas.
Experienced embroiderers shared with us their tips for applying future designs to fabric:
- Having hooped the fabric, apply the design printed on thin paper and sew the outline manually or on a machine if you know how to sew with the conveyor lowered;
- draw the drawing with a chemical pencil;
- You can draw with a thin piece of dry soap, but not colored soap.
Choose any option, and don’t forget to break the design into sections, this will make it easier to embroider both a simple logo and a complex pattern.
Satin stitch embroidery patterns are varied, for example: 


And these patterns are suitable for embroidering a logo or a bright pattern: 
We hope that these design patterns, which you will copy onto transparent paper or directly onto fabric, will be useful to you for decorating clothes: 


Clothes with embroidery will always be original and unique!
Video: Learning to cross-stitch on clothes
Comments
Related posts:
 Embroidery on knitwear: decorating clothes with your own hands (patterns)
 DIY embroidery on a sweater (photo and video material)
Clothing decorated with embroidery takes on a completely different elegance, significance, and high class. You can create such decor not only with your own hands, but also with the help of modern sewing equipment with special programs. This unique technique allows you to transform the design you have chosen and adapt it to be applied to fabric. But our article is more devoted to handmade work, so you will learn how embroidery appears on clothes. It is also easy to prepare diagrams and drawings for this with your own hands.
Now we will tell you in more detail how to do do-it-yourself satin stitch embroidery on clothes.
Important! It is better to use a knitted sweater as an example. The appliqué method is ideal for this purpose and goes well with this embroidery method.
First of all, find a suitable circuit or make it yourself.
To work you will need the following:
- Fabric for applique embroidery.
- Pencil for creating designs on fabric.
- Floss threads, the color of which must match the indicated shades in the pattern.
- Scissors.
- Hoop.

Perform embroidery according to these instructions:
- First, print out a drawing of your circuit.
- Now transfer this design onto the fabric. It is best to use bottom lighting for this. Place the diagram on the glass and place the fabric on top. Place the lamp under glass and transfer the diagram onto the material using a marker.
- Stretch the finished pattern using a hoop, then secure it.
- Depending on the desired volume of the pattern, insert the required number of threads into the needle.
- Embroider the design using satin stitch, following each line and all the outlines of the prepared pattern.
- Perform a one-sided satin stitch so that the volume is obtained on the front side, and only the stitches are visible on the back.
- After completing the work, remove the hoop and cut off the excess fabric. Be sure to leave a strip to make it easier to connect the applique to the garment along the edge using wide stitches.
Important! It is better to embroider appliqués with floss threads, because they withstand repeated washings well due to pre-treatment.
This embroidery method is ideal directly for bulky knitted items, because doing such work on knitwear will be inconvenient. An applique sewn to a sweater will really decorate and transform it. Summer items do not require the use of appliques, since they are made from thin fabrics, so it is enough to take a ready-made item or fabric and embroider the design you like using a pattern, threads, or a hoop.
Cross stitch embroidery on clothes
If you are wondering how to do cross stitch embroidery on clothes, then keep in mind that its implementation requires compliance with certain rules and nuances. It is customary to embroider with a cross specifically on summer clothes, in particular on sleeves, pockets, and collars. For this purpose, light ornaments are chosen, parts of which are repeated from time to time.
Important! Be sure to wash the fabric before cutting to prevent warping and shrinkage. It is better to start embroidering on clothes at the moment when there are already patterns and cutting lines on it.
You will need to follow these steps to get original cross stitch on your favorite jeans:
- Prepare a diagram for embroidering a dragon, all the necessary materials and tools. We will use white threads and canvas.
- Baste the canvas to the jeans, embroider with white thread according to the pattern.
- Place the embroidered design in water for a while, leave it in it for 10 minutes so that the canvas dissolves and only the threads remain.
Important! There is another version of the canvas - an invoice. It is made from thick threads and is distinguished by stiffer and larger cells arranged in a strict order. It is also basted to the fabric, then the design is embroidered, and it is removed using tweezers.
Clothing with cross stitch looks very stylish, elegant, fashionable, and is in great demand.
Embroidery of floral pattern with ribbons
Now you will learn how to do ribbon embroidery on clothes with your own hands. The master class given in this section is devoted to the use of silk ribbons to decorate the necks of knitted clothes.
But before you get started, read some useful tips:
- Ribbon embroidery should be neat on both sides.
- Transitions cannot be made using ribbons. That is, if you have embroidered one flower, then immediately fasten the ribbon and only then secure the ribbon separately for the new flower.
- When finished, be sure to cover the backside with lining fabric.
Important! Do not forget that products with such decor can only be washed inside out.
Also, before doing embroidery on clothes, prepare the necessary tools and materials for work:
- Schemes. If desired, they can be enlarged and even divided, this is especially true in cases where the embroidery will be done on clothes with a round neckline.
- Beautiful silk ribbons in green, olive, pink, sand, peach, blue, light blue.
- Sharp scissors.
- A regular needle and a needle with a wide eye.
- Beads in several shades of pink.
- Monofilament.

- Enlarge the diagrams to the required size, cut them, and transfer them to clothing.
- First of all, embroider large flowers, which will consist of 6 petals. Use pink ribbon for this and make loop stitches. Using beads, additionally secure the petals.
- Embroider ruffled flowers in light blue. Take a blue ribbon and mark it with floss. As soon as the assembled ribbon reaches the desired length, pass it to the wrong side, and on the front side, fix the required arrangement of the petals with thread.
- Create a core from the peach ribbon using French knots.
- Next, make small inflorescences with a sand-colored ribbon. Make three loops, then decorate them with French knots in one twist.
- Take a white ribbon and make loose French knots of different sizes, that is, with two and three twists.
- Decorate the core of large flowers with small pink knots.
- Make stems from the green ribbon using straight stitches, and leaves from ribbon stitches. Make a few stitches to create a charming openwork branch.
- Now make small flowers and buds from the blue ribbon. Use a stitch called “lazy daisy” for this. The flower will consist of five stitches, the bud - of one, two or three.
- Don't forget to make cups for the buds using the same stitch and olive-colored ribbon. Use twisted stitches to make the stems.
- Decorate your clothes with branches of roses. The flowers are made from French knots of pink and peach ribbon, the stems from twisted stitches in green.
Video material
We can say that the embroidery on the shirt with your own hands is complete, all that remains is to hem all the protruding tails with a thin thread from the wrong side so that they do not later crawl out onto the front side of the product. You can decorate any of your items with a variety of patterns, giving it a new design. Even old things can be significantly transformed and become wearable after applying such decor.
Machine and hand embroidery on clothes
The pattern, its density, and openwork (richelieu) differ. Ornaments and patterns can have a flat or convex appearance, be slightly contoured, lacy, or tightly covering the entire surface of the product. Functions of modern embroidery:
- can decorate things.

On T-shirts
On jeans
On shirts
On dresses
Types of stitches
To start embroidering, you need to become familiar with the types of stitches used in the process. There are several of them, each differing in technology and type of application:
- The chain stitch is the most common and is a loop stitch, machine or hand stitch. Sometimes called a chain stitch, you will need a chain hook or needle to perform it. From the starting point, point the needle to the left, loop the thread under the tip from right to left. Pull the thread through the fabric, again point the needle to the left to the second point, pass through the loop, lead to the third point, place the loop under the tip of the needle. Variation of the stitch - fastened: repeat the first step, pull the thread and secure the loop with a small stitch, make 5 stitches in a circle (you will get a “daisy” pattern).
- Lingent (overlocking) - included in the group of loop stitches, they are distinguished by close placement to each other with the formation of a tight “ribbon”. The fabric is visible between each vertical stitch. Execution process: from the starting point through the second, draw the needle to the third point, which will lie to the right of the starting point. Pass the thread under the tip of the needle from left to right, pull the thread, rise to the fourth point (located close to the right of the second), bring the needle to the fifth point, placing the thread under the tip of the needle. Embroider in rows with tight, even stitches.
- Crossed – sometimes called moss, Persian, Russian, goat or witch. Refer to the group of crosses: from the starting point, pass the needle through the second point to the third, make a cross with a cross of threads at the bottom. Repeat on the other side.
- Herringbone - a loop stitch to create a light ornament. Other names are feather or rosehip. From the starting point, move the needle through the second to the third point, pull the thread under the tip of the needle to the right, bring the needle to the left, repeat pulling the thread twice.
- A running stitch is a simple linear stitch made at intervals equal to or nearly equal to the length of the stitches. Through the second point, move the needle to the third without pulling the thread through the fabric, bring it through the fourth point to the fifth, pull the thread without pulling the fabric. Try to make the stitches even and the same length.
- The cross stitch is the second most popular stitch, otherwise called the Prussian, patterned or printed stitch. It can be done at any scale and at any angle. From the starting point at the bottom right, draw the thread diagonally to the second point in the top left corner, from the top right point, draw the thread to the bottom left. Repeat with even stitches at equal intervals.
- Lowercase - similar to machine stitching, used for a clear outline. It belongs to the group of straight stitches, similar to the “back needle” and Holbein stitch. The work begins from the lower right point by pulling out the threads. Sew a series of small line stitches to create a line.
- Stem - a contour stitch from a group of straight lines. It is distinguished by graceful, partially overlapping lines with a smooth, raised tip. Bring the needle through the second point over the working thread, pull the thread, holding it under the needle, and finish the stitch.
- Satin stitch is the main stitch for embroidering flowers, otherwise called damask. Place the stitches close to each other, bring the threads from bottom to top from right to left. Make sure that the edges of the motif are even, stretch the threads for a smooth design.
- Knot (bead, French dot, lace knot, rococo) - performed separately or side by side to create a soft outline, embroidering the center of the flower. At the starting point, wrap the thread around the needle counterclockwise, holding the needle over the fabric, and repeat. Gather the twists together, move the needle to the tip, insert it into the fabric close to the starting point.

First, you need to wash the clothes that the craftswoman will decorate. This is necessary to protect against shrinkage of the fabric, distortion of the pattern and check for shedding. Embroidery on clothing requires a number of materials - from threads and canvas to needles and non-woven fabric. If you embroider by hand, you need to prepare a comfortable, well-lit place. For the machine process you will need a free table and a lamp for lighting. Additional materials: seam ripper, scissors, copying or tracing paper for transferring the design.
We make amazing embroidery on clothes
Embroidery on clothes has not lost its relevance for many centuries. It didn’t matter what class a person was, everyone was sure to have clothes with embroidery. And particularly skilled craftswomen decorated the outfits of the rich class with their own hands, while remaining in modest embroidered clothes themselves.
True, initially hand embroidery not only decorated clothes, it was also given protective significance, but over the years the aesthetics of perceiving clothes with embroidery came to the fore. Embroidered clothing, regardless of whether it has a brand label or logo on it or not, is always original. And it doesn’t matter what technique your outfit is decorated with - cross stitch, satin stitch, stem stitch, cutwork... - the main thing is how it’s done.
First steps in embroidery
Decide on clothes. Practice your skills. For example, with a cross on cotton T-shirts, pants, shirts... They are convenient for the first work experience and are not the most expensive.
Select the decoration area. If this is a shirt, this is the best place for a personal logo (embroidery can also be regarded as a sign of your exclusive work):
Select a drawing. When looking at diagrams, give preference to those that show patterns with a repeating pattern. They are easier to follow, especially at the initial stage of work.
When we improve our skills, we can cross-stitch complex logos and patterns: on the chest, and on the sleeves, and on the back of the product. Like in these photos:
What to do next - step two
We wash what we decorate. This way you will insure yourself against shrinkage of the fabric and distortion of the design, and check whether the clothes with embroidery are fading or not. Otherwise, it will be very disappointing if your handiwork and the hopes associated with it disappear during the first wash.
We also check the threads for color fastness: wet them, wrap them in white fabric and see if it has stained. If so, do not rush to get upset, but treat the threads by heavily soaping them with laundry soap (winding them, for example, on a clothespin) and immersing them in very hot water for 15 minutes. Rinse thoroughly in cold water and soak in a solution of vinegar and salt for several minutes. Then rinse again with your hands, wrap in a white cloth and iron. If there are stains again, it is best to boil the threads for about five minutes in a vinegar-salt solution. After this, they will definitely not shed, but will only delight you with their colors.
For the anti-molting solution:
- 1 glass of cold water;
- 1 tbsp. l. 9% vinegar;
- 1 tbsp. l. salt.
 After ironing the clothes, attach the canvas in place of the design or logo, having previously ironed it.
It is better if it is a little larger than the figure on the diagram.
You need to secure the canvas tightly, smoothing out wrinkles with your hands, using pins or a stitching stitch. That way she won't squirm.
In order for the embroidery on clothes to be neat, there should be no noticeable punctures around the design, so the needle should have a small eye. And another tip: when cross-stitching in squares, try not to pierce the threads of the canvas itself, otherwise it will be difficult to remove. If you do everything correctly, it is easy to remove the canvas threads with your hands by alternately (!) pulling out its horizontal and vertical rows.
The patterns we offer in the photo (which are cross-stitched) can be perfect for the first experience of decorating clothes on your own for adults and children, or they can become your personal logo:
Having “stuffed” your hand, you can use more complex patterns and embroidery patterns in clothes, giving them a special chic with your own hands, using the patterns in these photos:
Basics of satin embroidery
If you prefer satin stitch embroidery on clothes, you don’t need to use canvas.
Experienced embroiderers shared with us their tips for applying future designs to fabric:
- Having hooped the fabric, apply the design printed on thin paper and sew the outline manually or on a machine if you know how to sew with the conveyor lowered;
- draw the drawing with a chemical pencil;
- You can draw with a thin piece of dry soap, but not colored soap.
Choose any option, and don’t forget to break the design into sections, this will make it easier to embroider both a simple logo and a complex pattern.
Satin stitch embroidery patterns are varied, for example:
And these patterns are suitable for embroidering a logo or a bright pattern:

We hope that these design patterns, which you will copy onto transparent paper or directly onto fabric, will be useful to you for decorating clothes:
Clothes with embroidery will always be original and unique!
Video: Learning to cross-stitch on clothes
We embroider on clothes with our own hands
Nowadays, embroidered clothes are very popular and the demand for them is increasing day by day. This is primarily due to the fact that embroidery on clothes allows you to turn even the most ordinary thing into an exclusive, original and stylish model.
How to embroider a floral pattern with ribbons on clothes
Let's study a small master class that will tell you how you can decorate the neck of a knitted sweater, T-shirt or blouse with your own hands using silk ribbons. But before you get started, we want to give you some useful tips:
- Embroidery on clothes with ribbons should be neat not only on the front side, but also on the back side, so you shouldn’t have any constrictions on the back side;
- Don't use ribbon transitions. Having embroidered one flower, fasten the ribbon, and for another flower, fix the ribbon in a new way;
- After finishing the embroidery, cover the inside with lining fabric or knitted interlining;
- Do not forget that a product decorated with embroidery must first be turned inside out and only then can it be washed.
In addition, we will need to prepare all the necessary materials and tools for work:
- schemes. If necessary, the proposed schemes can be enlarged and divided. This will be especially true if you decide to embroider this floral pattern on a product with a round neckline with your own hands;
- silk ribbons (they must be ironed in advance);
- scissors;
- a regular needle and a needle with a wide eye;
- pink beads (light and slightly darker);
- monofilament.
Let's get started:
Enlarge the diagrams to the desired size and, after cutting them, transfer them to the product.
First, embroider large flowers consisting of 6 petals. To do this, you will need a pink ribbon (7mm) with which you will need to make loop stitches. And using beads, you can additionally fix the petals.
Next we will need to embroider light blue ruffled flowers. Taking a blue ribbon (7 mm), you will need to mark “Apple Blossom” on it, using a floss thread folded once. After the ribbon you have assembled becomes the desired length, you will need to pass it to the wrong side, and on the front side, fix the desired arrangement of the petals with a thread. The core is made from peach ribbon (4 mm) using French knots (in 1 twist).
 Next according to the plan, we make small inflorescences from sand-colored ribbon (4 mm). We will make them from 3 loops, which in the middle will be decorated with French knots, in 1 twist.
 Next, we will need to do, perhaps, the most labor-intensive part of our embroidery with our own hands. First, we will take a white ribbon (4 mm) and make not very tight French knots of different sizes (2-3 twists). Then we will need to decorate the core of the largest flowers with a small pink knot.
We will make the stems from green ribbon (4 mm) using straight stitches, and the leaves from ribbon stitches. In order to create a beautiful openwork branch, you can make a couple of stitches called “Wing” (overlapping).
 Now we will make small blue buds and flowers with our own hands. We will make them using the Lazy Daisy stitch: the flower will consist of 5 stitches, and the bud will consist of 1, 2 or 3. In addition, we will make cups for the buds using the same stitch and olive-colored ribbon. The stems can be made using twisted stitches.
Our embroidered clothes are almost ready, all we have to do is decorate them with rose branches. The flowers will be made using French knots (2-3 twists) from peach and pink ribbon (7 mm), the green stems will be made from twisted stitches, and for the leaves we will need to make several ribbon stitches. The photo shows what beauty you should get in the end:
At this stage, our hand embroidery is completed, all we have to do is carefully hem all the protruding tails from the inside with a thin thread so that they do not subsequently “crawl out” onto the front side of the product.
Look at the photo and admire how delicate, original and neat the embroidery on clothes is:
How to cross-stitch a design on children's clothing
Our master class will help you decorate a children's T-shirt or sweater using cross stitch for this purpose. So, for work we need:
- hoop;
- favorite embroidery patterns;
- canvas;
- floss threads;
- scissors;
- needle;
- beads (if you want to make some elements convex).
Let's get started:
- Redraw the diagram onto the canvas and, attaching it to the product, fix everything with a hoop;
- Start cross stitching with the largest elements;
- The eyes can also be embroidered with a cross, but in order for clothes with embroidery to look more interesting and elegant, we made them from beads;
- All other details are also cross-stitched, but if desired, the nose and mouth can also be made from small beads;
- When the hand embroidery is completed, all you have to do is trim the canvas.
Using regular cross stitch, you can diversify your baby’s wardrobe and decorate everyday T-shirts with bright animals or popular cartoon characters:
Embroidering logos on clothes
As a rule, computer embroidery of the selected logo is most often used, because in most cases large companies decorate the clothes of their employees with certain symbols. However, you can embroider the logo of your favorite company yourself.
To do this you will need:
- a product on which you will embroider a logo;
- scissors;
- floss threads or beads;
- logo embroidery pattern. For example, you can choose schemes from well-known companies;
- needle;
- hoop.


To embroider the logo you like, you will only need to select the desired size and font, after which you can make markings on the fabric using the selected pattern and get to work. As an example, you can look at the photo of the finished “NEW World” logo embroidered with beads on summer trousers:
Video: Cross stitch on a shirt
Embroidery on clothes - necessary tools, how to embroider with your own hands or on a machine
For many centuries, embroidery on clothes has not lost its relevance. In ancient times, embroidery was used to judge a person’s class; the robes of rich officials and the clergy were decorated with gold, and ordinary people were decorated with modest ribbons and beads. If earlier a thread pattern was also a talisman, today embroidery is in the foreground for the aesthetic perception of clothing and decoration. There are several embroidery techniques, each with its own materials and process.
Why do you need embroidery on clothes?
Modern clothes with embroidery belong to the arts and crafts of needlework. The principle of embroidery is working with a needle or crochet, a machine to create a pattern, a three-dimensional image. Decorate leather, felt, cotton. For work they use linen, cotton, silk, woolen threads and beads, pearls, stones, sparkles, sequins, gold, and sometimes even coins. With the help of women's hobbies, you can create entire ornaments, logos and inscriptions - indispensable for workwear, custom-made sports uniforms, and national costumes.
Depending on the type of embroidery technology, the pattern, its density, and openwork (cutwork) differ. Ornaments and patterns can have a flat or convex appearance, be slightly contoured, lacy, or tightly covering the entire surface of the product.
Functions of modern embroidery:
improving or emphasizing the aesthetic properties of the material;
emphasizing the texture and color of the fabric;
can decorate things.
On T-shirts Embroidery on T-shirts or tank tops is popular. With its help they become brighter and more expressive. More often, T-shirts with embroidery are decorated with a logo and are used for sports uniforms and workwear. Inscriptions on clothes made by embroidery emphasize the color and texture of the fabric, highlighting its owner due to its improved aesthetic properties. For embroidery, use pockets, the upper part of the back, and the front surface at chest level.
On jeans Embroidery on jeans is more often used to decorate women's clothing; men do not perceive such design. Pants can be “colored” with bright patterns, embroidered with individual flowers, stars, or completely filled, for example, with one pant leg. The pattern decorates the jeans and emphasizes the slenderness of the legs. Popular places for application are pockets (back and front), the front of trousers, the bottom hem, and the belt area.
On shirts Logos and inscriptions are often used to decorate shirts with embroidery. They are placed on the collar, cuffs, pockets, and belt. It is advisable to apply a repeating pattern (ornament) or inscriptions. For the latter, the machine method of decoration is optimal. With a pattern applied, a polo shirt looks more attractive, more respectable, and can be used to create a unified style (football teams, companies with a dress code).
On dresses Dresses decorated with VHI embroidery look rich. These are national costumes for dance teams or clothing used in everyday life. Bright contrasting threads are used for decoration; the pattern is applied to the collar, sleeves, belt, and hem edge. The choice of design depends on the mood and purpose of the item. The ornament is suitable for everyday use, rich designs like flowers or forest motifs are suitable for evening events.
To start embroidering, you need to become familiar with the types of stitches used in the process.
There are several of them, each differing in technology and type of application:
Chain stitch- the most common, refers to looped, machine or manual. Sometimes called a chain stitch, you will need a chain hook or needle to perform it. From the starting point, point the needle to the left, loop the thread under the tip from right to left. Pull the thread through the fabric, again point the needle to the left to the second point, pass through the loop, lead to the third point, place the loop under the tip of the needle. Variation of the stitch - fastened: repeat the first step, pull the thread and secure the loop with a small stitch, make 5 stitches in a circle (you will get a “daisy” pattern).
Splint (overlock)– included in the group of loop stitches, they are distinguished by close placement to each other with the formation of a tight “ribbon”. The fabric is visible between each vertical stitch. Execution process: from the starting point through the second, draw the needle to the third point, which will lie to the right of the starting point. Pass the thread under the tip of the needle from left to right, pull the thread, rise to the fourth point (located close to the right of the second), bring the needle to the fifth point, placing the thread under the tip of the needle. Embroider in rows with tight, even stitches.
Crossed– sometimes called moss, Persian, Russian, goat or witch. Refer to the group of crosses: from the starting point, pass the needle through the second point to the third, make a cross with a cross of threads at the bottom. Repeat on the other side.
Herringbone– loop stitch to create a light ornament. Other names are feather or rosehip. From the starting point, move the needle through the second to the third point, pull the thread under the tip of the needle to the right, bring the needle to the left, repeat pulling the thread twice.
Smetochny- a simple linear stitch made at intervals equal to or nearly equal to the length of the stitches. Through the second point, move the needle to the third without pulling the thread through the fabric, bring it through the fourth point to the fifth, pull the thread without pulling the fabric. Try to make the stitches even and the same length.
Cross- The second most popular stitch, otherwise called the Prussian stitch, patterned or printed. It can be done at any scale and at any angle. From the starting point at the bottom right, draw the thread diagonally to the second point in the top left corner, from the top right point, draw the thread to the bottom left. Repeat with even stitches at equal intervals.
Lowercase– similar to machine stitching, used for a clear outline. It belongs to the group of straight stitches, similar to the “back needle” and Holbein stitch. The work begins from the lower right point by pulling out the threads. Sew a series of small line stitches to create a line.
stalked– contour stitch from a group of straight lines. It is distinguished by graceful, partially overlapping lines with a smooth, raised tip. Bring the needle through the second point over the working thread, pull the thread, holding it under the needle, and finish the stitch.
Gladue– the main stitch for embroidery with flowers, otherwise called damask. Place the stitches close to each other, bring the threads from bottom to top from right to left. Make sure that the edges of the motif are even, stretch the threads for a smooth design.
With a knot(beaded, French dot, lace knotted, rococo) - performed separately or side by side to create a soft outline, embroidering the center of the flower. At the starting point, wrap the thread around the needle counterclockwise, holding the needle over the fabric, and repeat. Gather the twists together, move the needle to the tip, insert it into the fabric close to the starting point.
Materials for embroidery on clothes
First, you need to wash the clothes that the craftswoman will decorate. This is necessary to protect against shrinkage of the fabric, distortion of the pattern and check for shedding. Embroidery on clothing requires a number of materials - from threads and canvas to needles and non-woven fabric. If you embroider by hand, you need to prepare a comfortable, well-lit place.
For the machine process you will need a free table and a lamp for lighting. Additional materials: seam ripper, scissors, copying or tracing paper for transferring the design.
Threads For embroidery, special embroidery threads are used. The color of the thread is selected depending on the type of pattern. Before decorating clothes, the material is checked for color fastness: it is wetted and wrapped in white cloth. If it is stained, you can fix the color of the threads with a special compound - lather it heavily with laundry soap and immerse it in very hot water for 15 minutes. After this, the threads are thoroughly rinsed with cold water and immersed in a solution of vinegar and salt for 2-3 minutes (a tablespoon of 9% vinegar and salt per glass of water). When choosing threads, their thickness is taken into account - the thicker it is, the lower the number on the package.
Polyester– resistant to color loss during washing and chemical exposure.
Viscose - suitable for decorating clothes made of thin fabric, reflects light, emphasizing the elegance of the pattern.
Cotton– are more often used in machine embroidery, but over time they can lose elasticity, become deformed, fade, become thinner and become tangled in knots. Ideal for use on leather and denim clothing.
Needles Embroidery on clothes should not spoil things during the decoration process, so you need to use needles with a thin small eye (otherwise puncture marks will remain). You can choose special or universal needles size No. 70-90. If embroidering is done on elastic, knitted fabrics or leather, you will need special needles.
Textile When choosing clothes to decorate with embroidery, pay attention to the type of fabric from which it is made. Counted fabric has an equal number of threads in the weft and warp, resulting in even stitches with equal spacing. The more threads of the fabric, the denser the pattern will be. Smooth materials include velvet, satin, silk and wool. They are more difficult to embroider on. For embroidery, choose a heavy fabric that will hold the threads, but at the same time light to create an impressive raised pattern. Before decorating, make a test pattern on a small area of clothing. To prevent the fabric from stretching, iron it from the wrong side before embroidering - this will prevent warping and deformation of the design on the finished garment.
Overlay canvas For smooth and beautiful embroidery on clothes, especially cross stitch, a canvas is required. It is a mesh-like, rigid material that makes it easy to create crisp, tight stitches. After ironing the clothes, attach the ironed canvas to the place of the design, choosing a slightly larger size than the design itself. Secure the canvas tightly with pins or a temporary seam, and smooth out the “wrinkles” with your hands. When making a drawing, try not to sew on the canvas itself, otherwise it will be difficult to remove. To do this, alternately pull out the threads of the canvas of horizontal or vertical rows with your hands or tongs. If you cannot completely remove the canvas, pull out only the outermost ones, and cut the rest to the tip. This way the crosses will retain their density and evenness, and the pattern will not be deformed.
Nonwoven To secure the pattern, adhesive cushioning materials on a non-woven basis are used. Non-woven fabrics are popular. It is a paper-like material made from cellulose fibers with the addition of polyester. It is available in different densities and with a continuous or spot adhesive coating. For embroidery, the material is cut “lengthwise” so that it does not stretch. It is optimal to choose interlining interlining with a lining so that it does not fluff when washed. After finishing the decoration, stick a piece of non-woven fabric slightly larger than the design itself on the back and iron it well. This will secure the threads, prevent them from unraveling after several washes, and maintain the density and necessary rigidity of the clothing. For embroidery on the edges of things (hems, sleeves, pockets, cuffs), non-woven tapes are used.
How to embroider clothes by hand
The choice of technique depends on the color of the fabric and surface (smooth, printed or fleecy). First you need to transfer the design to the fabric. To do this, use a special pencil (evaporates after 24 hours from the moment of application) or a stencil, you can also use tracing paper, and for thin fabrics, transfer the design to the light. The safest way to apply a design is to attach tracing paper with safety pins and embroider directly over it. Having transferred the pattern, secure the fabric in the hoop, prepare the threads and needles, and begin embroidering according to the pattern.
Cross stitch Traditionally, cross stitch on clothing is considered the easiest to perform. This style is suitable for decorating summer dresses, sundresses, children's or adult jeans, and caps. For decoration, choose pockets, sleeves, collars; from the patterns, an ornament will be optimal. Baste the canvas to the desired area, fasten the hoop, first embroider crosses of one color, then other shades. Use dense, smooth threads, making sure the stitches are even. After embroidering, remove the canvas by pulling out rows or simply dissolving it in cold water (there are such types).
Gladue Satin embroidery on clothes looks no less elegant, but its execution is more difficult because you need to monitor the clarity of the stitches. To begin, put on a hoop, apply a pattern from thin paper, sew the outline by hand or apply the pattern with a chemical pencil or soap. Starting with a small section of the pattern, make dense, even stitches of the same size, placing them as close to each other as possible. For satin stitch embroidery, a scarf, the hem of a dress, the sleeves of a shirt or the leg of jeans are ideal. Chinese and Japanese stitch can be double-sided or one-sided, straight or oblique. If floss threads are used for embroidery, then it is better to use cotton, linen or burlap. Lawn, satin, and silk are embroidered with silk threads, and dense fabrics are embroidered with iris threads. For embroidery, choose the thinnest possible needles and pull sections of clothing tightly. First, the outline is drawn, then the relief of the drawing itself is filled.
Beads Bead embroidery on clothes and shoes looks incredibly beautiful. It's difficult for beginners, but there are some secrets to getting an elegant drawing. Basic stitches for bead embroidery:
Monastic– the front part consists of diagonal stitches with beads; on the wrong side, vertical rows are obtained.
Lowercase - one bead for each stitch. The needle is brought out from the wrong side between the first and second beads, the bead is strung, the needle is inserted in front of the first bead. Having brought the needle out from the wrong side between the second and third bead, string the second bead and insert the needle between the first and second bead. Repeat to create a smooth, tight line. For a tighter stitch, pull the yarn through the backstitch at the end of each row.
stalked– fasten the thread, put on the bead, insert the needle into the fabric and bring it out behind the strung bead. Go through the bead again, thread the second one, insert the needle into the fabric behind the new bead, and bring it out between the last two. Embroidery this way is very dense.
Arched– used for non-rigid embroidery. String several beads onto each knit stitch, but attach only the one at the intersection of the stitches to the fabric. A few more useful rules for bead embroidery for beginning craftswomen who want to decorate things: sew the beads evenly, with the same slope; use beads of the same size; pull the hoop tightly; use fishing line, synthetic or chrome threads so that they do not sag under the weight of the beads; The color of the thread must match the color of the canvas, embroider in rows; the length of the thread per row should be 4-5 times the width of the embroidery; to prevent the thread from getting tangled, wax it (press it to the wax and pull it through it, remove the excess); do not secure the thread with rough knots; a popular decoration technique is a half-cross; choose needles No. 10 or 12, do not re-tighten the threads from the wrong side, secure the working thread with a double knot from the wrong side.
Machine embroidery on clothes
Machine embroidery is very widespread because, compared to hand embroidery, it is faster, of higher quality and lower in cost. Embroidery machines have special equipment and software control, which helps to make identical patterns for an entire batch of clothes. A needle is installed on the machine, a thread is threaded into it, the fabric is prepared, and secured with a plastic hoop. The machine embroidery process requires almost no canvas. After installing the program and selecting a pattern, a pattern is applied to the clothing.
The article was written based on materials from the sites: serviceyard.net, sovets.net, vnitkah.ru, vishivashka.ru, menzela.ru.
Any embroidery requires perseverance and painstaking work, but it will give the item a special personality. For beginners, you can start with cross stitch, satin stitch or bead embroidery. First you need decide what you want to apply an ornament, pattern or decorative element to. What fabric is the chosen object for embroidery and what style do you want to stick to.
Features of this embroidery technique
When applying any pattern to an item, it is necessary to maintain proportions, otherwise the embroidery will not look like one whole with the item, but a separate spot. For example, when embroidering on coarse fabric, choose thicker threads or larger beads, and vice versa, light, thin fabrics love thin, elegant threads and small, neat beads. Of course, you can experiment in using the sizes and densities of threads, but this can only be done by experienced craftsmen with an artistic sense of balance, otherwise your products will not look like a masterpiece.

Cross stitch requires a clear calculation of the placement of crosses on clothing. For beginners, it would be a good option to start their creativity with, since they have everything for an easy start, including the itself. And satin stitch embroidery does not require precise calculations, you just need to adhere to the contour of the chosen image for application to clothing. It looks very impressive on clothes, but more often it is used for embroidering logos. Well, bead embroidery always remains a fashionable element on clothes, and the execution technique is much simpler than any other.
Ideas for such embroidery with patterns
We choose. If you cannot visually transfer the pattern onto the fabric, then you can use thin tracing paper, placing it on the drawing, and transfer all the lines. Then place the tracing paper on the desired area of the fabric and secure it with pins, or better yet, sew along the edges to secure it with large stitches. Now you can start sewing on the beads, and at the end, carefully tear the tracing paper and remove the basting.


To work with beads, you need to know exactly how to embroider clothes. We recommend that you read the detailed description of fixation methods.


Each one allows for an error, but it won’t be so noticeable on clothes. But how to do cross stitch? The tracing paper method will not work here. We recommend drawing vertical and horizontal lines on the fabric, thus depicting a grid with sectors of 9 crosses. It's possible done using a special fabric marker, which dissolves after contact with water.
For convenience, use a hoop in your work; they are also small in size for ease of embroidery in places where clothing bends. For beginners, it is better to start with simple patterns.


Not all types of embroidery are suitable for application to clothing. The ribbon type is used in clothing items, but we do not recommend using this type of decor, since when washing things, the ribbon can twist or wrinkle, which will ruin the appearance of the product. But if you really want to apply this decor, then it is better to do it on accessories, for example on a bag.
Ribbon embroidery on clothing always forces a certain style, while an accessory with similar decor can carry individuality in its image and be simply an accent.


Sequins come in different shapes and sizes, but they always look bright. They can either completely cover a dress or simply make small patterns. Sequin embroidery on clothes can be done either frivolously or according to patterns.


Computer (machine) embroidery is wear-resistant and can be used on fabric of any quality. Much cheaper than hand embroidery and has the fastest production time. When ordering such embroidery, it is necessary for the programmer to calculate an individual program based on a given layout. And then the machine will apply embroidery to the item you want. Computer embroidery looks very impressive on clothes!

Embroidery-applique is also done using a machine. The desired pattern is applied to the fabric from which the applique will be made, and along the drawn contour is sewn with a simple stitch for fixation, and then the excess fabric is cut out around the stitched element.
The stitched edges of the appliqué elements are sewn using an embroidery machine. Or you can apply a ready-made embroidery-applique, prepared in advance on a separate piece of fabric, to sew on clothing.

- The video clearly shows the technique of satin stitch embroidery with a detailed description of the process itself. Watching a video tutorial simplifies learning and makes the technique accessible to beginners.
- The bead embroidery technique is demonstrated in the video. As shown, you can create very beautiful decorative elements for clothing in the form of a brooch.
When embroidering on clothes with your own hands, of course, it is better to use patterns. In any case, embroidery is an excellent solution when you really want to add a special touch to your clothes, but you either don’t have the time to embroider, or you can’t do it at all. Is it worth embroidering yourself if you can solve it easier and faster using new technologies? If you are an artist, then satin stitch embroidery is well suited for realizing your imagination.