The ability to knit always commands respect from others, because it requires skill, perseverance, and things turn out unique. It is believed that knitting - counting stitches, monotonously knitting each row - has a therapeutic effect. And in order to please not only the process, but also the result, you need to be proficient in technical techniques, in particular, knit and garter stitch.
Elementary patterns for knitting
As with any type of needlework, you need to start learning the basics of knitting with simple, basic patterns. They, like any of the most intricate patterns, are built on a combination of front and back loops. To make a knit stitch, you need to pull the thread into the loop captured from behind with the knitting needle. To knit a purl stitch, the thread is passed through the front. From alternating knit, purl, and also the formation of yarn overs ( air loops, which are obtained when the thread is thrown onto a knitting needle and knitted in the next row like the rest of the loops) are obtained original patterns. Garter and stocking stitches are considered the easiest to perform. These types of designs were once used in the most popular products - down scarves and stockings (hence the names). But even today, products knitted with scarf or stockinette stitch are in demand.
Features of garter stitch

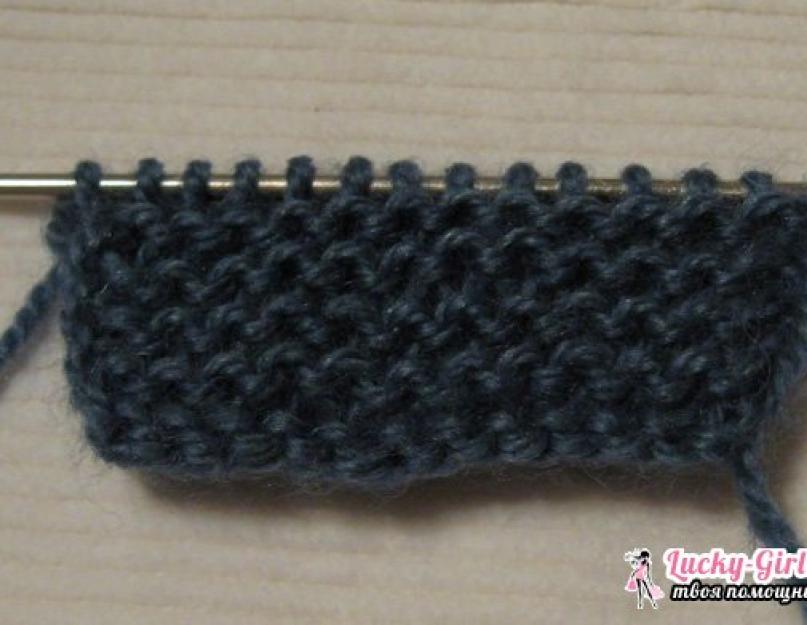
If you want to learn how to knit, then garter stitch with knitting needles, a pattern described below, is the best place to start. It is not for nothing that needlewomen, as already mentioned, used this design to make scarves. The pattern is an alternation of smooth and embossed, “scaly” rows. In the old days, this type of knitting was called “ruffle”, “beds” or “rope”. Garter stitch has a number of advantages compared to other patterns:
- holds its shape well and does not stretch;
- adds the volume necessary for knitted items to the finished product;
- does not deform (the hinges do not move or move apart);
- does not curl the edges of the product;
- is an excellent background for more complex drawings.
So, to understand the basics of knitting you will need:
- knitting needles 5 (thickness corresponding to this number allows you to knit fairly large loops and avoid pulling the yarn);
- any yarn of medium thickness (acrylic threads are more suitable for beginners, as they do not tangle and are elastic in work).
The execution of a garter stitch pattern is as follows:
- For the prototype, we cast on 20 loops plus two edge loops - they make the edges of the product neat and even.
- We knit the first row. Having captured right knitting needle th back side of the loop on the left, pull a thread through it, which is placed loosely draped over index finger left hand, and form a new loop. This is a classic way to knit knit stitches.
- We knit the second row in the same way, but now we always grab the loop from the left knitting needle not from the back, but from the front, so that the pattern does not twist. This method of tying loops is called “grandmother’s”.
- We knit 10 rows and secure the pattern with a hook.

This method is based on facial loops- the drawing turns out smooth. If you knit on circular needles, make sure that the base of the loop does not twist. To do this, remove it from the knitting needle and turn it in the “right” direction.
There is another way in which you can knit a scarf fabric. Purl loops are used for this. That is, the thread is brought out through the leading edge of the loop on the left knitting needle. Then the product will have a looser, wavy structure. For some needlewomen, this method of garter stitch seems more convenient, since even and odd rows are knitted identically, which can be seen, for example, in a video about garter stitch with knitting needles.
In any case, the fabric knitted using the garter method is one-sided: it does not have a “face” or a back, which is why it was used for knitting shawls and scarves. Currently, this pattern is used to create scarves, snoots, hats or pullovers. By placing the pattern vertically, you can lengthen the silhouette of the finished product and, moreover, not be afraid that over time it will stretch and become excessively wide.

- We cast on 20 loops and two edge stitches. Unlike stockinette stitch, stockinette stitch tends to curl at the edges. Therefore, the finished product must be steamed.
- We knit the first row as purl loops - then the edge will not curl into a tube, causing inconvenience in further work.
- We will already knit the second row facial loops. We monitor the uniformity of pulling the loops.
- The knitting pattern consists of alternating rows of two types of loops.
- Having knitted 20 rows, close the loops with a hook and evaluate the result.

If you want the knitting to be tighter, you can knit the loops using the “grandmother’s” method.

Stocking and garter stitch with knitting needles, the pattern described above, is the basis for comprehending the most complex, much more original designs. Despite their simplicity, basic patterns require a certain skill and dexterity. Therefore, you will have to “rehearse” more than once or twice so that in the end a truly high-quality fabric comes out of the knitting needles. But when you master these techniques perfectly, completely new horizons will open up before you!
When beginning knitters begin to master the basics of the craft, they learn different techniques casting and basic types of loops, purl and knit. The first pattern to learn is often the stockinette stitch.


This pattern is most often used in knitting needlework. It is used to knit various products, from simple scarf to the suit. U stockinette stitch there is another name, it is stockinette or jersey. The fact is that the pattern was used to knit stockings in the old days.
Before considering how to make a pattern, study its varieties, which are distinguished by the side of knitting. Knit pattern according to front side, and get the front surface. If the wrong side of the fabric is taken as a basis, the option is called purl stitch.

Their execution is no different, and the drawing itself is one-sided, because it looks different on each side of the canvas. On the front side these are straight loops, on the back side there are rows of arcs. The reverse side of the products resembles garter stitch. The main difference is the distances between the arcs and the thickness of the canvas.
Advantages of the pattern

- Products can be steamed. After this, the drawing does not change and does not lose its quality.
- Models are knitted using stockinette stitch according to any pattern, even the most complex.
- The pattern is suitable for any type of yarn, knitting needles and hooks. Thick yarn and large-diameter knitting needles produce a warm fabric. If you take fine material and tools, you get amazing knitwear.
- Any ornaments for children's things look great on face knitting. This is a convenient basis for bright fragments. The pattern is harmoniously combined with all the ornaments if you insert fragments, make individual details, or add relief and openwork.

5.This is an option for decorating products with embroidery, beads, leather and other materials. The front surface allows you to combine any palette of shades.

6. The pattern is used to knit both everyday and festive clothing models.
7. It is suitable for working on circular knitting needles.

Secrets of proper knitting
Choose the right knitting needles and yarn. You should not knit a thick thread thin knitting needles and vice versa. A competent combination will allow even a simple model to become spectacular.
 Another bonus for beginners is that you can learn from any number of loops. The front satin stitch does not have a repeat in the height and width of the pattern, so a convenient number of loops is cast on for the control sample.
You can cast on loops using any technique. The disadvantage of the pattern is that it curls at the edges of the canvas. To avoid this:
- Start and end knitting with an elastic band or finishing pattern.
- Steam the bottom of the product.
- On the wrong side, crochet the chain, connecting it to every second loop of the main knitting.
- Knit the first row with purl stitches (SP) on the right side of the fabric.
- You have learned the secrets of edge design, now move on to basic knitting. Cast the first row.
Scheme of this pattern:

The first edge is removed, the rest are knitted with knit stitches (KL), and the last edge is purled. After turning the canvas, it is also removed. Even rows in this pattern are knitted according to the pattern.
Circular knitting The front stitch differs in that all rows are knitted with LP. For the circular method, the pattern scheme differs from the main one.

Separately called the irrevocable knitting method. This technique involves the absence of the wrong side at the time of knitting. The set and the first row are no different from the main method. After knitting the last edge, the left knitting needle is inserted into the previous loop on the right knitting needle. Wrap around working thread left knitting needle, and use it to knit a loop. So they continue to move in the opposite direction until the end of the row.
When making the product, any convenient method is used. Circular knitting allows you to make patterns without seams. Many people use this feature to avoid painstakingly joining parts.
Video: Front and back stitch
Piggy Bank of Patterns / Simple knitting pattern for decorating a jacket They often say about such clothing models: “Simple, but tasteful.” Sometimes a very insignificant, at first glance, detail can change the image of a simple thing beyond recognition. This jacket or blouse is knitted in a simple stockinette stitch, but the small background pattern along the placket gives it a completely different look. If our pattern repeat is only 6 loops, then the bar has approximately 2 repeats in width. It goes along the edges JACKETS.COATS.CARDIGANS.
SKIRT WITH A CHECK PATTERN A tight-fitting, elegant knee-length skirt attracts attention not only with its aristocratic pattern, but also with the unusual design of the hem. SIZES 32/34, 36/38, 40/42 and 44/46 YOU WILL NEED Zarina yarn (100% fine merino wool; 165 m/50 g) - 300 (350-350-400) g anthracite color; straight knitting needles No. 2, 3, 3.5 and 4; circle. knitting needles No. 3.5, 80 cm long. PATTERNS AND DIAGRAMS KITCH STAIN STITCH Face rows - front loops, purl rows - purl loops. IN...
Jumper with diverging braids A raglan cut jumper with a modern dynamic design attracts attention with its unusual diverging braids. Sizes 36/38 (40/42) 44/46 YOU WILL NEED Yarn (70% natural wool, 30% baby camel wool; 125 m/50 g) - 500 (550) 600 g light gray; knitting needles No. 3 and 4; circular knitting needles No. 3. PATTERNS AND DIAGRAMS Knit the following patterns on knitting needles No. 4. FACE SMOOTH Front rows - front loops, purl rows - purl loops. “BRAID” A (ON 12 LOOPS) Knitted...  pullovers
SKIRT WITH A CHECK PATTERN SKIRT WITH A CHECK PATTERN A tight-fitting, elegant knee-length skirt attracts attention not only with its aristocratic pattern, but also with the unusual design of the bottom. SIZES 32/34, 36/38, 40/42 and 44/46 YOU WILL NEED Zarina yarn (100% fine merino wool; 165 m/50 g) - 300 (350-350-400) g anthracite color; straight knitting needles No. 2, 3, 3.5 and 4; circle. knitting needles No. 3.5, 80 cm long. PATTERNS AND DIAGRAMS KITCH STAIN STITCH Knit rows - knit stitches, purl rows...
WARM DRESS WITH RAGLAN SLEEVES Sizes: 38-40 (44-46). The length of the dress with a collar is 84 cm. You will need: yarn (60% merino, 40% acrylic, 85 m/50 g) - 600 (700) g melange-gray, knitting needles No. 6-7, circular knitting needles No. 6-7, 60 cm long PATTERNS Elastic band 1 x 1: The number of loops is a multiple of two plus two edge loops. Facial rows: front, purl. Purl rows: we knit a knit stitch over the front one, and a purl stitch over the purl row. Purl stitch: 1st row: purl all loops; 2nd row: all l loops... Knitting
Exquisite and unique hat with an unusual shape Size(s): single Yarn: DROPS ALPACA (100% alpaca; 50 g. ~ 167 m.) DROPS KID-SILK (75% mohair, 25% silk; 25 g. ~ 200 m.) Number of balls: 50 gr. ALPACA and 25 gr. KID-SILK Knitting density: 22 p. x 30 r. stockinette stitch with double thread (1 of each type) = 10 x 10 cm. Tool(s): 3.5 mm circular needles. and 3 mm. for elastic Pattern: knit according to diagram M.1. Knitting tip: when unrolling the work, tighten the working thread well...
Patterns for your piggy bank Unusual braid knitted with a description of knitting and a pattern diagram. This pattern can be knitted Women's sweater or decorate a pullover knitted with a simple stockinette stitch. Will one or two braids, located on one side of the shelf, bring simple model its zest. Description of knitting pattern The pattern repeat consists of 12 loops + 2 edge loops.
Loose two-color jumper with “braids” #knitting@nerukodel An unusual checkerboard pattern with gaps attracts attention at first sight. It is formed by separately connected strips connected by crossing. SIZE 38-42 YOU WILL NEED Yarn (100% cotton; 90 m/50 g) - 300 g each color. ecru and gray-green; circular knitting needles No. 5. PATTERNS AND DIAGRAMS FACIAL STAIN STITCH Facial rows - front loops, purl rows - purl loops. GARNIK KNITTING Knit and purl rows -...
Tailcoat cardigan with openwork back An easy-to-make and very unusual model for those who love to knit and know how to crochet. On the back of this simple-looking cardigan there is a large openwork insert. Size 36-42 YOU WILL NEED Yarn (58% viscose, 27% polyamide, 15% cashmere, 150 m/50 g): 750 g blue-gray; straight knitting needles No. 4; circular knitting needles No. 4, length 120 cm; hook number 4. PATTERNS AND DIAGRAMS KITCH STITCH Face rows - front loops, purl rows - purl stitches...
Lazy Jacquard If you love jacquard patterns, but don't like knitting them, there is a great technique for knitting "lazy jacquard". Its essence is that every two rows are knitted with yarn of a different color, and an imitation of the ornament is created by removing loops of the previous color. Like all jacquard patterns, lazy jacquard is knitted in stockinette stitch unless otherwise instructed. Knitting patterns
Chic warm hat. The hat is knitted in the round. Pattern repeat 19 loops Therefore, having knitted the sample, calculating how many loops you need for your size, round this number so that it is a multiple of 19. +1 loop in order to close the cast-on row into a circle. The height of the cap is determined by calculations. Decrements are made in the part of the pattern where the purl stitch is, between the braids, evenly distributing the decrease loops so that wedges do not form. Pattern repeat is already included... Snoods, hats, scarves, etc.
The color is just bomb! Gray-red dress with relief and jacquard patterns!
SIZE 36/38 YOU WILL NEED Yarn (75% sheep wool, 25% polyamide; 100 m/50 g) - 550 g gray and 300 g red; circular knitting needles No. 4.5, 40 cm long. RIBBING Alternately 1 knit, 1 purl. JACQUARD PATTERN A Knit according to counted pattern A using stockinette stitch. In width, start with a loop before the 1st arrow, repeat repeat 6 times = 24 sts and end with a loop after the 2nd arrow. Knit 1 time in height with... Knitting
Pattern “Arrows” - post by user Tamara Sergeevna (Toma) in the Knitting community in the Knitting category for beginners This graphic pattern will look great against the background of products knitted with a simple purl stitch. The number of loops is a multiple of 18 + 2 + 2 edge loops. Each row begins and ends with 1 edge. EVENING DRESS This simple and spectacular dress is made with knitting needles. A beautiful openwork top, a tight-fitting bottom and sparkling yarn are all the components chic dress
. Author: Radchenko N. S. Size: 42/44. Low degree of difficulty. You will need: 700 g of Semenovskaya yarn “Magnolia” (100% cotton; 214 m/100 g) in yellow tones; knitting needles No. 5; circular knitting needles No. 5; auxiliary knitting needle. Knitting technique for dress patterns: On knitting needles: stockinette stitch (knit stitch - knit stitch, purl stitch - purl stitch... Taika Knitting a dress Lantern dress Warm voluminous dress fashionable style
You can wear it anywhere! Sizes 98/104 (110/116 – 122/128). YOU WILL NEED Yarn (44% polyacrylic, 32% polyester, 18% polyamide, 6% mohair; 125 m/50 g) – 200 (250–300) g smoky pink; knitting needles No. 6 and 8; circular knitting needles No. 6, 40 cm long. PATTERNS RIBBING Alternately knit 2, purl 2. FACE SMOOTH Front rows - front loops, purl rows - purl loops. 1 p. DOUBLE From 1 p. knit 1 person. loop and 1... So you have learned how to knit two main types of loops - FACIAL And WRONG
...I think that now experienced knitters will throw tomatoes at me, but still consider that you have learned to knit, now we will only improve our skills. Let's look at what stocking stitch and stockinette stitch are.
Based on this, there are quite a large number of different patterns. We will get acquainted with some of them, try to connect them using a diagram or description, and try to collect a small collection))) So, we already have one sample: this shawl stitch , there is no point in drawing a diagram here, because all stitches in all rows are knitted FACIAL .Today we will add to our collection
stockinette stitch, also known as stockinette stitch - description
1. Cast on 15-20 loops for the sample.
2. Knit:
first row — PURL LOOPS
second row - FACE LOOPS
3. And so we alternate - a row of purls, a row of facial ones. Knit 10-15 rows.
4. Loops according to the drawing. What does it mean? This means that the row on which you will close the loops must be knitted with knit stitches, then when closing you knit the Knit stitches, and if purl, then when closing you will knit the PURL Loops.
This is what you should get:
front side of the sample - stockinette stitch (stocking stitch) wrong side of the sample -
 Probably, it should be said that this is conditionally the front and back sides, because... When knitting a product, any of them, at your request, can become the front one.
Now let's try to write down the knitting of this pattern schematically (although this is not necessary for this knitting, but we need to understand “where the legs grow from”))) and it is advisable to do this using a simple example...
Let's agree that our blog will have the following schematic symbols (in the future I will make either an article or a page where all the information on this topic will be compiled, but for now...)))  And what happens:
Below diagrams 1, 2, 3, 4, 5 are loops,
on the right 1, 2, 3, 4 are rows.
We knit the first and third rows with purl stitches, and the second and fourth rows with knit stitches, close them by purling them (this is if you read the diagram). In general, nothing complicated. Have questions?