Both children and adults love the touching Teddy bear.
Appearing in the toy world, he immediately won popular love. You can buy a bear in a store, but how much cuter and more expensive it will be if you knit it yourself with an ordinary crochet hook from wool or cotton yarn.
The first Teddy bears were made with a moving head, paws and legs. But such complex toys can only be knitted by very experienced craftswomen. We’ll talk about simpler Teddy bears that even beginners can make.The traditional color of the Teddy bear is gray and blue, which is what needlewomen try to stick to in their work. Although bears appear in other colors, they are also very charming and attractive. Talented knitters come up with new clothes, jewelry and accessories for Teddy that make everyone’s favorite bear fashionable and modern. It’s not difficult to crochet a Teddy bear, you just need work and patience. But as a result, you will get the whole family's favorite toy. To make a bear you will need:
- Wool or cotton yarn, hooks of different sizes.
- A piece of fabric for patches.
- Sintepon, floss threads, buttons, ribbons, beads and seed beads.
- The body, head, muzzle, ears, paws and legs are crocheted according to the pattern.
- The connected parts are stuffed with padding polyester and sewn together.
- The eyes and nose are sewn on and the mouth is embroidered.
- For stuffing, use only padding polyester. Over time, the cotton wool will crumple and ruin Teddy's appearance.
- The eyes and nose of the bear can be sewn on in the form of buttons or purchased ready-made at a craft store.
- Try to knit the fabric tightly. Use a hook with a thickness less than the thread.
- To make your knitted Teddy look cute and touching, sew his eyes close together.
- The little bear will become even more charming if you provide him with clothes by knitting a hat, scarf and sweater.
Designations used in knitting patterns:
- VP - air. a loop
- SBN-st. without crochet
- PSN - semi-st. double crochet
- SSN - art. double crochet
- С2Н - st. with 2 yarn overs
- SS- connecting art.
- P - increase (we knit 2 sc in the loop of the previous row)
- U - decrease (we knit two loops together)
Teddy bear, crocheted - master class
We will need: gray and white yarn, blue and black floss threads, hook No. 2.5, black beads for the eyes, padding polyester, gray fabric for the patch.Step one: we knit the details of the bear according to the patterns (head, body, ears, nose, paws and legs).
Torso
 Yarn gray knit 2 air. loops, in 2nd air. We knit a loop with 6 sc. Without connecting the rows, we knit in a spiral.
  Add padding polyester and distribute it evenly over the body, rolling it in your palms. Then use a needle to close the hole.
 Head


We do not close the back loops yet, leaving a thread 50 cm long for 1 row of decreases. We begin to design the bear's face. Sew on the eyes in the form of two black beads with black thread. It is advisable to sew the beads closer to each other to make the bear look more touching. Then we embroider the eyebrows and “scars” with black threads, and the nose with blue threads. After decorating the muzzle, close off the last loops.
Ears
With gray yarn we knit 2 air. loops, in the second air. We knit a loop with 6 sc. First row - knit 1 sc into each loop to make 6 loops. Fasten the thread connecting post, leaving 15 cm for sewing. Then we sew the ears to the head.
Paws

 Legs
Legs


Step two: sew all the finished parts together with gray yarn. Teddy bear is ready!
Knitted Teddy bear - master class

We will need: wool blend or acrylic yarn, some white yarn for the muzzle, blue thread for the nose, padding poly or holofiber for filling, beads for the eyes, black thread for patches.
Work order: we knit the parts of the bear according to the given pattern, sew them together, sew on the eyes, embroider the nose and patches.

Knitted Teddy bear with a bow - master class

We will need: gray wool or cotton yarn, hook No. 2 or No. 3, ribbon, beads for the eyes, black threads for the nose and eyebrows.
Work order: we knit the parts of the toy according to the pattern, fill them with padding polyester and sew them together.
Knitted bear with scarf - master class

We will need: 60 g of Soufflé yarn Brown, 30 g yarn beige colour, some lilac yarn for a scarf, hook No. 2, 2 beads, black threads for the nose, padding polyester.
Work order: we knit the parts of the bear (we knit the body and head together). We sew the connected parts together. We start knitting from the head in a circle st. without a crochet.
Head with body:
- We knit 6 rows, increasing to 40 loops, then we knit exactly 11 rows.
- We reduce the number of loops to the volume of the neck (you should get 18 loops), then knit exactly 2 circles, adding loops for the volume of the body. To do this, first double every second loop, and in the next rows - at the beginning every 4th, then every 6th loop.
- We knit two rows evenly, then we double every 3rd loop until the body is slightly larger than the head (you should get 55 loops), then we knit 8 cm evenly.
- We begin to decrease the loops by skipping every 3rd loop.
- As we knit, we fill the parts with padding polyester.
- Using beige thread we knit a chain of 3 air. loops and close into a ring.
- We knit 3 rows, increasing to 25 loops.
- We switch to brown yarn and knit exactly 5 rows.
- Then we decrease 4 loops, knit exactly 9 rows and decrease the remaining loops.
- Using beige yarn we knit a chain of 8 chains. loops
- We knit around the chain, adding loops at the turns. In total you need to knit 4 rows, then knit exactly 5 rows.
- On one side we decrease 7 loops, then we decrease 2 more times by 3 loops.
- We knit exactly 7 rows, evenly decreasing the remaining loops.
Ears: Using brown yarn we knit a chain of 6 chains. loops, close the circle and knit 9 tbsp. with a double crochet in the center. You need to knit 2 pieces from brown yarn and 2 pieces from beige yarn.
Scarf: we knit a chain of air with lilac yarn. loops of the required length and tie it st. double crochet To prevent Teddy from being sad, you can knit a cute girlfriend in a fashionable skirt for him.
Using the same crochet pattern, each bear gets its own special character.
Teddy bears also live at the North Pole.
A mohair bear with a flower, knitted by yourself, will be a wonderful gift for any holiday.
To crochet a Teddy bear, you need to put in a lot of work, but the resulting result will exceed all your expectations. A funny little bear, knitted by your talented hands, will fill your home with warmth and comfort.
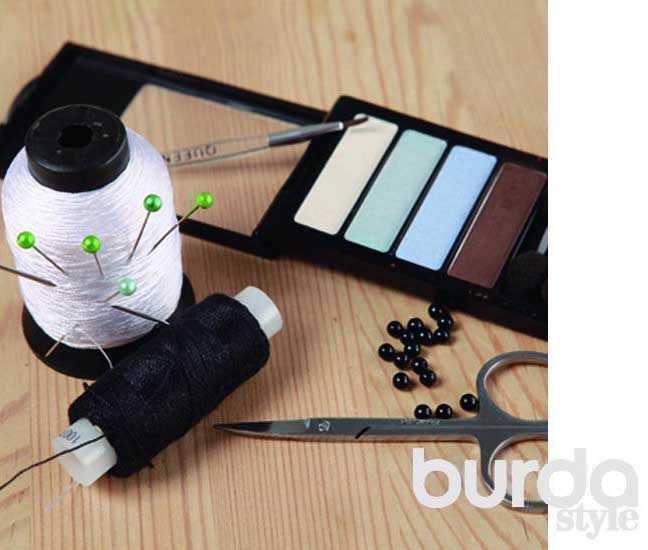
You will need
For knitting and stuffing
Hook No. 1.5; white wool or acrylic threads; padding polyester or padding polyester.For finishing
Black threads; brown eye shadow; 4 pins; large needle with a large eye; scissors; durable nylon threads; 2 black beads for eyes.Completing of the work
First we knit the parts of the bear.
Head
1st r.: 2 ch, 6 tbsp. b/n in the second loop from the hook.2nd row: 2 tbsp. b/n in each column = 12 tbsp..
3rd row: *3 tbsp. b/n, 2 tbsp. b/n in the next column, from * repeat 3 times = 15 tbsp. b/n.
4-5th year: Art. b/n in each column in a circle. Knit 1 tbsp. b/n in the next column to shift the knitting to the middle of the cervical part of the head. This column is not taken into account and is used to adjust the center of knitting.
6th row: 3 tbsp. b/n, 9 connections tbsp., 3 tbsp. b/n, knit in each loop.
7th row: 3 tbsp. b/n, * 2 tbsp. b/n in the next column, from * repeat 9 times, 3 tbsp. b/n = 24 tbsp. b/n.
8th row: 6 tbsp. b/n, *2 tbsp. b/n in the next column, from * repeat 3 times, 6 tbsp. b/n, **2 tbsp. b/n in the next column, from ** repeat 3 times, 6 tbsp. b/n = 30 tbsp. b/n.
9-12th: Art. b/n in each column in a circle.
13th row: *4 tbsp. b/n, 2 tbsp. b/n together, from * repeat 5 times = 25 tbsp. b/n. Knit 2 tbsp. b/n in the next column to shift the knitting to the middle of the cervical part of the head. These stitches are also not taken into account and are used to adjust the center of knitting.
14th row: *3 tbsp. b/n, 2 tbsp. b/n together, from * repeat 5 times = 20 tbsp. b/n.
15th p.: *2 tbsp. b/n, 2 tbsp. b/n together, from * repeat 5 times = 15 tbsp. b/n. Knit 1 tbsp. b/n in the next column to shift the knitting to the middle of the cervical part of the head.
16th p.: *1 tbsp. b/n, 2 tbsp. b/n together, from * repeat 5 times = 10 tbsp. b/n. Fill your head with synthetic down and close the stitches, knitting 2 together until the end.
Torso
1st row: 2 ch, 6 sts. b/n in the second loop from the hook.2nd row: 2 tbsp. b/n in each column in a circle = 12 tbsp. b/n.
3rd row: *1 tbsp. b/n, 2 tbsp. b/n in the next column, from * repeat 6 times = 18 tbsp. b/n.
4th row: *2 tbsp. b/n, 2 tbsp. b/n in the next column, from * repeat 6 times = 24 tbsp. b/n.
5th row: *3 tbsp. b/n, 2 tbsp. b/n in the next column, from * repeat 6 times = 30 tbsp. b/n.
6-9th r.: Art. b/nv each column in a circle.
10th r.:. *1 tbsp. b/n, 2 tbsp. b/n together, from * repeat 10 times = 20 tbsp. b/n.
11-13th r.: Art. b/n in each row in a circle.
14th row: *2 tbsp. b/n together, from * repeat 5 times, 10 tbsp. b/n = 15 tbsp. b/n.
15th r.:. *1 tbsp. b/n, 2 tbsp. b/n together, from * repeat 5 times = 10 tbsp. b/n.
Stuff the body with synthetic down and close the stitches, knitting 2 together until the end.
Upper paws
1st row: 4 ch, 1 tbsp. b/n in the second column from the hook, 1 tbsp. b/n, 3 tbsp. b/n in the next column, turn to the other side of the chain of air loops, 1 tbsp. b/n, 2 tbsp. b/n next column = 8 tbsp. b/n.2nd row: *2 tbsp. b/n in the next column, 1 tbsp. b/n, from * repeat 4 times = 12 tbsp. b/n.
3-4th r.: Art. b/n in each column in a circle. Knit 1 tbsp. b/n in the next column to shift the knitting to the middle of the back side of the upper paw.
5th row: 4 tbsp. b/n, *2 tbsp. b/n together, from * repeat 2 times, 4 tbsp. b/n = 10 tbsp. b/n.
6-13th r.: Art. b/n in each column in a circle.
Fill the foot with padding and close the stitches to the end, knitting 2 together.
Lower paws
1st r.: 6 ch, 1 tbsp. b/n in the second column from the hook, 3 tbsp. b/n, 3 tbsp. b/n in the next column, turn to the bottom side of the chain of air loops, 3 tbsp. b/n, 2 tbsp. b/n in the next column = 12 tbsp. b/n.2nd row: 2 tbsp. b/n in the next column, 3 tbsp. b/n, *2 tbsp. b/n in the next column, from * repeat 3 times, 3 tbsp. b/n, **2 tbsp. b/n in the next column, from ** repeat 2 times = 18 tbsp. b/n.
4th row: 6 tbsp. b/n, 2 tbsp. b/n together, 2 tbsp. b/n, 2 tbsp. b/n together, 6 tbsp. b/n = 16 tbsp. b/n.
5th row: 4 tbsp. b/n, *2 tbsp. b/n together, from * repeat 4 times, 4 tbsp. b/n = 12 tbsp. b/n.
6-12th r.: Art. b/n in each column in a circle.
Stuff the paw with synthetic down and close the stitches to the end, knitting 2 together.
Knit the second leg in the same way.
Ears
1st row: 4 ch, 1 tbsp. b/n in the second st. from the hook, 1 tbsp. b/n, 3 tbsp. b/n in the next column, turn to the other side of the chain of air loops, 1 tbsp. b/n, 2 tbsp. b/n in the next column = 8 tbsp. b/n.2nd row: *2 tbsp. b/n in the next column, 1 tbsp. b/n, from * repeat 4 times = 12 tbsp. b/n.
3rd r.: Art. b/n in each column in a circle.
Finish by joining with a stitch into the next stitch. Cut the thread.
Tie the second ear in the same way.
Tail
1st row: 2 ch, 6 tbsp. b/n in the second loop from the hook = 6 tbsp. b/n.2-3rd r.: Art. b/n in each column in a circle. Finish by joining with a stitch into the next stitch. Cut the thread.
Step 1
We embroider the nose, mouth, and claws with black threads. We outline the eyes and ears with pins.
Step 2
We pass the nylon thread, leaving a tail, from the left ear to the right eye, put on the bead and thread it back.
Step 3
We pull the ends of the thread tightly so that the eyes sit deep, and tie them. We sew the ears with these ends of the thread.
Step 4
Using one thread, we sew both lower legs at once, then both upper legs, but on the outside of the legs we insert the needle 1–2 mm below the thread exit point, and with inside and in the body the entry and exit points of the thread coincide. We tighten it tightly.

Step 5
For the navel, we insert the thread several times on the tummy and bring it out at the place of the tail.
Step 6
Sew on the tail and head.
Step 7
Using the tip of the brush, apply tint (shadows) around the eyes, nose and navel.
Children and adults know the soft, cute Teddy bear. He appeared in the toy world a long time ago and acquired true love in people. You can buy this toy in a store or make it yourself using ordinary threads and a hook. It is desirable that the threads be cotton with the addition of wool thread.
The very first bears had moving heads, legs and paws. However, such a complex toy with mechanisms can be made by experienced needlewomen. We will present the simplest Teddy bears that craft beginners can make.
The most suitable and well-known color of the Teddy bear is blue-gray; this is what many needlewomen use when making their works. However, if desired, the bear can be made of a different color; it will not become any less attractive. Experienced needlewomen They knit accessories, jewelry and clothes for Teddy, which makes him more modern.
What to pay attention to, work sequence, materials
Crocheting a Teddy bear is not difficult; all you need is patience, labor and available materials. The end result is a cute, soft, fun toy that people of all ages will enjoy.
To make a bear you need to buy
-hooks of different sizes, cotton or woolen threads; -ribbons, buttons, a piece of padding polyester, beads, beads; -a piece of fabric to make a patch, thread for embroidery.The pattern for knitting a bear is standard, as for other options. That is, according to the presented diagram, you need to knit the head, body and muzzle of the bear cub, its legs, paws and ears. After all the parts are knitted, they are sewn together and stuffed with padding polyester, then the parts are sewn into a bear. Upon completion of the work, his mouth, nose and eyes are embroidered.
Here are some tips to ensure you have the most charming, beautiful and fashionable Teddy bear.
- 1.As a filler, you should use only synthetic padding polyester, since cotton wool and other materials will form clumps over time, and this will spoil appearance toys.
- 2. The nose and eye for the toy can be purchased in special needlework stores, but if there is no opportunity or desire, then they can be embroidered with ordinary embroidery threads.
- 3. You need to knit the parts tightly. The threads should be thicker than the hook.
- 4. To make Teddy funny, cute and mischievous, his eyes need to be placed closer to each other.
- 5. It is advisable to dress your friend, so he will become more charming and fashionable. Therefore, you need to knit a sweater, a hat, a scarf, and socks.
Below you will find several lessons on knitting bears with detailed description the whole process. Each work is supplemented with a description of the work sequence and a knitting pattern.
Here are the symbols that are present in knitting patterns
- VP - air loop
- SBN-st. without crochet
- PSN - semi-st. double crochet
- SSN - art. double crochet
- С2Н - st. with 2 yarn overs
- SS- connecting art.
- P - increase (we knit 2 sc in the loop of the previous row)
- U - decrease (we knit two loops together)
Master class on crocheting a Teddy bear

You need to take two types of yarn: white and gray, embroidery threads black and blue, two black beads for the eyes of the bear, a hook No. 2.5, padding polyester and gray fabric needed for patches. The very first step is knitting the details of the pattern; the body, head, nose, ears, legs and paws are knitted.

Take gray yarn and knit 2 air loops, and in the 2nd. we knit an air loop 6 sc. There is no need to connect the rows, since the body of the spiral is knitted.


All nape stitches are still open, but the thread must be left at 50 cm to complete the first row of decreases. Next, we move on to designing the bear’s face, embroidering the eyes with thread to make two black beads. The eyes should be closer to each other, so the bear’s face will be more touching. You can also embroider the toy’s eyebrows with black threads, but it’s better to make the nose out of blue threads. When the muzzle is formed, you can begin to close the last loops.
We knit in the same way, that is, we knit two air loops, in the second we knit 6 sc, only now we use gray yarn. In the first row we knit 1 sc in each loop, you should get 6 loops. Next, we connect the thread with a column, but you need to leave 15 cm for sewing. Now you can sew the ears to the head.


 Step two: now you need to sew all the finished parts with gray yarn and the bear is ready!
 Knitted cool Teddy bear - ready-made master class

To work, you need to buy acrylic or wool blend yarn, blue thread for the nose, and a little white thread for the muzzle. To fill the bear, you need to purchase a piece of holofiber or padding polyester, beads for the eyes, and black threads for the patches. Work plan: First you need to knit the parts according to the pattern, then sew them together, embroider patches, eyes and a nose.

Teddy bear with a bow - master class
 You need to buy gray cotton or woolen fabric, ribbons, hook No. 3, black thread for embroidering Teddy’s eyebrows and nose. Work plan: all parts are knitted according to the pattern, then they are stitched and filled with padding polyester.
Little bear with a scarf - master class

You need to take: brown ryazha – 60 g, white– 30 g, lilac color – 5 g. black thread for the nose. Hook No. 2. two beads and padding polyester. Work plan: the head and body of the bear are knitted together, they are all stitched. From the head the knitting goes around without crochets.
First you need to knit 6 rows, gradually increasing to 40 loops, you should knit 11 rows. Next, we reduce the number of loops so that it is equal to the neck, that is, 18 loops. We knit two more circles, while adding loops for the volume of the body. To do this, double every second loop, in other rows every 4 loops, and then every 6 loops. We knit two rows evenly, after which you need to double every 3 loops. We do this until the body is wider than the head, on average you should get 55 loops, after which you still need to knit 8 cm. After this, the loops are reduced, skipping every 3 loops.
We take a beige thread and knit a chain of three air loops, which we close into a ring. Then we knit three rows, increasing to 25 loops. Next, take the brown thread and continue knitting 5 more rows. Next you need to decrease 4 loops and knit 8 rows, all remaining loops are also decreased.
Take a beige thread and knit a chain of 8 loops. We also knit around it, but adding loops at turns. In general, 4 rows are knitted, then another 5 rows. Next, on one side you need to decrease 7 loops, and then 3 loops two more times. Next, we knit 7 rows, evenly decreasing the remaining loops.
Using beige threads you need to knit a chain of air loops, and then close them into a ring. A total of three rows are knitted, gradually increasing to 20 loops; you should also knit 3 rows evenly.
A chain of brown threads is knitted into 6 stitches. And then the circle is closed and another 9 tbsp are knitted in. with a double crochet right in the center. For the ears you need to knit two pieces each from beige and brown yarn.
Interesting ideas for knitting Teddy bears


In order for the bear not to be sad, you can make him a girlfriend in stylish skirt or a fluffy hat. Even if one scheme is used, each bear is individual. If this is a mohair bear, then such a fluffy bear will be an excellent gift for any occasion. Of course, to make such a beautiful bear, you need to spend a lot of effort, but the finished result will pleasantly please you with its originality. Cute, soft bear A teddy knitted with your own hands will warm you up on a winter evening and walk with your owner on a hot summer.
Video:
A toy bear is an object of adoration not only for children, but also for adults. He is like a “talisman” for the family, so he lives in almost every home. Nowadays it is very fashionable to make toys with your own hands. And crocheted bears have become the most popular. It doesn't matter who you are loving mother or a grandmother, a beginner or an experienced needlewoman, but you need to try to knit a bear. Believe me, he will become a family favorite long years. And you will learn how great it is to make such toys with your own hands!
Children love cartoon characters, so for the initial work you can crochet a Teddy bear. This hero is traditionally considered a model of sincerity and kindness. This touching and recognizable bear is knitted quickly and easily. It can be large or tiny, fluffy or smooth, plush or velor, but always gray in color, with a blue nose and expressive eyebrows. The special features of this knitted toy are its movable head and movable limbs.
To create movements, there are special cotter pins that you can buy in a store or make yourself. Perhaps working with details will seem difficult for beginners, then it is better to knit a simpler bear. It will not lose its attractiveness and charm. Subsequently, you can come up with new clothes for him that will make the bear also fashionable.
It is most convenient to do the work with a crochet so that the texture of the parts is dense and retains its shape for a long time. In addition, crocheting small parts of a bear is much easier than knitting.
All that remains is to find some free time and prepare:
- yarn and hooks;
- filler;
- beads or beads;
- floss threads and needle;
- scissors and pieces of fabric for patches.
We offer you a variety of models and options for crocheting bears, with detailed descriptions of patterns and techniques. Many samples are accompanied by color photographs and step-by-step recommendations sequences of actions. This is very valuable for beginning needlewomen. At the end there are links to video master classes.
Having finished knitting, you will receive an extraordinary experience and joy from the fact that you were able to create a bear filled with kindness, care and your love!
Crochet bear, toys from the Internet
Crochet bears in pajamas
The bears are crocheted, height 24 cm. The bears are crocheted according to the same description.
Materials:
- Yarn Softy BabyAlize (Softy Baby Alize) 100% micropolyester, 50 g / 115 m.
We use 3 colors, the color of the bears’ skin (beige),
pajama color (pink and blue). - Yarn “Cotton grass” - cotton - 65% polyamide - 35% 100 g / 220 m (white).
- Hook No. 1.75, knitting needles No. 3.5 for knitting a night cap.
- Any yarn is stiffer and harder for slippers. I used cotton (Rose).
- Eyes, noses (they can be molded from plastic).
- Filler.
- Wire for handles.
- Cotter pins for connecting the head to the body. I attached the handles with thread fastening.
- Various decorations, buttons.
Crochet Big Billy Bear

Crochet polar bear
Elena Zibrova's toy.
For knitting you will need:
- hook No. 1.5
- Yarn Coco Vita Cotton
- filler for toys
- 2 black beads for eyes
- floss threads
Crochet bear in a scarf
The size of the finished toy is 15 cm.
To knit a bear you will need:
- hook 2.5/3 mm;
- 4 colors of yarn (light brown, pink, white, dark brown);
- filler.
Crochet bear on a wire frame
To knit this bear we used:
- Bari yarn from SEAM-145 m. in 50 g;
- hook 2 mm;
- holofiber filler;
- braided wire 2.5 mm;
- half beads for eyes;
- embroidery floss;
- darning needle with a large eye;
- pliers;
- glue moment transparent.
Crochet little bear
Designed by Sue Aucoin of Out of the Thistle.
Crochet amigurumi bear with gift
Materials
- Anabel Alpina yarn or similar thickness Lily Vita Cotton in beige, red and white colors and a 2.5 mm hook;
- white fluffy yarn Krokha Nazar or Softy Alize for pompom and hook 3-3.5 mm;
- thinner yarn for the muzzle in white (Lily Alpina) and suitable hook(I have 1.6 mm), black thread, needle, scissors;
- half-bead eyes 8 mm and glue;
- pink blush and cheek brush.
Cute crochet bear
Crochet bears: Amanda and Annie
Translation from Loren Ver.
You will need:
- acrylic yarn
- hook
- plastic eyes
- filler
- ribbon
- buttons
Crochet Teddy bear from Maria Ustyushkina
Necessary materials:
- Yarn ALIZE Softy, color 119 ( grey sky), one skein was enough for me.
- Yarn ALIZE Softy, color 55 (white), for the face.
- YarnArt JEANS, color 33 (blue) for embroidering seams and nose.
- Gray felt for patches.
- Filling (sintepon, padding polyester or holofiber).
- Hook No. 2.5.
- Beads for eyes (I have about 5 mm).
- Long needle for thread fastening.
Crochet Teddy bear from Zhuravleva Lyudmila
Adorable bear cub in pajamas. Translation by Irina Koreneva
The size of the finished toy is about 23 cm when using similar yarn.
Skill level: advanced.
We knit in a spiral, in continuous rows, unless otherwise indicated.
In amigurumi, most of the details start with the magic ring. If you do not want to use it, you can start with a chain of 2 chain loops, knitting 6 sc in the first loop.
Use a knitting marker or piece of yarn to mark the end or beginning of a row. Move the marker after completing each row.
Materials and tools:
Yarn Cotton (50 g / 85 m; 100% cotton)
Beige is the main color
White - for the muzzle
Light pink – for shoes, collar and clasp
Purple - for pajamas
Pink – for decorative seam
3 mm crochet hook (or suitable for the yarn of your choice).
Yarn marker.
Filler.
Eyes on a secure mount (Ø 14 mm).
Four small buttons.
Cotton yarn for embroidering a bear's nose
Needle for sewing on details and embroidery.
Crochet bear Roma
Necessary materials:
- Yarn (I have violet. Manufacturer: PNK named after Kirov, composition 100% cotton, weight: 75 g, length: 225 m)
- brown (primary color),
- just a little beige for the face,
- any two colors for the blouse (you can use one if you want a plain one);
- filler;
- hook of suitable diameter;
- safety eyes with a diameter of 8-10 mm;
- stitching needle;
- some black floss threads to decorate the face.
Crochet bear in a sweater
Materials:
- Yarn of various colors of your choice (body color, muzzle color, sweater color and two colors for stripes on the sweater);
- Black beads for eyes;
- Thread for embroidering the nose;
- Hook to match the yarn. Personally, I used hook number 2. the result was a 7.5 centimeter bear;
- Tapestry needle;
- Filler.
Crochet pink bear. Translation by Lily Iskakova
Crochet bear from Oksana Saukhina
Crochet Teddy bear. Description author laska_sweden
Photo of the bear - Lyudmila Martynova.
Baby teddy bear crochet
The bear is knitted according to the description of baby Yo-Yo.
Crochet valentine bear
A simple description of cute little bears. You will need 30–40 grams of yarn of any color and a suitable hook; two beads and yarn like “Iris” for the eyebrows, nose, mouth and claws (black or other suitable color). For the face, palms and heels, you can use a different, lighter color (my bears have white). You will also need a filler - padding polyester, padding polyester, comfortel, cotton wool or something like that.
The head and body are one piece. The legs and arms are knitted one at a time and then sewn to the body. It is convenient to embroider the nose and mouth on the muzzle when it is not yet sewn to the head. It is better to sew on the eyes and muzzle before you start knitting the body. The ears can be sewn on after the bear is ready.
Crochet bear
The bear is not very big. Only 10.5 cm.
Material:
- yarn "Olga". But it will be prettier and you won’t have to comb it if you use Lotus Stretch Grass yarn.
- Filler: actually a special one is used. filler for toys, but regular yarn will do. I had “Vita elegant” in the right color on hand. It is soft and does not fall off, holds its shape well.
- You will also need a button and beads (nose and eyes, respectively).
Crochet amigurumi bears, another option
Crochet bears, cartoon characters "Care Bears to the Rescue"
Teddy bear with flower from Dione Design
Materials and tools:
- Yarn 150m/50g (polyacrylic) and 120m/50g (cotton):
- 50 g blue
- 50 g beige
- 20 g white
- 10 g pink
- 5 grams green
- A little yellow and brown
- 2 plastic eyes with 14mm safety lock or 2 black beads
- Filler
- Hook number 3.5 or suitable for your yarn
- Needle.
Not only children are delighted with knitted toys. Adults are also very happy when they receive such an unusual and original gift. However, in order to connect the intended character, it is important to have special skills. Which beginner masters lack. Therefore, in this article we propose to study the technology of crocheting a teddy bear.
Where to begin
Experienced needlewomen say that knitting toys is a very fruitful activity. And not only because it allows you to keep yourself busy creative work. Much more important is that the result is an amazing and original creation that will delight all family members and, first of all, the needlewoman herself. Therefore, those who once dared to do knitted toy, forever fall in love with this technique.
Professional craftsmen note that it is much more convenient to perform various crafts using a hook rather than knitting needles. They also say that knitted bears are the most popular. However, in order to really do beautiful craft, you need to prepare. The first step is to decide which bear you want to knit. It could be a Teddy bear, the Soviet Olympic Bear, Umka, or even a talking bear from the American comedy "Ted". In the material presented below, we will look in detail at how to crochet a Teddy bear. After all, it is he who is the most popular toy.
Yarn selection
Knitted toys are made using the amigurumi technique. We study the features in detail below. For now, let’s look at the most suitable knitting threads for the job. Experienced craftsmen We are convinced that acrylic yarn is best suited for the craft we are studying. If the product is being prepared as a gift for a child, it is wiser to consider children's yarn. Among which it is easy to choose suitable color. In this case, we need gray for the main one, white for the muzzle, blue for the nose, black for stitching the parts. In this case, it is better to choose skeins from one company. But it’s better not to use fluffy or multi-layered yarn. At least for beginning needlewomen. It's uncomfortable to work with her. In addition, a crocheted teddy bear may turn out to be too holey. That is, the filler will be visible through the knitted fabric. The product will look sloppy and, accordingly, ugly.
Search for a hook
Experienced needlewomen advise taking special care and scrupulousness in choosing the tool that will be used to knit the intended product. Traditionally, for various things, knitters use a hook equal to the thickness of the thread. However, the amigurumi technique has its own characteristics. And the hook size refers specifically to them. Craftswomen who knit toys professionally say that crocheting a teddy bear should be done in such a way that the knitting is as tight as possible. Therefore, it is wiser to consider a thinner instrument. You need to focus on the selected yarn. Also, you should not buy too much long hook. The ideal one is the one that fits well in the hand.
Additional items
Many beginning needlewomen, having decided to make a knitted toy, think for a long time about what filler to choose for stuffing their craft. Experienced craftswomen are convinced that it is best to fill a crocheted small or large teddy bear with holofiber. This will allow you to wash it if necessary and dry it without any problems. It is better not to use cotton wool or batting. This material will dry for a very long time, flowing down, leaving red-brown marks on the toy. In addition, the bear will be quite heavy.

It is also worth noting that professional knitters purchase filler in large quantities in a specialized store. Because they need to fill a lot of toys. If the reader just wants to master a new skill or try his hand at a technique of interest, you can use the inside of a gutted pillow or an unnecessary blanket as stuffing. You can also put scraps of fabric into a crocheted teddy bear. But in this case, the craft can also turn out to be heavy. In addition, it will not be very convenient to wash it.
"Magic" amigurumi ring
Perhaps the reader has heard about the term that we formed in the title of the current paragraph? If not, we will explain that the amigurumi ring is another feature of this technique. Knitting any craft begins with it. Including our little bear. However, it does not involve any difficult actions. Next, we invite readers to study detailed instructions on implementation amigurumi rings:
- First of all, we take the prepared yarn.
- And wrap the thread around your index and middle fingers.
- The result is a loop.
- Which must be carefully removed.
- And tie it with six single crochets.
- Connect the first and last loop.
- And then carefully pull off the middle of the resulting circle.
- To do this, you need to pull the beginning of the thread.
- This is how we started crocheting an amigurumi bear.
- In the next row we need to double the number of stitches. To do this, we knit from each column bottom row two new ones.
- Then we knit three rows according to specific instructions.
- And turn the circle to the other side. Thanks to this, the initial thread will be inside the bear cub.
- We carry out further work, also moving in a circle, but in the other direction.
Torso-base
Having carried out competent preparation and having analyzed all the features of the technique being studied, you can begin crocheting a teddy bear. Work begins with the completion of the largest detail - the body of the bear. To do this, take the main yarn and carefully study the sequence of actions described below:
- We make a loop, forming an amigurumi ring, and tie it with six single crochets.
- In the first row, from each loop of the bottom row we knit two new ones.
- In the second, we increase through one single crochet, in the third - through two.
- In the fourth row, we knit two single crochets from one loop of the bottom row, maintaining an interval of three stitches.
- We knit the next five rows without changes, just moving in a circle.
- In the tenth row we make the first decreases. We knit two single crochets and fasten them with a single loop. The interval is one column.
- Further description of the crocheted teddy bear involves simply crocheting the current number of loops. Therefore, we knit five rows without increases or decreases.
- In the fifteenth row we make a decrease, maintaining an interval of five columns.
- Then we stuff the bear’s body with the prepared filler.
- We knit the sixteenth row, decreasing through one column.
- Work is done!
Bear head

In the next part of the instructions on how to crochet a bear cub, we will analyze the technology for performing the most important part of our craft. To do this, we prepare yarn of two colors. Since we are starting work from the spout, we take a white knitting thread. Then we dive into the creative process, following the description:
- In the second row we make an increase every three columns.
- We knit the third and fourth row in the round without changes.
- We switch to gray yarn.
- In the fifth and eighth rows, we double the number of loops, knitting two new stitches from each loop of the previous row.
- In the sixth we make an increase through one column.
- In the seventh - through two columns.
- We knit the next four rows without changes.
- Next, we begin to cut the loops. In the thirteenth row we make a decrease through three columns.
- We simply knit the fourteenth and fifteenth rows.
- In the sixteenth we make a decrease through two columns.
- In the seventeenth - through one column.
- We knit the next row without changes.
- In the nineteenth we decrease half the loops.
- We knit the twentieth without changes.
Ears for a bear
Experienced needlewomen say that it is not at all necessary to crochet a Teddy bear. Beginners can use the described technology to make any other white or brown fluffy. If you wish, you can even knit a panda. You just need to choose knitting threads of the appropriate colors. Of course, no bear cub can do without ears. Therefore, next we will find out how to complete this detail:
- Work begins with knitting an amigurumi ring.
- Then divide the number of loops by three.
- We knit 2/3 of the ear in increments through two stitches.
- The remaining 1/3 with connecting posts.
- Repeat the last two steps one more time.
- Next, we knit 2/3 of the eyelet three rows without changes with simple stitches, and 1/3 with connecting stitches.
- According to the instructions described, we prepare two parts.
Upper legs
If you look closely at the bear cubs, crocheted, you will notice that the upper and lower legs differ in size. Therefore, you should knit two parts at a time, and not all four identical ones. First of all, we study the technology for making the upper legs or handles:
- Forming an amigurumi ring.
- We make an increase through two columns, and in the next row - through three.
- After four rows we knit without changes.
- We knit the twelfth and thirteenth rows without changes.
- In the fourteenth we cut half the loops.
- Break the thread and pass through the remaining loops.
Lower legs
At this point we study the technology for making the legs of our bear:
- First of all, we form an amigurumi ring.
- We make an increase through one column, and in the next row - through two.
- After six rows we knit without changes.
- In the seventh row we make a decrease through two columns.
- From the eighth to the eleventh row we make decreases at intervals of three columns.
- We knit the next three rows without changes.
- In the fifteenth row we decrease through three columns.
- Then we knit two rows without changes.
- In the eighteenth year we cut half the loops.
- Break the thread and pass through the remaining loops.

How to make a bear that can stand
- Work begins with the formation of an amigurumi ring.
- Then we knit a circle of the required size.
- Having achieved what we want, we knit the piece in height. We just move in a circle without increases or decreases.
- Then we gradually reduce the loops. Professional craftsmen say that it is better to record the initial addition of loops and complete the part in the same way. That is, make decreases instead of increases.
If the reader liked this description more, it can be used when knitting the upper legs. But we would like to remind you once again that the lower legs should be larger than the upper ones! It is also important to mention that regardless of which option the reader prefers, the paws will need to be well padded.
Collecting the teddy bear
When all the details are ready, you can move on to the final part of our instructions. On it we have to use a needle and thread and sew the upper and lower legs and head to the body. The ears should be attached to the last part. It should also be supplemented with eyes. Moreover, for these purposes you can use simple black beads or ready-made eyes. You can buy them at any craft store. You can also make “live” eyes yourself if you wish. Experienced needlewomen prefer to knit them, starting with an amigurumi ring and continuing to add to the desired size of the circle. Beginners glue eyes from colored cardboard. After which both options are covered with a thick layer of Momenta glue. Dry and use as intended. The nose for the teddy bear can be knitted, embroidered or made in the same way as the eyes. In any case, it is important not to forget to supplement the finished craft with edges and constrictions representing fingers.
Teddy bear highlight
We have presented to your attention a master class: “Crochet a teddy bear.” However, it is finally important to note: those who decide to knit a Teddy bear cannot do without one more step. Sloppy patches on the side, paws or head of the teddy bear. To do this, it is best to use a piece of felt. contrasting color. Although you can also knit square patches.
Knitted toys are becoming increasingly popular every day. They are easy to do. But if the needlewoman has imagination and the necessary knowledge and skills, she can create a real masterpiece.