Replacing a zipper, as well as other minor clothing repair procedures, can be done at home. Of course, to replace a zipper in any case, you need a sewing machine, but having a machine and a knowledge base on how to replace a zipper on a jacket will not help you sew a new zipper beautifully and unnoticed.
First, before replacing a zipper, you need to determine how complicated this process is. We determine how to sew a zipper into the jacket. If the jacket does not have a plastron, that is, a protective strip that protects the zipper from the wind, then replacing the zipper in it is not at all difficult. Before replacing a zipper on your jacket, practice on a simpler model. You need to take a thicker needle for the machine so that there are no gaps. Sometimes you come across fabric that skips, no matter what needle you use. In this case, the fabric looks too soft and thin. If you come across such fabric, to replace the zipper, sew through paper.
Ripping out the old zipper from the jacket
To replace a zipper on a jacket, you first need to remove the old zipper. To do this you will need thin small scissors and keen eyes. It is easier to remove the zipper from the jacket from the wrong side. To do this, turn the jacket over and move the zipper as far away from the fabric as possible so that you can see the threads that attach the zipper. You can randomly cut out all the threads, you can cut one stitch, and simply pull out the remaining stitches loop by loop. In any case, the procedure is not complicated, the main thing is not to cut off something necessary and rip something that does not need to be ripped.
Now we pull out the remaining threads from the jacket that were used to stitch the zipper and the jacket is ready for the appearance of a new zipper. Often, when sewing a zipper onto a jacket at the end, you may find that the horizontal line of the hem or the yoke line does not match. This kind of work looks sloppy and ugly. Therefore, at the stage of basting the other part of the lock, mark with chalk the horizontal seams or finishing lines, or the line of sewing in the collar. When sewing the second part of the zipper onto the jacket, just pay attention and check that all the marks match when you close the zipper.
How to replace a zipper on a jacket without problems?
The main thing is to take everything into account and measure it. It is convenient to sew in a zipper using a special foot for a sewing machine. It’s called a “foot for sewing in zippers.” This foot can press not only the braid, but also the teeth; the braid is pressed tightly, so there are no gaps in the stitching.
To finally attach the zipper to the jacket, all that remains is to sew it to the sides of the product without touching the details, then turn it inside out and sew the lining on the inside. To do this, you need to open 15 cm of the seam line of the lining sleeve. Through this hole you can turn the jacket inside out after hemming the hems. You can do this: sew the lining to the side with a lock. Sew along the side, there is a line for sewing in the zipper, and you need to sew along it.
After that, sew up the other side, turn the jacket inside out through the hole in the lining sleeve. The opened hole also needs to be sewn up and finishing lines laid.
If in a jacket with a zipper the finishing line went in a circle - along the collar, side, bottom, then when the zipper was steamed, the collar line should have been damaged and it also needed to be restored. To do this, finish the stitches slightly above the stitching to catch the damaged end as well.
To replace a zipper on your jacket, make sure you have everything you need to replace it. After all, for example, not every machine can stitch a zipper on a leather jacket. And sometimes, replacing the zipper is not necessary at all. You can simply replace the slider.
Replacing a zipper can be not only a way to repair a jacket, but also simply a spectacular way to update the design - to do this, you can replace the zipper on a jacket using a bright color or an unusual slider.
The zipper in a leather jacket, as a rule, is installed strong, with a powerful slider (No. 8) and with metal links, and lasts for many years. But still there comes a time when it begins to “diverge” and the zipper in the jacket needs to be replaced.
Buying a zipper for any jacket, jeans, bag is not a problem. In hardware stores you can choose any color of zipper tape, length and size you need. But how do you replace a zipper on a jacket, without resorting to the services of a workshop, on your old household sewing machine?
Sewing machine for replacing zippers in leather clothes


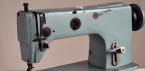
Replacing a zipper in leather clothing is perhaps the most difficult and expensive type of clothing repair. And it doesn’t matter whether the jacket has a long zipper or a short one, repairing leather clothes is always expensive. This is mainly due to the characteristics of this material and the thickness of the seams, which can only be sewn confidently on a special machine, such as a class 22 industrial sewing machine, such as the one in the top photo.
To replace a zipper on a leather jacket, you definitely need to have a sewing machine that can sew leather, otherwise you can break not only the needle, but also the machine itself. Be sure to read the instructions and if it doesn’t indicate that you can sew rough materials or natural leather on it, then don’t even try to do it.
But don’t despair, remember about your grandmother. She probably has an old Podolsk type sewing machine with a foot or hand drive. This machine definitely won’t break and will sew any leather, at least you won’t mind this sewing machine.
Of course, the replacement of the zipper will be done poorly, one might say in a makeshift manner, but if you try hard, then the new zipper in the jacket will look quite decent.
In this video you will see how easy it is to sew leather on a Podolsk type sewing machine by installing a Teflon foot on it.

If you have a machine, and you have installed a thick needle on it, or better yet a special needle for leather, bought a zipper and threads, then you can start replacing the zipper in a leather jacket.
First, of course, you need to remove the old zipper. Open the finishing and at the same time connecting seam and carefully tear off the old lock, since the lock tape is glued to leather clothes. Actually, you will also need to glue the tape of the new lock, so you also need to buy glue for leather or rubber. Instead of glue, you can use special double-sided adhesive tape. Once all thread residue has been removed from the old seam, you can begin preparing to replace the zipper. By the way, for many it will be a problem to undo the old lock so as not to damage the material of the jacket. You can use the method as in this photo, you can use a stationery knife, but a shoe knife is best suited for working with natural leather.
Using a small brush, apply glue to the inside edges of the side of the jacket where the old zipper was, and install the new zipper. First, attach the zipper tape to the front side of the side of the leather jacket, and then to the wrong side.
Carefully place the zipper tape over the adhesive and press the edge of the jacket tightly against the zipper. Check that the edges of the zipper teeth are exactly along the edge of the jacket, if necessary, tear off and rearrange the tape. Leave the jacket for a short time. When the glue is absorbed into the tape, repeat on the other side of the jacket, from the inside out.
Before removing the old lock and replacing the zipper, pay attention to how it is installed. As a rule, the wrong side of the lining is glued well below the zipper teeth. This makes it easier to move the slider and install the zipper. By the way, the new zippers have standard sizes, but since leather tends to stretch, the new zipper may be a little shorter. In this case, it is better to buy a longer lock and shorten it exactly to the required length, using wire cutters, as shown in this photo.
After the zipper is glued to both sides of the jacket, you need to do the finishing stitch. This is the most difficult operation when replacing a zipper on a leather jacket. Therefore, look at the recommendations in other articles on the site, perhaps some of them will be useful to you.
If, when replacing a zipper, the sewing machine does not move the leather well, you can sew it through thin paper, which is then removed. The threads must be strong and elastic; nylon threads are not suitable for sewing.
But before you make the finishing seam, you need to carefully fasten the zipper and check whether the lock is installed evenly. If necessary, you can tear off the glued zipper tape and rearrange it.
If everything is done correctly, and the lines of the pockets, neckline or connecting seams of the parts along the front of the jacket coincide with each other, then you can do the finishing stitch.
You need to sew slowly on the front side with a sewing machine, stitch by stitch, trying to get into the old holes pierced with a needle. To make the machine, or rather the foot, move easier, lubricate the seam area with a small amount of shampoo or soap, and then wipe with a dry cloth.

A zipper is usually inserted into a leather jacket with one seam, so while sewing, check that the needle is gripping the bottom side of the jacket. If you do not have enough experience, you can sew the seam with thread using large stitches along the old holes without piercing the skin in new places. Besides, you won’t be able to pierce four layers of skin with a hand needle.
Thick, rough areas and seam joints can be softened by lightly tapping them with a hammer.
How to replace a zipper slider

Repairing a zipper on a jacket, jeans, or bag does not always require replacing it. Replacing zippers is required if the teeth of the metal lock have become detached from the tape, or the tip of the left side of the fastener has become frayed. In such cases, you cannot repair the zipper with your own hands, and replacing the slider or, as they also say, “dogs” will not help.
A more complex case is when the slider in a bag or suitcase needs to be replaced. If the zipper comes apart when fastening, you will have to contact a workshop or studio and replace the zipper. But you can replace the slider in a jacket yourself; the main thing is to buy a slider of the same size and type at a sewing accessories store.
To avoid mistakes when buying a slider, it is best to have an old slider with you. But even this does not guarantee that it will definitely fit. It is possible that after replacement the lock will come apart or not fasten at all. This is especially common with so-called “twisted” or spiral lightning. Less common with tractor and metal zippers.
So, how can you replace the slider and repair the zipper yourself easily and simply?
First, you need to remove the fastener on the right side of the zipper strip if the lock is metal or spiral. The “tractor” zipper does not have such a fastener, or rather, it is there, but it is not removable, but this one is a little lower.
Using an awl or a small screwdriver, carefully straighten the tabs of the bartack. After this, remove the old broken slider and install a new one in its place from top to bottom. Place the fastener in its original place and bend the petals back with pliers or a screwdriver.
Check how the lock works with the new slider, and to facilitate its movements, you can rub the teeth with a piece of dry soap.
Replacing the zipper slider "tractor"

The “tractor” zipper slider is a little more complicated. The slider can be removed only after the molded plastic fastener has been removed. It can be removed with pliers, “bitten through”, and the slider replaced. But how can you prevent the slider from popping out when you close the zipper?
The easiest way is to remove the fastener from some old metal zipper, preferably a larger one, and place the tractor on the zipper strip.
You can remove the slider without removing the fastening if you try to push the slider between the teeth of the tractor zipper and then insert the slider back in the same way.
To make removing and installing the slider easier, you can lubricate this area with liquid soap.
You should remove and install only in the very top part of the zipper, since with this “barbaric” method you can damage several teeth, and the slider in this place will “slow down” and may even jump out.
If a zipper on a jacket breaks, there is an alternative - walk unzipped or replace the zipper on the jacket. If you choose the second option, you can try to carry out this operation yourself, or you can contact a specialized studio.
Reasons for replacing the zipper yourself
The cost of replacing a zipper on a jacket, like other services and products, is constantly increasing. If you have enough money, no free time, and you live alone or with several adults, then it is better to contact a specialized studio. If you have children, then, as a rule, such problems arise with enviable frequency. In this case, it is better to master this technology yourself.
What you need to replace a zipper
To carry out this operation, you will need a new zipper of the same length and approximately the same width as the one to be replaced. In addition, you will need threads of the same tone as the color of the jacket. It is very advisable to have a sewing machine with a special sewing foot.
Replacing a zipper on a jacket
We remove the broken zipper, as well as all the threads that may get into the new zipper.
If there is a bar, remember its location. From the inside of the lining on the sleeve we trim a piece of about 15 cm.
First, they sew on a strip that covers the zipper from the inside and protects the person from the wind. We make a basting using threads (in the future, when the eye “gets full”, this operation can be abandoned). We place the bar in its previous location and sew with a sewing machine.
Next we begin to sew on the zipper. If it was not possible to find a zipper of the same length that was originally on the jacket, then we replace the zipper with one of greater length. The excess is removed using scissors from the top side.
The zipper is attached to the jacket. The zipper and jacket edges are aligned. Control marks are made on these edges (zippers and jackets). As a rule, using chalk or a piece of soap to prevent the elements of the jacket from warping.
We open the zipper, apply it to the jacket and combine the marks, align the cuts, sweep.
If you purchase a longer zipper, bend this excess at a right angle and cut it off.
We lay the jacket, stitch it and make sure the stitching is even.
When using pins alone, they are placed in front of the paws to prevent the needle from breaking.
It is better to sew the zipper with a special foot, which allows free movement along the teeth. If you don’t have such a foot, you can use a regular foot and stitch at a distance of 0.3-0.5 cm from the teeth.
We perform the same technological operations with the second part of the zipper.
After we have stitched and checked that the marks and edges of the jacket match along the length, we turn it inside out and align its edges with the edges of the lining. After this, the selection is basted and attached to the zipper sewing line. This line will be visible from the inside out. The edges of the zipper will go into the collar at the top or be sewn into the fabric of the jacket.
Turn the jacket right side out. We sew the ripped sleeve.
If necessary, straighten the jacket, baste it and make a finishing stitch on top, getting into the original seam, which is noticeable.

This is how, in general, replacing a zipper on a jacket with your own hands is done.
What to do if the sewing machine does not sew a jacket or there is no sewing machine

When replacing a zipper on a leather jacket, the sewing machine may not be able to sew through the leather. The method proposed below is also suitable if you do not have a sewing machine.
In these cases, you can sew a new zipper under the old one. In this case, you need to make an indent from the links in order to ensure free movement of the zipper slider. You can also cut off the zipper links.
If this method does not suit you, you need to look for an industrial sewing machine for leather.
Changing a zipper on a leather jacket
We remove the old zipper by opening the seams and tearing off the old zipper, which is held on with glue. Remove the remaining threads. We attach a new zipper using leather glue or double-sided tape, then fasten the jacket and check that the neckline, lower edges of the jacket and the pocket line are level. We make a connecting stitch on a special sewing machine.
When sewing on a zipper, you need to make sure that the needle catches the bottom edge of the jacket, since the skin can only be pierced once.
Changing the slider

In many cases, all you need to do is replace the zipper slider on your jacket. If the slider does not close the zipper, you can use pliers to tighten it as a temporary measure. In this case, only the dog is changed. Replacing the zipper is required when its edge is turned into “shags”, or if there are no teeth on the tape. The store purchases the same slider number that was used for the same type of lock. If in doubt, it is better to take your jacket with you and try to button it in the store. The runner is removed from the tape after removing the top fastener, which is placed back after inserting the runner. In a plastic “tractor” type lock, it cannot be put back; instead, a metal fastener from the old lock is used.
In conclusion
If necessary, you can replace the zipper on the jacket yourself. You need to have a machine, patience and follow the instructions. For a leather jacket, such a replacement is more difficult to make, but possible.
Hello, my dear readers. Today I had to face replacing zippers on trousers, so I decided to dedicate a blog article to this. To be honest, I don't really like remodeling, fixing, etc. It is much more pleasant to create some beautiful thing from scratch))). But what can you do?…..It often happens in life that you pull the “dog” on a zipper unsuccessfully, and it takes it and comes off! And the trousers are my favorite... So I have to replace zipper. You can, of course, take it to the master in the studio, but we are our own masters here, right?
So let's get started..
There are these trousers with a broken zipper. It seemed to me that it would be a long process to replace and sew in a new zipper, and so I put off this, in my opinion, “unpleasant” task for several days. And I was very surprised at the end when I did it in 10 minutes!
The first step is to flog the old zipper. To do this, it is best to use a steamer (as in the photo):


We open the seams on the left half of the trousers with a seam ripper, so you will get a separately ripped hem, zipper and the main left part of the trousers. We cut the zipper at the root so that we don’t have to undo the belt as well (well, of course, if you want, you can undo the belt a little above the zipper, then the top of the zipper will be sewn, as it should be, into the belt. But in my opinion, this is a waste time and effort, and it does not affect functionality).
We also rip off the other part of the zipper on the right side of the trousers.

Now we take a new zipper and cut it from the top, having previously measured the desired length. The length of the zipper should be a couple of centimeters longer than necessary, we will turn the zipper 90 degrees at the top, so do not cut the zipper end to end.
We pin or baste (I'm always too lazy to throw)) half the zipper to the side where the slope is located. Let me remind you that the slope is a rectangle of fabric that covers the zipper on the inside of the trousers.

So, first we sew the zipper to the trousers themselves, and then we put this slope underneath as it should be in the end, and sew three layers on the machine with one seam: the outer fabric of the trousers, the zipper and the slope.

When one side of the zipper is sewn, we proceed to the second part.
We close the zipper (fasten it), and completely fasten the trousers with a button, as they should look when wearing the product.

We turn the trousers over with the front side facing us, and pin the outer right part of the trousers with a zipper and a slope on the inside. We chop by touch, the main thing is to make sure that there is no displacement in the codpiece area. In this way, we fix the zipper in a fastened state, so that when we sew the second part of the zipper, it does not turn out that the zipper is not fastened all the way, or is “pulling” somewhere. 
Turn the codpiece over to the wrong side.

Now we need to carefully pull out the pins and use them to pin together the unsewn half of the zipper and the right side of the trousers, i.e. the same thing, just remove the fabric of the slope from under the pins.

We unfasten the zipper and sew the right side on the machine, bend the upper section of the zipper so that relative to the entire zipper it lies horizontally (i.e. at an angle of 90 degrees) and hides under the waist allowance. It turns out that in the process of sewing a zipper, the needle can rest directly on the zipper links, which lie “edgewise”, so do not accidentally break the needle, you need to sew slowly in this place, skipping that 1 mm stitch when the zipper links move from the front side to the back... ..oh, I missed it... but I hope it will be clearer to you.. 
When both parts of the zipper are sewn, all that remains is to fix the slope at the bottom. 
From the wrong side, we use a pin to connect the lower edge of the slope with the allowances and the zipper on the right side of the trousers. We sew 1 cm on a machine. This way we fix the codpiece at the bottom. If desired, you can also add decorative stitching along the front side of the trousers. 
Watch also the video about how to change a zipper on trousers:
Friends, good day and good mood to everyone. It's autumn and it's time to take out your warm clothes from the mezzanine: jackets and down jackets. The very first thing you need to do is check the condition of warm clothes for appearance and operation of fasteners and locks.
How much does it cost to replace a zipper on a jacket at a studio?
I think that it will not be difficult for any housewife to sew on the torn ones, but if it turns out that a demi-season jacket requires repairs in terms of replacing the zipper, then many will resort to the help of a specialist in the studio. But believe me, if you have a sewing machine at home and you know how to use it, then replacing the zipper on your jacket with your own hands will not be so difficult. Watch how to change the lock on a jacket in my master class today and save your family budget. After all, the approximate price for replacing a zipper on a women’s jacket in a studio is from 700 rubles.
What did I need to change the lock on the trigger with my own hands?
- detachable zipper lock
- single-horned sewing machine foot for sewing on a lock
- machine needles No. 100 - 110
- threads
- sewing tools: tailor's pins, scissors, measuring tape, chalk
How to choose the right jacket lock in the store
You can buy a zipper that fits your jacket at a sewing accessories or fabric store - to do this you need to measure the non-working old zipper on the jacket. To make the task of choosing a lock easier, you can use a ripper to remove a non-working lock from your jacket and bring it with you to the store for a sample.
There are several types of locks in the store: tractor and spiral, detachable and permanent, metal and plastic. In my master class I will use a metal tractor split lock, you can choose any one depending on the old model of the zipper. The main thing is that it is detachable. When purchasing, check the suitability of the new lock: you need to unfasten and fasten the zipper once or twice to the end, also checking the connector.
The price of a lock (metal zipper) in the store will cost you much less than what they will offer in the studio. Therefore, if you decide to replace the zipper on your jacket in a studio, it will be more economical to come with what you purchased.
How to change the lock on a jacket step by step
I have a warm vest with a lining, which does not yet have a zipper. I had already purchased a metal zipper at a hardware store, its price was 130 rubles.


1. I disconnect the lock and apply it to the product as shown in the photo.

2. I turn the lock with the front side facing the vest and pin it with pins.

3. I install a special foot on the sewing machine for sewing on a zipper lock. It is called single-horn and is equipped with almost every model of sewing machine. If you have a thin needle, you also need to replace it with a stronger 100 or 110.
I make a straight stitch, trying to get the needle closer to the teeth of the lock.

4. I fasten the zipper and make small notches on the second half of the fastener at the joints - this is the collar, raglan and belt. This must be done so that when fastening the lock on both sides it will lie symmetrically and there will be no distortion.

5. I do step 2 with the second half of the zipper, while applying chalk marks to the joints. Next on the typewriter is point 3.
Now, having fastened the lock, you can check whether you sewed it symmetrically.

6. I sewed the lock to the vest, now I need to connect it to the lining correctly. To do this you have to crawl inside the vest. In order to perform this operation, you need to prop up the lining. I usually do this on the back at the very bottom as shown in the photo. I use a steamer.

7. I turn the vest inside out. And I apply the lining to the lock as shown in the photo. I secure it with tailor's pins.

8. Using a sewing machine, I sew a straight stitch along the edge of the lock. With this I sew the lining to the zipper from the reverse side. I do the same with the second half of the zipper.

As a result, I get a lining neatly sewn to the lock. This is what the vest looks like from the reverse side.

9. On the front side I put hand stitches, fixing the vest fabric closer to the fastener. This is done so that the fabric of the zipper does not show through. It doesn't quite match the fabric of my vest, so I'm only showing the metal part of the lock. I iron the running stitch through the ironing iron.

10. Using a sewing machine with a foot for sewing on a lock, I lay a finishing stitch on the front side of the vest on both sides of the zipper lock, at a distance of 0.5 cm from it.