You can refresh your appearance and hair using various modern techniques and accessories. One of the current methods is hair dyeing. Today, the ombre technique is very popular, which allows you to get a very smooth and natural transition between several shades, as if the hair itself had bleached in the warm sun.
In this article, we’ll take a closer look at ombre coloring options for blondes, find out the features of this procedure, and get acquainted with interesting ready-made options from stylists.

Peculiarities
Recently, not standard hair coloring options, but more modern and gentle ones such as ombre and balayage, have become increasingly popular. Ombre is a technique that involves a smooth, subtle transition from one shade to another.
Speaking about fair ladies, including fair-haired and blondes, it is worth noting that they, as a rule, leave their natural color in the root zone, as well as right up to the middle of the hair, but lighten the ends several shades lower. As a result, the lightening procedure is considered quite gentle compared to, for example, regular and complete hair lightening.


The ombre dyeing technique is very popular among long-haired blondes, as well as fair-haired ladies with short bob-type haircuts. The ombre effect looks amazing at any length.

Advantages and disadvantages
In any coloring technique, there are significant advantages and disadvantages that cannot be ignored. The advantages of ombre include several points.
- This technique is considered more gentle and safe, since professional and safe coloring compounds with care components are used to dye hair.
- It is very easy for fair-haired ladies to achieve the desired ombre effect the first time, since they do not need additional initial lightening of the strands.
- Thanks to ombre, you can significantly increase the volume of your hair. This is no secret - after all, light shades always look more voluminous and attractive.
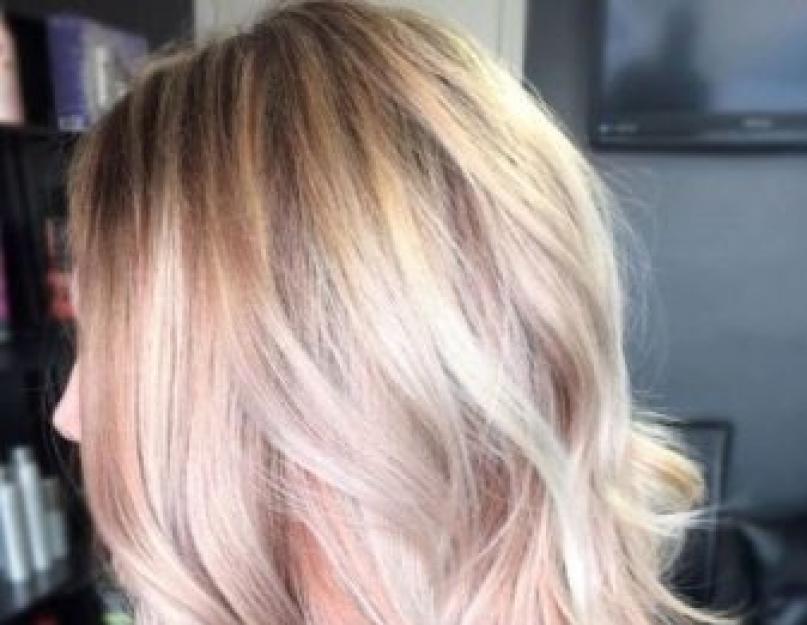
- Ombre on blondes looks very fresh and natural. Moreover, this coloring looks great with any haircuts and styling. The smooth transition is in perfect harmony with straight and even hair, as well as with slightly curled ends.
- A big plus is the ability to choose the desired shade or even several to color it to match your natural color. Today, paints are produced in a huge variety. For example, ladies with family warm shade Hair color can be gold or caramel, while cool beauties will choose ash or platinum.
- Thanks to ombre, you can hide significant imperfections on the face, including excessive angularity or prominent cheekbones. Someone, on the contrary, may due of this coloring and the right haircut will highlight your advantages in the best possible way.
- It is impossible not to note the durability of the staining. On average, it pleases its owner for up to six months, after which color correction may be required.


Ombre on blondes looks stylish, fashionable and attractive.
We can safely say that it will not go out of fashion in the next couple of years, because this is the technique that celebrities from all over the globe love so much.
As for the disadvantages of this technology, there are not so many of them. The most basic ones include a number of nuances.
- Quite a high price for coloring, which ranges from 6 thousand rubles. It is also very important to consider that to obtain the required shade, the hair will have to be tinted. Moreover, this additional procedure should be performed not only in the salon, but also at home, since the light pigment is washed out quite quickly. All expenses ultimately add up to a round sum. But the result, of course, cannot but please.
- The disadvantages include the lack of professionalism of many hairdressers offering this fashionable coloring service. Many specialists have absolutely no idea how to do it because they have not received the appropriate training. As a result, they offer regular highlighting for a high price, but not to the roots.

Varieties
Today there are many coloring options using one or more fashion technicians. Next, we will consider the most popular of them.
- Classic ombre option. Dark top of the root zone and light tips. When dyed correctly, the color transition is smooth and not abrupt. As a rule, color stretching is done. Blonde hair at the ends can be tinted in absolutely any color, for example, pink. In general, bright and unusual ombre shades are found in colorful colors.
Lavender, lemon or strawberry colors can be used here.


- Scandinavian ombre also very popular among blondes. It represents the opposite classic version this coloring. In this case, the top is painted with a light shade of blond, and the ends are painted dark.


- Vintage ombre look done when you want to focus not on the general transition between shades, but on slightly regrown roots, which create an even more natural effect.


- Multi-tone option coloring is done if it is necessary to make a multi-stage transition between several shades.


The choice of one or another type of ombre should be made based on personal preferences. color scheme, as well as the condition of the hair at the time of the proposed dyeing. Each type is made for any hair length.
Before implementing the desired coloring, We recommend that you pay attention to some expert advice.
- Blonde girls with very thin and brittle hair Before dyeing, it is recommended to restore your hair, especially if it has been dyed more than once before. Painting weak hair can only spoil the final look. Masks, herbal infusions, as well as properly selected shampoo and conditioner can be used as restorative procedures.

- You should not do ombre dyeing at home. This is not as simple as it might seem at first glance. Ultimately, if you do not have the appropriate skills, the result is still disastrous. When choosing this coloring, you should never save on your hair.

- Owners of white hair should take a closer look at ombre options with shade transitions. Such options look especially attractive, especially those in which golden, caramel and even chestnut shades play with each other.


- To maintain healthy hair, it is recommended to wash it only with a special shampoo and balm (conditioner) for colored hair. They are the ones who will not wash out the coloring pigment ahead of time. According to the recommendations of the specialist who will carry out the coloring, it is best to choose a tinted shampoo for home use.

- You can style your hair using a regular straightening iron. They not only straighten them, but also make beautiful curled curls. You can also slightly curl the light ends using a curling iron or brushing while drying.


Options to note
Today, many fair-haired representatives of the celebrity world choose ombre. Next, we will consider successful options that may be of interest, as well as those that you can take as the basis for your future coloring.
- Model Rosie Huntington-Whiteley enough long time wore ombre. On the red carpet, she could be seen with both short and long hair, dyed in such a way as to create a natural effect and a smooth transition between the two shades.

The ombre coloring technique was presented to the world by celebrities and it left few people indifferent.
The girls immediately wanted to imitate their idols, because this style of painting is unusual - the natural color is preserved at the roots and nearby, but starting from the middle, it turns into increasingly lighter colors.
However, procedures in beauty salons are too expensive, so if you really want to, you can set up a beauty salon at home and do the ombre yourself.
How to dye ombre hair and do it correctly at home, what to pay attention to when dyeing your curls at home, detailed video tutorials - all this is further in the text.
Description Ombre
This style appeared with light hand stylists interested in the spectacular hair color of Californian surfers.
The curls that were burnt out over the summer grew back in winter, and between the light ends and natural color the roots resulted in a smooth transition.
All the stylists had to do was perfect the technique, achieving the natural transition of colors created by the dyes.
Ombre effect – fashion trend , which has captivated not only hair beauty experts. Now it is used in clothing, makeup and manicure.
The Ombre effect looks best on dark or light brown hair.
This universal technique is suitable for both fashionistas and girls who do not want to radically change their appearance, but want to add a twist to it.
There are no strict rules in this technique by choice of color or proportions.
If you dye your hair with a natural color, the impact of dyes on it will be minimal and there will be no need for frequent adjustments due to growing roots.
No matter how much the curls grow, it will not change the original idea at all, so the ombre technique is not only super fashionable, but also practical.
The longer the hair, the more space for imagination stylist.
- Short hair significantly narrows the area of action, but the solution would be to highlight individual strands with a color gradient along the entire length.
On long curls The transition of shades is best placed at shoulder level or slightly lower. There is room for a stylist's imagination to run wild and experiment with shades.

The average length allows the transition zone to be located at the level between the earlobe and the chin.

House painting technique: step-by-step instructions
More often ombre is done on dark hair ah, gradually lightening the ends. You can imitate the ombre style with your own hands using multi-stage lightening.
At the same time, there are different techniques. If you get acquainted with several, you can choose one that can be easily reproduced on your own.
Preparing for painting
In addition to paint, you need to prepare devices in advance, which you may need in your work:
- container for diluting dye components;
- paint brush;
- food foil, cut into strips 10 cm wide and 5 cm high longer than the intended painting area;
- gloves;
- hair bands.
First you need to prepare your hair: comb and divide into strands; it is better to cut off split ends immediately.
Secure each strand with an elastic band 1 cm above the coloring area. No need long hair dividing it into strands in 2 tiers, this will only get in the way.
For independent actions, it is enough to make 4 ponytails– 2 on both sides of the face and 2 behind.
Stir the dye according to the instructions, and see the recommended exposure time there (usually 40 minutes). Wear gloves.
Painting methods
Mentally divide the painting area into 4 parts(for example, 5 cm) and time (10 minutes).
The first area should be exposed to the dye longer than the last, so subtract 5 minutes from the last time period and add it to the initial time.
 Next proceed step by step:
- Place the strand along the strip of foil in the middle and paint its tip 5 cm. Bend the foil from the bottom and wrap it on the sides so that it does not slip. Do this with all the strands. You need to work quickly, but without fuss. Wait 15 minutes.
- Unfold the foil and apply dye to the next 5 cm of hair. You can use a fine-tooth comb to distribute it evenly. Wrap the foil. Repeat on all strands. Wait 10 minutes.
- Repeat the previous step. Wait 10 minutes.
- Repeat the previous step. Wait 5 minutes.
A smooth transition will be made gradually from heavily colored tips to natural color.
At the end of the allotted time, remove the foil and throw it away, rinse your hair well with mild shampoo and conditioner, dry it and enjoy the effect.
You can achieve the Ombre effect by coloring the ends of your curls in 3 stages. This option is suitable for light hair (for example, light brown).
How to do ombre at home this way? Preparation is carried out in the same way as in the previous version., but the strands to be dyed must be moistened so that water does not drain from them.

Mentally divide the area to be highlighted into 3 parts. Apply the composition in the same way as in the previous version, but you will only have to wrap and unroll the foil 3 times.
The first section is lightened for 20 minutes, the rest - 10 minutes each. When using foil, the transitions are rich and the ends of the hair are lighter.
If you need a “lighter” coloring with smooth transitions, instead of foil and a brush, use a comb with frequent teeth, while the strands with the composition remain open.
With this technique, it is better to use a cape over your shoulders so as not to stain your clothes with dye.
A derivative method from the ombre technique that gives excellent results is.
This technique is used by selected masters and is offered in a limited number of beauty salons. But no girl is forbidden to try to reproduce it at home.
You can listen to the advice of masters who actively use the Ombre technique:
- To make your curls look impressive, you need to cut off all the damaged ends - these are the ones that are accentuated by lightening;
- you should not carefully draw the upper border of the paint - the more uneven it is, the more natural the transition looks;
- you should not be afraid of experiments, but if you have doubts about the result, you can first limit yourself to coloring the ends, which, if unsuccessful, can be easily cut off;
- Ombre looks impressive on blonde hair, but instead of lightening, the ends of the hair are darkened.
Admiring the result and receiving satisfaction from it, you happily feel that everything is in your hands (including saving on the stylist).
Ombre (maybe not quite in correct technique) you can make at home and surprise with a new fashionable look.
Blondes who prefer bold experiments can use bright colors instead of a lightening agent when coloring.
We'll tell you how to do ombre at home to make it look cool!
How to make ombre at home step by step
Ombre will be a fairly simple technique if you already have some experience with hair coloring. This method does not necessarily have to be performed with a smooth transition from one shade to another. That is, the jewelry work of a master is not always required. This means that you can figure out how to make an ombre yourself.
The transition from one shade to another in ombre can be smooth or abrupt. Credit: Rex by ShutterstockIn addition, it is not necessary to do dark roots and blonde “according to the classics.” This method works great with combinations of the most different shades. In addition, you can try.
Ombre, on the contrary, is light roots and dark ends. Credit: Rex by ShutterstockIn other words, you can improvise a little on how to do ombre, and you don't have to be a professional colorist. That is, it is quite easy to cope at home if you know the following rules.
Step-by-step instructions on how to make ombre yourself
You should start by choosing paint shades.
1. Choose ombre colors
At this stage, it is important to decide what kind of ombre you want:
Classic with dark roots and light tips;
Reverse ombre;
Other options, such as colored ombre, black and red, or.
In fact, the choice of shades is unlimited. Credit: Rex by ShutterstockPerhaps for the ombre shade combination you choose, you don't need to dye the roots, but just need to lighten or dye the ends. To get any shade lighter than the original hair color, you need to follow.
If the strands are already colored, you will also need to lighten or. And then, of course, tint it in the desired color. By the way, you can use the ombre technique for home implementation.
It is important to note that before using any coloring agents It is best to do an allergy test. To do this, you need to apply a drop of the composition to a small area of skin. If redness or discomfort occurs, quickly wash off the product.
2. Before making an ombre, we determine the border of the transition of shades
You determine the boundary of transition from one shade to another in ombre yourself.
The border of the transition of shades in ombre can be higher or lower, at your discretion. Credit: Rex by ShutterstockIt is worth keeping in mind that ombre can grow out for a long time and beautifully, and the transition from one shade to another, accordingly, falls lower.
3. Paint the roots
Before making an ombre along the entire length of your hair, it is important to tidy it up. If you plan to leave your roots with your natural shade, you can skip this step.
When you need to change the shade of colored roots from dark to light or bright, you will need to lighten or wash the color, and then toning. In other cases, you just need to paint it in the desired shade. A predetermined coloring boundary can be separated with hairpins or elastic bands.
4. Paint the ends
Next, you need to divide your hair into thin strands. Each strand needs to be secured with an elastic band at a level just above the shade transition boundary you have determined. You can use a little to make the color stretch seem smoother.
Then you have to dye the lower part of the hair to create an ombre. It is best to apply the coloring composition with a special brush so that it is distributed evenly. The paint must be kept for exactly as long as indicated in the manufacturer's instructions.
5. After doing ombre, take care of your hair properly
Finally, it's time to remove the dye from your hair, wash and dry your hair. By the way, it wouldn’t hurt to nourish your strands with a mask, especially if you’ve bleached your hair.
Editor's tip: let's say it fits perfectly. Its formula with almond and shea butter helps strengthen damaged strands and maintain their brightness and shine.
Ombre hair coloring has not lost its popularity for several years now. recent years. The love of fashionistas for this type of color hair has a completely rational explanation.
Firstly, the contrast of lightened and dark strands in the face area refreshes and youthful the image. Secondly, it is convenient - you do not need to touch up the regrown roots as often as with full classic coloring. Thirdly, the hair is not damaged along its entire length, and the procedure does not need to be carried out frequently. Fourthly, it suits everyone, regardless of length, face type, and original hair color. Fifthly, this is a great way to return to your natural color, grow it and look stylish and neat.
And yet, ombre hair coloring can be easily done at home. This does not require special skills or tools, just regular paint from the store, gloves, food foil, and a few rubber bands. You can experiment with colors and the method of drawing and application. Thus, it is easy to change without unnecessary expenses, time and money, without leaving home.
How to do ombre dyeing at home
Considering all the above benefits, it is difficult to resist the temptation to transform your appearance in this way. The question remains - how to get this trendy color? You can, of course, go to a salon and pay a tidy sum for such beauty. Or you can do ombre coloring at home, on your own. And if you take into account the recommendations of professionals, the result will be no worse.
First of all, it is necessary to determine where the color transition border will be located. For example, for long hair, the transition is made in the area of the shoulders and below.
For hair middle length– at the level from the earlobe to the edge of the chin.
On short haircuts the transition is made by highlighting individual strands or painting the most long ends strands near the face. Here the stretch is less short, and the border looks clearer.
Therefore, dyeing ombre hair at home is best done on long or medium-length hairstyles.
What you need

This instruction - dyeing ombre at home with a photo - will also be required.
Preparing for coloring
The main thing to consider before doing ombre dyeing at home is that your hair will inevitably be damaged by the influence of the dye. Therefore, you need to prepare your curls for such an impact.
To begin with, it is recommended to carry out a course of moisturizing treatments for the ends of the hair, using oils or balm. Then cut or lightly profile the ends to a short length. Because after dyeing, dry and damaged hairs will become even more clearly visible. If you have short or medium-length hair, then such preparation is not required.
Visually determine the area where the transition will be located. It is important to clearly understand where to finish applying paint in order to avoid mistakes in the process.
Wear clothes that you don't mind getting dirty.
Read also:
There is no need to wash your hair before dyeing. Please note that the recommendations are given for medium hair thickness; if you have thick hair, then you need to divide it into the parietal and occipital zones. And already them, into four equal parts.
1. Comb your curls along the entire length with a wide-tooth comb.
2. Part your hair in the center, dividing your hair into two parts. On the left and right, part the part again with a comb from the crown to the area behind the ear.
3. Tie four ponytails with elastic bands.
4. Mix the paint components in a bowl using a brush.
5. Apply dye to the ends, starting from the back of the head. To a height of approximately 5-6 cm.
6. Wrap with foil.
7. Wait 5 minutes. Unfold the foil, then apply the dye again to the strands, rising 5-6cm higher.


8. Wait 5 minutes again, and again color the curls to a higher level.
9. Having reached the border of the color transition, blend it for a smooth distribution.
10. Total time procedures should not exceed the paint holding time recommended on the packaging. On average 20-30 minutes.
11. Rinse off the coloring composition using shampoo and conditioner.
Ombre hair coloring at home is step-by-step application dye (brightener) starting from the tips and ending with the border of the color transition. Using this technique, a smooth color transition is achieved, since the paint exposure time decreases as it approaches the transition zone.
Methods
 You can dye your hair with an ombre effect at home in another way. For example, apply dye immediately to the entire lower part of the hair, without first dividing it into curls using elastic bands. In this case, each strand is dyed to a different height.
This method is good for light brown and light brown initial colors. The gradient is also done different ways– the level is higher on the face, lower on the back of the head, similar to a semicircle. Straight or uneven transition line.
 If the shade of your curls turns out to be yellow, use tinting agents. For example, Tonic tonic is 9.1 platinum blonde, or 7.1 graphite.
Coloring using the ombre technique gives the appearance expressiveness and originality. By and large, there is no need for a hairstyle with such coloring - the play of color is good in itself. Is it possible to do ombre at home?
Features of the technology
Ombre is original technique dyeing hair in two colors with a transition from one tone to another. Exist various options ombre: from roots to ends, a dark tone can turn into a light tone or a light tone can turn into a dark tone.

It is acceptable when any natural tone turns into a bright, unexpected color (pink, blue, green, purple). Moreover, if when transitioning from one natural tone to another the boundary is certainly blurred, then in the case of transition to a bright unusual tone it can be expressed very sharply.

Additional advantages of the transition from a dark tone to a light one include a certain effect of burnt hair, and also allows you to do a little trick: with a dark tone that is sufficiently close to your native one, you can increase the time between colors, since the regrown roots will be less noticeable.


Carrying out ombre dyeing yourself is no more difficult than usual. Let's look at this process in detail.
Preparation of tools and materials
For coloring you will need:
- clarifier;
- selected paint;
- container for preparing paint (bowl);
- comb;
- latex gloves;
- brush for applying paint;
- brush for applying brightener;
- food foil;
- hair clips or elastic bands;
- shampoo;
- conditioner (balm).

The foil should be cut into strips of approximately 10 centimeters.
The length of the strips should be several centimeters longer than the staining area.
The choice of materials for painting is quite diverse. It will simplify the task by purchasing an ombre kit, in which the necessary components have already been selected in the required proportions, as well as detailed instructions to them. The disadvantages of this method may be the increased price (for convenience) and the lack of the required color for sale.


Blondoran is often used in the salon, which also requires the purchase of an oxidizing agent.

There is a risk of overdoing the concentration, so it is recommended to leave the choice of this procedure to professionals.
The simplest and most gentle option is a dye for blond hair containing a lightener. You won’t get a bright contrast, but your hair will be healthier.

How to do it?
Let us describe step by step the process of dyeing in 2 colors at home. To begin with, we note that it is better not to wash your hair before coloring, and even better - do it 2 days before the procedure.
- Having prepared all the necessary products, you need to thoroughly comb and lightly moisten your hair. Then divide the entire volume of hair into a straight parting, and divide each part further using a clip or elastic band. In a similar way we get 4 tails - 2 on each side of the face.
If your hair is thick, you need to make more ponytails.

- Now prepare the clarifier: remembering to wear gloves, mix the ingredients in a bowl according to the instructions on the package. If you decide to lighten with blondoran, then add oxidizer by volume 2 times more than blondoran. The mass should be homogeneous and without lumps.

- We apply the brightener using a brush, which is usually included in the coloring kit. Starting from the ends of the strands, we move from bottom to top, slightly short of the elastic band, trying to apply the composition evenly. You should paint quickly so that the brightener does not have time to dry out. The entire procedure should take 10-15 minutes.
Some hairdressers advise pre-twisting the strands into strands to make the border between the lightened and unlightened areas more blurred.

- Then we wrap each tail in foil as follows: we place the strand lengthwise in the middle of the foil, wrap it from the edges, and bend the bottom edge up and along the sides so that the foil does not slip. Keep it for about 30-40 minutes.

- We remove the foil, wash off the brightener and apply it again - now 5 centimeters higher. We wait 10 minutes and wash our hair again.

- Lastly, we lighten the ends of the hair again. Apply lightener to them and wash off after 10 minutes. After which I wash my hair with shampoo and conditioner.


If you have little experience in not overexposing the lightener, it is recommended to check whether the desired tone is obtained. You need to look at a small strand after 20 minutes. If you are satisfied with the color, wash off the bleach from all your hair. If the shade needs to be lighter, wait another 10 minutes and check the result again.

Another secret is that after washing off the bleach, the hair should be dyed with a light dye containing care components (vitamins, oil) to make the transition look more natural.
This will also give your hair the nutrition it needs. All modern paints contain nutrients, so it is not necessary to recommend a specific brand.

After bleaching, the hair must be thoroughly dried before proceeding directly to coloring. It's good if you let them dry naturally.
- The step-by-step guide to coloring looks almost the same as to bleaching.
- The hair must be divided into strands again and collected in ponytails. It is advisable to twist them into bundles. The more ponytails you make, the more natural the transition will look.
- Wearing gloves, we will dilute the paint, following the instructions exactly. Remember to ventilate the room.
- Using a paint brush, apply paint from bottom to top. The paint should cover the entire lightened area and go slightly beyond the border with the unlightened area. This will achieve a smooth color transition.
- We keep the paint for as long as indicated on the package. The effect will be better if you wear a special cap or cover your head with cellophane.

We wash off the paint with warm water. Keep in mind that you must also wear gloves to do this. Then the gloves can be removed and your hair can be washed with shampoo for colored hair using a restoring balm.
We divide the hair into strands and dye it with a brush from bottom to top from the ends. On short haircuts, the coloring border is usually at the level of the middle of the ear. We keep each colored strand wrapped in foil for about half an hour - as written on the package. Then remove the foil, wash your hair with shampoo for colored hair and dry it with a hairdryer.
Now we tint the roots. Apply the paint to the roots and use a comb to distribute it so as to cover the already painted areas. Thus, we get a smooth transition from one color to another. Leave the dye on for about 20 minutes, then wash it off, wash your hair again with shampoo and conditioner, and then let the curls dry.

For long
Long hair is the most suitable option for ombre, as the transition looks especially natural. The length makes it possible to diversify coloring techniques - use not the classic 2 colors, but 3 or even more. You can dye it diagonally, you can select individual strands. On long curls, the coloring border usually runs at the level of the chin.


We moisturize the hair, divide it into 4 tails, then dye from the ends of the tails from the bottom up, slightly below the elastic band. Wrap it in foil as described earlier and keep it for about 30 minutes, depending on the instructions. Wash and dry your hair. Next, you can tint the roots, as described in the case of short hair.

To medium
Ombre on medium hair is especially recommended for long bobs, bobs and similar haircuts. Stylish haircut It looks especially impressive in unusual colors, for example, white and crimson. Elongated side strands, colored in bright color. When cutting a medium length haircut, lightening the lower part of the hair imitates the natural burnout of the strands.


The ombre technique will also help to correct the shape of the face; in the classic style (dark top, light bottom), painting makes the face more elongated and thinner. The haircut option with bangs makes it possible to highlight the bangs - for example, by coloring their ends.
When distributing the dyeing time along the length of the hair, it should be taken into account that the dye should be kept at the first stage of dyeing for 5 minutes longer than at the next one, this way a smooth color transition is achieved.


There are many dyeing methods, differing in the choice of materials and technology. You can, for example, dye your hair in 3 stages, lightening them one by one. The strands should be moistened, and the area to be lightened should be visually divided into 3 parts. The first section is kept in foil for 20 minutes, the other two – 10 minutes each.
Transitions to a different tone will be smoother if you use a comb instead of a brush for coloring.

For light and dark hair, the dyeing technique is little different. The main difference is in the color and concentration of the oxidizing agent when using blondoran. For light hair, oxidizers from 3 to 6% are recommended, and for dark hair, from 9 to 12%. Moreover, any bright, unusual color looks impressive on light hair.

For brunettes, there are 4 especially popular ombre coloring methods.
- Classic (two tones), in which dark strands smoothly transition into light ones.
- Imitation of regrown roots, when the black color turns into light quite high, in the temple area.
- Three-color dyeing, and with a sharply defined border. Non-standard colors look impressive, especially on bright brunettes.
- Selective ombre, highlighting individual strands or bangs.


Let's look at the process of dyeing dark hair yourself. In this case, it is recommended to choose ombre paint 2 shades lighter. Any shades of caramel or milk color are good for contrast. You can also try coppery red color.

Following the instructions, dilute the dye in a bowl, then comb your hair and divide it into separate strands. Apply paint from the ends, from bottom to top, to approximately the middle of the area that will be painted. Keep the strands wrapped in foil for 20 minutes. Then you need to wash off the paint and pat your head dry with a towel.

The next application of paint is from the ends to the border of the coloring, now we hold the paint for 15 minutes. Wash it off again. The next step is to darken the top of the hair from the roots. Apply the paint to the roots with a brush and then extend it to the border with the lightened area. Wait about 10 minutes and wash your hair using the balm. Then let your hair dry.

Blonde hair gives a lot of scope for imagination and experimentation with different colors. Classic ombre involves lightening, giving the effect of burnt hair. But the opposite option is also possible - darkening the lower part of the hair and the so-called effect of regrown roots. It's easy to make it yourself.


For light hair, the dye is usually chosen 2 shades darker. Having cooked necessary materials, you need to dilute the paint as written on the package, apply it to the roots and wait about 15 minutes. Now, on top of the first layer of paint, apply another one to the roots and use a comb to extend it to the intended coloring line. Wait another 10 minutes.

The border can be made even or diagonal - this is achieved with the help of hair ties, which are used to secure the hair in ponytails and form the desired line. After washing off the dye and drying your hair a little with a towel, you can tint the ends of your hair again if the desired effect is not achieved. After waiting about 20 minutes, wash your hair with balm and dry it.

Doubts often arise as to whether it is possible to do ombre on colored hair, especially dark hair. If you are already a pro in the field of dyeing your own hands, and thoroughly know the characteristics of your hair and the dyes that you always use, then you will certainly achieve the desired result. But if you are a beginner, you should keep in mind that the interaction of paints sometimes gives unexpected effects, so it is best to entrust the procedure to an experienced master.


And if you are for experiments, then it is worth remembering that dyed hair should first be bleached.
The ombre technique gives the effect of increasing the volume of hair, and thanks to wide range colors and methods of applying them suit absolutely any face and is possible on any hair length. However, some advice will not be superfluous.
- When choosing paint, it is recommended to give preference natural dyes, professional paints or well-known manufacturers.

- Carefully read the instructions on the paint packaging and follow them strictly, otherwise you may damage your hair.