I was organizing the folders on my computer and found these interesting collars.
There are a lot of them here, and perhaps even small, but maybe they will be useful to someone.
As you know, fashion is cyclical, and if these collars are not in fashion today, this does not mean that they will not be in demand in 5-10 years.
What I mean is that there is no need to write that they are too old-fashioned - everything comes back in fashion!1. Collar with a detachable stand for a men's shirt. It consists of two parts - the stand and the collar itself.
In general, this is the advice to everyone: if you want to cut out a collar, and you don’t know how to do it, which collar is best, and you don’t want to cut the fabric, then it’s best to cut the collar you like from fake fabric (fabric that you don’t mind cutting, it’s better to choose the most suitable in texture), and figure out how you like its shape and how it lies.
In this case, you will not ruin the fabric, and you will be able to evaluate the collar.
And it’s not even so important whether a woman’s shirt or a men’s shirt is the same – the construction is the same.
According to different methods, of course, it differs, but this construction (EMCO method) is quite successful (although there are some angularities and shortcomings).
The shirt collar pattern consists of the collar itself and the stand.
Construction of the collar pattern:
1. Construct an angle at point O.
2. From point O upward, we lay a segment equal to 7 - 8 cm, and place point B.
3. From point B up, set aside a distance equal to 6 - 8 cm (collar width), and place point B2.
4. From point B on the horizontal we make a notch:
5. We connect points A and B with a straight line, in the middle of which (point c) we build a perpendicular up and down, along which we put 1.5 cm in both directions, and put points at b1 and b2.
6. At point B we build a right angle.
BB1 = AA2 = 3 - 4 cm.
Draw the bottom of the rack parallel to the top. We complete the ledge equal to the width of the half-skid. The corner can be rounded or left as an angle - according to the model.
The width of the collar at the front and the design of the ends according to the model.
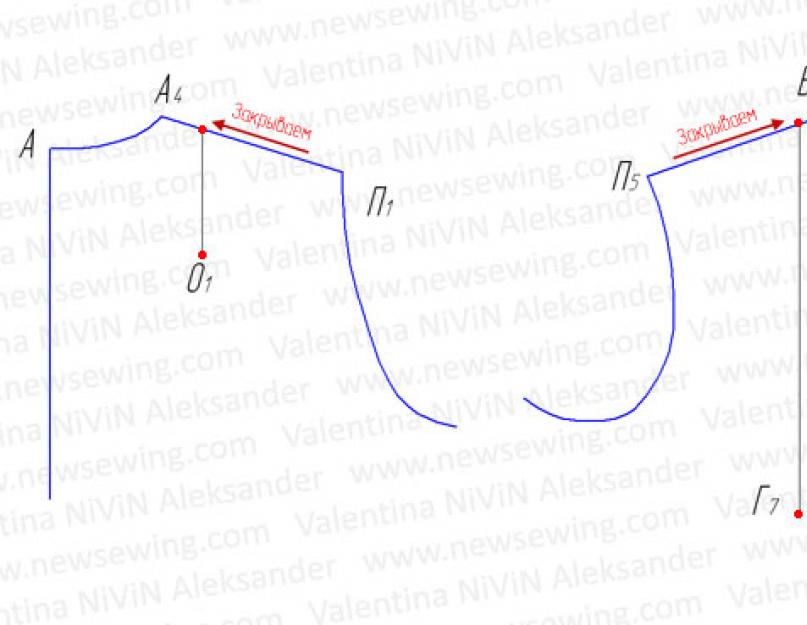
7. AA3 (up) = BB2 + 1 cm
8. A3A4 (right) = 4 - 5 cm
9. Connect points B2 and A4 with a straight line. At its middle A6A7 = 1 - 1.5 cm.
10. We draw the departure line with a smooth curve.
Happy building and sewing!
Quite often you can see shawl collar in clothes.
Such a collar is in demand in blouses, dresses, and even coats, although, probably, most often such a collar can be seen in a robe.
The shawl collar looks very dignified and can be made from almost any fabric.
Pattern it is also not complicated and can be built very quickly.
Constructing a shawl collar pattern (according to the EMKO method):
1. On the continuation of the shoulder line, set aside a distance equal to A4-B = 2 - 3 cm.
2. Connect points B and L, at the intersection with the neck line we place point F.
3. From point A4, on the continuation of line A3-A4 to the left, set aside a value equal to the length of the back neckline and place point O.
4. From point O we lift up a perpendicular to line A4-O, along which we set aside the amount of rise in the middle of the collar = 4 cm - for stooped figures, 6 cm - for kinked figures, and we get point B3.
5. Connect points B3 and A4.
6. From point B3, perpendicular to B3-A4, draw a line to the middle of the collar.
7. Stand height:
B3-B2 = A4-B = 2 - 3 cm.
8. We set aside the width of the departure according to the model, but not less than B3-B2 + (3 - 4 cm), and we get point B4.
9. We draw up the departure line according to the model.
Shawl collar in clothes:
It is presented below and is not anything complicated or scary.
So you don’t need to be so afraid, you can just read it carefully and everything will become clear.
Where can we see an apache collar?
Most often these are blouses and dressing gowns.
But such a collar can often be seen on a wedding bolero.
So, if you decide to sew a wedding bolero, then take note of this collar.
He classical and looks appropriate on many models.
This is, so to speak, a classic that never goes out of style.
Apache collar pattern (according to the EMKO method):
1. On the continuation of the shoulder line, set aside the height of the stand A4-B = 3 cm.
2. Connect points L and B, at the intersection with the neck line we place point F.
3. We continue the L-B line up and put it from point B to the length of the back neck - put point B1.
4. From point F we draw an arc to the left with a radius equal to F-B1, along the arc to the left we lay off a segment B1-B2 = 5 cm.
5. Connect point B to point B2 with a straight line and perpendicular to it from point B2 draw a line from the middle of the collar up and down.
6. From point B2 to the left on the line of the middle of the collar we lay off a segment:
B2-B3 = A4-B = 3 cm, and to the right B2-B4 = the width of the departure according to the model.
7. Position of the front end of the collar.
Point C - according to the model.
8. We draw the departure line and the edge of the collar to the inflection line L-B according to the model.
9. We draw the line for sewing the collar into the neck through point B3 tangentially to the neck, with A4-A41 = 0.5 - 0.8 cm.
This apache collar pattern may vary slightly, depending on the height of the stand.
You can make a turn-down stand:
Or you can make it so that the collar stands at the back, and only its ends are bent:
And you can even do something in between the two options described above:
Below is pattern of a stand-up collar for products with a combined fastener to the top and open to the style.
These collars are most widespread in shirt-style blouses and dresses.
What makes it special?
And the peculiarity is that, unlike turn-down collar patterns with a slight rise, this collar has a kind of one-piece stand-up and looks good both when buttoned and when unbuttoned.
The pattern of a stand-up collar is constructed as follows:
1. Construct an angle at point O.
2. From point O upward, we lay off a segment equal to 2 cm and place point B.
3. From point B up, set aside a distance equal to 3 - 3.5 cm (height of the stand), and
put point B1.
4. From point B up, set aside a distance equal to 8 - 10 cm (collar width), and place point B2.
5. From point B on the horizontal we make a notch:
R = BA = neck length - (minus) 0.05*OB
7. From point A upward we set aside a distance equal to OB2.
8. Distance A3A4 - according to the model.
9. The collar stitching line touches the line OA at point (A1), located at a distance of 1/3 of the segment OA, from point A to the left.
We trace the collar along the control points.
There is a whole group of collars called "fantasy".
Fancy collars are obtained by spreading out the flap of a flat-lying collar of any shape.
These include a collar, which will be discussed below - this is a “mould” collar.
It is usually built on recessed neck.
I will give the construction using the EMKO method.
It is best to make a mold collar from silk fabrics, because... they will flow and lie very beautifully.
Its construction and pattern is very simple.
A2-B1 = 10 cm
A5-O = 9 cm or more
From the drawing we translate the collar pattern, draw cut lines on it, divide the pattern into 8 parts, along which we cut the pattern from the flyaway side and spread it apart.
The amount of expansion depends on the thickness and structure of the fabric, and can range from 10 to 20 cm.
We draw the departure line with a smooth line so that the collar fits nicely into the folds; it should be cut along the bias thread towards the middle of the collar, i.e. to the line A-B at an angle of 45 degrees.
Most often, such collars can be seen on blouses made in a romantic style, but you can also find coats with such collars.
Flat collars.
This is one of the types turn-down collars.
Flat collars are characterized by a small stand-up or its complete absence. This type of collar is mainly used in women's blouses and dresses, as well as in children's clothing and can come in a wide variety of shapes and sizes.
The drawing of a flat-lying collar is built directly on the drawings of the front and back. First, we decide on the model of the dress or blouse and match the neckline, i.e. if necessary, we deepen, expand or change the shape.
For convenience, during construction, we close the chest dart on the shelf, and on the back - the shoulder dart.

Rice. 2
Then we place the back and front patterns on a blank sheet of paper, combining the shoulder sections so that the points at the base of the neck (A4 and B3) coincide, and the points at the ends of the shoulder lines (P1 and P5) overlap each other by 1 - 3 cm. The smaller the approach, the lower the height of the stand. With greater approach, the rise of the rack increases.

Rice. 3

Rice. 4
We trace the outline neck, partially middle front and back seams, and also armhole line.
Look at the drawing to have an idea of which lines of the drawing are involved in the construction. 
We remove the back and front patterns and continue constructing the collar itself on the sheet of paper where we drew the outline.
Stitching line The collar should exactly follow the line of the neckline of the back and front.
Collar width in the middle (distance АШ) and at the ends (В4К), the departure line (ШК), as well as the starting point of stitching (К) in the middle of the front are determined by the model of your dress or blouse, i.e. yourself. The collar flap is formed by a smooth line connecting points W and K.
It should be remembered that the departure line should approach the line of the middle of the back at right angles.

Rice. 5
Important: When making patterns, you should know the following.
The pattern of the upper collar along the departure line should be 1-3mm larger than the pattern of the lower collar. The thicker the fabric,  the greater this difference should be. This is done so that when turning the turn-down part away from the rack top collar could freely go around the lower collar without tightening or deformation - that’s it. So that during the basting process the stitching line does not peek out from the side of the upper collar, i.e. for the formation of perekant throughout the entire flight - that's two. And ultimately, to ensure a good fit of the collar, and hence the appearance of the entire product.
Therefore, first copy one part of the collar from the main drawing clearly along the line, this will be the collar. And then, on a separate sheet of paper, enlarge this pattern by adding the required amount along the outer contour
- this will be the top collar. Look at Fig.6
Fig6 Cutting details.

Rice. 6
The share line basically always corresponds to the fold line. Why mostly? Because you can place the midline obliquely. And if you are sewing a product from fabric with a pattern (check, stripe, coupon or just a large pattern), then you are guided by the need to match this pattern.
When copying on the pattern, it is necessary to put marks (notches) that determine the control points of connection between the collar and the neckline at the level of the shoulder seam and the middle of the back.
The last step is to copy the collar pattern itself onto a separate sheet of paper. We will end up with two cut pieces with a fold. Upper and lower collar or aka collar.
Ready!  You can start cutting. Don't forget to allow seam allowances when cutting. It is usually customary to add 0.75cm along the entire contour of the collar. If you are new to sewing or think that you do not have enough experience, make a pattern with allowances on the seams. In this case, you will just have to chalk the pattern on the fabric and cut along the chalking line.
After making the pattern, it is better to test it on inexpensive fabric to make sure that it looks exactly as you expected.
The departure line, and hence the shape of the collar, can have a wide variety of configurations. Figure 6 shows 4 types of flat-lying collars with different departure line configurations. You can add to this collection.

Rice. 7
We offer as an example several options for flat collars.
In this example, we deepened the neck slightly.

Rice. 8
In the next example we will widen the neck.

Rice. 9
And one more option, in which the starting point for sewing in the collar is slightly offset from the center of the front. This option is used if, for example, a ruffle is sewn along the edge of the collar. Or if you intend to attach any decoration (accessory), such as a brooch, bow or flower, etc., in the center of the neckline. Or if you just decided so, your desire alone is enough.

Rice. 10
Having mastered the principle of construction itself, you will be able to design any shape of a flat-lying collar on this basis. Starting from school, sailor and ending with an unlimited number of fantasy collars.
Be creative and enjoy your creations.
I draw your attention to the recommendations highlighted in words Important or Main. Be sure to take them into account. Usually they do not refer to a single episode, but to the total amount of information or to a significant part of it. In order not to repeat ourselves, we highlight it, focusing your attention on it. Although we will still remind you of this from time to time.
Don't forget to add it to your bookmarks. The bookmark buttons are below.
The rights to this article belong exclusively to the author. Full or partial use of the materials of this article in electronic publications on the Internet is possible only if the following conditions are met:
Information about the author must be preserved. In the title or at the end of the published reprint, the source must be indicated: www.site Internet resource "Sewing Crafts Master" with a direct, active, visible to the user, not blocked from indexing by search engines hyperlink to this article.
Republication of texts in newspapers, magazines or other replication outside the Internet is possible only with the written consent of the author.
Detachable collars (or patch collars), which appeared last year, continue to gain popularity at incredible speed. Every second fashionista dreams of acquiring the desired accessory, but it is still difficult to find them in offline stores. But this is not a problem for a fashion craftswoman! You can make a patch collar with your own hands, and there are quite a few ways to do it.
DIY removable collars from an old shirt
This is the simplest option for creating a patch collar. All you need is a shirt, scissors and any decorative elements (beads, stones, rivets, etc.). Interesting ideas can be gleaned from the photos and videos below.


How to sew a patch collar
This task is a little more difficult; to implement it you will need a pattern and fabric (most often leather is used). Initially, a pattern is drawn on paper, transferred to fabric, cut out, and then all the details are sewn together. The finished product is decorated with various accessories.


How to knit a detachable collar
Lace collars look very impressive - weightless, thin and graceful. You can make such a removable collar with your own hands using a crochet hook and thin threads, for example, cotton. For those who understand crochet techniques, I suggest you consider several patterns. (In principle, patterns of any lace motifs are suitable for knitting a collar.)


 Openwork collar: diagram
  Finished openwork collar


DIY lace collar. Option 2.
If you don’t know how to weave lace yourself, you can use a ready-made one. Photo instructions are attached below.

DIY collar necklace
This season, collars that look more like are especially popular. They are made of metal, stones and beads. It is quite difficult to create one at home. However, if you are proficient in beading techniques, you can experiment.


Detachable collars look great with blouses and any other clothing that does not have its own collar. It does not matter whether the turn-down collar lies on the fabric or on the bare body. Moreover, the latter option may be even more attractive.


It is best to wear a detachable collar with contrasting clothing. For example, a white collar with a laconic black sheath dress will look very impressive. This image does not require any additional ones. And in general, if you have a richly decorated detachable collar, it is better to refuse additional bright accessories. The exception is modest monochromatic models, devoid of any decor; such collars can easily exist with massive and bright decorations in one set.
A collar is a functional and decorative element of clothing that borders the bottom of the neck of shoulder garments. Its usual design is just a strip of fabric. Varieties consist of an upper and lower part, which are usually sealed from the inside. In addition to fabric, knitted, felt and leather, models are lace and knitted.
Before sewing a collar, you need to decide on the cut and style.
Collar types
- One-piece.
- Set-in.
- Removable.
modostr.ru
Basic collar styles
- Rack.
- Shirt.
- Flat turn-down.
- Raised turn-down.
- Shawl.
- Jabot.
- Clamp.
- Designer.
The most common are standard shirt collars with a one-piece or cut-off stand. Such a detail can become part of the patterns of both women's and men's shirts.
Sewing a collar

vladivostoktimes.ru
Depending on the model and shape of the neckline, the pattern can be one, two or four parts. You need to connect a part that has a fold with other cut parts so that its edges meet at the cut. The cut usually accompanies the fastening of the garment. The two parts are sewn from the inside out on three sides, and then turned inside out.
Before transferring the pattern onto the fabric, it is recommended to measure the neckline. This value should be equal to the length of the paper collar configuration (it is measured by the stitching cut), or exceed it by 0.5-1 cm. If necessary, the patterns are lengthened.
If you are sewing a collar with a partial stand-up, make the upper part slightly larger than the lower one in length and width - then the part will fit better.
Collar reinforcement

blogspot.com
Almost all fabric collar models are reinforced from the inside with a special cushioning material. This adds strength to the edges of the collar and hides seam allowances that can sometimes be visible. Gaskets are made of adhesive sealant (for example, non-woven tape), rigid or light materials, and fabrics of intermediate density. The cut of the compacting layer must take into account the direction of movement of the grain of the model.
Features of working with a collar
- The reinforcing material is attached to the underside of the upper part if we are sewing a turn-down model. A sewn-in hard seal is attached to the necks of products made from light, thin fabrics using a low-heat iron. The gasket must first be basted to the underside of the upper part of the structure.
- If you are using a turn-down collar, the seal is placed from the inside of the upper part - where the fold runs.
- The stand-up style is strengthened from the outside. In this case, the seal is cut out for the whole part and attached from the inside, along the fold. Adhesive pads in these models are used only to add density to the upper part, up to the fold line.
- The pattern of the seal usually matches the configuration of the collar parts. Gaskets made of medium and low density material, as well as adhesive seals, are cut taking into account allowances. They are cut off after applying the stitching as close to it as possible. On dense gaskets, excess material is cut off immediately before applying the stitching.

A simple version of a sewn-in collar is the “stand-up” collar. The model with a placket with a lapel is called a cowl collar. The strip is attached directly to the seam line of the neckline, along the entire circumference of the product. The sharp corners of the plank, on which the cut is usually made, can be rounded.
The pattern of the model is made from a single piece with a fold and is a rectangular piece.
Processing technology
- Cut out the part and the seal.
- Fold the inside neck seam allowance inside out along the line along which the garment will be sewn. Trim off excess, reducing to 6 mm.
- Fold the product along the fold line facing inward. Make the spare edges of the outer part wider.
- Cut the corners along the folding line diagonally.
- Press the seams at the ends of the strip. Fold in the seam edges, directing them towards the inside of the model. Iron.
- Sew the finished collar with the outer part to the neck.
Two-piece stand-up collar
The pattern of the model on a standing bar consists of external and internal fragments. The ends can be joined at the front or back. In this case, the seal is cut according to the contours of the external part. To avoid excessive density, excess corners are cut off diagonally from the upper edge of the seal.
Fold the neck seam allowance inward along the bottom edge of the garment diagonally. Trim excess material to 6 mm.
Align the top cuts of the workpiece and its ends facing inward. Sew the details along the top edges.
Trim the seam, allowing for enough material for one more on the outer piece.
In places where V-shaped bends are formed, cuts are made. Corners are removed diagonally.
Place spare material inside the part. Machine stitch along the entire top.
Turn the product right side out. Move the top seam inward slightly. Iron and sew to clothing.

opalona.com
- The classic collar model is a turn-down shirt collar on a stand. The standard shirt fabric pattern consists of two main pieces and two support pieces. The margin in both cases is left at 0.8-1 cm.
- It is not recommended to raise the collar higher than 1-1.5 cm above the bar. Its length in this case is equal to the length of the neck of the product itself.
- An adhesive gasket is used as a seal. The seal patterns are one support piece and one turn-down piece with no stock.
- If the drawings of the stand and base are combined into one configuration, the sewing process will be greatly simplified.
Processing technology
- Align existing collar pieces with right sides facing inward.
- Fold the fabric with pins at the corners so that the top piece is a couple of millimeters larger than the bottom. This is necessary for more accurate processing of the outer seam.
- Go through machine stitching. The stitch size when approaching the corners should be 1.5 mm. After the stitch reaches the corner, apply one stitch across - this will make the corner sharper.
- In order for the outer seam to be made with high quality, the stitching is done not along the very border of the interlining fabric, but at a distance of 1-1.5 mm from it.
- Trim the corner reserves of material one above the other (in a cascade), retreating 1 mm from the line.
- Turn the model out by hand, without using any tools that could tear the corners. It is important to maintain the symmetry of the ends.
- Machine stitches of equal size at equal distances from the edge.
- Sew the placket, folding the seam allowance.
- Pin the face of the outer post to the face of the lower main piece. The stitch should go along the very border between the gasket and the supporting part.
- To ensure that the model's curve takes the shape of the neck, the bend is fixed and connected to the collar along its entire length.
- On the wrong side, mark the border of the future plank. The length of this line should be equal to the length of the neck.
- Attach the right side of the support piece to the wrong side of the shirt. The spare edges should lie on the face of the product. Connect the inner and outer parts of the plank.
- Form a bend and steam the part.

catalog2b.ru
The flat turn-down collar rests completely on the shoulders of the product without rising above them. An example of such a style is the “sailor jacket”.
The model, which includes a front clasp, is one solid piece. The back clasp option consists of two parts with excess material and two sealing parts (no stock as standard).
Processing technology
- Attach the seal to the two upper parts of the base.
- Connect all parts of the model, machine stitch the outer edges.
- Trim seam allowances. At the bends along the entire perimeter of the pattern, make V-shaped cuts. Bevel spare edges and trim corners.
- Smooth the replacement material towards the bottom of the product.
- Sew along the previously placed face seam of the lower piece, taking in the seam allowances.
- Turn the collar and its corners right side out.
- You can manually roll the seam towards the lower part. The model is processed with an iron.
- Sew on the collar, inserting it between the garment and the inner facing.
Raised turn-down collar
A raised turn-down collar with a partial stand-up collar is a model in which the lower part imitates a supporting part, and the upper part bends down. At the back, the bar may be slightly raised. Used for modeling coats, raincoats, jackets, jackets.
The stand of a raised collar is sewn to the collar, not the other way around. The pattern consists of two parts for the upper collar and two parts for the lower supporting base. The lower collar and upper placket are cut out in one copy.
Processing technology
- Connect the bottom bar to the bottom of the base. Start stitching from the center of the stand to the edges. During the sewing process, the base material is pulled back with your free hand.
- The second edge of the support also begins to be sewn from the center. Connect the bottom bar to the top of the model.
- Cut allowance reserves. Reduce the size of the lower collar. To do this, connect the seams along which the stand was previously attached. Shape the product so that it follows the curve of the neck.
- Cut off the resulting excess at the edge of the lower collar (3-5 mm).
- Place the pieces facing each other. The top part should be larger than the bottom.
- The model begins to be sewn from the centers of the parts to the edges. Having brought the stitch to the corner, lift it with your free hand so that the stitches merge into an arc. Make sure that the corners are bent towards the lower collar part.
- Move the seam to the lower part by 1-3 mm. The size of the roll increases with increasing tissue density.
- Sew the edges of the product. Connect the seams to the strips.
- Form a collar and sew it into the product.
Collar in 5 minutes

A patch collar is an independent detail of an outfit and an accessory. Sometimes it is a type of costume jewelry. The model is not sewn into the product, its production does not require special skills, and sometimes does not require stitches (holes are made using an awl). It can be completed even in 5 minutes.
It is made by cutting off the collar of an old shirt. A fastener in the form of a button or ribbon is attached to the part, either front or back. Decorated with rhinestones and beads.
They are made according to neck measurements from various types of fabric, as well as from felt or leather. The pattern of a turn-down product with a fastener to the top or to the bottom can be lengthened, making the collar dimensionless.
A flat collar lies flat along the neckline and is characterized by a small stand-up or no stand-up collar. This type of collar is most often used on children's clothing, bouquets and dresses, jackets and coats.
The construction of a flat collar is carried out directly on the combined front and back of the product with a slight overlap of shoulder sections in the armhole area. To do this, combine the tops of the neck at points A 1 and A 2, and the end shoulder points P 1 and P 2 should overlap each other by 1-3 cm.

Thanks to this construction, the length of the collar's departure is maximum, so the collar lies flat on the product.
To construct a collar, the chest dart on the front should be moved to the side seam or to the waistline.
The stitching line of the collar exactly follows the line of the neckline of the back and front.
The width of the collar and the line of departure (its shape) are determined by the model.
Pattern of a flat collar with rounded ends

1. Temporarily move the dart on the bulge of the chest to some section of the front, for example, to the side.
2. Attach the back to the front, matching the shoulder sections at the neckline and overlapping them on top of each other at the armhole by 1-1.5 cm. A slight overlap of the front and back shoulder sections at the armhole eliminates the flat collar from unsightly slack along the departure line.
3. In the drawing of the basic base of the product, expand the neckline along the shoulder line by 1 cm; deepen in the middle of the front by 2 cm, in the middle of the back by 1 cm. Draw a new neckline at a right angle to the middle of the back.
4. Draw a collar with a width of 6 cm in accordance with the drawing.
5. To improve the fit of the collar, lower the front middle section of the collar 0.7 cm below the front neckline.
6. Copy the collar from the drawing of the front and back.
Below is a detailed video on how to sew a flat collar.