Oven mitts are very helpful in the kitchen - they allow you to safely handle hot pans and pots. But potholders also have another purpose - they fill the kitchen with bright accents and make it stylish.
Materials and tools for the master class "Kitchen oven mitt "Cat""
flannelette checkered fabric, natural floral fabric, white natural fabric, thick fabric for the inside of the potholder, red, black and white threads, scissors, a needle, two black beads, one black bead.
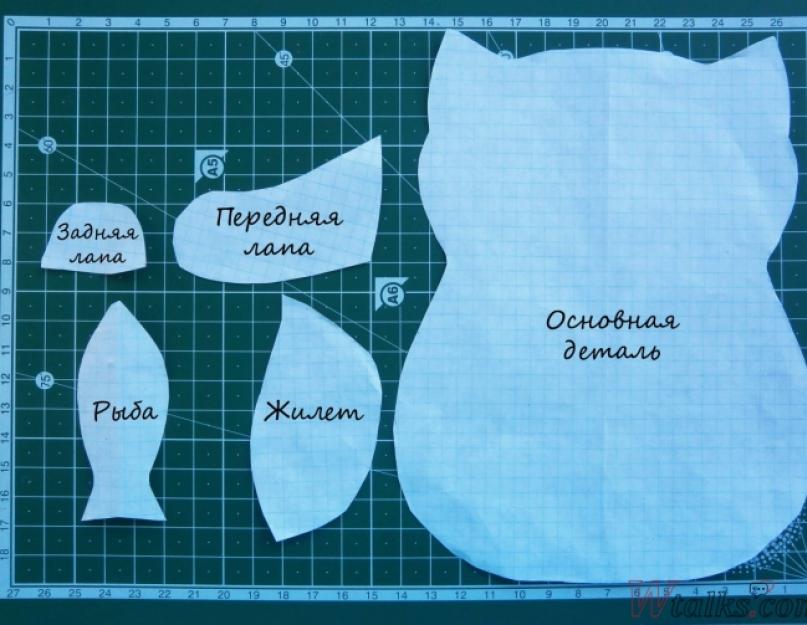
Instructions:1. Let's start working on the tack by making a pattern. Let's draw on paper and cut out the main detail in the form of a cat, a vest, a fish, and paws.

2. Using a pattern, cut out two main parts from the fabric, adding seam allowances. We will cut one piece from checkered fabric, and the second from floral fabric.

3. Using the pattern of the main part, cut out two parts from thick fabric without seam allowances.

4. Using patterns, cut out four parts of a vest and two parts of a fish from plaid fabric, adding seam allowances.

5. From flowered fabric, cut out four parts of the front and back legs, adding seam allowances.

6. Put the pieces of thick fabric together and place them on the piece of checkered fabric. We pin the parts together with pins or sew them together with threads.

7. We quilt the parts - sew parallel lines on a sewing machine, and then make perpendicular lines.

8. We will sew the vest parts in pairs.

9. Turn the vest parts inside out, straighten and smooth them with an iron.

10. Sew the details of the fish along the edge.

11. Cut a hole in the fish, turn the fish inside out, straighten it and smooth it with an iron.

12. Sew together the parts of the front and back legs in pairs, leaving the sides unsewn. We will make cuts on the rounded sides so that the legs turn out better and there are no folds on them.

13. Turn the legs out, straighten and smooth with a hot iron.

14. Take the main piece of floral fabric and sew a vest, front and back legs to it.

15. From white fabric, cut out two parts of the muzzle in the same shape as in the photo.

16. Sew on the details of the muzzle using a zigzag seam.

17. Let's take a piece made of checkered fabric with thick fabric sewn to it and a piece made of floral fabric with paws and a muzzle sewn to it. Place the pieces right sides together and sew along the edge, leaving a small unsewn hole at the top.

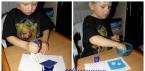
18. Sew up the hole on the fish through which we turned it inside out. Sew an eye on the fish using a black bead and embroider a mouth.

19. Turn the potholder right side out. Let's straighten it out and smooth it out. We will make a loop from the plaid fabric and sew it into the hole through which we turned the potholder inside out, while sewing up the hole. We embroider the fingers on the paws with black thread. Let's sew the fish to the cat's paws.

20. Sew eyes on the cat using beads, and embroider a nose with red thread.

The oven mitt in the shape of a cat is ready.

All that remains is to find a place for the oven mitt in the kitchen. After all, a kitchen that has unusual oven mitts looks much more comfortable.
This is a quote from this post
We sew potholders "Cat faces". Master class.I am posting the most detailed photo course. Let's start right now.
The main pattern is light on a dark background, the potholder size is approximately 16.5-17 cm at the widest point (cheek). In theory, when you print this photo, you should get a life-size potholder. But first, check what size you will print; if it is larger or smaller, adjust it in some editor.
Before you start sewing, read the ENTIRE photo course in its entirety, taking into account all amendments.
To work, you need to prepare two templates, cutting them out of paper.
The first (main) is the general contour of the tack, a pattern without seam allowances.
The second template is the inner part of the potholder, the “muzzle,” filled with gray.
Since I sewed these potholders impromptu, I didn’t prepare at all, so I’m showing you how I sewed them.
For the back I will use denim, the muzzle will also be made of denim, so it is not necessary to “insulate” such a potholder too much. I laid the main template on the slimtex and cut out the sealing part with 1 cm allowances.
Place the cut-out piece made of slimtex (or any other sealant) onto the fabric you choose for the background. The fabric lies face down. Focusing on the edges of the slimtex part, we cut out the part of the desired shape. We fasten the parts together with pins.
At this stage, you need to weave a strip of background fabric from the main fabric for a loop 6-8 cm long, or use braid, rope, etc. for it... Fold the strip in half, align its edges with the edge of the workpiece and attach it in the marked place (in the middle between the ears ) as shown in the photo.
We fold this two-layer “sandwich” in half (no matter in which direction) and make a cut with a total length of 5-7 centimeters.
We unfold the “sandwich” and place it with the front side on the front side of the jeans chosen as the backing. We cut off the excess and also fasten all the layers together.
We put the now three-layer “sandwich” on a piece of flannel (two layers are possible), again fasten all the layers with pins and trim off the excess flannel.
We place the main template on the four-layer workpiece and secure it with pins.
You can trace the outline of the template and then stitch along it, but I stitched directly around the template, focusing on its edges.
Trim excess seam allowance to half a centimeter. Trim off the corners of the seam allowance near the tips of the ears. Don't forget to remove the pin layers.
Along the contour, cut off excess sealant from the allowances and flannel on the reverse side. in curved areas, cut the allowances, not reaching the seam by 1-2 mm. Cut the corners near the ears, also 1-2 mm short of the seam.
We turn our semi-finished product inside out through the hole.
Using a peg and an awl, we pull out the corners of the ears.
Iron our workpiece lightly, but without fanaticism, and just slightly steam it.
To prevent the cut from affecting the shape of the potholder, we will fasten it on both sides from the backing side.
Now it's the turn of the second template - the inner contour of the "muzzle". We select the fabric for the “muzzle”, copy the template to the wrong side and cut out the detail of the cat’s denim face.
We place the cut-out piece from jeans onto the workpiece and stitch it along the contour with a rather large “appliqué” seam. I chose a seam width of 4 mm. Remove the pins securing the cut.
We transfer the contours of the ears, nose and eyes onto paper.
We cut out the details of the ears, nose and eyes from fabric pre-reinforced with fleece-fix. We place them on the workpiece in accordance with the pattern and iron them.
We sew all the details to the base using an appliqué stitch and light threads. The seam width is smaller - 3 mm.
The pupils can be sewn on with an appliqué stitch, but I drew them with fabric chalk and followed the contours with an appliqué stitch to match the pupils. And finally, use lighter threads to finish the finishing seams around the eyes, nose, mustache and mouth. The seam is continuous, starting from the corner of the eye - on the nose, then the mustache and around the nose, and then one lip and moving to the second half in the reverse order. That's all.
And now for the correction.
Since I sewed the appliques through all the layers, almost the entire face of the cat was imprinted on the back of the potholder. I just like this, I did it deliberately, but... My machine has long been somewhat loose, and the appliqué seam does not look very nice on the back. It would probably be best to first make appliqués of the eyes, ears and nose on a cut-out piece of jeans, and only then sew it along the contour. And the finishing stitches will already serve as a stitch that holds all layers of the product together. That's all. It seems to me that everything is clear.
Since oven mitts and oven mitts are always in sight, they must be neat and beautiful. Therefore, it is better when there are a lot of them on the farm, so that you can change them from time to time.
- In addition, to sew oven mitts for the kitchen with your own hands, you do not need to have serious experience and needlework skills, so you can sew them together with your child.
- And original homemade potholders are a great idea for a gift and even... a small hand-made business on sites like the Crafts Fair or Etsy.
Choosing fabric and filling

The main thing in sewing potholders with your own hands is the correct choice of fabric and filling.
- The best fabrics for potholders are natural ones, such as linen, chintz or cotton. But try to choose dense fabrics - they will last longer.
Tip: you can also use scraps of old jeans.

- You can choose not only original fabrics, but also shapes - hearts and mittens, strawberries and Christmas trees, squares and stars. Also keep in mind that different forms of oven mitts differ in functionality, which means it is best to make a full-fledged universal set: several squares, a long pot holder, a mitten.

- Filler must be inserted inside the potholders. Most often it is padding polyester, batting, felt or drape. Batting and other dense, thick natural materials are more suitable for sewing tacks, since synthetic padding has a high thermal conductivity and at the same time a low melting threshold.
Tip: you can use an old terry towel folded in several layers as a filler.
- Embroidery, appliqués, ruffles, etc. are used as decoration.

How to sew a potholder yourself
So, how to sew a potholder quickly and easily? Let's first sew this traditional mitten with edging and a loop.

There are many ways to sew mittens, but the principle is approximately the same - use 6 layers - 4 pieces of fabric and 2 pieces of filling.

- First we need to make a potholder pattern. Place your palm on the paper (or directly on the fabric), making indentations of 2.5-4 cm from it, schematically draw the contours of the mitten as in the photo on the right, and then cut out the resulting template.
- Cut 2 pieces of lining fabric and 2 pieces of facing fabric according to your template. You can cut all 4 pieces from the same fabric, but it is better to choose a soft, natural, pleasant-to-touch fabric for the back of the mitten, and dense, beautiful, colorful fabric for the front side, so that the stains on it are less noticeable. We chose different types of cotton fabrics for the back of the mitten and its front part - for originality and clarity of the example.
- Now, also in the shape of a mitten, cut out 2 pieces of filler. We remind you that it is better to avoid synthetic materials. In our case, we use ordinary white fleece, but it is better to take a denser and thicker fabric, for example, the same batting.
- Now you need to put all the parts into a puff sandwich in the following order:

- We fold two blanks of facing fabric facing each other, as in photo No. 1.
- Now we place mitten blanks made from filler on top and bottom of the already folded front parts (photo No. 2).
- And finally, we place the purl fabric in the top layer “face up”, and in the lowest layer we place the last piece (purl) “face” on the table (photo No. 3).
- Now let's start sewing. All edges are stitched with an indentation of 5-7 mm, and as a result we get an inverted potholder.

- Now we cut off the excess fabric along the edges (about 3 mm from the seam) and make cuts in all the rounded places (photo below) so that our mitten turns out neatly.

- Now we turn the product inside out and decorate the sleeve with piping - bias tape (preferably not satin, but cotton), a strip of fabric, braid or ribbon. Since our goal is to show the easiest and fastest way to sew potholders with your own hands, we use ready-made bright tape and simply wrap it around our mitten, pin it and stitch it. If you use fabric, then it needs to be sewn with the edges folded. At the end we sew a loop from the same binding and our mitten is ready.

Here is another cute potholder, sewn using the described method.

If you want to complicate the task a little and make the mitten quilted, then you need to slightly change the sewing process as follows:

First you need to “quilt” one three-layer workpiece simply from rectangular scraps of fabric, folded in the same order as described in the instructions in paragraph 4, and then the second one. Keep in mind that the threads should match the front material of the mittens. You will get 2 quilted rectangular parts of the future potholder, which need to be folded together so that the wrong sides look outward from the bottom and top of the “sandwich”. And finally, we sew the folded parts along the contour of the mitten template (see step 1). Next, we process the edges of her sleeve with braid or fabric and sew on a loop.
We sew a square potholder or hot stand
Now let's start sewing a square potholder, which is very, very easy to sew - unlike mittens, here we use: 2 pieces of batting and 2 pieces of face fabric. Patterns of all parts measuring 20x25 cm (or any other) are made. You also need a strip of fabric for the buttonhole - 8x15 cm, and of course an ironing board, iron, needle and thread, sewing machine and scissors.

The work is carried out according to the following algorithm:
- Again, a “sandwich” is made from the fabric: 1st layer - batting, 2nd layer - fabric face up, 3rd layer - fabric face down, 4th layer - batting. You need to make 2 such puff pastries.
- Two blanks are sewn together on 3 sides, while the lining should still be outward.
- The potholder is turned to the outside and ironed.
- The loop is sewn and implanted.
- The fourth side is stitched.
- a square potholder can also be quilted if desired;
- you can also sew a pocket to one side;
- Using the same principle, you can sew oven mitts in the shape of a heart, circle, stars, etc. with your own hands.
Here are some ideas for sewing potholders with your own hands using the basic principle described above (scroll the photo to the right).

Patchwork potholders

Patchwork tacks look unusual, but before you start sewing, you should decide on the technique for joining the patches. Here are 3 main ways:
- Standard blocks– you will need to make square elements and then machine them.
- Pattern sewing - pieces are cut according to special patterns. These are elements such as birds, leaves, hearts.
- Sewing on a base - here the elements are not sewn together, but are sewn to a pre-prepared base.
To make a simple product using the patchwork technique, you need to prepare three colors of fabric, a knife, threads that match the color of the fabric, pins and a ruler. Then we prepare shreds - squares with a side of 10 cm. Each of the squares is cut into triangles, and they are already laid out as required by the diagrams. All triangles are sewn together to create one side of the product. The second side is made using the same principle, and lining material is placed between them. Then the edges are carefully sewn up, and a loop is attached to the corner - that’s it, the potholder is ready.
These potholders are crocheted.
Materials for the cat:
- cream-colored cotton crochet yarn (for a pair of potholders you will need 2 balls);
- black and white embroidery yarn;
- hooks No. 3.5, 2.5 and 1.75.
Mouse materials:
- cotton yarn for crochet in gray and pink (for a pair of potholders you will need 2 balls of gray and 1 ball of pink);
- black embroidery yarn;
- hooks No. 3.5, 2.5 and 1.75.
Potholder - Cat
Size: about 20 cm in diameter.
Main drawing: knit etc. in the round, with cr. make it spiral. To control the number of stitches, it is recommended after the last stitch of one cr. insert a thread of contrasting color. Then do the next cr. At the end of the Remove the thread and insert it at the beginning of each cr.
Sample: 5 rub. give 5 cm in diameter.
Execution: knit the head with the main pattern. 1st round: make 2 stitches in the thread ring. p. + 7 t. p. = 8 p. 2nd cr.: Double every 2nd p. 4 times = 12 p.
7th cr.: Double every 6th p. 6 times = 42 p.
8th cr.: first double the 3rd p., then 5 more times every 7th p. = 48 p.
16th cr.: first double the 7th p., then 5 more times every 15th p. = 96 p.
17th cr.: Double every 16th p. 6 times = 102 p.
18th cr.: First double the 8th p., then 5 more times every 17th p. = 108 p.
Ears knit according to the pattern in successive p. Below the line are some items of the 20th cr. Start the left ear of the cat on the 22nd stitch before the loop, knit according to c. A. Start the cat’s right ear on the 10th stitch after the loop, work according to cx. B.
Eyes crochet with black embroidery yarn No. 1.75. Knit 25 doors in a thread ring. stb., with the 1st stb. replace 4 v. p., close the circle c. p. Using white yarn for embroidery in a thread ring, make 10 p. stb., with the 1st p. stb. replace 2 v. p.
Nose make with a double thread of black embroidery yarn and a size 2.5 crochet hook. Dial 6 v. p., knit one t.p. in the 2nd a.p. from the hook, in the next st. p. 1 p. stb., in the next century. item 1 stb., 1 v. p., 1 yes. stb., 1st century p., 1 stb., in the next st. p. 1 p. stb.. in the next century. p. 1 t. p.
Sew on the eyes and nose.
Mustache and mouth embroider with black embroidery stitch yarn (see picture).
Potholder - Mouse
Size: about 20 cm in diameter.
Main drawing: see potholder "Cat".
Sample: 5 cr. give 5 cm in diameter.
Execution: knit the head with the main pattern. 1st round: make 2 stitches in the thread ring. p. + 7t. p. = 8 p. 2nd cr.: Double every 2nd p. 4 times = 12 p.
3rd cr.: Double every 2nd p. 6 times = 18 p.
4th cr.: Double every 3rd p. 6 times = 24 p.
5th cr.: Double every 4th p. 6 times = 30 p.
6th cr.: first double the 2nd p., then double every 5th p. 5 times = 36 p.
7th cr.: Double every 6th p. 6 times = 42 p.
8th cr.: first double the 3rd p., then 5 more times every 7th p. = 48 p.
9th cr.: Double every 8th p. 6 times = 54 p.
10th cr.: first double the 4th p., then double every 9th p. 5 more times = 60 p.
11th cr.: Double every 10th p. 6 times = 66 p.
12th cr.: first double the 5th p., then 5 more times every 11th p. = 72 p.
13th cr.: Double every 12th p. 6 times = 78 p.
14th cr.: first double the 6th p., then 5 more times every 13th p. = 84 p.
15th cr.: Double every 14th p. 6 times = 90 p.
16th cr.: first double the 7th p., then 5 more times every 15th = 96 p.
17th cr.: Double every 16th p. 6 times = 102 p.
18th cr.: first double the 8th p., then 5 more times every 17th p. = 108 p.
19th cr.: Double every 18th p. 6 times = 114 p.
At the place of the last addition between both stitches, for the loop, cast on 15 sts. p. and add the 20th cr.
20th cr.: first double the 9th p., then 5 more times every 19th p. = 120 p.
After the 20th cr. ring c. p. for a loop, tie tightly, etc.
Ears do according to cx. Start in pink, bold dot is the first in. n. Dial 6 v. p., 1st t.p. tie in the 2nd c. p. off the hook. After the 7th p.m. Tie the side edges and the bottom edge of a thin line. Start knitting in gray from the arrow and work 3 more rows.
Sew the ears between the 9th and 19th stitches under the last edge. heads.
Eyes knit with black embroidery yarn and crochet size 1.75.
Make 30 tr in a thread ring. stb., of which 1 tr. stb. replace 5 v. p. Using white yarn for embroidery in a thread ring, make 10 p. stb.. of which the 1st p. stb. replace 2 v. p. For the nose, use black yarn for embroidery in a thread ring to make 20 stb., of which 1st stb. replace 3 v. p.
Sew on the eyes and nose. Embroider the mustache and mouth with black yarn stitches (see picture).
Patterns for knitting potholders:
Anna Timayer "Elegant potholders"