Many needlewomen try themselves in such a difficult technique of doing things as patchwork. And of course, very original things made using this method attract attention. Our grandmothers always used this technique when creating patchwork quilts. So how to sew a patchwork quilt for beginning needlewomen? You can use the patterns or watch DIY sewing workshops.
In contact with
How to sew a blanket from scraps
 Sewing blankets from scraps with your own hands is a very interesting activity that is fascinating and takes a lot of time. The main thing is that to make such things you can use old fabrics or things that you haven’t worn for a long time. Therefore, blankets made from scraps are comparatively cheaper than those purchased from a factory.
If you don’t have any old items, you can buy scraps of fabric at the store or use patchwork kits on sale. When creating a patchwork quilt with your own hands, patterns can be easily found on the Internet, and from their description, it is clear that they recommend choose at least 6 different fabric colors.
Choosing filling for a quilt
Since the products are different, the filler required is different. They consist of at least 2–3 layers:
- Beautifully designed top.
- The filler, or as it is commonly called, the insulation of the blanket.
- The bottom part of the blanket is called the lining.
It is worth noting that if you create a patchwork quilt with your own hands without a second layer, then you will succeed very beautiful bedspread. Most often, it is customary to use synthetic winterizer as a filler or insulation. This material does not shrink or deform after exposure to water. And this quality is perfect for creating things using the patchwork technique. But if you want to sew a baby blanket for a newborn, then it is better to resort to using only natural materials in production. Here several natural-based fillers for sewing a patchwork quilt:

Tools and materials for sewing a blanket using the patchwork technique
This technique of sewing is becoming very popular nowadays. More and more specialized sewing stores are offering kits for free sale for sewing with patches and patterns. But you can also assemble all the equipment yourself, because many tools are found in every home’s sewing drawer. In order to start practicing this needlework technique, you will need to stock up on this list of necessary tools and materials:
- Well-sharpened scissors or a quilting knife.
- Sewing needles.
- Threads.
- A simple pencil.
- Tailor pins.
- Measuring tape in centimeters.
- Tailor chalk or soap.
- Paper.
- Sewing machine.
- Material for flaps.
- Natural insulation for blankets.
- Lining.
DIY baby quilt for girls
 Products using this technique can be created for both girls and boys; all you need to do is simply change the color of the fabric. For creating baby blanket for a girl, use the desired pink shades of cotton fabrics and use natural insulation as a filler.
When creating a patchwork quilt, you can watch a master class for beginners on the Internet to get a rough idea of what kind of work you have to do. As it became clear from the video, novice needlewomen often use the chess patchwork technique.
Materials for production:
- Scissors.
- Threads.
- Fabric in two shades of pink.
- Paper.
- Pencil.
Take paper and draw a diagram according to which we will cut and sew a baby blanket for a newborn. As a rule, a small square blanket measuring 120 by 120 cm is sewn for children. Cut out a square from the paper with which you will cut. Use the diagram to count how many squares there are different fabrics you need, and start cutting.
Cutting out the fabric distribute the flaps in a checkerboard pattern. And start sewing the pieces of fabric together, ironing each seam from the inside with an iron and steam. As soon as the top fabric is ready, iron it properly and begin basting the insulation. Distribute the batting or wool over the surface of the product and baste it by hand, it will be more convenient, then sew on a sewing machine so that the fabric does not bunch up.
Quilt the blanket along with the insulation along the existing seams from the flaps. Sew each square, this will allow the insulation not to bunch up and keep its shape during use.
From one whole piece material, cut out the lining of the bottom side of the baby blanket. And also baste and stitch on the machine, three sides and half of the fourth. Carefully turn out and hand-sew the remaining portion of the blanket. That's it, the beautiful baby blanket for a newborn girl is ready and can be used for its intended purpose.


Patchwork baby blanket using the well technique
 When creating patchwork quilts with your own hands, photos of sample works can be viewed on the Internet. When you see a product made using the technique of joining flaps called a well, you definitely won’t be able to pass it by. Remember the main rule for sewing: when stitching, the patches should go to the side precisely from the center of the product. So, creates the right visual effect.
In the photo, you can see that it is best to take larger shreds, or, more precisely, not huge, but long. It would be better to say that it has a regular rectangular elongated shape.
Step-by-step instruction to make such a product it will look like this:
- Take a leaf plain paper or whatman paper will fit much better, and draw a diagram as shown in the picture with your dimensions.
- Each element is drawn in full size on separate sheets.
- Lay out all the stencils that will be used to cut out the flaps on the fabrics; for sewing using this technique, it is best not to overdo it with the number of colors, two is enough contrasting colors will be sufficient. We add about 1 cm of allowance to each piece to sew the parts together.
- After cutting out the elements for making a blanket is completed, we recommend laying out the entire drawing from them in the assembly to see what happens and whether you did everything correctly. Take fabric for cutting on a cotton basis, and, of course, the same texture.
- Baste the parts together and iron them properly, so that later it will be easier to sew on a sewing machine.
- Connect all the squares of the structure together using a sewing machine, press all the seams on the inside.
- Now add a second layer of insulation inside and stitch it along the existing seams on the blanket. Since we are making a baby blanket, the insulation must accordingly be natural, this has already been discussed above in the article.
- Then we cut the back side out of the lining material and sew it to the product.
That's all, the master class on creating a baby blanket for newborns using the well technique is finished.
Master class on sewing a children's patchwork quilt with panels
 Your baby will really like this educational blanket. After all, on its surface they will be collected different elements that you can touch and feel. And most importantly, children learn about the world by putting into their mouths everything they can get their hands on, and he can chew this blanket calmly, since we will make it only from natural fabrics and materials.
To complete this master class you will need the following materials:
- Cotton fabric in different pastel colors to create the front part of the product.
- Natural based insulation.
- Lining.
- Multi-colored material with cartoon characters, and regular plain material different colors, it is best to take all the colors of the rainbow.
- Large buttons.
- Pieces of fur.
- Threads.
- Scissors.
- A simple pencil.
- Sketch paper.
Algorithm for creating a patchwork product:
- Take the main fabric and cut it into shreds, there is no need to be overzealous with drawing up a pattern or ornament, the main thing and interesting thing in this technique will be made as a panel at the top.
- Having sewn the top of the blanket, iron it properly along the seams and stitch it to the insulation.
- Sew a lining at the bottom for our lovely baby blanket.
That's it, one part of the work is ready, we made a patchwork quilt in pastel colors different shades so that the general background does not stand out in any way, and the panel looks beautiful and bright against its background. Now let’s think about what we want to see on top of the product, for this we take paper and pencil and begin to fantasize.
 In the center we need to develop the main plot, for this we can take scraps with cartoon characters of the same size and sew them on top of the blanket. So, we will have beautiful cartoon characters that your baby will then fall in love with. Along the edges of each patch with cartoons you need to put a thick canvas so that the baby, lying on such a beautiful blanket, can touch it and develop his fine motor skills.
Now let’s unfold the storyline in the corners of the product, since we have already thought through the center of the panel. We have four corners that need to be somehow played out for the benefit of the baby’s development. For example, in the first corner you can place various geometric shapes of different colors.
When sewing them onto a blanket, you can put a little cotton wool inside the squares and triangles, so they will become voluminous and beautiful. The baby will touch them and remember the shape, and the mother, playing with him, will tell what geometric figure it is and its color. The whole perception of children is laid down from childhood, even if it seems to you that they don’t listen or remember anything, but this is not so, then you will wonder where they could get this knowledge from when you start talking and remember the wonderful blanket created with your own hands.
The second corner can honorably be occupied by a small clearing of flowers, so to speak, a flower bed with clearly defined flower tops and leaves on the stem. Buttons will help us to create such beauty large sizes for the center of the bud, and small ones as petals. Draw no more than three flowers on the sketch, it is better to make them large, it will be more interesting for the baby to play with them. When making such a panel on a blanket, remember that you need to sew all the details more than once, since the kids will pull and bite all parts of your panel.
Flowers will be made from buttons different sizes, We recommend simply stitching the stem from green material , but the leaves need to be made as convex as the geometric shapes; when sewing on the parts, place a little cotton wool inside. You can frame the bottom by creating a flower pot or vase from the material.
 The third corner can be decorated by creating a bunny or a pussy from the material; on top of the parts you can carefully sew pieces of fur onto the body. While playing with such a panel, the child will stroke the animal and understand that it is soft and fluffy, so we can teach him how to stroke it, and not tear the hair out of animals. You can sew an applique of a cat, a bunny and a bear. Whatever you want and can do, the main thing is to remember that you are trying for your own baby.
In the fourth corner you can create unique pockets sewn onto the blanket. The baby can put toys or something else small there. Or do something else, if you have any other ideas, this is your blanket and you can do whatever you want with it. Sew on large zippers to fasten and unfasten with your baby.
By performing master classes on making patchwork products for our kids, you will plunge into the world of childhood, so beautiful and extraordinary.
A blanket made of “quick” squares in a “patchwork” style is a warm and soft home decoration. Read here how to make it yourself. Schemes, patterns and step-by-step instruction for beginner needlewomen.
Content:
Grandma's colorful blanket, patchwork rugs and bedding, bright pillows and potholders with multi-colored appliqué have been familiar to us since childhood. Such cute little things always filled the house with warmth and comfort. Unfortunately, only grandmothers remember the technique used to make those cozy and cute blankets. And every girl and woman should get acquainted and make friends with patchwork in order to be able to fill her hearth with something dear and close.
Fabric for making a patchwork blanket

Patchwork is patchwork sewing from fabric of various household and decorative items - beds, blankets, bags, clothes, tablecloths, kitchen utensils, etc. The technique, known for thousands of years, is popular all over the world. Skilled craftswomen create all sorts of outlandish works of art using the patchwork method. And novice needlewomen are advised to start with wide blankets made from “quick squares”. Such products are practical and aesthetic, and are also optimally suited for mastering such a delicate science.
Today, patchwork is considered one of the most popular patchwork techniques. It consists of stitching together various pieces of fabric according to the mosaic principle. In hand experienced needlewomen bright pieces of material turn into luxury products, surprising and delighting. But not all fabrics are equally good for patchwork patchwork.
To choose the right material for creating a patchwork quilt, you can follow the traditions of our grandmothers: simply save all the scraps and leftovers from sewing clothes or bed linen. From such different-sized shreds you will certainly get a motley blanket. Or you can do it much simpler - purchase a set of fabrics for patchwork in any specialized store. Since the most difficult process in the patchwork technique is working with the material, the fabric must certainly not only be beautiful in appearance, but also of sufficient quality.

Cotton fabrics are considered the ideal material for patchwork because they meet all the important requirements:
- Do not wrinkle;
- Don't rush;
- Do not shrink;
- They do not shed;
- Easy to cut.
Sewing material stores offer customers a huge selection of cotton fabrics of different colors and densities. But, unfortunately, they are not always suitable for patchwork. Some options fray too much when cut, others are hard to iron or sag after washing. It is, however, recommended to buy special fabrics for patchwork that have undergone special pre-treatment. This material is very easy for beginners to work with.
Popular types and patterns of patchwork

The patchwork style is a wide field for ideas and experiments, which has no boundaries in combinations of shapes, colors, and types of material. Here, any creative idea of the author can be brought to life. Fancy patterns, applications with animals and flowers, geometric mosaics and others no less interesting options Easily folds into a warm blanket or comfortable blanket.
Of course, you can create a diagram for a product with your own hands, armed with imagination and a sharp pencil. Or you can use ready-made ones, of which there are hundreds of thousands, depending on the types of patchwork.
Let's look at the most popular types of patchwork:
- Classic English. In this version of patchwork, all parts of the same shape and size are used, usually in two primary colors. Patterns for English patchwork are very primitive. For example, squares of two shades arranged in a checkerboard pattern, or symmetrically stitched triangles.
- Eastern patchwork. The manufacturing principle is similar to the classic one, but differs in the use of various decorative elements- ribbons, beads, zippers, etc. Most patterns for oriental patchwork products allow greater freedom in the shapes and sizes of parts. For example, these can be arched and wavy patches, connected and decorated with satin ribbons.
- Crazy patchwork. The most “free” look. Characterized by its aesthetics and attractiveness. As a rule, the shape, color and size of parts are not limited by anything other than the pattern used. And the designs can be incredibly diverse: images of nature or flowers, floral or geometric patterns, complete abstraction.
Making a patchwork blanket step by step
Of course, the abundance of various complex patterns and variations of products using the patchwork technique surprises even those craftswomen who have devoted decades to this type of art. And for beginners, there are more primitive, but no less beautiful and functional options. For example, a blanket of “quick” squares. It’s better to start from there.
Preparatory stage

First of all, you need to decide color scheme and the size of the future product. Although for the first time any available pieces of various shades will be suitable. Prepare in advance a piece of fabric for the wrong side of the blanket, corresponding to its future dimensions, and the same piece of padding polyester. Don't forget about the fabric for the edging. It is better to buy it with a reserve. In our case, to make a blanket from squares you will need chintz of three colors, scissors, a ruler, pins, chalk, a template and a sewing machine.
It is recommended to pre-soak chintz fabric in hot water, then rinse with cold water, starch and iron. A tablespoon of starch is diluted in a glass of cold water. Then the mixture is poured into 2 liters of hot water and stirred thoroughly. The chintz is rinsed in a slightly cooled solution, ironed while still wet and dried.
After preparing the material and collecting all the necessary tools, you can begin preparing those very “quick” squares that will make up the blanket.
Preparing “quick” squares for a blanket

The production of the elements we need begins with the preparation of the strips. From two pieces of fabric of different colors, cut two strips of the same width. Then, placing them face to face, stitch along one edge. At the next stage, cut a wide strip from the third piece of chintz, corresponding to the size of the previous two together. Sew the resulting third strip to the first two on both sides, first folding them face to face, just like the first time. As a result, you will end up with something like a sleeve turned inside out.
At the next stage, cut the resulting sleeve with an even zigzag into isosceles triangles. To do this, use a square, triangle or triangular ruler template. As a result, from one long “sleeve” you will get several double triangles, and, accordingly, squares in the spread.
Assembling squares using patchwork technology

To create a product in the patchwork style, a wide variety of patterns and styles are used. The squares you have can be folded into zigzags, scales, triangles or diamonds. The choice of style depends only on the taste of the craftswoman. It is not recommended to rush in such a matter. It is better to fold the parts in several different ways, among which it will be easier to determine the most successful one.
The assembly of “quick” squares is carried out as follows: first, the parts are sewn together into longitudinal strips, only then the strips are sewn together. The main thing is not to forget to iron the finished seams. Essentially, the front side of the blanket is on at this stage completed.
Making a blanket from “quick” squares

You can use any fabric, preferably natural, as the back side of the blanket. Batiste or chintz will do the job best. For quick assembly For the blanket, place the prepared fabric for the wrong side face down, then spread a layer of padding polyester and place a piece of squares on top, face up. Using a sewing machine, stitch around the perimeter of the future product. The border can be the edges of the picture or the edges of the squares.
Before the process is complete, all that remains is to make the edging of the luxurious blanket. To do this, you need to cut a strip of suitable fabric 8 cm wide and slightly longer than the side of the product. Apply the resulting strip to the front edge of the blanket, aligning the edges. Use a sewing machine to stitch the strip to the blanket, then fold it over to the wrong side, turn it under, and stitch again to the right side. Finish the remaining edges of the blanket in this way.
At this point, making a blanket from “quick” squares is considered complete. For the first time, such a product is considered optimal in terms of complexity. But even if the result is not entirely ideal, you should not be upset. The second try will certainly turn out better!

Nowadays, patchwork creations have become more popular than ever. In between the noisy bustle and tiring workdays, you really want to touch something warm and cozy. Even those women who have never thought about needlework before begin to confidently master patchwork. Decorative sofa cushions, aprons, hot pads, colorful panels, curtains for a country house, ultra-modern bags and many other things I can create experienced craftswomen.
Beginning needlewomen should pay attention to a few useful tips:
- Before using new fabric, it must be washed, ironed and only then cut. This will prevent accidental shrinkage, loss of color, or other problems.
- The color of the thread used should match the color of the shred or differ by a couple of tones.
- For drawing, use a pencil or soap. It is prohibited to use a pen.
- Cutting is done along the shared thread. In this case, the part will not warp.
- When cutting, leave a 1 cm indent on all sides. If the fabric is loose - 1.5 cm.
- Ideal templates are made of plastic.
- Without a ruler, patchwork is impossible.
- The resulting fragment must be ironed after each line.
Patterns for making a blanket using the patchwork technique

Depending on the chosen patchwork technique, the needlewoman may need one or another pattern pattern:
- Square technique. It involves creating a product from square patches or square blocks of different colors. In this case, a pattern in the form of a regular square or a pattern of strips from which a square block will be made will be useful.
- Strip technique. This is parallel or circular stitching of strips of different colors and lengths. To create a product using this technique, you will need to cut out different strips.
- Triangle technique. In many ways similar to squares. Most often, patterns of isosceles triangles, identical in size, but different in color, are used for it. Parts can be sewn along a short edge to form a strip, 4 pieces to form a square or in the shape of a star.
- Honeycomb technique. It got its name thanks to the end result. Upon completion of the work, the design of the product will resemble the pattern of a honeycomb. For production, patterns of symmetrical hexagons are used.
- Lapachiha technique. It is considered the most interesting and at the same time difficult. Pieces of fabric with raw edges are attached to the canvas, thereby forming a three-dimensional drawing of a certain pattern or a chaotic image of a three-dimensional abstraction. If a specific pattern is chosen for the product (bird, animal, flower, etc.), patterns for each part will be needed. If you plan to randomly sew on different patches, you can do without patterns altogether.
Products made using the patchwork technique are not only beautiful and cozy home decorations, but also positive emotions from the process of their manufacture. Agree, several pieces of fabric, sewing machine and imagination combined can work wonders.
Remember we wrote about hygge style? How did you not read? Be sure to read and get inspired by this lifestyle and the philosophy of organizing a Scandinavian interior. The philosophy is very simple: coziness, comfort, nothing superfluous, nothing that could irritate, distract or tire.
Patchwork bedspread in the interior
A maximum of soft and comfortable things, a lot of textiles, a homely hearth, natural materials. The house is calm and safe, friends gather here, it’s not boring to be here yourself, curled up in your favorite handmade blanket and immersed in dreams. By the way, about handmade and bedspread. We offer to bring this luxurious picture to life and create a patchwork patchwork quilt with your own hands.
What materials are needed for a patchwork bedspread?
Well, let's start by defining the concept of patchwork. This is a technique that allows you to sew a whole blanket, or rug, or even a bag, clothing, stole, from many different small scraps. Such products are not only warm and therefore practical, but very stylish and authentic, which means they can decorate the interior. We will sew a blanket. What we need:
- remnants of various fabrics (it is desirable that they be of approximately the same quality, or at least the same thickness);
- ruler, pencil;
- scissors;
- fleece;
- fabric for the wrong side (denim can be used);
- thread, needle or sewing machine;
- for more complex option you will need a diagram.
Technique for creating a bedspread from scraps
For starters, you can try sewing DIY patchwork blanket from squares. Then you don’t have to think about the pattern and sewing the bedspread will be easier.
You need to cut out many identical squares from the scraps - use a pencil and ruler so as not to make mistakes in the sizes.
If you have a sewing machine, the process will go much faster. Sew the squares in rows, and then sew the rows themselves. When the fabric is ready, it needs to be ironed from the inside to straighten the seams.
 Pattern of a patchwork bedspread
 Then you need to measure the item to cut the appropriate fleece fabric. Now attach the blanket to the fleece front side up.
The next step is to cut out the fabric from denim or any other fabric - this will be inner side blankets Next, place the denim right side down on the fleece and blanket stack.
Your stack can be basted a little and then topstitched. Leave a hole in one of the corners so that the blanket can be turned inside out. If you did everything correctly, then on one side you will have denim, on the other, the front side of the blanket is made of patches, and the inside is fleece. The hole must be sewn up with hidden seams and the finished product must be ironed again.
 Patchwork quilt pattern
 If you want to increase the size of the blanket, then at the assembly stage you can lay plain strips of fabric between the squares. Now you have a finished patchwork quilt.
Video instructions for beginners:
DIY patchwork blanket: using patterns
A more complex pattern will require precision cutting and a diamond eye. First, study your stock of scraps: what material is plentiful, what is less, and what is generally in short supply. Next, you can come up with a diagram yourself by drawing it on a sheet of paper with paints or pencils, or take ready-made templates.
Remember that it is most convenient to sew the flaps in blocks, and then sew these blocks together. Don't forget to leave seam allowances, otherwise you will end up with a product that is half the size you expect.
 Scandinavian motifs
 Patchwork style: bedspread in different techniques
More precisely, the execution technique remains the same, but the products will differ from each other in appearance.
A handmade product is a thing with a soul. Purchased products do not have the charm that every craftswoman puts into her “brainchild.” If everything is clear with small items, then not everyone takes up sewing large items, because in addition to the ability to work with a sewing machine, you also need perseverance and imagination. A patchwork bedspread is a large thing, but quite easy to sew.
How to sew a patchwork blanket
For beginners, it is better to choose patterns with large fragments, this will allow you to make a blanket faster. For experienced needlewomen, there are many master classes that talk about creating complex patterns from small shapes.
Only the upper part of the patchwork cover is made from scraps, and a whole cloth is taken for the bottom layer. This simplifies the work and increases the wear resistance of the product. To sew fragments together with a machine, it is better to use a regular edge stitch. Undoubtedly, linen stitching is stronger, but it may not penetrate fabric consisting of three layers.
Types of patchwork:
- “Quick squares” - patchwork bedspreads are sewn from square fragments.
- "Watercolor" – Special attention to color.
- “Strip to stripe” is a blanket made of long rectangles sewn alternately.
- “Log cabin” - in the central part there is a square, and stripes are sewn around it in a spiral.
- “Magic triangles” - simple or complex shapes are made from triangular fragments.
- “Checkerboard” - the blanks are sewn in a checkerboard pattern.
- “Russian square” – multi-tiered sewing.
- “Honeycomb” is a pattern of hexagons.
Tips for a beginner on where to start sewing using the patchwork technique
Simple tips to make it easier for beginners to sew patchwork bedspreads with their own hands:
- determine the exact size - a lot depends on this parameter;
- choose a color - the organic nature of the entire product depends on their compatibility;
- prepare the fabric - soak for 10 minutes in hot water;
- To make working with textiles easier, it is recommended to starch and iron it;
- cut into fragments of the required size, leaving allowances;
- prepare the backing textile.
Prepare your tools:
- needle and thread;
- scissors;
- pins;
- sample;
- pencil;
- sewing machine
Working technology step by step
The main stages of making patchwork bedspreads with your own hands:
- drawing a sketch;
- choice of material;
- stitching flaps;
- formation of the finished product;
- Drawing a sketch.
The most important part of the process, because it depends on appearance products. You can draw a sketch on paper, take it from the Internet, or lay it out on the floor from fragments, following the patchwork style. Many ideas on how to sew a bedspread are available in master classes, which greatly simplifies the creation process.
Material selection
Choosing fabrics to match is not easy, but it is very important. The appearance of the bedspread depends on this. In this matter, it is worth relying on the taste preferences of the craftswoman. For two-color products, the only choice rule is dark and light colors. With multi-color bedspreads the situation is more complicated. Colored fragments should be sewn not in disorderly chaos, but by laying out a pattern, based on existing patchwork patterns.
Technique of stitching flaps
The sequence of actions when stitching fragments is as follows:
- You need to cut two equal strips from textiles of different colors.
- They are folded inside out to each other, stitched, and ironed.
- Now from the textile of the third shade you need to cut a strip equal in width to the first two.
- The third and first two are folded right sides together and stitched.
This technology allows you to make a double-sided sleeve, from which squares are then cut. Next, you need to decide on the pattern, and then you can start connecting.
Fragments of a certain shape are sewn together in pairs if the pattern is complex. Then you should connect 4, 8, and so on until the composition is complete. If the bedspread is made of squares, the joining technology is slightly different. Square blanks are sewn into strips, and after carefully ironing the seams, they are assembled into a finished patchwork product.
Formation of the finished product
When the front part is ready, you should start sewing the back side. To do this, a piece of selected fabric is laid out on any flat surface, face down. If the bedspread is insulated, then a layer of synthetic padding should be placed on the reverse side.
The front side with a patchwork pattern is placed on top, and the product is stitched around the perimeter. The edging is made from a strip of fabric approximately 8 cm long, sewn along the edge. If the edging according to the sketch is wide, then more fabric is needed to make it.
DIY baby blanket in patchwork style
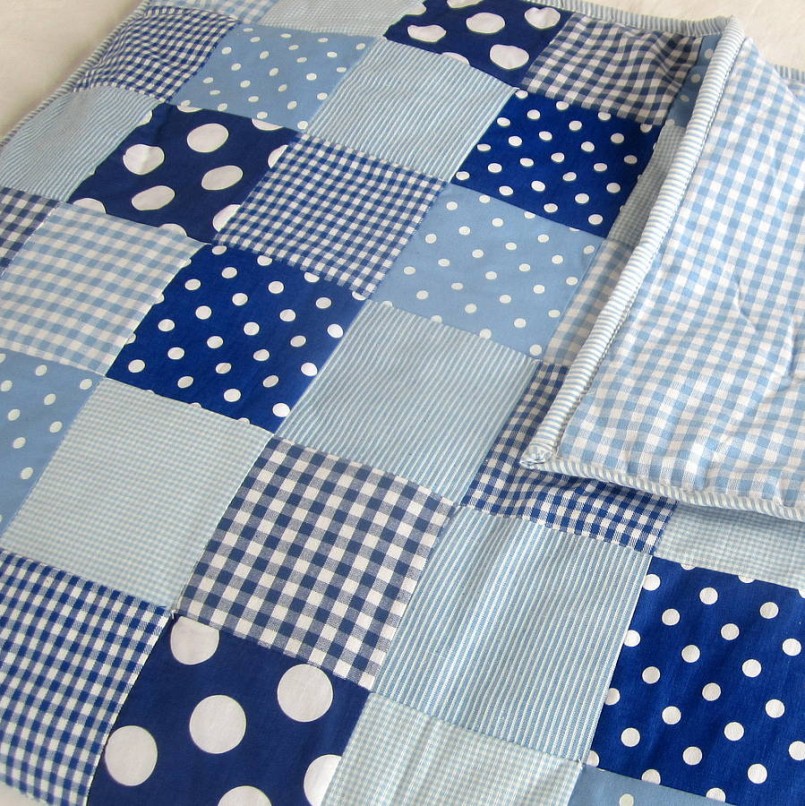
For beginners, the “Fast Square” technology is suitable. To make a patchwork bedspread for a girl, you should choose more pink textiles, for boys - blue.
You will need the following materials and tools:
- 4 types of textiles;
- fleece for the back;
- needle and thread;
- ruler, pencil;
- scissors;
- sewing machine.
The simplest option is children's patchwork bedspreads made of 48 squares. To make such a thing, it is enough to cut the prepared fabric into square fragments of the selected size, adding 0.5 cm to allowances on each side. The squares are sewn together in strips, each seam is carefully ironed. When all the strips are ready, you should sew them.
Spread the fleece on the floor, place the front part on it, carefully round the edges with scissors and sew. The child will be happy to cover himself with such a blanket.
We reveal the secrets of how to sew a patchwork bedspread
In order for the product to turn out, you need to be patient and first draw a sketch in order to visualize what kind of thing it will turn out to be. Bedspreads made from rags will be smooth and beautiful if each seam is ironed on both sides. Another secret - do not choose old worn fabric, but relatively new one. A blanket with prints will look great.
DIY patchwork bedspread master class

To ensure that all the squares are even, you need to use a ruler. For the same purposes, the fabric is laid in several layers. In our case, the patchwork bedspread will be two-color. Having laid each type of textile in a double layer, we cut off the edge to even it out.

Using a special ruler, mark the width and cut off the strip. You can use a regular ruler, but then it is better to secure the fabric with pins before and after the cutting site.

Here are the cut square pieces, ready for stitching. Their number and size are determined by the dimensions of your product.

The synthetic winterizer also needs to be cut into squares to make the quilted patchwork bedspread warm.

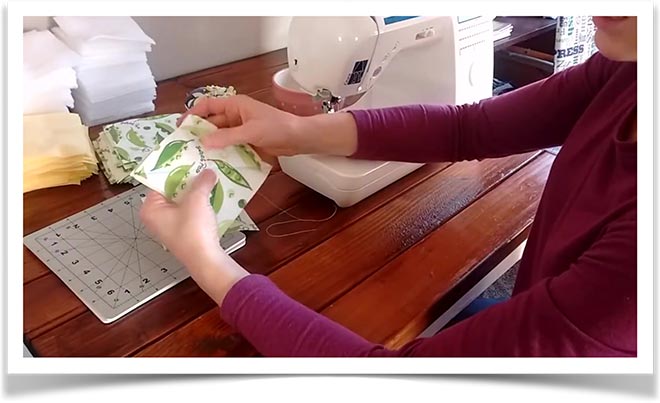
Now you need perseverance. We take a fragment of padding polyester.

Cover it with a yellow cloth.

Turn it over, cover it with textiles with a pea pattern, and secure the “sandwich” with pins.
Now we need to mark the lines in the middle. To do this, take a pen, apply a ruler at an angle of 45 degrees and draw.

When the square piece is stitched diagonally crosswise, you can put it aside and move on to the next one.

The photo shows the process of creating fragments. Also in the left corner there are two stitched squares.

We continue to make preparations.

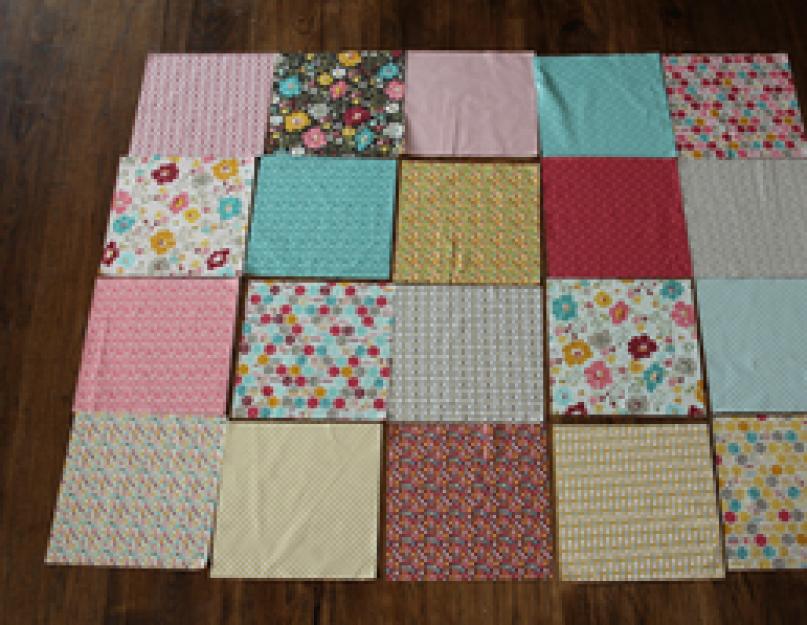
This is how the fragments will be arranged - in a checkerboard pattern.

First we sew in pairs, then in 4 pieces. The photo shows 3 blanks consisting of 4 squares.

But 8 pieces have already been sewn.

To decorate the seams, you can use scissors to make cuts and unravel the threads. Use scissors carefully so as not to cut the seam.
Patchwork bedspread in a modern interior 61 photos
Examples original ideas can be seen in the photographs. Here are bedspreads made in patchwork style that fit perfectly into the style of the home. Products can be cotton, cotton and others. The color should “echo” the main color chosen for the design of the room.
Handmade things retain the warmth of the craftswoman. The guide described above shows that even this large product, like a bedspread, it's easy to make. The only thing a beginner may lack in the process is patience.


Most ordinary people will agree that blankets made from scraps are warm memories from childhood associated with trips to visit their grandmother in the village. These varied pieces of fabric knitted together really create a cozy home environment, especially with the onset of cold weather.
The technique of patchwork or patchwork has its roots in the distant past, but today it is being revived again and enjoys wide popularity. Naturally, over time, patchwork technologies have changed and become more modern, as shown in the photo of patchwork quilts.
Creation technology
The process of sewing a product from small pieces of fabric is actually a very exciting activity. In addition, it does not require huge financial investments. After all necessary materials in the form of various pieces of fabric, you can purchase them as a set or use old things that may be lying in your closet.
Many ideas and secrets from experienced designers can be found at dizajny.guru

As a result, things that have gone out of fashion will be able to continue to exist in a new way and will remind of the wonderful past. But you should not use very old things, so that your diligence will not be in vain.

To create a patchwork quilt, you need to prepare 6 or more different colors of fabric. To realize a unique design with the help of your irrepressible imagination, you should use different colors, fabric structures and patterns on them. Slightly gathered details will add volume to the texture and an impressive appearance.


How to sew a patchwork quilt with your own hands? To do this, just watch master classes from the Internet that will help you learn the patchwork technique yourself.

Choosing the right fabric
To sew a blanket from scraps with your own hands, you need pieces of fabric of the same thickness and texture. Color palette fabrics are selected in accordance with the interior style, wall colors and furniture.

Contrasting combinations of fabrics look most advantageous against the discreet background of the main fabric. You should not allow excess variegation; it is better to give preference to moderation.

Before starting the sewing process, you need to make a preliminary layout of the blanks on the leading base of the fabric, move a little away from it and evaluate the resulting masterpiece. So to speak, a look from the outside will help you understand the success of the combination of design and color scheme.

Blanket filling material
A patchwork blanket has three main layers: a beautiful top, insulation and a lining bottom. If you take the insulation out of the blanket, you get a regular bedspread.


For insulation of the product, padding polyester is most often used, which does not shrink after washing. Therefore, it does not need to be soaked before sewing, as it will not change its original appearance and size.

Its only drawback is that it is synthetic. The use of synthetics is undesirable for children; it is better to use the most natural materials possible.

As alternatives, you can use natural fillers:
- made of cotton, similar to lightweight batting without threads. It is milky in color, 2 or 3 mm thick, and does not crumble. But after contact with water it may shrink by approximately 5%. In this regard, it should be pre-soaked, carefully squeezed in a towel and dried.
- made from 100% natural wool. Its main property is considered to be excellent thermal insulation, which is great for handicrafts.

Sewing patterns used
Do-it-yourself compositions using the patchwork technique can contain patches of various configurations: quadrangles, triangles or stripes. First, they are cut out of cardboard or thick paper. The easiest way to create a patchwork masterpiece is from large squares, which will undoubtedly appeal to novice needlewomen.

Patterns of increased complexity for a patchwork quilt can be viewed on special websites so that you don’t have to worry yourself, or you can buy them in a needlework kit.


Technique for stitching a blanket from scraps
To avoid deformation of the shape during operation, when washing or cleaning the product, the layers of the blanket must be connected to each other. In addition, stitches fulfill the mission of decoration, hiding defects that appear during work.


The joining of layers can be done by machine or by hand. To save time, it is better to use a machine; in addition, you can complete the necessary stitching. A hand-quilted product is softer to the touch and to use.

After the border is sewn on, the quilt stitching begins. First, the layers are securely fixed. The blanket is turned inside out and hand basting is done from the center to the edges. This stage must be approached very responsibly.

If the basting is done poorly, then the machine stitching will be of poor quality with bubbles and gathers, which cannot be corrected. To avoid material running up, you should do a preliminary basting and stitch from the middle to the edges.


Materials and tools required
To organize and create a patchwork quilt you will need: a table, threads, a template, prepared fabrics, insulation material, lining fabric, binding, needles, pins, chalk or soap, scissors, a measuring tape, a sewing machine and an iron.

Using various fabrics You can get various masterpiece blankets using the patchwork technique, which will become a real interior decoration, and also warm and cozy. To create children's patchwork quilts, use only natural materials. Go for it and you will succeed!

Photo of a patchwork quilt