Plastic bottles cause horror among all environmentalists on our planet. The problem is that repeated use of this (seemingly) convenient device is harmful to the body. How to be? The answer is simple - creativity. New Year's toys made from old bottles will create incredible comfort. Making them will be as easy and enjoyable as possible, and we will show and tell you how to make them yourself. Let's start with the video.
The simplest craft option
For this craft you will need:
- bottom of the bottle;
- paint/markers/markers;
- needle, thread, fishing line;
- paper;
- ribbon.
It is necessary to cut off the bottom of the bottle (you can take any volume). And then do some magic on it: paint it or leave the original color, decorate it with snowflakes, make a hole and thread a fishing line on which the toy will hang on the Christmas tree. You can make a single design using the same fishing line. All this can be seen in the photo below. We have selected several master classes.


Balls from a bottle
In this case, we just need to cut our bottle into strips. These strips must be the same length and width. They need to be glued at one end and then at the other so as to form a future Christmas tree ball. This ball can be decorated as you please: – Metal Ox, so you can build on this, and also refer to the traditional New Year's symbols(sparkles, ribbons, red/green/gold paints, rain, cones, etc.).


Bells from a bottle
Bells in the form of a New Year's toy will decorate the Christmas tree with their presence. How to make them - the top part of the bottle is necessary, because it is similar in shape. You will need paper, foil, paints, tinsel, fishing line, ribbons, glue. Part of the bottle should be wrapped in foil, secured with glue (preferably instant fixation) and decorated with snowflakes, tinsel, etc.


One two Three! Shine Christmas tree!
For this Christmas tree decoration you will need several bottles. Again, we take several of the upper parts, cut them into small strips, and place them on top of each other. The lower part can serve as a base. They can be secured with glue, but this is optional. Decorate with balls, beads or tinsel.

A few more ideas...
Toys made from bottles are just your imagination, which you can literally make into reality with your own hands. You can use any paints. The shape depends on preference. It is not necessary to take small bottles; for example, you can make a Santa Claus from a five-liter bottle (you can make a beard from plastic spoons). Lids can also become Christmas tree toy. We have selected several ideas.


A wonderful one is coming winter holiday — New Year 2020. It's time to decorate your house for his arrival, so that Santa Claus on his magic sleigh does not pass by and leaves good gifts under our tree. It is very interesting to decorate the Christmas tree and rooms with homemade toys for the holiday. The process of making them is fascinating, as is any creativity. Such crafts can be made from the most simple materials, for example, - from plastic bottles. From ordinary plastic bottles you can make a lot of interesting and beautiful things that can successfully replace store-bought analogues. Our story today is dedicated to the 7 best and original crafts from plastic bottles for the New Year 2020, which will be held under the sign of the White Metal Rat. Let's look at them in detail in our article.
Christmas tree
Unusual Christmas tree can be made from simple plastic bottles. It is important to collect necessary materials for this craft and follow the master class step by step.
To do this you will need:
- Plastic bottles;
- Scotch;
- Sandpaper (cardboard);
- Scissors.
Progress:
- The bottom and neck of the bottle should be removed, and then you will get a straight pipe. Then you should prepare blanks from twigs. They must be of different sizes so that the Christmas tree turns out to be cone-shaped.
- Then the plastic bottles need to be cut lengthwise into 3 parts so that subsequent tiers are smaller than the previous ones. You need to make needles on each workpiece, and to do this they are cut into thin strips, but not completely. To make the Christmas tree stand stable, it is advisable to use the bottom of one of the bottles as a stand.
- A sheet of cardboard needs to be rolled into a tube and placed in the neck of the bottle. You can secure it with tape. Now each tier of branches needs to be secured to the tree. You can install a toy on the top or come up with something else. To make the Christmas tree fluffy, the needles should be cut thinner. Usually blue or transparent bottles are used for this. That's all, our craft is ready!
Christmas balls
You can decorate your Christmas tree with handmade toys. In your work, it is important to follow all the steps step by step, and then you will get wonderful products.
To do this you will need:
- Plastic bottle;
- Glue;
- Rain;
- Any shiny jewelry.

Progress:
- The paper needs to be wrapped around the bottle: this will help mark the workpieces on it. It is necessary to cut 4 rings 1 cm wide. Then the rings must be fastened together using the “crosswise” principle and secured with glue. The result should be a ball of plastic strips. You need to choose beautiful threads or rain so that the toy can be used for the Christmas tree.
- To decorate the resulting blanks, it is better to use foil, beads, seed beads, etc. You can place inside such a ball small ball. You can use as much imagination as you like with this craft. This will be a very interesting activity for children.
Snowflakes from plastic bottles

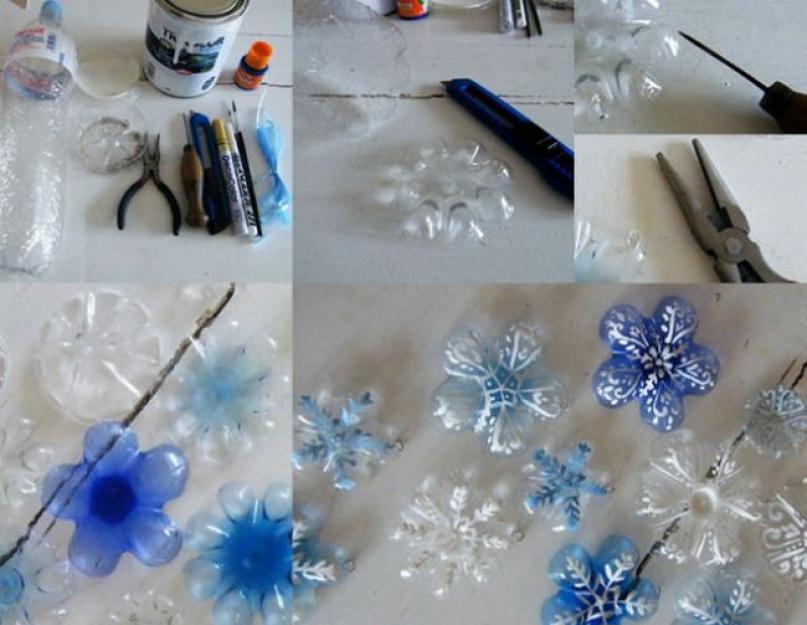
To expand the range of crafts made from plastic bottles for the New Year 2020, as Christmas tree decoration You can also make snowflakes from the bottoms of bottles. This process will also be possible for beginners in this creative endeavor.
To work you will need:
- Scissors;
- Acrylic paints white, blue, gold, silver color- to choose from;
- Plastic bottles, preferably blue;
- Paint brush;
- Wire;
- Pliers.
Progress:
- We take plastic bottles and stationery knife or use scissors to cut the bottom as low as possible to the base, leaving only the grooved part.
- After the bottoms are ready, we begin painting our future snowflakes. Depending on the desired design, select the thickness of the brush, and then start painting. As drawings, you can use various ornaments that come to your mind. This also applies to the choice of paint color with which you will decorate your New Year's product.
- Once your snowflake has turned into a beautifully painted masterpiece, give it time to dry while you use wire and pliers to make a small eyelet for the thread. Attach it to the snowflake and thread the thread into this ring.
Well, our New Year's toy for Christmas tree decoration is ready, which you now have the right to be proud of. A DIY snowflake can serve as a worthy decoration not only for your home, but also for a kindergarten, if you have Small child, and also act as an exhibit at an exhibition at the school of New Year's products.
Penguins made from plastic bottles

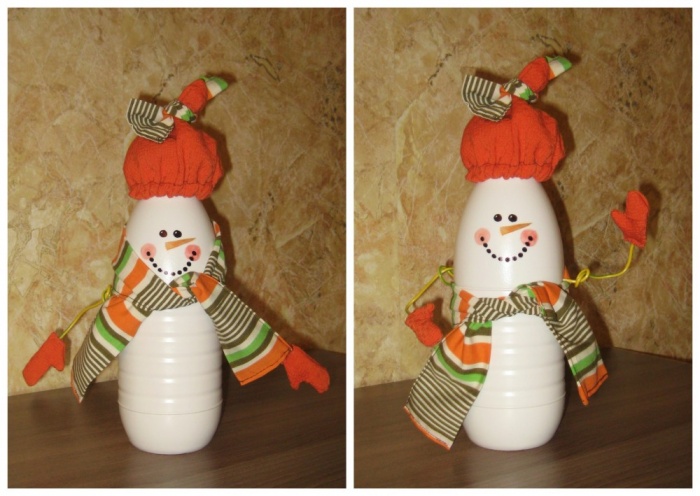
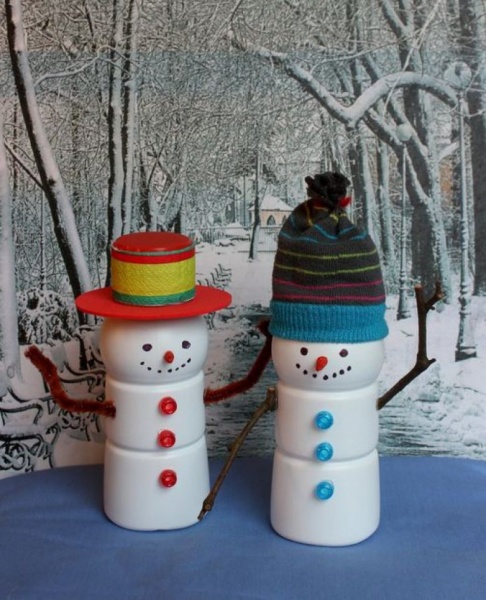
Original New Year's decoration Your home for the New Year 2020 may include penguins made from plastic bottles, which should be placed in the rooms and under the tree as decoration. This craft will delight all your family and guests, and especially children. Without spending a lot of time, you will create with your own hands a real masterpiece art that will cause a lot of positive emotions and sincere smiles from your household.
To work you will need:
- Plastic bottles (one toy takes two bottles);
- Scissors;
- Acrylic paints - white, black, red and others;
- Brushes;
- Small colored scraps for a scarf;
- Buboes or bows for hats;
- Glue.
Progress:
- We take the bottle and cut off the top part almost completely or half to get the body of a penguin. The head is made from another bottle and also from the lower part, but the workpiece should be slightly smaller.
- We connect both blanks by inserting the upper part, which is smaller, into the lower part, which is larger.
- After you have built the penguin's body, start painting it. Take acrylic paints and carefully apply them to a plastic product, imitating the color of a penguin, as shown in the photo. Use more bright colors, because the brighter your New Year's penguin turns out, the warmer and more cheerful the smiles of your family will be.
- When your penguin takes on a realistic look, you can tie a small scarf around its neck and attach a bubo or bow to its cap with glue.
What a cartoonish miracle you have created!
Video tutorial on making penguins from plastic bottles
Golden bells

Golden bells will look original on the New Year tree. This work is done very quickly and is suitable for kindergarten.
To do this you will need:
- Plastic bottles;
- Acrylic paint; if desired, instead of acrylic paint, you can use fabrics, ribbons and accessories.
Progress:
- For work, you should take 0.5 liter bottles, but more is possible if the tree is very large. The bottom of the bottle should be cut off. To make bell petals, you need to cut the edge of the bottle in a zigzag shape. Since the resulting edges will be sharp, care must be taken.
- The petals of our craft need to be made pointed, and you can use a knife to give them shape. To make holes for the rope, you need to heat the knitting needle and make holes. You can do this work with scissors, but be very careful. At the end of the work, the bells should be painted, and they will dry within an hour. To give the products a New Year's look, they need to be decorated with tinsel, garlands or sparkles. The instructions are simple, and you can do the work in your own sequence.
Candlesticks made from plastic bottles

To do this you will need:
- Plastic bottles;
- Scissors;
- Glue gun;
- Universal glue.
Progress:
- You can make a wonderful candlestick for the holiday with your own hands. You can use bottles different colors. The containers need to be cut in half. The edges of the part that remains with the bottom should be cut into strips, not reaching 4 cm. The strips can be of different widths. The resulting container will be a candle stand.
- Strips of plastic should be melted over a candle. Then use a glue gun to attach the candle to the foil. The space around the candle can be decorated with beads or stones. This way the candlestick will have little weight, and our craft is ready.
Video master class on making candlesticks
Cone
You can make original cones with your own hands; this craft from a plastic bottle will perfectly decorate your Christmas tree and home for the New Year 2020.
To do this you will need:
- Plastic bottles;
- Scissors;

Progress:
- You need to create squares from a plastic bottle, after which their corners should be rounded. The result will be products like chamomile. After this, you need to treat the edges of the petals with a candle so that they fall down.
- All parts must be strung on a thread in descending order. A bead must be inserted between them. Then you need to make a spruce branch and secure it to the pine cone. The product is ready to create a festive atmosphere.
The symbol of 2019 will be the Pig. Before the New Year, schools and kindergartens often organize competitions for the best thematic crafts; for this you want to make something unusual and original. There are many presented here step-by-step master classes- how to make a pig craft with your own hands step by step photos and video.
The Pig is a soulful old lady, she is courteous, kind and extremely scrupulous. You can trust her with any intimate secret; she will never betray or spill the secrets entrusted to her. She is distinguished by her honesty, she will never lie, even for her own good, she is simple and vulnerable. But she is not so weak as she is good-natured. As the Chinese horoscope says, the boar is a symbol of pleasure, simplicity, passion and fertility. The Year of the Pig will be successful and favorable for everyone!
For this holiday, you can make a bunch of crafts with your own hands. A holiday gift can be absolutely anything, but it will be better if it contains the symbol of the year - a pig. Decide in advance what you want to accomplish for the coming year. The gift should be pleasant, beautiful and useful. But whatever one may say, every person likes to receive a gift made with their own hands.
Here are some current ideas:
- Sew or knit small versions of the piglets.
- Make a postcard with a pig and be sure to write a congratulation in it - great gift for a colleague and simply as an addition to the main presentation.
- Make pigs in the form soft toy.
- You can make a piggy bank from a plastic bottle.
- You can also make pillows for a sofa, armchair, and even for a car. Cute piglets will warm and delight those to whom you give them.
Even though piglets are pink and cute, they love to measure puddles and play in the mud. Often the delicate color of their skin is hidden under a thick brown layer of earth or clay. In this tutorial we will make a pink pig that is bathing in a swamp. Let's start the lesson by selecting the material, then knead the mass in our hands, roll up the suitable parts and assemble them into a single product.
Modeling - useful and exciting activity, which is aimed at developing mental abilities child in the same way as drawing or creating paper appliqués.

You may need such a figurine if you are creating a farm, playing exciting game to reproduce animal sounds, stage a play about the three little pigs. In any case, creating animals with your own hands is always exciting.
What you will need for work:
- The main material is pink plasticine;
- Brown plasticine;
- Chestnut or acorn - will help save weight;
- Toothpick – fastening of the head and body.
For work, we can take 1 block of plasticine to get a miniature figurine. An acorn or chestnut will help you save weight. These fruits have a rounded shape, so you can camouflage such a frame inside the body. In any case, we will have to show the fat creature, because all the piglets are very well-fed, so the extra volume of the body will not hurt.

From the prepared pink plasticine you need to make: a torso (for it, prepare an acorn or chestnut and a large cake), legs, a head and a tail. Cut the block into pieces and knead each one separately in your hands if you have thick plasticine and not waxy one.

Glue a pink cake onto the acorn, place it between your palms and smooth it out, roll out the surface. Next you need to make a ball head and attach it using a toothpick. But the matter is complicated by the dense material that we placed inside the body.
You will have to first make a hole in the acorn so that you can then insert a piece of toothpick into it. Also make small fragments that will allow you to copy the appearance of the planned pet: ears, snout, tail.

Glue a wide flat cake onto the ball. Press the dents twice. Glue a little above the eye, and cut out a mouth a little below.

Connect the head to the body with a toothpick. Glue the ears to the head, lowering the cakes down. Glue the tail at the back and twist it into a spiral. The figurine already looks like a pig.

Do the legs. There is no need to do each one separately. You can form simple rectangular pieces, cut along the tip of a toothpick, then glue two hooves to each piece.

Attach the legs to the body. Also make a large cake out of brown plasticine - this will be a swamp where we will place our cute pig. She will love to bathe in the sun.

The inhabitant of the farm - a plasticine pig is ready. She doesn’t grunt, doesn’t run away, doesn’t ask for food - she’s just a toy that is very similar to a real animal. Perhaps this is one of those three famous little pigs who outsmarted the bad wolf.


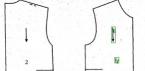
In this master class we will make such a pig from an ordinary plastic bottle.

It is better to choose a bottle with a pink cap. But you can paint any lid pink acrylic paint.

We cut out the middle of the bottle - we need to shorten it.


We connect the upper and lower parts; if desired, you can fix them with glue.

- four foot covers;
- printed ears and eyes.

You can print our sketch in A4 format. 
We cut out all the elements, also do not forget to cut out the strip for the tail.

Using hot glue, attach the ears, eyes and pink overalls.

Attach the legs.

Our glamorous pig is ready!


This is such a fluffy and soft pig that can be made from knitting threads.

We have to:
- wool threads;
- pink chenille wire;
- felt;
- button;
- ready-made eyes;
- cardboard.
We cut out two rings from cardboard: the outer circle with a diameter of 7 cm, the inner circle 5 cm..

We cut yarn 1-1.5 meters long into 5-6 threads. 
We put the two rings together and begin to wrap them with yarn.


We wind until the hole closes.

The last circles can be pulled through with sticks.

Then cut the yarn along the outer edge with sharp scissors.


Spread the rings a little, wrap the middle with thread and tie.


All that remains is to remove the rings and shake the pompom.

We make legs and a tail from chenille wire and glue it on.


I didn't have a pink button the right size for the pig's snout, so I painted a matching button with pink nail polish.


We glue all this to our pompom.


The soft pig is ready!


I used half a skein of standard yarn.


Bookmark using origami technique
Many parents and all educators devote a lot of time and attention to the development fine motor skills children. Why do this? By developing fine motor skills, you also develop the brain, that is, attention, thinking and memory. How to do this?
To develop children's fine motor skills, special techniques have been created and quite a few books have been written. But even without knowing all this, you can come up with something new, interesting and useful every day for your child.

For example, you can make an unusual bookmark in the shape of a pig using the origami technique. In itself, this unique ancient technique is already designed to develop fingers and arms, as well as attention.

Materials needed to make a bookmark:
- double-sided pink colored paper;
- scissors;
- Ruler and pencil;
- glue;
- button.
First, we need to construct a square with a side of 12-15 cm using a ruler and pencil.

Carefully cut it out and fold it diagonally once.

Now you need to fold the two corners to the fold, as shown in the photo.


We fold the side corners and wrap them in the resulting envelope. The corner blank is ready. Now we begin to revive it.

We will make a pig from the resulting corner, so we need to cut out ears from the same pink paper. A large pink button will serve as our piglet. You can take the eyes ready for toys, but you can also draw them and then cut them out.

Carefully glue the button, eyes and ears. The result is a funny, cheerful pig that will store the page and you can easily find it.

What will it be like? original gift for dad or grandma! It is even more valuable because it was made by children's hands.


Each of us has pencils and pens. Especially in children. And so that they are all in one place and do not get lost, we will crochet a cute pencil holder in the shape of a pig. This pencil holder will fit perfectly into a child's room. In addition, tying it will not be difficult.

To knit a pencil holder we will need:
- yarn in light pink, dark pink and black;
- hook;
- needle;
- a little padding polyester;
- cup.
We start by knitting the bottom of the pencil holder. Let's knit a circle using double crochets. We knit with light pink yarn.
Let's make a sliding loop and knit twelve stitches into it. Starting from the second row, we will make increases. In one row in each loop, in another through a loop, in the next through three loops and so on. We knit a circle the size of the bottom of the glass, which will be the base of the pencil holder. Our bottom is ready. It is better to take a heavy glass for the base so that the pencil holder stands firmly and does not fall.

And now we need to raise our next row a little. To do this, we knit a row for back walls We no longer make loops or increases. We begin to knit the walls.

We knit rows until our knitted cup hides the base. This is how we tied a regular glass.

Let's tie the nose into a snout. We knit it with dark pink yarn. Let's make two loops and knit six single crochets into one. We will make increases from the second row. In one row in each loop and in the other row through the loop.
Then we knit a row behind the back walls of the loops and knit another row with single crochets.

Now let's tie the pig's ears. We knit them with dark pink yarn.
Let's make four air loops and perform two double crochets in the initial loop. We knit four turning rows. And in each of them we make an increase in the first and last column.
Using light pink yarn, we tie each ear with single crochets.

We will tie the eyes with black yarn. Make ten half double crochets into a sliding loop and tighten the loop.

On the patch we embroider minks with black yarn. We sew the patch to the middle of our knitted cup, filling it a little with padding polyester.
And we sew the ears on the sides, folding their wide part in half. To sew the ears evenly, you can find the middle and count the same number of stitches in both directions.

Then we sew on the eyes.

All that remains is to embroider a smile. We also embroider it with black yarn.
The crocheted pencil pencil in the shape of a pig is ready!

How to crochet booties
How to knit such adorable booties in the shape of piglets for your baby with step-by-step photos, see here.


DIY application from foamiran “Piglet”
You will get a little pink pig if you repeat this interesting lesson. Naturally, it is intended for children, they are the big fans of paper making. The figurine will turn out to be unique, because it needs to be made exclusively from circles. In order to somehow diversify the work, we will replace the paper with foamiran - an unfamiliar material with a unique soft texture. It will be even more interesting to work with him.
If you have a pink leaf, then it is perfect for a little pink pig, if not, then take paper or foamiran at your discretion. The circles will become details for making crafts; this shape will allow you to reproduce the fact that the pig is plump.

To make an applique in the shape of a pig, prepare:
- pink foamiran;
- blue cardboard;
- compass;
- scissors;
- glue;
- white paper coin;
- black marker.
How to make an applique in the shape of a pig with your own hands step by step.
Blue cardboard will become a canvas for an interesting foamiran applique. The pink leaf will later become a pig, you need to cut out a sufficient number of circles from it suitable size. This is the minimum amount of materials that will be used.

Cut 3 large and 1 small circle from pink foamiran. The small circle will become the head, one of the large ones will become the body of the pet. Leave them unchanged. Cut the remaining two large circles in half. While you will need 3 semicircles to imitate the legs, the hind legs will visually merge, so you don’t have to show the second one.

Glue a large whole circle in the center - this is the body of the pig, you need to position it so that all other parts of the body fit onto the prepared sheet. Directly attach one half of the circle - a leg - to the round body, move the other leg forward a little. But make these 2 parts on the same level. This way the front legs will already be in place.

Glue a small circle on top of the two semicircles - this will be the head of the animal. Add a leg at the back, turning the part with the convex side towards the head.

Now you need to use the remaining half of the third large circle. At the second stage of work, we cut 2 of them in half, but only 3 halves were used for the legs. So, the last fragment will be used to make the ears and tail. Cut 3 segments. Thus, the initially prepared parts will be triangular.
Glue the ears to the head, lower the tips down and secure with glue. Glue another segment at the back in the form of a tail, bend it just enough to show an imitation of a hook. The foamiran figurine is already ready. Now you can design the muzzle. Glue a white paper coin in front - a patch, draw black dots. Also make 2 slits - eyes. That's all the manipulation of materials.

The pig turned out to be very positive; all kids will like this children's craft, because it is easy to make and bright.

Using the same principle, you can perform completely different familiar or exotic animals. Experiments are always interesting and useful for the development of children.

How to make another one, see this applique here


How to make a chestnut pig with your own hands
Of course, pigs are most often depicted as pink, and chestnuts are the brown stuff. We have 2 ways - to mask the chestnuts under a thin layer of pink plasticine or to use the pink mass only in fragments, gluing additional parts of the figure.

The following tutorial describes in detail how to make a pet from natural material. This craft is easy to do, so kindergarten-age kids can master it. See how to do it here.
Every child asks mom or dad to buy him a Kinder surprise, not so much to taste delicious chocolate, but to see what kind of toy is hidden inside. Did you know that you can make a toy from a Kinder Surprise capsule with your own hands? Children will happily get to work.
Thus, they will experience triple pleasure: they will taste their favorite sweet, be surprised and rejoice at the surprise they will find inside, and also have an interesting time doing exciting creativity. With step by step photos Here.


Do-it-yourself piggy bank video tutorial
DIY yellow pig made from paper
Bookmarks are always appropriate. Absolutely everyone uses them, be it adults - they always like to read at night, be it teenagers who go to school and use textbooks, be it children to whom their parents read interesting and instructive stories. Thus, a bookmark can become a symbolic gift for the New Year, made with your own hands. And it represents the head of a pig. More simple option you won't find it. Step-by-step master class here
For decoration New Year's table You can make this little pig out of lemon.


The yellow pig is the symbol of 2019
People born in the year of the Pig are usually successful in business. Representatives of this sign are energetic, resourceful and straightforward. They take their business seriously and can go to great lengths to fulfill their desires. Moral and material satisfaction fully characterize the Year of the Pig. But some people can live this year carefree without much financial wealth. They do not notice aggression and betrayal in those around them.
In the year of the Pig, brave and strong people who go ahead in any situation. Pigs are hardworking and smart, but at the same time they believe in deception, often confusing it with the truth. Pigs prefer to follow the straight path; they are simple and open people who can find a common language with the society around them.
The pig is a great player. She hides a competitive spirit that she usually doesn't show to strangers. Often she doesn't believe in herself. Often a lot of questions are spinning in her head, for example, about what is the right thing to do in this or that case. This is a very sincere person, he will easily conquer any person with his open and honest thoughts and actions.
The Pig sees only good qualities in the people around him. She will not even think that there may be enemies among her close people. She wants to believe that only kind and honest people live in the world. She often gets disappointed in people because of her good-natured attitude. It is almost impossible for someone who has ruined his reputation with her to become her friend again.
The simplest and cutest do-it-yourself nylon pig
Content
And we come to you, as always, with our interesting and original ideas New Year's crafts. This time we will create crafts from plastic bottles. Firstly, don’t forget that plastic takes more than 100 years to decompose, so we should use it as much as possible in order to do less harm to the environment.
Secondly, these crafts will not require too much money from you. Thirdly, you can make a lot of interesting things from this scrap material. In our article you will find figurines, a garland, a piggy bank, Christmas tree decorations and many other crafts made from plastic bottles.
New Year figures made from plastic bottles
These New Year crafts from bottles are very easy to create. Here is a set of necessary items:
- plastic containers;
- scissors and stationery knife;
- paints, brushes;
- textile;
- Knitting;
- felt;
- glue gun.
For example, you can make adorable penguins. To do this, you need to cut the workpiece in half, and cut off the bottom for the cap. Next, you need to paint them like penguins, glue the parts together using a glue gun and decorate the figures with textiles.
A little advice - instead of a glue gun, you can use tape, which you can simply paint over later.

Use acrylic paints, they adhere better to plastic.

From this simple and affordable material you can also make bright and beautiful apples, which can be placed under the Christmas tree or used to decorate the kitchen. By the way, the decor is suitable not only for the New Year, but also for other holidays.

You can make a toy for a child - a horse on a stick. If you improvise, you can also create a dog, because this is a symbol of the upcoming 2018. And the color, by the way, is yellow! So use more yellow when creating your wonderful crafts.
Christmas tree decorations made from plastic bottles
If you have collected a lot of material that we need in the house, and you no longer know where to put it, then our advice to you is to get creative! Use this container for creativity! You can make wonderful snowflakes from the bases. They just need to be slightly decorated and a string attached so they can be hung. Use a thin brush to apply the design. From such blanks you can create a whole garland or a wreath for the door.

Crafts for the New Year from bottles are both original and inexpensive.
But these bells are obtained from the tops:

A whole ball can be created from the bases of bottles. The parts can be decorated, or they can be used in their original form:

Crafts made from plastic bottles for the New Year are an opportunity to give old things a second chance, an opportunity to join the culture of recycling things and sorting garbage. Thus, we consciously approach the use of resources, and besides, you can always call yourself a trash art artist, and this, by the way, is a very fashionable movement today. In general, this handicraft is good on all fronts!

And the following Christmas balls made of strips that are decorated with various beads, paints, ribbons and other decor:

Snow globes
Another cool idea is to use plastic bottles to create Christmas snow globes. What we need:
- smooth plastic bottles;
- acrylic paints, brushes;
- glitter;
- decorative figures;
- glue;
- foam or artificial snow;
- sequins, beads.
First, you need to cut off the top and bottom parts of the bottle so that one tube remains. You need to cut a circle out of polystyrene foam along the diameter of the pipe; we will attach our decorative parts to it.
Then, having coated the sides of the foam with glue, it needs to be glued to the main part of the composition, placing the decorations inside.
The top and bottom of the pipe can be decorated with cut-off parts of the bottle, gluing them with a glue gun and decorating them with artificial snow and ribbons. Crafts from plastic bottles are ready! You can also sprinkle sparkles, sequins and beads inside.

You can, on the contrary, use only the top and bottom to create a kind of New Year's snow globe.

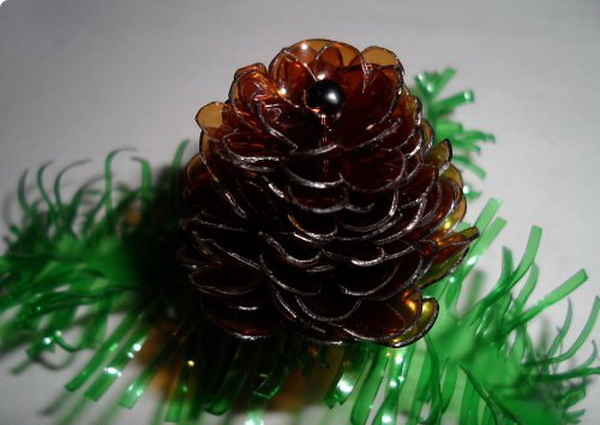
Cones made from plastic bottles
Another decorative option when plastic is used to create a cone. It is better to use brown blanks right away.
You need to cut out something like daisies from your material and string them on a string. Make blanks of different sizes so that you end up with a cone. You can cut fir branches from a green bottle.
Wreath made from plastic bottles
For this we will need the bottoms of plastic bottles, wire, a bow and other decorations.

The details can be painted gold to give the craft pomp and completeness, and also to disguise the material from which the wreath is made.

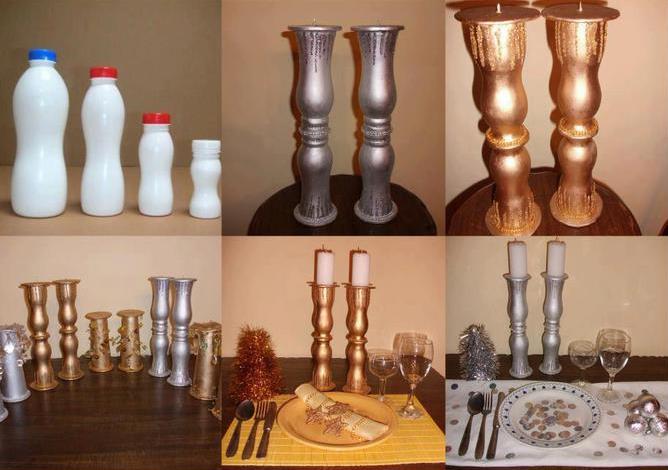
Candlestick for New Year
One of the New Year's attributes is a candle. Well, you and I can make some pretty good candlesticks.

The next candlestick is made of two components, decorated with coffee beans, but, most importantly, it is a beautiful decorative candle.

By the way, don’t forget that you can use not only mineral water bottles or sweet water, but also from yoghurts, kefir and other products.
Souvenirs for the New Year
You can prepare something humorous and funny for guests or children. For example, make a pig piggy bank out of a plastic bottle. And what? Very original! If you manage to make a dog piggy bank, it will be even better!

Use acrylic or spray paint, felt parts, fabric, beads and various other decor for decoration. But children will definitely be delighted with such funny turtles. For the base, use thin kitchen sponges or foamiran. We have already described how to work with this material in our articles.

How do you like a whole flowerbed of tulips in the middle of winter? This composition can be used to decorate a summer cottage or the courtyard of a private house. Guests will definitely not understand at first that these beautiful flowers are made from ordinary plastic bottles. As they say, crafts made from plastic bottles for the New Year are a manifestation of imagination and ingenuity.

And a few more options for completely non-winter flowers made from the simplest and most accessible materials at hand:


Cup made from a plastic bottle
If you want to stand out from the crowd, have a special attribute, or you need to have a cup to match your costume, then it can very easily be made from the material we know. By the way, read our articles where we tell you how to make crafts for the New Year from a bottle of champagne - this may also come in handy. So here's the cup:
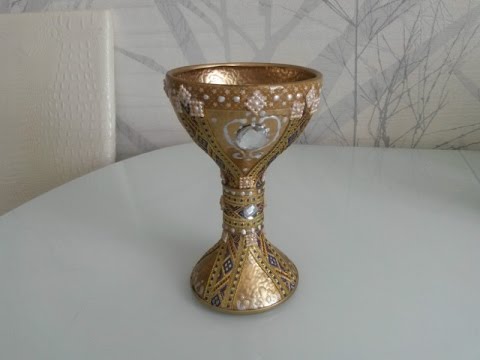
Luxurious, right? And, at first glance, you can’t tell at all what it’s made of, and at the second glance, too!
The design of a future cup for wine or as a reward may look something like this:
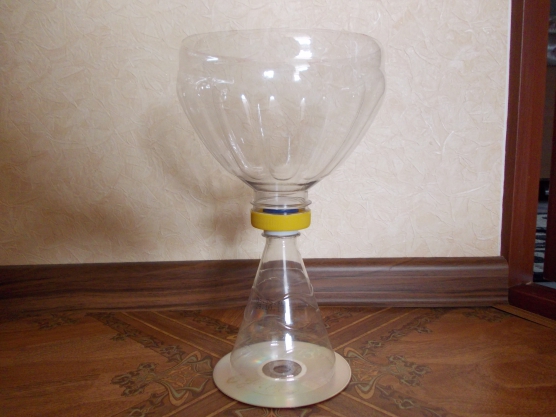
Or like this:

We really enjoy telling you about different unusual crafts, about materials from which you can make amazing things and which are found in almost every home. All this so that you can find a moment for creativity, for relaxation, for your hobby. Slow down time around you, let, as they say, the whole world wait while you create beautiful things. Well, in conclusion - crafts for the New Year from bottles video master class:
See how you can create a cheerful garland, which can be hung in the kitchen or in the children's room, or wherever you want, at your discretion.
Post Views: 1,290
New Year is a holiday of magic and fulfillment of desires. According to Eastern calendar, every year has its own patron. For the upcoming 2019 it is a Pig (Boar). To attract good luck, health and prosperity to your home, it is advisable to make souvenirs with the image of such a philosophically calm and good-natured animal. Of course, you can buy ready-made souvenirs, but items made independently retain the warmth of the master’s hands and a piece of his soul. The topic of today's article is the symbol of 2019: the Yellow Pig (Boar) with your own hands. Select suitable master class, prepare materials and experience all the joys of the creative process!
There are many ways to make a talisman for the coming year with your own hands. The article describes step by step instructions to such methods.
- Making a paper piggy different ways(applique, papier-mâché, origami).
- Edible souvenirs in the shape of a pig.
- Yellow Pig (Boar), made of textiles (master class for labor lessons at school).
- DIY pig sewn from felt.
- Symbol of the upcoming 2019: an applique made from cotton pads.
- Boar from a plastic bottle. The article describes step-by-step instructions for making a traditional piggy bank and original flowerpots for the garden.
- Piggy, made by hand from tights. The master class is very simple, and the DIY craft turns out remarkably beautiful and original.
- Piggy made from plasticine (task for kindergarten or junior school). In a similar way, you can make crafts from polymer clay or salt dough.
- Symbol of 2019: Yellow Pig (Boar), made with your own hands from corrugated paper.
Symbol of 2019: DIY Yellow Pig (Boar)
Paper is perhaps the most popular and versatile material. Paper products can be made with a child at home or in kindergarten, starting from the age of 4-5, and such complex and interesting technology schoolchildren and adults are fascinated by origami experienced craftsmen. Paper is a cheap, pliable material for a wide variety of manipulations. You can make it out of it various crafts For home theater, games or holiday table decorations. Among other characters, the main character, the hero of the occasion, is, of course, a pig. Symbol of 2019: The Yellow Pig (Boar) can be made with your own hands in the following ways.
The easiest way, accessible even to kids, is do-it-yourself applique. Find interesting templates with images of pigs on the Internet, print them, cut them out and paste them onto thick paper or cardboard. Children 3-4 years old, of course, will need help from their elders. Preschooler in kindergarten or junior schoolboy able to handle this type of work independently. The template can be printed in color or black and white. In the latter case, the blanks are painted with a pencil, felt-tip pens or paints. The finished craft can be decorated with small shells, rhinestones or sequins
Application from leaves: from schematic to complex realistic image. This task is equally suitable for kindergarten or school.


It is not at all necessary to make images of “farm” pigs. If your baby likes such cute characters as Peppa or Piglet from Soviet or American cartoons), what are the symbols of 2019? A template for Peppa can be found on the Internet or, if your artistic abilities allow, you can draw it yourself. The following options are also possible paper crafts with your own hands.
Kit for a young fashion designer. Make an applique of Peppa Pig or some other famous pig on cardboard. Cut along the outline. From paper, cut out items of clothing with strips of paper so that you can attach them to the doll. It is advisable to use thick paper for wardrobe items.

On the Internet there are many scans for three-dimensional figures of pigs. Just print out the pattern you like, bend the paper along the marked lines and assemble the figure. Some layouts require gluing for strength.

Children in middle and high school have access to more complex techniques: origami or quilling. A do-it-yourself pig figurine using the origami technique can be simple (from one sheet of paper folded according to a certain pattern) or complex, consisting of several modules. Beautiful and durable pig figurines are made using the papier-mâché method. Crafts can also be functional. If you cover a tin can with a slot with paper (wrapping paper or newspaper), you will get a classic piggy bank, a real heroine of Andersen’s fairy tale. Products made from papier-mâché look especially beautiful and original if you decorate them using decoupage. The raw material for such a product can be a roll toilet paper or a cellulose egg tray.

An original and not at all complicated technique - 3D applique. You will need 3 rectangles of different sizes: for the head, snout and torso. Glue 3 cylinders. Attach circles cut from paper to the end parts. Roll 4 paper legs and cut out ears. Draw nostrils and eyes with a black felt-tip pen. Color the hooves black. Connect the parts. Make a bow tie from colored paper or a piece of bright textile. The paper piggy is ready. You can use it for a home mini-performance or as a Christmas tree decoration.

Edible surprises
Symbol of 2019: Yellow Pig (Boar), made with your own hands, can be quite edible. The decoration of the New Year's table will be cookies in the shape of pig faces. A 6-7 year old child can make delicious pigs with his own hands with the help of his mother or grandmother. For original baking, you can use ready-made yeast or puff pastry. The piglets' faces are cut out with a glass, snouts and ears are made from the remains of the dough. The nostrils and eyes are made from raisins, prunes or candied fruits. The pig is baked in the oven, first brushed with egg.

Guests will love these unusual and non-standard cookies. And in combination with aromatic tea - it’s absolutely wonderful. Experienced housewives They can come up with more intricate decor.
Pig - symbol of the New Year 2019 crochet
There are many ways to knit and crochet piglets. The simplest option is a pig - the symbol of 2019, crocheted in the form of a round potholder with your own hands. The basis of the product is two parts round shape- snout and head. Ears – 2 parts, made in the form of beveled triangles. The legs are rectangular, you will need 2 blanks. The easiest way to embroider a pig's eyes and nostrils is with black thread.
Materials, devices
- For work you will need.
- Three hook.
- Pink yarn.
- Leftover black yarn for embroidering eyes and nostrils.
- Needle.
- Hollow fiber for stuffing.
Master class: detailed description
The crocheted pig, the symbol of 2019, is made in the following sequence.
- Knit a chain of 4 air loops, close the ring.
- Work the first round with single crochet stitches in each stitch of the chain.
- Continue knitting, determining the number and frequency of increases yourself, so that you get a flat surface, without wavy edges. Knit until you get a round piece with a diameter of 200 mm.
- Using the same technology, tie a patch (diameter 70 mm).
- To knit one ear, make a 6-8 cm chain of chain stitches. Knit the first row with single crochets. Continuing to knit with the same stitches, make symmetrical decreases on both sides until the workpiece takes the form of an isosceles triangle with a rounded top.
- The legs can be knitted separately and sewn or knitted from the bottom of the workpiece.
- Place the blanks together. Sew the pot holder.
- To make the face of the funny piggy more expressive, tie the finished product with contrasting threads in a circle.
- Make a squiggle tail from a chain of air loops, then sew it to the finished product.
- Sew thick fabric on the back side. It will give the craft the necessary rigidity and strength.
This is an excellent activity for labor lessons at school.


Video (detailed master class)
Video (part 2)
Symbol of 2019: DIY Yellow Pig (Boar) made from fabric
There is probably not a single child (or adult either) who would be completely indifferent to soft toys. Dolls made in the Tilda style are very popular. This is a very special world of dolls. The founder of the style is designer from Norway T. Fennanger. A piggy made with your own hands using the Tilda technology looks simply great and will be a wonderful gift for the New Year. So, the symbol of 2019: DIY Yellow Pig (Boar) made from fabric.
Here are 2 variants of tilde pigs: large and small, both flying.


For sewing, it is advisable to use natural textiles: calico, linen, cotton or poplin. This is one of the canonical rules for sewing tilde toys with your own hands. Piggy can be made from light fabric without a pattern. The symbol of 2019 looks good: the Yellow Pig (Boar), hand-sewn from fabric with a small “rustic” pattern. Canvas white You can color it yourself: with a coffee solution or tea leaves. After dyeing it takes on a flesh tone. The pig will turn out to be quite realistic, “farm-like”.
Necessary materials
In addition to the fabric, you will need.
- Filling: synthetic fluff or holofiber. Lavender or a vanilla pod added to the filler will make the toy exquisitely fragrant. Calcined buckwheat can also be used as a filler. The result is a 100% environmentally friendly option.
- A piece of felt is for the wings. Felt can be replaced with thick fabric.
- Threads, needle.
- Pencil for coloring blush (another feature of tildes).
- A simple pencil for marking.
Master class step by step
- Fold the fabric in half.
- Print the finished pattern on thick paper, cut it out and lay it on top of the material.
- Trace the patterns with a simple pencil. Don't forget to add 0.5 cm to the seams.
- Cut out the pieces. You will get 8 blanks for the legs, 4 for the ears and 2 for the body of the pig.
- Sew the ear and leg blanks from the inside out, turn the fabric right side out.
- Sew the body of the pig in the same way, then stuff it more tightly with filling. The parts can be sewn by machine or by hand. It all depends on your sewing skills, taste preferences and textile density.
- Using a blind stitch, sew on the pig's ears and legs.
- Make eyes from beads or paint them with acrylic paint.
- Draw a soft, “blurred” blush with a pencil.
- Make a ponytail from a sewn strip of fabric with a wire inserted inside. Sew the tail into the pig's body.
- Cut out the wings from felt or thick fabric, and carefully sew the pigs to the body.
- Decorate the pig according to your taste: appliqué, lace or original clothes.
This is what should happen.

Here is another technology for sewing a soft toy “pig” from textiles.
Symbol of 2019: Yellow Boar (Pig) made from felt
Felt products are durable, practical and look very beautiful. The felt toy can be used as a Christmas tree decoration, a small keychain for a backpack, or to decorate a greeting card.
Tools, materials
To make a craft with your own hands, you will need.
- Multi-colored felt.
- Threads, needle.
- Scissors.
- Filling: holofiber or synthetic fluff.
- Ribbon or braid.
- Paper for patterns.
- Pencil for marking.
- Set of toy accessories.


Symbol of the New Year: procedure
Symbol of 2019: Yellow Boar (Pig) made from felt using this algorithm.
- Print the patterns on thick paper.
- Fold the felt in half.
- Place the patterns on top of the material, trace with a pencil, cut out according to the pattern.
- Carefully sew the parts together, stuff the piglet with holofiber or synthetic down. The toy will look voluminous.
- Sew a toy and decorate it to your liking. Make nostrils and eyes from special toy accessories or embroider with black thread.
This is how beautiful it turns out.


Symbol of 2019: Yellow Boar (Pig), made with your own hands from felt, is ready.
Symbol of 2019: DIY Yellow Pig made from cotton pads
Young crafters enjoy making appliques with their own hands. Unusual possibilities are opened up by ordinary cotton pads, which are sold in any cosmetic store. The investment of time, money and labor is minimal, and the picture turns out nice and original. The pig will be plump and round, as it should be.

Materials, tools
For work you will need.
- Dark colored cardboard for the base.
- Cotton pads.
- Watercolor paints.
- Brushes.
- Glue.
- Black felt-tip pen or marker.
Algorithm of actions
Step-by-step instructions for making the symbol of 2019: DIY Yellow Pig from cotton pads next.
- Stepping back approximately 2-3 mm from the edge of the cotton pad, cut out 3 circles. Cut 2 of them in half.
- Set aside 1 cotton pad. This will be the torso.
- Paint the blanks in pink color, leave them for a while to dry.
- Glue a circle of larger diameter onto the base. This is the torso.
- Glue 1 back leg and 2 front legs (the second back leg is not visible).
- Glue the head so that it extends slightly onto the body and front legs of the pig.
- From the remaining pink blank, cut out triangular-shaped ears. Glue them to the head, turning the ends down. The pig will turn out to be lop-eared.
- Cut out the tail, crochet it and glue it to the base.
- Design the applique by drawing nostrils and eyes.
Symbol of 2019: DIY Yellow Pig, glued together from painted cotton pads, ready. Photos of the working process.

DIY pig (boar) from a plastic bottle
Plastic bottles are a material that is found in every home. Although it is considered junk, the products made from it are quite nice. The shape of the bottle vaguely resembles the body of a pig. Therefore, a pig (boar) made from plastic with your own hands will turn out to be quite realistic. Consider two step-by-step master class: a piggy bank and an original flowerpot for a country mini-flower garden made from a bottle.


Necessary materials
You will need them.
- Bottle 0.5-2.0 l.
- Glue, scissors.
- Eyes (made of cardboard or toy accessories).
- Colored paper, cardboard.
- Acrylic paints.
- Brushes.
Master class: description of the algorithm
The step-by-step procedure is as follows.
- Shorten the bottle by cutting out the middle part.
- Connect the 2 parts so that you get the body of a pig.
- Cut out ears from thick cardboard, and from colored paper - a rectangle for pasting the body.
- Cut a slot for coins in the “back” of the pig.
- Cover the pig with paper. It is much more practical to paint the animal with yellow or pink acrylic paint.
- Glue ears and eyes to the base.
- Screw a stopper onto the bottle, painted pink with acrylic dye.
- Make the legs from bottle caps and glue them to the base.
Such decorations can be made to decorate the yard at a school or kindergarten. The pig (boar), made from a plastic bottle with your own hands, is ready.
In the same way, you can make your own pot in the shape of a pig for your garden, only the hole is larger and wider. The shape of the excavation for filling the soil is rectangular or oval. To prevent plant roots from rotting, make several holes in the animal’s abdomen. A layer of expanded clay is poured onto the bottom of such a mini-flowerbed, and a layer of fertile soil is placed on top. You don't have to do the legs. If there are a lot of bottles, you can make a whole herd of pigs.


If there is a canister in the house household chemicals, then by painting it with pink acrylic paint and punching several holes in the cork “patch” with a hot awl, you will get a convenient watering can with a handle. It will especially appeal to young gardeners. She looks something like this.

Step-by-step video of the master class
Do-it-yourself pig from tights, step-by-step master class
You can sew a soft toy as a gift for a baby not only from pieces of new fabric, but also from outdated children's tights. The given master class on making a pig from tights with your own hands is the simplest. With a little effort, even a novice craftswoman will cope with the task perfectly. Step-by-step photo of the working process.

Materials
- Old children's tights.
- Scissors.
- Thread with a needle.
- Stuffing: holofiber, padding polyester or padding polyester. It is not advisable to use shavings or ordinary cotton wool as filling. It will be impossible to wash such a toy.
detailed instructions
So, a pig made from tights with your own hands: a master class for beginners.
- Cut off the widest part of the tights.
- Sew the workpiece on one side.
- Stuff the toy and sew the fabric on the other side.
- Using a needle and thread, form the pig's face as in the step-by-step photo.
- Form the ears and snout of the pig.
- To sew the body and legs of the pig, cut off the “shorts” of the tights. Sew the bottom, stuff the workpiece with filler and sew on the opposite side.
- Form the arms of a soft toy from tights fabric.
- Connect all the parts together.
- Now all that remains is to decorate the toy: sew on the eyes, decorate it with fabric bows and buttons.
- In a similar way, you can sew a funny pig farm from old children's socks.

Products made with your own hands turn out to be a little primitive, but so cozy and cute that children play with them with more pleasure than with store-bought ones.
DIY plasticine piggy for New Year 2019
Another master class: DIY plasticine piggy for the New Year 2019. Materials for modeling are available to children from the first years of life. You can make a plasticine farm for a competition in kindergarten or school. In addition, modeling is an excellent means of developing motor skills in children.
What is necessary
- Necessary materials and equipment.
- Plasticine: pink, black and white.
- Stack – for drawing elements.
- Matches - for connecting individual parts together.
- Cardboard, oilcloth or modeling board.
Description of actions
Here are interesting step-by-step photos that will certainly be useful to you.


Now - a master class on making a pig from plasticine for the New Year 2019 with your own hands. Form from plasticine.
- 2 balls big size: head and body of a piglet.
- 5 small balls – legs and a snout.
- Drop-shaped pieces of plasticine: hooves, ears.
- “Worm” for the tail.
- Flatten the small ball-piglet. Connect it to your head. Using a stack, mark the mouth and nostrils.
- Make eyes from plasticine in 2 colors: black and white.
- Give the ears a triangular shape and attach them to the head.
- Connect the head to the body. For a better connection, use a match.
- Attach the legs to the body, preferably with matches.
- Cut the blanks for the hooves into a stack and attach them to the legs.
- Hook the ponytail back and attach it to the body.
This is such a handsome man you will get.

Or this Peppa Pig.

Yellow corrugated paper pig
The simplest master class, which is accessible even to a 5-6 year old preschooler.
List of accessories and materials
In order for the yellow corrugated paper pig to bring you good luck, you will need.
- Corrugated paper 300x500 mm.
- Eyes – accessories for toys.
- Hot glue gun.
- Scissors.
- A piece of black paper.
Step-by-step photos and work order


Procedure.
- Cut 2 strips of paper 10mm thick. Cut the sheets across the corrugation, otherwise it will be impossible to glue them together.
- Roll the strips in a spiral: larger and smaller diameters. In the last turn of a circle of larger diameter, bend the “ears” and glue them.
- Secure the resulting circles with glue.
- Glue the muzzle with the snout.
- Decorate the finished product by attaching eyes.
The yellow pig made of corrugated paper is ready. Taking advantage detailed master classes, step-by-step photos and videos, you can make wonderful toys with your own hands for a competition or exhibition at school or kindergarten.