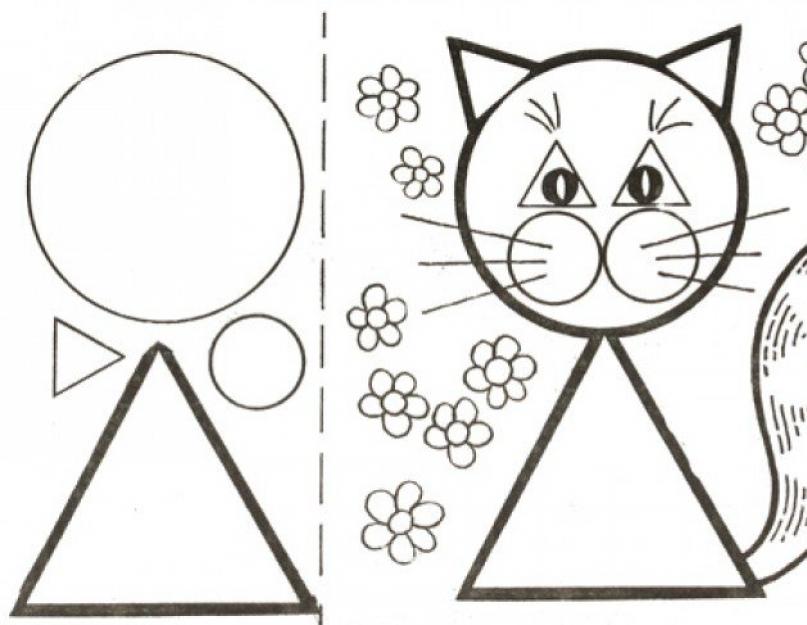
This will allow your child to learn how to choose the right size of objects, combine colors, and place different figures in space right? Of course, these are applications made from circles of colored paper, and in general applications from geometric shapes.
If you think about it and use your imagination, you can imagine any object as round, consisting only of round elements. Let's get creative and see what animals made up of circles and semicircles might look like!
Preparation of materials
First, let's decide what exactly we need to make such applications.
- First of all, colored paper;
- Scissors;
- Glue;
- Compass.
Templates may also come in handy, so we suggest you carefully look at the options with templates:


Bear

In order to make a bear figurine, we will take the materials and tools necessary for the work.
For the teddy bear, cut out circles in four sizes. The body is the largest circle, the head is a medium-sized circle, five small circles are the paws and muzzle, and two identical small circles are the ears. In total we need 9 circles.
You can prepare templates for children in advance so that they do not have to work with dangerous compasses.

All that remains is to assemble the bear into one solid figure. First, glue the body circle to a plain sheet of paper, then the head. Then the paws, the muzzle. We will make the ears from one circle, cutting it into two semicircles. Using a felt-tip pen, draw eyes, a nose and a mouth.


The bear made from circles and semicircles is ready!
Elephant and owl

For the baby elephant, we will also need the materials and tools for work described above. You will need 3 circles: the body - the largest circle, the head a little smaller and the ear. And there are 4 semicircles: two for the trunk and two for the feet.
First we glue the body, then glue the head and ear to it. From below to the body we glue circles and semicircles that form the legs. We will assemble a trunk from two semicircles and glue it to the head.
Draw the eyes and tail with felt-tip pens or paints. The elephant made of circles and semicircles is ready!

For the owlet, take a large circle for the body, two medium ones for the wings, two semicircles for the ears and three quarter circles for the paws and nose.
The gluing process is the same as usual: we start with a large element and glue the head to it. Then we glue the ears and beak to the head. Draw the eyes with a felt-tip pen or paint.
Glue the wings and legs. You can draw or glue a branch on which the owl is sitting.

Bullfinch
We will need the details that are shown in the picture: one large black circle, a smaller circle Pink colour, a black semicircle and one black circle divided into six parts.

Glue the bullfinch figurine onto cardboard or paper. As usual, we start with the body, then glue on the pink breast. We also glue the black wing with an overlap.
Then we glue the paws, tail, and decorate the bullfinch’s face with eyes and beak. The bird is ready!
Ladybug

Let's prepare 4 circles of different diameters. Choose contrasting colors, for example, black and red. First of all, we glue the body of the ladybug onto the cardboard, that is, a larger circle. For the head, take a second black circle, fold it in half and glue it to the first one at the edge.
Now let's make the wings. To do this, take red circles, fold them in half and glue them on one side to the body near the head so that the tips of the wings barely touch.
We finish the work: with a felt-tip pen we draw eyes, paws and dots on the wings. Ladybug is ready to fly!

You can make not just appliqués, but entire paintings with their help. For example, we can plant ladybug We can place an elephant or a bear cub on a flower or a green lawn in a circus arena, adding some balls or a bicycle.

Experiment with the setting, with the animals themselves on the applique, and they will sparkle with new colors!
So, we see that circles and semicircles can create a whole zoo with a variety of animals. Here's a pelican:


And the chicken:


And the pig:


And even a lion:

If you give children imagination, you can make a wide variety of animals, and more! There are a lot of ideas. For some applications, you will need to prepare templates for the lesson in advance; children can cut out some parts themselves. The main thing is not to be afraid to try, fantasize, invent, because imagination is the key to successful applique and crafts!
Video on the topic of the article
Let's watch a video tutorial on appliques made from circles of colored paper.
Lesson on fabric appliqué (school preparatory group)
Subject:"Elephant"
Target: Making applique from fabric.
Tasks:
Introduce children to fabric appliqué.
Develop an interest in creativity, a caring attitude towards work, fine motor skills hands, eye, sense of form.
Shape visual-figurative thinking, compositional and aesthetic feelings.
Cultivate the habit of working carefully and bringing the work started to its logical conclusion.
Equipment: Projector, slides depicting heroes of K. Chukovsky's fairy tales, a sheet of thick cardboard, fabric, PVA glue, a piece of chalk, scissors.
Preliminary work:Reading works by K. Chukovsky, looking at illustrations, memorizing excerpts from works.
The course of direct educational activities.
Organizing time.
Turn right, turn left,
And smile at each other.
Give everyone your smiles,
And let everyone smile at you.
Educator (hereinafter referred to as B):Guys, I received a letter this morning, listen to what they wrote to us.
“My dear children! Help me find my baby elephants. They sent me five or six pounds of chocolate for my sons, I don’t know, but they can’t eat any more. I roar, I roar, I search, I search, but I still can’t find the elephants.”
IN: Guys, unfortunately, the author forgot to subscribe. Who wrote the letter?
Children (hereinafter D): This is an elephant.
IN: How could I not have guessed, well done, what fairy tale is this elephant from?
D: From the fairy tale "Telephone".
IN: Who wrote this work?
D: This work was written by Korney Chukovsky.
Reading an excerpt from a fairy tale by K.I. Chukovsky “Telephone”
IN: Let's remember who called on the phone?
D: Elephant, crocodile, hares, bear, herons, gazelles, kangaroos, rhinoceros. (slide show)
IN: That's right, guys, let's help the elephant find his baby elephants?
D: Yes, we will help.
IN: But first I invite you to play.
Physical education lesson “Elephant”
An elephant walks in the zoo
Ears, trunk, gray (head tilted to the sides)
Nods his head (head tilts forward)
As if he’s inviting you to visit (head straight)
One, two, three - forward bends,
One, two, three - now back (tilt forward, backward)
The elephant shakes its head -
He is happy to do exercises (chin to chest, then tilt his head back)
Even though the charge is short,
We rested a little (the children sit down)
IN: Today we are going to make applique using fabric, not paper.
At the beginning, the teacher clearly shows and explains, how to do the job.
IN: First, we make a background for the picture using fabric, coat the entire surface of the cardboard with PVA glue and glue the fabric (selected in advance for the background). This will be the background.
Then we trace the silhouette of an elephant onto the fabric using a template. Cut carefully along the contour. Lubricate the pattern with glue and glue it to the background. We complete the remaining details with a felt-tip pen.
IN: Before you get down to business, you need to stretch your fingers.
Finger gymnastics: “Elephant”
An elephant went for a walk, (Middle finger of the right hand - “trunk”)
He shakes his trunk. (All other fingers are the “legs” of the elephant)
Top-top, top-top... (The elephant must walk, leaning on all four legs, without touching the ground with its trunk.)
I say to the elephant: “Stop!” (“The elephant” stops.)
You can depict an elephant alternately with your left and right hands.
If it is difficult to complete the work, the teacher helps.
IN: Did we help the elephant find his calves? (yes) You all did a great job, everyone turned out to be a good baby elephant. We learned how to make beautiful and interesting applications. Look how cute and beautiful your baby elephants are. The baby elephants will go to their father elephant on a special vehicle for transporting animals. Every job is reviewed. The teacher encourages each child.
Reflection:
Guys, did we help the elephant find his babies?
Were you interested?
Now you know that applique can be made not only from paper, but also from fabric.

And here I ask you: look at the picture from the bestiary - “Elephant”. What authenticity and, at the same time, masterful stylization! Realism and humor. Honestly, not a single cartoon elephant stood next to such an oliphant from ancient manuscripts.
So, while preparing for the lessons, I cut out a beautiful silhouette of an elephant. Fine. I can. Where to put it now? It is not required for lessons - I cut out a new one in each class and show everything step by step.

This means that the first ancestor is not in demand. But he is so beautiful, bestial!
It's decided! - Let’s start working on the theme “Elephant Applique”. I was already thinking about the plot, but, you know, illustrating fairy tales using the appliqué technique...
And if not an illustration, then what? Glue the elephant on colored paper So what? - All? No, that won’t work, we need some interesting move. A! Bestiary! In the Aberdeen Bestiary, the images of animals are made without any special subjects, but everything is so decorated!

Frames, background, vegetation! In some ways this is very reminiscent of my favorite popular prints. So I’ll start my applique series “Bestiary” in the style of popular prints.
I glue the elephant onto a gray background, designate a frame, and come up with conditional vegetation - for courage and entourage. I color with bright markers. Well, here, I admit, the technique is mixed. You can’t call it pure applique, but the picture turned out funny. Here - I ask you to love and favor: “And I am called an oliphant and I never go to bed.”
– a great way to spend quality time with your child. Every child will be happy to try to create the image of a favorite character, animal or picture if adults help him with this.
An interesting version of a children’s craft is an “Elephant” applique made from paper or ready-made paper cupcake tins.
What you will need for work:
- a sheet of light gray colored paper (you can use self-adhesive paper or film);
- two paper cupcake tins of different sizes (they can also be replaced with colored paper);
- sheet of colored cardboard (for background);
- glue;
- pencil;
- scissors;
- toy eyes.
Let's get started.
From light gray paper we cut out elephant ears according to the template.

From the same sheet we cut out four long rectangles - these will be the paws, and one short rectangle - this will be the tail. Separately cut out the tassel for the tail. We also draw a wide arc on the sheet, cut it out - you get a trunk. If you are using white muffin tins, paint them light gray (you can do this after gluing the tins onto the cardboard).
Let's assemble our elephant:
Glue the ears to a smaller diameter cake tin to create a head.

Glue a larger diameter mold (body) onto a sheet of cardboard, and glue the head to it. When gluing the mold, coat its corrugated edge well and press it tightly to the cardboard.

Glue the paws, tail, trunk and eyes in the right places. Attach a tassel to the tail.


Using self-adhesive film in our work, we will teach the child to more accurately distribute the parts and carefully apply them to the cardboard. Using regular colored paper, we will teach him how to carefully apply glue, being careful not to stain the appliqué parts.
This “Elephant” craft will be a continuation of the series and will help your child create his own zoo.