A car is not a luxury, but a convenient means of transportation. He helps us out in many situations. But do not forget that this is also responsibility for the lives of pedestrians and passengers. Sometimes a simple technical inspection 2015 can reveal flaws in the car that should be eliminated to avoid accidents.
Many car owners probably face the problem of cleaning their seats or simply want to update their seat covers. I offer several ideas for knitting covers for cars with your own hands.
For beginners, this may be a labor-intensive job, but for experienced craftswomen, knitting covers will not be difficult.
First you need to take measurements. To do this, you can use regular transparent film and a permanent marker. Applying the film to the seat, we outline each part of the cover with a marker.
Then we put the film along the contour and knit the seat cover along it. The pattern can be any, the main thing is that it does not stretch. Most of the models are crocheted. You can also knit multi-colored fragments and connect them by applying them to the pattern.


Large knitted flowers look especially beautiful. You can decorate other areas of the car with flower fragments.


If you want, you can tie only part of the seat. The color of the yarn can be matched to the color of the car or covers.


Or use contrasting yarn to refresh the interior of the car.


Children will especially like bright colors. For them, you can knit convenient pockets on the rear seats.


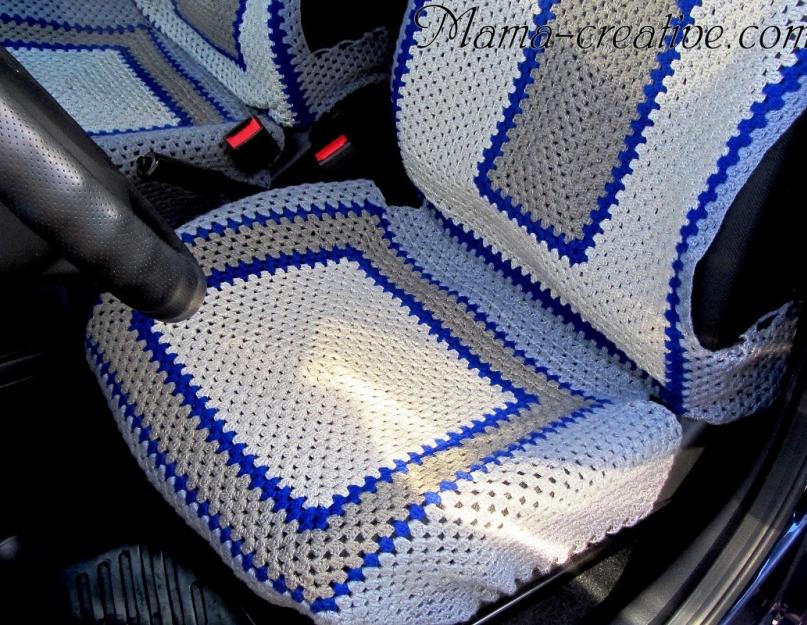
The interior of a car plays just as important a role as its appearance. Therefore, every motorist faces the question of protecting car seats. And here is the dilemma: what is better - to buy car covers in Irkutsk or a cape. The choice is individual and depends on personal preferences, but with sufficient skills you can make covers with your own hands.
A knitted cover is a completely non-standard, creative and very cute way to protect car seats from rapid wear and tear. Naturally, a man cannot do this on his own, and therefore business wives or craftswomen from the atelier come to the rescue.
In order for a knitted cape to look no worse than branded covers for Ford Mondeo 4, you need to intelligently approach the choice of not only the pattern, but also the color (its combination) and the choice of yarn. The fact is that just any thread taken will not work, since due to constant friction it will quickly become thinner and holes will appear in the fabric, which are extremely and extremely troublesome to eliminate unnoticed.
Let's start with the threads. Not every yarn is suitable for our purpose. Firstly, a thread that is too delicate will quickly rub against pants pockets, belts and various things that we like to throw on seats. Secondly, bags, zippers on jackets and other accessories should not cling to the weaving.
The thread must be strong and wear-resistant. It is better to use synthetic (nylon, nylon), mixed yarn, natural linen and hemp threads. If you want to decorate your car with bright colors, but there are no suitable options among the options you looked at, you can use synthetic yarn, popularly called “grass” with the addition of thin fishing line or nylon thread. It is worth paying attention to the material used for weaving macrame.
As for color, it's purely personal preference. Undoubtedly, you should first of all be guided by the general style of the car. If you are the owner of a black vehicle, you can combine white, gray, black and cherry, purple, red, yellow, pink, cold blue. The main thing is that the bright color matches with something else in the salon. In addition, it is recommended to use a thick enough thread so that tying all the chairs does not take you a year.
Now about the pattern. Only a fairly experienced person can create a pattern. Therefore, if you don’t have such skills, you can do it much simpler. Firstly, you can rip open an old, worn-out car cover and use it to knit parts, which are then simply connected. As an option, knit individual elements (squares, circles, floral patterns), and then adjust everything to the shape and weave it into the background mesh. You can choose elastic knitting, and then simply pull the cover over the chair like a stocking, but not everyone likes this. It’s worth clarifying right away that the knitting should be quite tight.
Knitting needles or crochet hook? This is a personal choice for everyone - who is more accustomed to working with what. But with a hook, a more original design will come out, and it’s easier to assemble car seat covers in Tomsk into a single fabric from individual parts, then simply connecting them.
Based knitting a simple granny square Can knit case on any seat or stool. In this case, the knitted fabric will not consist of several separate motifs, but is connected by one piece in the form of a rectangle. You can knit a cover from yarn of the same color or by combining several colors without breaking the thread, which is convenient if you want to unravel this item and knit something else.

The first row is knitted around the chain, repeating: 3 dc from each loop of the chain, 2 dc. loops, to knit the next group of stitches, step back 2 loops of the initial chain. At the beginning and end of the chain of final loops, knit 3 groups of three s/n stitches separated by 2 air stitches. P.

To knit the second row, attach a new thread and knit 3 treble stitches from arches, 2 chain stitches. loops. At the corners of the rectangle, make increases by knitting 2 groups of 3 treble stitches.


When the rectangle is knitted to the size of the seat, to secure it, knit 2 rows without increases in the corners and one row with decreases to tighten the cover. To do this, when knitting the last row, do not knit air loops, only st s/n from arches.
In this article we will tell you how to do it yourself. As it turns out, there is very little material on this topic on the Internet. But now knitted covers in the salon are a real squeak of fashion! This is a stylish accessory and a great gift for a car enthusiast.
Selection of materials for knitting car covers
The work, of course, should begin with selection of materials . Because We will be knitting covers for more than one season; we will need fairly strong, but at the same time soft yarn. In this case, Macrame yarn from YarnArt was used. It is voluminous, but not at all prickly (which is a big plus: you must agree, it would be very uncomfortable to sit on a warm, prickly seat in the summer in the heat or in the fall in rainy weather). This yarn has only one “disadvantage” - the small meter in the skein, so you will need a lot of skeins. For knitting from macrame yarn, a hook number 4.5 is perfect. The knitting turns out to be quite large, the product is knitted surprisingly quickly. If you want the cover to be very tight, take hook number 4.
Step-by-step instructions for knitting car covers
Let's start with the headrests.
Knitting a headrest for knitted covers in cars
We measure the parameters of the headrest: height (1), width (2) and height of the upper narrowest part (3).
 Main parameters of cases
 First, the front part is knitted with the main pattern. The dimensions of the rectangle are equal to parameters 1 and 2.

We begin to tie the finished rectangle on all four sides with mesh No. 1
 Grid diagram No. 1
 Attention: We do not make any additions in the corners; the mesh is knitted strictly along the perimeter and turns out to be “perpendicular” to the front part.
Now the back part of the headrest is knitted, also with mesh No. 1
Because in our case, the headrests have the shape of a triangle, in the rear part here you need to make a small increase in width, then the headrest will fit without unnecessary tension.
 Increase scheme
 After the back part is tied, we tie the entire headrest with one common row of mesh so that it fits onto the seat exactly on the “pins”. You can tie a row of single crochets along the edge.
 Finished knitted headrests (back view)
 Knitting a car seat cover
For knitted covers on cars may differ, because... Different car brands have different seat shapes. But the basis for all is approximately the same (in our case, the Volkswagen Turan car).
Of course, the ideal option is if you have an old car cover at your disposal. Pull it apart at the seams and get an absolutely accurate pattern for the future knitted cover.
The top and bottom parts are knitted separately and then joined.

The burgundy color shows the area that is knitted with the main pattern; all other parts are knitted with mesh No. 2.
 Grid diagram No. 2
 For a simpler calculation, you can knit all parts of the cover pattern separately and then sew. In this case, everything was connected together (it’s much more difficult to calculate, but then you won’t have to sew it together).
Knitting the bottom of a car cover
We knit a rectangle with parameters 4 and 5 with the main pattern (see photo above). All other parts (sides and back - they are marked in yellow and blue) are knitted in accordance with the parameters of the pattern with mesh No. 2.
Knitting the top part of a car cover
The upper part is knitted a little differently. Firstly, it is not exactly rectangular, because... where the driver’s back is, the seat narrows slightly, so the main part (which is knitted with the main pattern) must be knitted straight just until the narrowing begins, and then gradually and evenly reduce the number of stitches on both sides. The result is a canvas with the following shape:
 Shape of the top of the case
 The side elements (yellow and blue colors on the pattern) are also knitted with mesh No. 2 - their shape again depends on the parameters of your pattern.
After the side part is ready, tie the back upper part of the seat (shown in lilac in the diagram). In our case, parts V-G no, and the rear cover ends at the level of the driver's back, without covering the seat pocket.
After you knit both parts of the cover, all that remains is to connect them in the middle.
It will not be possible to completely sew the cover along all the seams and sides, because... in this case it will be impossible to put it on the seat. To ensure that the knitted cover is securely attached, you can use various elastic bands, straps, Velcro, hooks or ropes (at your discretion). In this case, at the request of the customer, several long ropes were knitted.
This is what finished car covers look like in the showroom. 
In theory, the cover is put on “tightly”, but the customer wanted to raise it by putting the “pins” not on the side mesh, but on the main upper part, so in the photo the upper part of the cover “hangs” slightly. 
At first glance, it may seem that knitting car covers is very difficult. But, having started work, you will understand that “the eyes are afraid, but the hands are doing!”
Good luck!
This page is found by queries:
- crochet car seat covers photo
- how to knit car covers with your own hands
- how to crochet car covers patterns
- knitting patterns for car covers
Today everyone has mobile phones. To protect their screens from scratches, many people buy special silicone or leather cases, and protect the screen with special glass or film. But, rather than buying a store-bought option, isn’t it better to crochet a phone case with your own hands?
It can be anything: simple, with a pattern, a video of an animal’s face, or with patterns. It can even be woven from elastic bands or knitted with beads - there are no limits to your imagination. In addition, such an accessory can be safely presented as a gift to someone on their birthday! And small children will be completely delighted! So let's get to knitting! And our article will help you with this!
Crochet phone case: description
Master Class: how to make an original cat case for your smartphone ! Such a cute cat is very easy to knit. Moreover, the work will not take much time! We will need: thread (cotton or wool), needle , beads (may be needed for eyes) and hook (we will use 1.8mm clover). You can also use felt (or other necessary material) for the eyes, paws and tail, but this is at your discretion! So, let's begin!
- First you need to decide how many stitches to cast on
. It's very easy to do this: cast on a number of loops equal to the width of your phone(we took a Samsung phone). We have twenty air loops, which we will subsequently denote as follows: V.P.

- We knit exactly four rows : 19 single crochet, which we will denote S.B.N. (20th lift loop and turn).
- Needs to be knitted all the loops are neat and beautiful so that this case turns out beautiful and durable.
- E this is the bottom of our product. Next we tie it in a circle: we knit as many S.B.N. as the height of your phone requires
(for some it is too long, for us it is about 10 - 11 cm).

- The photo below shows how to knit ears
.


- Let's get started legs
. To do this, dial three V.P., close the circle. Next we do it as in the picture below: a total of seven rows. First row using white or other thread of your choice: 7 S.B.N. inside. Second row: S.B.N. and two of the same in one loop. And from rows 3 to 7 we change the color of the thread. Ours is black. Knits in a circle of the length we need using the same single crochets. We make 4 such parts.


- It'll be a little harder to tie your eyes
. To do this we type: chain 17 loops
(You dial the amount that suits the width of your mobile phone, its size).
 What to do next? We tie in a circle S.B.N. + 2 increases on the sides, due to the fact that two S.B.N will go into one loop.
 - Next, we do it as shown in the picture, without adding loops. Then we make one from 2 columns, skipping the columns of the previous row
.

 The eyes are ready! To make them like ours - tie with thread in the middle of the product. For volume, you can fill it with cotton wool or synthetic padding.. Don't forget to draw or sew beaded pupils!
 - Sew or glue all the parts together
(if desired, you can also make a tail by analogy, like paws). It would be nice too embroider his face
! Your cat is ready! You can glue a flower, use more than one color of thread... there are many options and ways to decorate it. You should try it!


How to crochet a phone case?
Another Case option for iPhone or other mobile phones ! So, perhaps you have leftover yarn from a previous knitting project. This is what we will need now! We suggest taking blue threads like ours. But, get ready! This will take longer than the first description!
- The first thing we will do is let's knit the bottom for our future product according to the diagram presented below. Again - worth it cast on stitches according to the width of the mobile phone (in this version it must be a multiple of three. This is a very important point!)
2. We got nine V.P. + lifting loop. Insert our hook into the 2nd loop (No. 2.5 - 3) and knit 3 S.B.N. In all the following loops we knit 1 S.B.N. in the last we knit 3 S.B.N., as in the first in order to carry out the rise.

3. One air loop and one single crochet in it. Next + 3 V.P., the next one must be skipped for the pattern, and in the next 1 S.B.N..
- Three V.P. – 1 skip – 1 S.B.N. So we continue to knit until the end of our row and close.


- Add 4 V.P. + S.S.N. loop at the base.


- In S.B.N. previous row(the one below): 1 S.S.N., 1 V.P., 1 S.S.N. and so on until the end of the row. Let's close.


- 1V.P., 1 S.B.N., and a hole from V.P. previous row .
- 3 V.P., 1 S.B.N. to the next hole. Repeat again until the end of the resulting row and close.


- We alternate in knitting two rows of one, two others
(described above). Don't forget to put the case on your cell phone step by step to make sure you do everything correctly!


- If you are satisfied with this option, simply close the row. If not, then you can knit the lace on top like we did.
- From the diagram below you can see: dial 4 V.P., 1 S.S.N. in the middle loop of the hole/arch from the bottom (previous row), 1 V.P, 1 S.S.N. in S.S.N. from below.


- We knit a whole row like this and close it by casting 1 V.P.

- We tie into the base loop: 3 V.P., S.S.N., 2 V.P., 2 S.S.N.

- 1 S.B.N. to the next S.S.N. bottom row.


- In the next S.S.N.: 2 S.S.N., 2 V.P., 2 S.S.N.


- Let's finish row, dial S.B.N. And cut off a thread.
- If you like the resulting option, then you can stop with what was done. And we also came up with white trim around the perimeter of the product
. For this, we have already taken a white color, you can choose any other. 1 V.P., S.B.N. in S.S.N. previous row(hereinafter will be referred to as R.). Into the arch from V.P. – 1 S.B.N., 3 V.P., 1 S.B.N..


- In each subsequent loop we knit 1 S.B.N.
(comes out 5 S.B.N.)


- The next arches are the same as in step 19. Close the row and cut the thread.
- Dial about 120 V.P. - this will be the rope for our product.


This model can be decorated according to your taste: choose different interesting buttons, make multi-colored sides, make it in the form of a toy for your child
. The main thing is that this creation will not only please the eye, but also Protects your phone from damage and shock. You see how easily you can adapt the remainder of unnecessary threads. By analogy we can relate handbag, fashionable wallet or crochet case for a tablet. Only two or even four times more yarn will be needed than now. In a word – a lot! 
And the color of the product can also be changed: green , yellow , white , blue , like ours, or some bright . We are sure that any needlewoman will find what she needs! Not a bad thing, right? Take our diagram as an example and create!
How to crochet a phone case for beginners: video
In the video below, the authors present you with several master classes with descriptions: beautiful DIY phone cases . They will describe their steps step by step and clearly show how to crochet a cover with their own hands using special patterns. Of course, you can sew it, but you must agree that knitting is more interesting!
Crochet phone cases: photo
Crochet cover for stool and chair with description
It's very easy to decorate your boring stools and chairs in the kitchen with your own hands.
. You need to knit square covers, the diagrams of which you will find in our article. This is a very interesting and very simple matter. They can be knitted either with knitting needles or with a hook.. We will focus on the second option. 
How to crochet a square rug for a stool?
We will teach you how to knit a rug for a stool from small and convex elements "popcorn" And regular colors . You can choose any pattern - there are no restrictions. The same covers can be made for armchair , and on ottoman , you can choose an openwork motif.
Crochet cover for a chair: patterns and description of knitting

Option for a stool with a flower pattern:
Crocheted covers for stools and chairs: photo
Crocheted car covers with patterns
Car covers are very easy to knit
. First, measure the dimensions of your car seats. We will provide patterns below that will make it very convenient for you to knit the pattern you like.
.


Varieties of covers and knitting methods
You can crochet a phone case not only from yarn , but also from beads, for example. This is a more complex method than just crocheting. Here is a more complex technology that we will teach you step by step.
Crochet with beads: phone case (patterns and description)
Beaded phone case : crochet patterns are presented in the video lessons below. By using beads you can create a variety of patterns and drawings. Such covers can be woven without a glass and a mug or with their help - there are a lot of options.
How to weave a phone case on a hook from rubber bands
Cool case possible weave from rubber bands , not crocheted. A good clear description of weaving is presented in the video below.
Crochet covers for Easter eggs
To make your own crochet cover for an Easter egg, follow the following description:

You can knit covers of any color this way, for example, white , yellow And pink . The product should be free so that the egg can go in and out. You can decorate it with beads, ribbon or lace.
Knitted crochet pillow covers
Knit one like this for a pillow based on oriental motifs in the video below. Decorating your home is very simple, the main thing is to have the desire!
Case for hooks and knitting needles: how to crochet?
We told and showed you how to tie various models of cases. But for the most important thing - they forgot! Where should we store all our working tools with which we create these masterpieces?