A teapot warmer is a functional item and a stylish element of kitchen decor that will highlight your taste.
First you need to decide how you will make it: knit or sew. Then we select appearance. You can look at a photo of a heating pad for a teapot on the Internet, or come up with a unique design.

Recently, heating pads in the form of a doll or animal (usually an owl, chicken, cat, etc.), or in the form of a fruit or vegetable, have become increasingly popular. Next, you need to decide for yourself: will it cover completely? teapot or the spout and handle will remain open. Not only the form, but also the stages of work will depend on this.

Here we will provide a master class on making three heating pads: sewn, crocheted and knitting needles.


To make a heating pad for a teapot with your own hands, you will need the following tools and materials:
- needle;
- scissors;
- sewing machine (if possible);
- compass (can be replaced with any container of a suitable size);
- tailor's chalk (or a piece of dried soap);
- threads;
- fabric for the top of the product (can be absolutely any texture);
- interlining;
- padding polyester;
- ruler or measuring tape;
- paper or newspaper (for drawing up a pattern).

If you know how to knit, the set will be smaller:
- hook or knitting needles;
- reinforced threads, acrylic or wool;
- sewing needle, a needle with a large eye for threading thick threads;
- lining fabric (preferably cotton).

Step-by-step description of actions
First, I’ll tell you how to crochet a heating pad for a teapot. It will be in the form of a chicken.

Crochet heating pad
After choosing a design and type, we get to work. Let's consider the option of making a closed heating pad, since it is easier to make. It is better to start knitting from the bottom. We cast on the first row of loops, equal to the width of the teapot, 2 centimeters. Then we knit in the circle up to 1/3 of the height. After this, we decrease the loops on both sides (from the side of the spout and the handle), 1st in each row, and so on until the end of the height of the teapot plus 1 cm.

At the end of the work, close the part, fold it in half to form an even trapezoid and connect both edges with the last column. The bottom edge can be made from contrasting threads.

Then we knit a circle for the head (from two halves), onto which we attach button eyes on both sides (you can glue ready-made ones). We make the beak in the form of a triangle. Having collected all the parts, we sew the workpiece and stuff it (with cotton wool, scraps, etc.).

We attach the finished head to one of the ends. We make wings and sew them on the sides of the trapezoid. Upon completion of the work, we cut out the inner cotton part. This will prevent any yarn lint from getting into the kettle. It should be 0.3 cm smaller side seam, and 1 cm longer in length than the top one.

We sew the lining. If the material is fraying, we process the edges with overlock, zigzag or finishing braid. Now let's connect the parts. Knitted cover turn the seams inside out, the lining with the seams out and insert it into the first one. We fasten the parts. We bend the bottom of the lining and attach it to the outer part.

Knitting heating pad
The second option is for working with knitting needles. The knitting pattern is simple: we cast on an edge row equal to the volume of the teapot + 1 cm and knit the fabric in garter stitch at two heights + 2 cm. Fold it in half and sew the sides together. We knit the ears tightly so that they stand up.


There are two ways - either cast on the loops from the top row or separately. The number of loops affects the length and durability of the ears. It's better to limit yourself to 10-15. When working, at the beginning of each row we knit the first two loops together. We knit this way until the end until two or one loop remains.

We sew on ears, eyes and a nose from buttons (or glue store-bought ones) and embroider mustaches. The top part is already ready. Further everything is the same as described above.

Sewn heating pad
The third type is for those who love to sew. Draw a semicircle with a diameter 1-2 cm larger than the teapot. We cut the blank from fabric, non-woven fabric and padding polyester. Folding the fabric front side inside, to the wrong side we apply padding polyester and connect it along the perimeter, leaving the bottom open.


We sew the interlining along the perimeter (except for the bottom), leaving 10 cm on one side. Then we put the lining with the right side inward and sew it along the bottom, turn it inside out through the hole, which we then sew with a blind seam by hand or on a machine. All is ready! Enjoy your tea!

Photo of kettle warmers


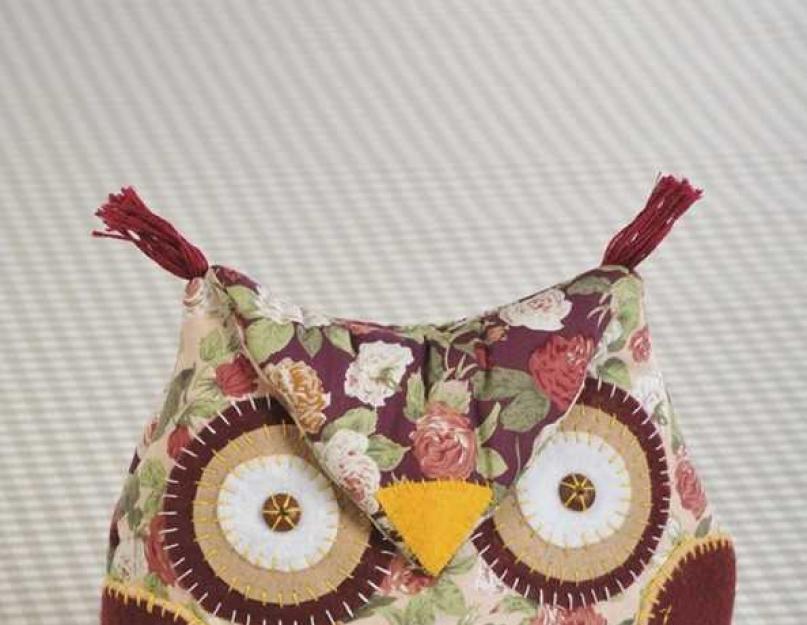
Knitted heating pad for a teapot with flowers - a guarantee not only that the drink will be aromatic and tasty. Your tea party will undoubtedly be a success, because a beautiful tea brings a smile to your face, which means it improves your mood.
Just imagine that the guests are seated at the table, and you bring in a teapot in such a soulful, floral “clothing”. Great, right?
In the photo you see the work of a craftswoman by nickname valerii
By the way, any housewife will not refuse such a gift. You can give a heating pad for a teapot using knitting needles or crochet for any occasion, even without it, if you would like to please your loved ones. How to knit such a beautiful and useful thing?
Scheme of a heating pad for a teapot must take into account the size and shape of your kettle, so first you need to take measurements from the kettle so that the heating pad fits it.
On our forum we have already discussed how to knit such a heating pad; you can find the diagram and comments at the first link under the photo. Be sure to read this thread to understand how to tie a heating pad for a teapot.
By changing the pattern of the main fabric and the shape of the knitted flowers, you can easily change the design of the heating pad for the teapot. Do-it-yourself heating pad for a teapot - good way dispose of leftover yarn, so if you have unnecessary balls languishing in your bins, then get your tools ready!
In today's selection you will find flowers for every taste. Let's see, what if your personal heating pad is waiting for you there?

8. Paid description of a knitted heating pad for a teapot from the site "Maggies crochet".
#crochet #knittinghobby #knitting #knitting #knittinghobbies crochet
Discussion of the article
Drinking tea for pleasure is not about rushing. It's about leisurely movements, beautiful napkins on the table, homemade shortbread cookies, "delicious" conversations with loved ones and cute, charming accessories that...
A great idea for needlework on long winter evenings is knitting. A knitted heating pad will not only help you brew delicious tea, but will also give your kitchen even more coziness. Needless to say, a heating pad for a teapot - great gift for love...
Pumpkin is traditionally associated with October, the month that ends with Halloween. Why not crochet a pumpkin, it's so cheerful? If you like practical things, you'll love our pumpkin version. It was heating...
A hot water bottle for a teapot is great! It helps keep you warm. Where? Wherever you want! Whether you're making tea or want soft-boiled eggs to stay hot for a long time. You just need to dress up what you need warmly...
No one will argue that aromatic freshly brewed tea with friends or family is one of the most wonderful ways to spend a couple of dozen free lazy minutes. Now imagine how wonderful it can be...
A knitted teapot warmer with flowers is a guarantee not only that the drink will be aromatic and tasty. Your tea party will undoubtedly be a success, because a beautiful crochet heating pad brings a smile to your face, which means it improves your mood...
The cute Burenka is ready to give aromatic tea to anyone who is willing to work a little. A hot water bottle for a teapot is the key to successful tea drinking, as any housewife knows. Do you use this secret? Sew a heating pad for a teapot...
Craftswoman Foxxy63 suggests knitting this cute heating pad for a teapot. For my crochet heating pad I chose Foxxy63 melange yarn cheerful color and decorated the finished item with an applique in the shape of a delicious lemon...
knitted chicken warmer for teapot
Do you like to drink tea for a long time? Place this chicken on a teapot, and it will keep the drink warm for a long time. And such a motley pattern will look wonderful in the interior of the kitchen.
For the chicken you will need:
- 450 g yarn coffee shade, suitable: Lotus, Ogonyok, Podmoskovnaya(thread thickness under hook number 4),
- 2 balls = 150 g of cotton thread, for example from the Kirov plant: Narcissus, Chamomile, Lotus(color contrasting with coffee, to create diversity),
- 50 g yarn Red,
- 15 g threads yellow color,
- padding polyester (15x15 cm),
- a pair of toy eyes or buttons.
- tool for work - hook number 5.
We take two balls, connect the two threads into one - motley. It turns out to be quite thick, so you need to take a larger hook number - № 5
.
2.
The body of the chicken is a dome-shaped cap. Type of knitting - lush columns in a checkerboard pattern. Their knitting pattern is in the lower corner of the photo.
The direction of work is in a circle. Number lush columns in each row: 12, 18, 29, 38, 46. The difference between two adjacent numbers will show how many lush columns need to be added to increase the diameter of the upper part of the dome
3.
Next, stopping adding loops, we knit 8-10 rows of lush columns - the height of the heating pad. It can be changed if necessary if the dimensions of your kettle are different. The last row is double crochets.
4.
The chicken's head is a pair of circles with a diameter of 10 cm. The knitting is simple: alternating rows - double crochets in one, single crochets in the other.
6 air loops, 12, 24, 34, 44, 48, 54 - the number of loops in each row (including added ones).
5.
Scallop. Place the mugs one on top of the other (back to back). We tie part of the circle (where the scallop is located) with red thread in single crochets, connecting both layers at once. This is the basis for the scallop itself
6.
On these loops you need to knit two rows of lush stitches
7.
Beak. To the right of the scallop we knit 7 single crochets with yellow thread in the same way as we knitted the base row for the scallop. Next we knit a double stitch, removing 1 loop at the edges: 7, 5, 5, 3, 1
8.
On the opposite side of the beak (“back of the head”), knit two layers of circles with single crochets working thread
15.
At the bottom of the head, tie a “collar” - 2 rows of lush columns
16.
We knit the “collar” first on one circle, then, without cutting the thread, we immediately move to another. Having finished the first row, turn the hook. We do the second row in the opposite direction
17.
Beard. Attach a red thread to the fabric. In the first row in the center of the “collar” we pull out 15-20 loops. This is the basis for the next mating
18.
On this line of loops we knit 1 row of fluffy stitches.
Place a small piece of padding polyester between the two circles of the head so that it “swells” slightly.
Sew it to the body
19.
Glue the eyes
20.
Tail. We knit a triangle according to the pattern. Fold the finished part in half. Sew to the body
21.