To prevent decorative dogs from freezing while walking in winter, many owners knit clothes for them.
I decided to show you how to knit the simplest and most ordinary jumpsuit. Based on such a jumpsuit, you can knit any kind of jumpsuit.
Before you start knitting, you need to take measurements of the dog. And knit a sample to calculate the knitting density.
Picture from the Internet.

1. 44cm(4cm on belly)
2. 30 cm
3. 28 cm
4. 32 cm
5. 10 cm
6. 20 cm
7. 12 cm
The overalls are knitted from head to tail in one piece, without thread breakage. You will need: Straight knitting needles, circular knitting needles and a hook. Threads p/w 100 grams = 250 meters.
We will knit according to the raglan principle from top to bottom.
Cast on as many stitches as needed for the neckline. I have 65 loops and knit with any elastic band that is convenient for you. I have 1*1

Next, we divide the loops into 5 parts: left shelf, left shoulder, back, right shoulder, right shelf. I divided it like this: 14p. left shelf, 3p (p1, k1, p1) - raglan line (hereinafter referred to as RG), 3p. left shoulder, RG, 27p. back, RG, 3p. right shoulder, RG, 14p. right shelf. And we knit a regular raglan from top to bottom, adding 1 loop on both sides of each RG in each front row.


We knit to the armpits of the front paws. We transfer knitting to circular knitting needles.

We knit the loops of the left front, removing them onto the right circular knitting needle.
RG, loops of the left sleeve, RG are knitted with facial loops using a straight knitting needle. Now we have the loops of the left sleeve on a straight needle, and the rest on circular ones.


Close the loops, DO NOT cut the thread.

Fold the sleeve inside out and crochet the sleeve to the armpit (the junction of the front and back) starting from the last loop of the closed row.


We connect the left front, the last loop of the closed sleeve, casting on 2 loops from the loops of the previous row between them, casting on two loops from the loops of the previous row between the last loop of the closed sleeve and the back, knitting the back loops with CIRCULAR knitting needles to the RG. We knit the RG, right sleeve and RG in front of the right front with knit stitches using a straight knitting needle. Thus, on circular knitting needles we have a left shelf connected to the back and a right shelf. Using the pattern of the left sleeve, we knit the right one. We connect the back and the right shelf, not forgetting to pick up the loops in the armpit. Getting the top part of the overalls


From the armpits we knit the front and back at the same time. We knit the last few rows on the shelves with an elastic band. WITH front side close the loops of the left front, knit the back and right front, turn over, close the loops of the right front in the purl row. Only the back loops remain on the knitting needles

We knit the back to the beginning of the hind legs. And again we knit raglan, as for the front legs.


We sew the cuffs with an elastic band in the same way.

Owners of dogs, especially small ones, are often faced with the fact that their beloved pets are cold in cold weather, and therefore do not want to walk outside. An excellent way out of this situation is knitted clothing for dogs, which warms the dog well, but at the same time (unlike fabric overalls) does not restrict its movements. The animal's chest and tummy mainly need protection from the cold. That's why optimal solution will dress your pet in a vest or sweater. Well, if you are the happy owner of a dog - a girl, then you can dress her up in knitted dress. In this article I will give you detailed diagram knitting a dress for a dog. This dress was knitted on Yorkshire Terrier.
You will need: wool blend yarn pink color— 100 g, wool blend yarn white- 50 g and some crimson yarn. As well as knitting needles No. 4 and a hook for decorative binding.
Knitting a dress begins from the neckline. We put 57 loops on the knitting needles with white threads and knit them with an elastic band 1 x 1 4.5 cm. The collar is ready.

Then we continue knitting with raspberry threads. We knit 2 rows in raspberry color, then on the tummy stitches we continue knitting with pink yarn, and on the back loops we will knit a pattern of pink hearts on a white background.
First front row: knit the first 21 loops with a 1 x 1 elastic band - these will be tummy loops, and the remaining 36 loops will be knit stitches. In the future, the tummy will be knitted with an elastic band 1 x 1, this will ensure a good fit of the dress, and the back will be knitted stockinette stitch. To expand the dress to the chest, we make additions in the area of the front legs: in the next front row we knit an edge stitch, we knit a knit crossed loop from the broach, 21 loops with a 1 x 1 elastic band, 1 knit stitch crossed from the broach, 36 loops - with knit stitches. We make further additions according to the same principle: add 1 loop before the elastic loops and 1 loop after the elastic loops, including these loops in the elastic pattern in subsequent facial rows.
At the same time, a pattern with hearts is knitted on the back loops.
To do this, in the 3rd row (front), knit the back loops in white as follows: knit 2, slip 1 loop as a knit, *knit 3, slip 1 loop as a knit.*, repeat from * to *, k2 ., edge Knit the next 4 rows in stockinette stitch in white. At the same time, when moving from the tummy loops (which are knitted with pink yarn) to the back loops, cross the pink and white threads on the wrong side with each other. In the 7th row on the back loops knit: 1 knit, add 1 knit. from broach, 2 persons. white, *3 faces. pink, 5 faces. in white *, repeat from * to *, 3 persons. pink, 3 persons. white, 1 face. loop from a broach in white, k1. and edging also with white yarn.
In the 8th row - knit according to the pattern,
In the 9th row - *7 loops in white, slip 1 loop in pink as a knit stitch (this is the middle loop of 3 pink loops)*, repeat from * to *, 7 loops in white
Rows 10 - 12 - knit all stitches with white yarn.
Knit the 13th and 14th rows with crimson yarn.
Row 15 - knit with pink yarn - knit 4, slip 1 stitch, * knit 3, slip 1 stitch*, repeat from * to * until the end of the row
Row 16 - all stitches in pink.
In the 17th row there is an edge stitch, then we close 13 loops, the next 7 loops - according to the pattern with an elastic band, we close 13 loops. Next we knit according to the pattern.
In the 18th row, in place of the closed 13 loops, we cast on 11 loops with air loops. In the next row we knit these loops with a 1 x 1 elastic band.
To ensure that the dress fits well to the dog and does not sag, we reduce the loops along the edge of the elastic. In every 10th row we knit the edge, then the first two loops of the elastic band together with one loop, and the last 2 loops of the elastic band we also knit with 1 loop together.
After 18 cm from the beginning of the elastic we knit the second strip of the pattern:
2 rows in crimson color,
2 rows in white,
in the next row (front row), alternate 4 loops with pink yarn and 2 loops with white yarn, in the next purl row, knit pink loops with pink yarn, and white loops with white yarn.
2 rows in white,
2 rows in crimson color,
 After the pattern strip is knitted, bind off the tummy loops. Next we will knit a skirt on the remaining stitches:
1st row - edge stitch, * 2 stitches in garter stitch (in knit and purl rows loops are knitted in knit stitch), 4 stitches in stockinette stitch*, repeat from * to *, 2 stitches in garter stitch, edge stitch.
3rd row - add one stitch from the broach in each block of 2 stitches in garter stitch, so that you get blocks of 3 stitches in garter stitch.
Knit a skirt for 5 cm. Then close all the loops. Crochet along the edge of the skirt as follows: 1 tbsp, 3 air loops, repeat until the end of the row, knitting st. b\n in every second loop of the skirt.
The last step is to carefully steam the finished part of the dress, then sew it along the side seam.
If you want to see a dress diagram for dogs, then pay attention to
Dogs become our best friends. They love us and protect us. We, in turn, must also treat them. It is our duty to make sure that our little and sometimes big friends feel comfortable in the winter.
There are now many specialized clothing stores open for dogs. Outfits are presented for every taste and color. Some people buy clothes just to dress up, while for others it is a vital necessity. But unfortunately for owners, things for their pets often cost them a pretty penny.
Knitting patterns for dogs, photo
In order not to spend extra money and spend your free time usefully, knit clothes for your little friends yourself. Show your imagination, add some decor and your sweater, for example, will be no worse than a store-bought one.


Dog measurements for knitting
In order for a suit to fit well, dogs, just like people, need to have their measurements taken. You should not mistakenly focus on the standard size indicators of a particular breed. All dogs are individual.
To take your measurements correctly, use our table.


Knitting patterns for dogs


Sweater for a dog, photo


How to knit a dog sweater for beginners, diagram with detailed description and photo

For beginners, you can knit this simple sweater for a dog from warm melange yarn. We will take thick threads, two hundred meters in one hundred grams of yarn. You will need number four knitting needles.
Yarn for work:

First, take measurements from the dog, use the table and description given above. After this, you can start knitting the collar. Try not to make it too tight; the sweater should be easy to put on and not cause discomfort to the dog. The optimal collar width for small dogs is five centimeters. We knit it with a 1x1 or 2x2 elastic band.

We knit the main part of the sweater with a simple stockinette stitch. You can put a pattern in the form of a braid along the back. We will knit the pattern on 17 loops. At the end of the collar, you need to count this number of loops in the middle and knit the pattern according to the diagram below. If you still find patterns difficult, you can knit the entire sweater using satin stitch.

After two rows of the main fabric, we begin to add. Add two loops on each row. We add loops until the width of the fabric reaches the size of the dog in the chest circumference, plus another two centimeters for allowances. Be sure to try the sweater on your dog. To make this easier, place the stitches on circular needles. Then put it back on the stockings. Don't be lazy once again do a fitting so you don’t have to start all over again.


Now you need to make slots for the paws. As shown in the photo, you need to skip the number of loops you need in size, knitting only the side parts from the holes. To do this, knit the first three centimeters, close the next six centimeters, and then knit to the second armhole. When will you get the right one?<<рукав>>, add air loops and knit further with a single piece of fabric.

Now we need a measurement from the abdomen, length. The fabric tapers towards the bottom of the tummy, so you need to decrease two loops every six rows. Don't forget to try the product on your dog.

Having reached the required length, finish the edge with an elastic band. Six rows are enough. The armholes for the paws would also be good to tie, you can crochet them. The last stage is assembling the sweater, sewing it and trying it on the owner.
Knitting pattern for dog overalls, details


Crochet pattern for dogs overalls, details

We will crochet number five. You can take the same white or milky yarn (Cinse Artico), or you can choose something brighter. You will also need a pink ribbon, about forty centimeters, and one pearl bead.
We knit according to the pattern: air loop, connecting column, single column. and a column with nak.
Before.
We start knitting the fabric from the waist line. We cast on 81 loops and close it into a ring. Next, using pattern number one, we knit seven centimeters in a circle. Next, the canvas needs to be divided into two parts. The bottom consists of 14 motifs, and the top of 12. Leave 2 motifs between them on both sides. for the armhole. We knit everything according to pattern number one.

Bottom part.
After 10 cm has been passed from the armhole, set aside 7 motifs in the center for the neckline. We knit the right and left parts separately. After 14 cm from the armhole, finish knitting. We knit the second side in the same way.
Upper part.
After 10 cm has been passed from the armhole, set aside 6 motifs in the center for the neckline. After 14 cm from the armhole, finish knitting. We sew the details of the bottom and top along the shoulders. The neckline or neckline needs to be tied. To do this, in a circle, first knit 2 rows with single stitches, then 2 rows with stitches. with nak. Use scheme number two.

All that remains is to knit the sleeves and the bottom of the overalls. First we knit the sleeves for the front legs. To do this, we raise the post in the armholes. and knit in circular rows of 10 centimeters using pattern number one. Then make a 4 centimeter column with a nak. according to scheme number two.
Let's move on to the bottom. From the first row along the waist line we knit 20 centimeters according to the first pattern. Then set aside 11 mot. in the middle under the hole for putting on. We knit the left and right sides separately 7 centimeters. At the same time, we perform a decrease, 2 columns. on each side. We sew together the parts of the fabric, not forgetting to leave an opening for putting on and armholes for the paws.
Using the first pattern, we knit in the armholes for the hind legs in a circle of 7 cm. Then make a column cuff without tape. 2 cm.
According to the third pattern, we tie the bottom of the overalls. We make a bow from the ribbon and decorate it with a bead.


Knitting pattern for a dog hat, details with photos

Many people think that a hat on a dog is just a whim of the owners. But there are breeds that cannot live without a hat in winter. Therefore, it will be very useful to learn how to knit a hat for your little pet.

If you decide to knit a hat yourself for your little friend, then we offer the simplest step by step example. You can take this hat again and decorate it however you like. The measurements on the chart are for a medium sized Yorkie. You must take your own measurements.


Knitting raglan for dogs, diagram with description

The most simple circuit raglan for clarity.

We will knit the sweater from the neckline. We cast on loops, the number of which corresponds to your measurements of neck volume. There are 64 stitches cast on in this tutorial. Divide them into four spokes. Knit the neckline with an elastic band two by two 15, and in order to get a lapel about 20 rows.

Let's go directly to the raglan. To get raglan in the future, divide your number of loops by three. They need to be distributed into loops for the back, front and legs. If you divide 64 by three, you get about 22 loops.
For sleeves, you need to calculate the number of loops based on the girth of the paws. For now we put these loops on another knitting needle. Then we continue to work in circles. On the knitting needle you are working with, cast on five to ten stitches so that the sleeve is not too tight. Close the circle and knit further.

We need to knit two hearts on the back. Where the pattern will be located and its size, choose at your discretion. The pattern is knitted according to the pattern.

After you complete the pattern, knit further in the round. The length of your sweater will depend on your dog's measurements, but remember that the back is always longer than the front. Once you have decided on the length, start knitting the elastic two by two. So we knit about seven rows and close the loops on the stomach, leaving the back.
Transfer all the loops to one knitting needle and continue working alternating faces. and purl rows. At the same time we make a decrease. We knit three loops together both at the beginning and at the end of the rows. You will get a smooth narrowing.
Only the sleeves remained. We remember those five or ten loops that are needed so that the sleeve is not tight and is free. Thread them onto knitting needles. Knit in a circle with a two-by-two elastic band to the length you need.
Our beloved pets - they are so sweet and believe in us so much. The owner of the dog is already convinced that the dog is man's best friend. Let's insulate our “pet” and give them a charming and warm blouse.
A knitted sweater for a dog is what he needs on cool days. A huge advantage of a knitted sweater for a dog is that it will be true to size. You couldn't ask for anything better.
Yarn and knitting needles are selected together. Depending on the model, you need to choose a knitting needle. If the raglan model is something you see very often, then you should definitely choose double needles. Regular knitting needles with ears will serve good friends to perform classic models.
You need to carefully choose the yarn for your “favorite”; cheap and cold ones are not suitable.
 A dog, like a child, requires warmth and affection. This is exactly what the yarn should be like. The yarn is selected for the cold season, and the more warm fibers it contains, the better.
Features of knitting a sweater for a dog on knitting needles
To create a sweater for a dog, you need to go through several steps:
Stage 1: taking measurements
When measuring, take into account that the “pet” will be active in the finished sweater and therefore immediately make adjustments of a few centimeters:
- product length (from collar to tail);
- width of the product (between the front and back paws);
- back and chest circumference;
- distance between paws;
- waist (abdomen) circumference;
- OL - paw circumference;
- ОШ - neck circumference.

The peculiarity of a dog sweater is that the back is usually knitted wider and longer; especially for a dachshund, models need longer lengths. Let's walk through step by step for beginners how to properly knit a warm sweater for a dog with your own hands.

Important! All measurements presented should be taken when the dog is in a relaxed state.
Stage 2: gate
Based on the measurements, a set of loops is made and then the neck is knitted.

More often the collar is simply done with an elastic band.
Important! The neck for a dog is not made long so that it does not interfere with the “pet”.
Stage 3: Raglan

The length of the raglan will depend on your measurements, as will all the details of this product.
Stage 4: sleeves

The loops for the sleeve will be closer to each other on the side of the front piece.
Stage 5: back/front

After reaching the required length, you need to make an elastic band and close the loops.
Knitting pattern
A sample (about 10-12 cm) is no small thing. We cast on loops on 2 knitting needles, then transfer them to 1 knitting needle, and use the 2nd knitting needle to knit the selected pattern. It is advisable to wash the sample, perhaps the yarn will shrink, then calculate the number of loops for the pet.

After all, it is this small detail that will help you accurately calculate the required number of loops for any part of the sweater.
Knit stitch - knit one row with only knit stitches, the next with purl stitches, then repeat the rows.

All this is done before the knitting stage.
Advice! It is advisable to outline a small plan and draw a pattern, recording all the measurements and converting everything into loops.
Step-by-step description of knitting a sweater for a pet
It's easier to make a sweater for your pet with detailed and clear descriptions. We offer you interesting 4 models of sweaters for dogs, made on knitting needles. The dogs in these things are simply adorable, and the handsome dogs themselves will not want to take them off after a walk.
Model 1
Sweater with Norwegian pattern V gray color It will look great on a small dog (for a miniature poodle or Yorkie).

To work you need:
- yarn of matching colors;
- knitting needles No. 3.

Description:
We cast on the required number of loops with stocking needles and perform a 2*2 rib stitch with a height of 6-7 cm. Then we move on to a simple stockinette stitch and at the same time 8 increase loops. You can go to the diagrams Norwegian patterns. At a height of 4-12 cm, the knitting will need to be distributed over additional knitting needles.
Knit the sleeves separately from the rest of the work.
A delicate sweater made from melange yarn will fit well on short and stocky dogs, such as a pug or others.

To work you need:
- knitting needles No. 5 and 6;
- melange yarn - 150 g.
Description:
This pattern is knitted like a regular sweater (not raglan). We start from the back, making it wider. The product begins with an elastic band and continues with stockinette stitch. A small deviation for the armholes.
The front shelf is somewhat narrower than the back.
The sleeves are two small parts.
The low collar is made of 1*1 elastic.
 After creating each part separately, everything is stitched together. A loop stitch is used to sew the sleeves together.
Model 3
A blouse with arans looks very good. But for a dog sweater, you shouldn’t make aranas on the sleeves and the front front. All this will only disturb the pet. It is enough to decorate only the back with arans.

To work you need:
- yarn Alize Cashmere 100% wool;
- stocking needles.

Description:
You need to knit with raglan and start from the collar.
Gate. Cast on 32 stitches on the needles. Knit 4 rows with an elastic band 1*1, then with an elastic band 2*1, for it you need to add one loop above each knit stitch. After 4 rows of this elastic band, switch to a 2*2 elastic band and make inconspicuous additions for it.
Raglan. Knit according to the patterns, at the same time make additions at 4 points for a neat raglan. The front and sleeves are stockinette stitch. The back is immediately made according to the pattern from the Arana pattern.
Front/back. The back and front are knitted in the round, but the front is finished a little earlier, for this you need to leave the loops on an additional needle. Knit the back, then pick up loops along the edge to knit the elastic around the entire fabric (front and back). The bottom elastic is knitted similarly to the collar elastic, but in the reverse order.
Sleeves. Knit each sleeve in a circle and finish the front stitch of the fabric with an elastic band. This is the same elastic band as on the collar of the product, but in reverse order.
Here is the finished product.
Model 4
Raglan for dogs from below. Very beautiful model with a small braid tied at the bottom. This is an ideal sweater for a small dog (Chihuahua, etc.).

To work you need:
- 2 skeins of baby pekhorka yarn, 50 g each;
- knitting needles No. 3.

Description:
Back/front Knit the front and back together. Cast on the number of loops according to size and make a 2*2 rib stitch (no more than 10 rows). The back then moves on to the main pattern from the diagram. Before knitting in satin stitch. Knit everything in the round until the armhole.
Sleeves. Knit each sleeve separately and also up to the armhole. Then connect all the pieces together and knit in a large circle. In each subsequent one, make decreases under the raglan. You need to create a collar with a hem, try on the product for a more comfortable collar height. Close the loops. The product can be worn.
This will help make walks brighter and warmer for your pet - you can simply knit a comfortable sweater for him. It's never too late to take care - so good luck to every beginner in creating a sweater for your beloved dog.
Creative ideas, knitting patterns


Do you love dogs? Then this publication is for you. Our pets are so faithful, so obedient, so smart, let them also be smart and beautiful! Moreover, inYazing for your pets is a huge, incomparable pleasure!
1:946 1:953
Owners of small breed dogs are especially close to the topic of clothing for their pet!
2:16102:4
Here is an example of a sleeveless vest for a small dog
2:93


Sleeveless vest with fringes
5:58You will need:
50 g of beige yarn, 20 g each of brown and terracotta (100% wool, 250 m/100 g), straight or circular knitting needles No. 2.5, crochet hook.
Knitting density:
elastic band 2×2 30 p. = 10 cm, stockinette stitch 25 p. = 10 cm, 40 r. = 10 cm.
Loop calculation
Take your dog's measurements and calculate the number of loops.
Neck circumference- 21 cm (63 p. + 2 cr. p. = 65 p., round to 66 p., since their number must be a multiple of 3); 1/3 girth ~ 7 cm (21 p. + 1 p. for elastic symmetry 2×2 = 22 p.); 1/12 girth ~ 1.8 cm x 2 = 3.6 cm (11 p.) - the width of the armholes at the beginning of knitting.
5:1020Bust- 35 cm + 2 cm for a loose fit = 37 cm (111 p.); 1/2 girth (width of back and tummy) - 18.5 cm each (56 p.)
5:1233 5:1238R distance from withers to middle of back- 11 cm.
5:1328 5:1333Armhole height: distance from the base of the neck to the end of the front paw + 1 cm = 7 cm (28 r.)
5:1488Armhole depth: for small dogs 2 cm (6 p.). 1/2 chest circumference - 1/3 neck circumference - armhole depth = 18.5 cm - 7 cm - 4 cm (2 cm for each armhole) = 7.5 cm (18 p.); 18 p.: 2 = 9 p.; Therefore, when knitting the armholes, you need to add 9 stitches from each edge of the tummy and back.
5:19635:4
To find out how many rows to add loops, divide the distance from the base of the neck to the end of the front paw + 1 cm by the number of added loops: 7 cm = 28 r.; 28 r.: 9 p. = 3 r. This means that yarn overs should be made along the edges of every 3rd row.
5:423 5:430Back/tummy
5:464Using a beige thread, cast on 66 sts. Using a 2×2 elastic band, tie a collar 12 cm high, making stripes of the same width with dark brown and terracotta yarn. Cast off 11 stitches and knit 22 stitches. (tummy), cast off 11 stitches, knit 22 stitches. (back).
5:869Turn the knitting over: knit 22 purls. (back), then take the thread from the second ball and knit 22 purls. (tummy). You can gather the loops of one piece onto a knitting pin and knit it later.
5:1212 5:1217Next, knit the back and tummy 28 rub. stitch, making yarn overs along the edges of each 3 rows. (9 times). The volume of the parts will increase by 18 stitches. Knit the first and last 3 stitches in garter stitch so that the edges do not curl. Then, along the edges of each part, dial 7 air. p. (armhole depth = 6 p. + 1 cr. p.). Now each piece has 54 stitches (22 stitches + 18 stitches + (2×7 stitches), and you need 56 stitches (18.5 cm). Add the missing 2 stitches when switching from satin stitch to rib 2 ×2, making 2 yarn overs at equal intervals. Using a 2×2 rib, knit another 4 cm, making colored stripes, like on the collar.
5:2180 5:6Assembly
Sew the details of the sleeveless vest and use a crochet hook to create a fringe at the collar using dark brown and terracotta yarn.


Clothes without seams

8:2


Clothes with a hood
10:1063 10:1066
11:2

Knitted by adding and decreasing stitches in the right places.
12:629Measuring neck circumference
Bust
Waist circumference
Leg circumference
Distance from the “collar” to the dog’s paws
Naturally, each dog has its own size.
12:928We calculate the loops. The yarn is different.
We cast on loops on knitting needles equal to the circumference of the neck.
We knit a collar.
12:1125After the collar, we divide the knitting into three parts. It depends where the fastener will be. If it is on the belly, then there are approximately 15 loops on the sides and the rest is on the back.
12:1422The number of loops depends on the density of the yarn (threads)
In every 2nd row we add one loop to the center from the sides.
So we knit up to the paws. Before the start of the hole for the paws.
12:98 12:261These three pieces are then joined and knitted together. Approximately 3 cm.
Then we begin to decrease the loops in the middle from the hole for the paws. Approximately two loops in every 4th row.
And so on until the end of knitting. I get 35-36 cm from the neck to the tail, including the elastic band.
Well, the design is as your imagination dictates!
It is tied with an elastic band on the armholes and straps using stocking needles.
You can make holes for tassels after knitting the collar and stretch the cord with tassels, etc.
For girls, I knit the belly to the end of the fabric; for boys, it’s better to 8 cm from the armholes and close the loops. Continue the required distance only for the central part - the back. Everything is individual and needs to be measured. To sit beautifully!
12:1558 12:4The hood can be knitted as a sock heel. Make it removable with buttons or ties.
12:175 12:182Knitted sweater for dogs
12:236 12:239


Here is the principle of knitting these sweaters and the basic pattern!
15:119We knit these sweaters from the collar. Calculate the number of loops for the gate. If it is high with a lapel, increase its length by 2 - 4 cm so that after sewing the product, the collar does not squeeze the neck. Also add stitches for symmetry, for example, when sewing the edges of a collar knitted with 1x1 elastic, 1 knit stitch and 1 purl stitch must be joined, otherwise the seam will be noticeable.
15:786 15:793So that the sweater can be worn over the collar and at the same time fasten the leash without any problems, make a hole in the collar for the collar ring. To do this, when knitting the penultimate row of the gate in the place where the middle of the back will be, close 3 - 5 loops in a row, and in the next row, cast on the same number of chain stitches. When the collar is ready, divide the knitting into two unequal parts: 1/3 loops - tummy, 2/3 loops - back. They can be knitted from two balls at the same time, or you can gather the belly loops onto a knitting pin and knit it later.
15:1773 15:6 
The depth of the armhole depends on the size of the dog
16:670 16:675For small dogs(Yorkshire terrier, toy terrier, chihuahua) it is 1 - 1.5 cm,
16:833for medium(poodle, dachshund, Jack Russell terrier, white terrier) - 2 - 2.5 cm, for larger dogs- 3 cm or more.
16:1042 16:1047To find out the armhole height, measure the girth of the front paw, add 1 cm, calculate 1/2 of the girth and subtract the armhole depth multiplied by two. If you plan to edge the armholes with elastic, then increase their height and depth by 1 cm. After both parts of the sweater are ready, sew them: do this first shoulder seams(sewing the edges of the collar), and then the side ones.
16:1705For details on how to calculate loops for a sleeveless sweater, see the description of the sweater.
16:179 16:186Sleeveless dog sweater “Heart”
16:273You can reduce the width of the backrest in two ways:
1. Smoothly: knit 2 loops together along the edges of the back in every second front row;
2. Sharp: knit 2 loops together along the edges of the back fabric in each front row.
The edges of the back, knitted with stockinette stitch, wrap up and spoil appearance products. To prevent this from happening, knit the back to the length of the tummy, knit the first and last 3-4 loops in garter stitch (that is, all rows of knit stitches).
16:1069For any pattern, it is better to knit the last 1.5 - 2 cm of the back with an elastic band. Then the product will take on a finished look, and the back will not ride up. If the pattern has voluminous braids, then when switching to an elastic band, knit all the braid loops 2 loops together
16:1511 16:6 
1 - 1/3 neck circumference;
2 - 2/3 neck circumference;
3 - the distance from the base of the neck to the front paw (this measurement is inaccurate and is used to calculate the approximate number of yarn overs along the edges of the parts);
4 - distance between the front legs + 2 cm (allowance for armholes);
5 - back width = (chest circumference + 3 cm) - (distance between front legs + 2 cm);
6 - belly length = distance from the base of the neck to the middle of the abdomen or to the hind paw);
7 - back length;
8 - the height of the armhole, the girth of the front paw increased by 1 cm (or by 2 cm, if the girth is very small) - the depth of the armhole x 2;
9 - armhole depth = 1 - 3 cm (depending on the size of the dog). If you plan to edge the armhole with elastic, increase its height and depth by 1 cm.
If the distance from the base of the neck to the beginning of the front paw (measurement 3) is more than 3 cm, then the vertical distance from the collar to the beginning of the armhole (b) may not correspond to the value of measurement 3, since it is inclined (a). That is, the actual number of rows will be less than the number that you get when calculating loops using a regular pattern measuring 10x10 cm. To make the correct calculation, knit the sample, making a yarn over at the end of the front rows, or calculate the yarn overs approximately: if measure 3 is equal to 3 cm, make 3 - 4 yarn overs, one from each edge of the front rows of the fabric, 4 cm - 5 yarn overs, 5 cm - 6 yarn overs, 6 cm - 7 yarn overs, 6.5 cm - 8 yarn overs.
17:1150 17:1157
Here's another option for knitted clothes for our kids!
the simplest thing you can think of.
18:168 
You will need:
100 g of brown melange yarn (50% wool, 50% acrylic, 280 m/100 g), knitting needles No. 2.5, brown buttons (5 pcs.), needle with a wide eye.
Knitting density:
elastic band 2×2 26 p. = 10 cm, 28 r. = 10 cm,
garter stitch 25 p. = 10 cm.
Loop calculation
Take measurements from the dog and calculate the loops.
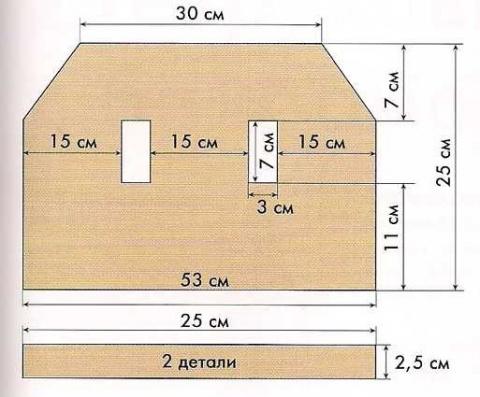
Product length- 25 cm.
Bust- 53 cm (137 p. - 1 p. for elastic symmetry 2×2 = 136 p.)
Neck circumference- 30 cm (78 p. + 2 cr. p. = 80 p.)
Distance from base of neck to front paw- 7 cm (20 r.)
Front paw circumference- 20 cm; 1/2 girth - 10 cm, 1/6 girth (armhole depth) = 3 cm (8 p.), therefore, 136 p. - (8 p. x 2) = 120 p.; 120 p.: 3 = 40 p. (15 cm) width of the tummy and each shelf
Armhole height: 10 cm - 3 cm (armhole depth) = 7 cm (20 r.)
Plank (2 pcs.) - 25 cm = 62 p.

Job description
Cast on 136 stitches and knit 11 cm (30 stitches) with a 2×2 rib. Then knit 40 stitches (first front), bind off 8 stitches (armhole), knit another 40 stitches (tummy), close 8 stitches again (armhole), knit the remaining 40 stitches (second front).
Turn over your knitting and knit 40 stitches of the second front, then take the thread from the second ball and knit the tummy loops, then use the thread from the third ball to knit the loops of the first front. Thus knit 20 rubles. Then dial 8 air. p. over closed loops. Knit in a straight line 1 cm (3 rows). Next, in three steps, begin to decrease the loops: 136 sts - 80 sts = 56 sts; 56 p.: 3 = 18 p. This means that you need to subtract 18 p. at a time:
21:21611st row- elastic band 2×2, 2 sts. every 7 p.;
2, 3, 4th rows- according to the drawing;
5th row- elastic band 2×2, 2 sts. every 6 p.;
6, 7, 8th rows- according to the drawing;
9th row- elastic band 2×2, 2 sts. every 5 p.
Knit the remaining 8 rows. in a straight line and close the loops. For the placket, cast on 62 stitches and knit 2.5 cm in garter stitch. On the other placket, make five buttonholes at equal intervals. Sew the trims to the front of the sweater. Sew buttons onto one of the strips. Quilt the collar from the inside with rubber thread in 2 - 3 rows.
CHILDREN - DACHS - a sweater for you!
21:1013(by shortening the length of the back, we adjust it to the size of your dog)
21:1134As a rule, it is difficult to calculate a sweater for a taxi because... it has non-standard measurements..... the simplest calculation for you:


This is such a wonderful sweater - very convenient to work with.....let's start.
23:650 23:655*So, to knit a dachshund sweater, we will need from 50 to 200 g of yarn (depending on the size of the dog), a set of double needles (5 pcs.) and circular knitting needles of 2 numbers, usually No. 3 and 3.5 or 4, depending on the thickness of the yarn.
23:1040* Measuring the girth of the dog's neck in the place where the tightly worn collar is usually located and cast on the required number of loops on smaller knitting needles. We close the knitting into a ring and knit the required number of rows around the neck (in this example, the neck is knitted with a double elastic band)
23:1576 23:6
Next, we distribute the loops, trying on our neck on the dog. I took the same number of loops for the back and chest, 3 loops for the sleeves and 6 loops for the raglan lines (4 stitches of the braid and 1 purl loop on each side). I knit the sweater itself using stockinette stitch.
24:978 24:1239 24:1246
At the same time, we simultaneously decrease the loops for the breast between the legs.
25:121 25:128 
Then we remove the loops of the back and sleeves onto knitting needles with fishing line (you can use a strong thread) and knit the breast in straight and reverse rows
26:873 26:880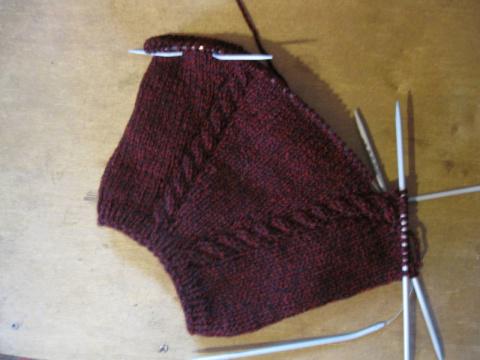
This is necessary for a good fit of the sweater, since the chest in taxi clothes should be much longer and more voluminous than the back; in the process of knitting the chest, we add loops so that the chest and back meet at the elbows:
27:1784 27:6
For now we leave the loops of the sleeves on the knitting needles with fishing line:
28:618 28:625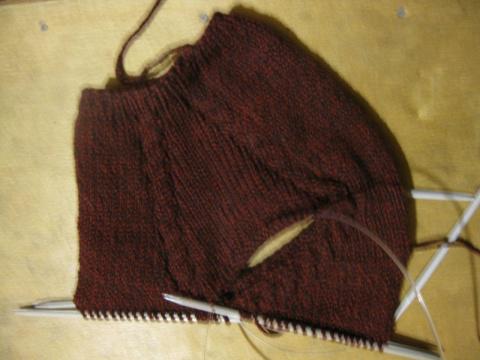
We combine the loops of the chest and back, knitting the outer loops so that there is 1 purl between the halves of the braid. loop and knit the torso in a circle, if necessary, reduce the extra tummy loops to the waist:
29:1513 29:6


something like this......
32:36 32:43