In order to grow, the baby needs to eat well. Modern manufacturers of children's furniture, knowing this, have developed many models of comfortable and multifunctional high chairs. Thanks to them, mothers can not only feed their baby in comfortable conditions, but also leave him for a while without worrying about the baby falling.
Quite often, high chairs are sold with a plastic cover that irritates the baby’s skin. In such cases, it is better to make the case yourself.
The cover can be called the main component of such a piece of furniture.
After all, it is on it that the baby sits and it is on it that the child’s mood, the state of his health, and, accordingly, his appetite largely depend. Many highchairs are equipped with oilcloth covers, which can cause irritation and peeling of the baby’s skin if it comes into contact with them. Being in a high chair for a long time, the baby may sweat and begin to be capricious.
How to find a way out of such a situation? The modern textile industry offers a large selection of fabrics made from natural raw materials and ideal for contact with the delicate skin of the baby. If your child is allergic or does not like to sit on oilcloth, if the old cover on the high chair has become unusable and you want to update it, buy a suitable fabric and try to sew a cover. This event will require very little material costs, and the result will exceed all your expectations.
Read also:
Features and stages in the house.
Preparing for cutting
To make the cover as comfortable as possible, it is better to make it from 3 layers of fabric. For the bottom layer, a rigid fabric is suitable, which will serve as a strong base for the entire structure. The layer is made of padding polyester or siliconized padding polyester, which will give the seat softness. The front part of the chair must be made of soft natural fabric, which will be safe in contact with the child’s body.
If you feel confident and have said to yourself: “I’ll sew a comfortable cover for my baby’s high chair,” prepare the following necessary materials and tools:
- Cotton, cotton fabric for the top layer.
- Sintepon for the layer.
- Rigid cotton or cotton + synthetic fabric for the bottom layer.
- Tailor's scissors.
- Chalk.
- Pins.
- Threads.
- Needle.
- Paper or non-woven fabric without adhesive for the pattern.
- Pencil.
- Sewing machine.
When you decide to sew a cover, you need to have an idea of how the future product should turn out. The most comfortable for feeding a child are covers that are attached with special pockets to the upper part of the back of the chair and armrests. In addition, they must have seat belts to keep the baby from falling. If necessary, the entire structure should be easily removable for cleaning and washing.
The easiest way to sew a cover and create its pattern is to make a pattern from an old cover. This is done as follows:
Straps are threaded through the holes in the case to prevent the child from falling.
- Remove the old cover from the high chair.
- Straighten all its parts and lay them on the floor.
- Attach paper or non-woven fabric to the structure and trace its contours with a pencil. You will get a pattern for the cover.
- On the pattern, mark the locations of the stitches. You can cut them with scissors. These holes will be useful when marking parts for stitching.
- It is also necessary to mark the slots for the seat belts. To do this, the cover is inserted into the high chair. The pattern must be placed on top and pressed, giving it the shape of a chair. The locations of the slots and bends are marked on the pattern.
Return to contents
Cutting and sewing
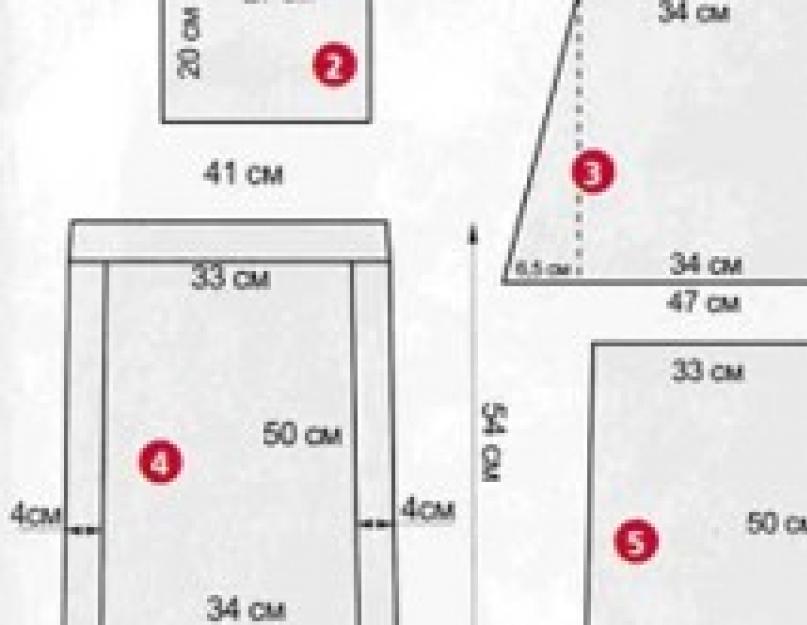
When the cover pattern is ready, you can start cutting the product. First, you should cut out the lining and pockets, for which you use stiff cotton or synthetic fabric. With the help of pockets, the cover will be placed on the back and armrests of the high chair. To make pockets, cut out 3 parts according to the pattern: the upper part of the back of the cover and 2 sides. When cutting, do not forget to make a seam allowance from the contour of the pattern about 1 cm wide.
When the pocket parts are ready, their lower part, which will be used to put them on the high chair, should be folded 1 cm and stitched. After this, the pockets should be placed on the front side of the lining fabric with the stitch down and sewn to it using a sewing machine.
Then the lining with the right side of the fabric is applied to the well-ironed and evenly laid out material from which the outer part of the cover will be made. Two layers of material should be pinned and basted. Only after this can you cut out the part from soft fabric. Such actions will avoid distortion of the fabric and, accordingly, the entire product as a whole.
Next, the resulting design is applied to the padding polyester layer with the wrong side of the lining, secured with pins, basted and cut out. Then all the parts fastened together are stitched around the perimeter on a sewing machine. At the bottom of the future product, you must leave a hole large enough to turn the cover right side out.
The previously made basting is removed from the stitched parts, then the product is turned inside out so that the padding polyester layer remains inside, between the layers of the lining and the facing material. The resulting structure should be laid on a table or floor and a pattern should be laid out on it, on the basis of which stitch markings are applied to the material with chalk. All marked stitch lines are first basted and then stitched on a sewing machine.


It all started with the fact that I decided to sew myself covers for high chairs, because I didn’t like this oilcloth. As soon as you sit the children down to feed, your back is always wet and the back of your head is sweating. I sewed it and I still had a piece of fabric left over for another cover. I thought that it would be lying around unnecessarily, so I made another case and put it up for sale in the Flowerbed. I took the same price as similar covers (on Kidstaff a woman sews similar ones, but from cotton). To my surprise, it sold very quickly and people started asking if there were more. I bought fabric, sewed three more, and so things went on. It turns out that such a product is in demand. There are many models of high chairs, almost everyone with children has them, so take your high chair as an example and sew on it, please.
You will need two types of fabric (for the top layer and for the bottom lining) and padding material (sintepon, silicone or whatever you like). First, remove the cover from your high chair, lay it out on the floor and make a pattern. You can use tracing paper or thin non-woven fabric without glue. Non-woven fabric is more convenient - it does not tear, does not wrinkle, is more durable and easier to work with. Cut small holes in the pattern along the stitching areas. They will be useful to you when you make markings for the lines (you will see the photo of the template below, since I wanted to reduce the number of photos to the required minimum and maximum information content). Now let's start cutting. First, using the made pattern, we cut out the lining and lapel parts (3 pieces). We line the edges of the lapel parts with a machine seam and baste them to the main lining, as shown in the photo. The main thing is not to confuse the front and back when assembling this structure, so that later you don’t have to flog it after turning it inside out.
Then we put the finished lining on the laid out velor (face up) (with the folds sewn down) and stitch it with basting. After this we cut out the velor. If you cut it first and then sew it on, there will be a distortion, since the velor is knitted and stretches well, in addition, the edges are curled into a tube.
We sew the cover around the perimeter, leaving an opening for turning it inside out. After you have turned the cover inside out, put the finished template on it and mark the stitching.
We sew the stitching lines and sew them on the machine. We sew up the hole through which we turned it inside out as we please (I sew it up with a hidden seam, and then add a stitch along the top. We sew a wide elastic band at the bottom to attach it to the chair.
I line the holes for the straps, but do not cut them. Some people don’t use them, so whoever needs them should cut them themselves.
Many mothers who have small children have encountered this problem: the child has not yet outgrown the highchair, and the cover on it has already become unusable. Manufacturers of children's tables often use oilcloth material for covers. It is practical, easy to wipe, but cannot be washed, since after several washes the material becomes rougher, begins to crack and becomes unusable. And it’s not very pleasant for a child to sit on a cool oilcloth and constantly has to lay something down; as a rule, it all slides off and causes great inconvenience. Therefore, this master class is devoted to sewing a cover for a child's high chair from one of the famous brands.
Material used and tools for sewing the cover
1) 1 meter of fabric (in this case crepe),2) 0.5 meters of padding polyester,
3) threads of a suitable color,
4) edging tape,
5) scissors, chalk or pencil, measuring tape,
6) pattern or old case.
Making patterns and cutting material
First you need to start with choosing a fabric. It's up to your taste. You can take raincoat fabric - it is easy to maintain, durable, wear-resistant and easy to wash. But it will not be very pleasant for a child to sit on it, as it slips and is cool to the touch. Corduroy will look very expensive and the child will sit on it pleasantly and comfortably, but cleaning is already a problem. In this case, crepe is used. It is less durable than raincoat fabric, but it is more pleasant to the body, is easy to wash and does not wrinkle.First, let's start cutting out the future table cover. For these purposes, you can use an old cover, or if it is not preserved, you can make a pattern from oilcloth. To do this, take a suitable piece of oilcloth and attach it to the chair. With a marker we outline all the parts and details of the chair where the future cover will be attached. Next, we cut out the template and once again apply it to the chair and check that all the parts fit tightly and coincide with each other. Then we take the fabric and fold it in half. We apply an old chair cover and begin to trace it over the fabric. Next, we cut out the pattern with a small margin for padding polyester and seam allowances.

We do the same with padding polyester, only we cut it out strictly according to the pattern.

We also make patterns for the rear (1 piece) and side fastening of the cover (2 pieces for each side).

Sewing a cover for a children's feeding table
First, let's start sewing the small parts of the cover. Let's start with sewing the side fasteners. We cut off the rivet buttons from the old case (or use new ones). We make a hole on two blanks, stitch them with a zigzag seam or, if available, with an overlocker. Insert buttons into the resulting hole and sew them on. Next, we fold two parts: one without a button and the other with the wrong side of the button facing inward. We stitch it, and in the end we get these side fastenings.
Then we prepare the rear mounting of the cover. We make the edging of the cutout for the seat handle and the lower front part of the part.

Let's start sewing the table cover itself. To begin with, on one part of the cover, just like on the side fasteners, we attach buttons for attaching to the chair at the bottom. We fold both parts with the front sides inward, pin the finished side fasteners to the place where they connect to the chair. We sew a regular seam from one side fastening of the chair to the other; there is no need to sew the upper part. Afterwards, use a zigzag seam to finish the sewn edges of the fabric.

Turn the cover right side out and iron it well. We insert a padding polyester pattern inside and stitch it along the sides and bottom of the chair seat to secure it. You can see it in detail in the photo below. We also cut a hole for the protective seat bumper.

Next, we make the edging of the cutout for the bumper, and stitch the cover with padding polyester at the top (the same as it was on the old cover). Then we make markings on the seat belt cover and, using a buttonhole sewing foot, sew marks under the belts. Then all that remains is to cut the fabric.

Let's move on to the final part of sewing a cover for a children's feeding table. We sew the two edges together, finishing the edges to make the seam neater using edging tape. This is what should happen.


Next we sew on the back fastening of the cover. We fold the cover and the fastening pattern right sides together and sew them, finishing the seams with a zigzag stitch or overlock. Turn the resulting cover right side out.

All that remains is to iron our cover and put it on the chair. This is what happens in the end.
Conclusion on the master class
In this master class, sewing a cover for a feeding table was described in detail. It takes very little time to sew it, and the cost of fabric is not high. Making such a case to order is an expensive pleasure. Therefore, all those who know how to sew at least a little and love handicrafts can easily please their child with a new and comfortable seat cover. Good luck in your creative processes.Sewing a cover for a high chair with your own hands becomes relevant when: 1) the old cover is damaged for various reasons; 2) he did not exist at all; 3) you just don’t like the old high chair cover. Let's look at all three options and show you how you can sew a cover for a children's high chair with your own hands.
At the very beginning, I would like to add the following, common to the three options: it is impossible to provide a ready-made diagram of a universal cover for any high chair, and even with dimensions. The fact is that the chairs are all different, and the cover is sewn depending on their design. Therefore, when creating a pattern, you will need to start from a specific model of a high chair or its old cover. And as a universal one, there will be general recommendations on how to sew a chair cover.
Below is a brief retelling of popular master classes on the topic of how to sew a cover for a high chair with your own hands. All these lessons come down to the sequence of certain actions. And let’s add a few practical considerations of our own.
Contents of the article:
High chair cover - choice of material
 Before you try to sew a cover for a high chair with your own hands, you need to find a suitable material. Many parents like bright colors, or, conversely, beautiful delicate colors, especially if a girl is growing up. In addition, I want my children to have the best. Therefore, soft velor and some other soft, easily soiled fabric, such as cotton calico, are selected. Kind of like a blanket or throw for a sofa.
Let’s say right away that it’s impractical to think like that. A small child will immediately sweep away all your beauty. He still has his own ideas about this world, and the most important thing for him is active movement. Including while in a high chair. Therefore, the more interesting and expensive the high chair cover is, the less it will last.
Let’s say separately that chintz will quickly lose its appearance, it will be a pity for the labor invested, and therefore we don’t take it at all.
Based on the needs and lives of children, it is worth starting from the following: it is best to sew a cover or cover for a baby’s feeding chair with your own hands from fabric on an oilcloth base, and it should not be of easily soiled tones. You can simply use any washable, strong fabric, such as raincoat fabric. Oilcloth is very easy to wash, and a certain color will help hide endless dirt. And there will be a LOT of it: from overturned porridge, to things painted with a pen - this is already true for grown-up kids. Therefore, we choose the fabric of the cover for a children's high chair in a neutral tone, perhaps with a bright pattern and on an oilcloth base. The finished case should be filled with soft filling, such as synthetic padding. Sitting on a soft cover on a high chair is always more pleasant for a child than on a hard chair.
 To prevent shrinkage of the already sewn high chair cover, its fabrics are decated before sewing. The easiest way is to wash the fabric before cutting. There is a more correct way - to wet the fabric in water with a temperature similar to that with which people will then wash. This is about 60C – 90C. hang to dry and iron with damp, pressing movements. Then you can start cutting and sewing.
Decatting of fabric is a wet-heat treatment in order to prevent shrinkage of the fabric during work and use of the finished product.
Now for those who complain that the baby is sweating in the high chair. Of course, sitting on oilcloth, the baby will sweat, especially in summer or winter with good heating. A diaper placed between the baby and the high chair can easily prevent this. Also, a diaper can be an alternative to a new cover for a high chair for feeding, for those who do not want to bother with the cover.
DIY high chair cover - removable option
 Why do we make a removable cover for a high chair for feeding a child? This cover is easy to remove and wash. It can be put on top of an old cover. It will be even softer this way. If you plan to use the new cover without the old cover on the high chair, then you need to put more soft filling there. That's all.
Our hand-sewn removable high chair cover will have three layers of fabric:
- The top layer, also known as the face, is an oilcloth-based fabric or other fabric; according to your choice;
- Soft layer filler - batting, or synthetic padding, or even foam rubber, if the machine will accept it;
- The bottom one, also known as the lining, is ordinary hard, strong cotton and/or synthetic fabric, or lining.
 The cover will be attached to the back of the high chair using a pocket. The pocket is a short piece of durable fabric, you can use the same one from which the lining for the case is made. It follows the shape of the upper part of the back, and is sewn to the cover from the back. On the sides the cover is attached to the chair using an elastic band or ribbons. High chairs are all different. This means that you yourself will need to look at the place - where and how much to sew so that it turns out well. If you use seat belts, you need to make holes. If you don’t use it, you can leave the cover on the high chair in a blind version.
You can see how to sew a cover for a high chair in the following video. It shows how you can sew a universal liner cover for a high chair. Unfortunately, there is no pocket and it is unclear what will hold the back of the cover against the back of the chair. However, the sewing sequence itself is shown correctly.
Sew a cover for a high chair with your own hands - the work process
 To sew a cover for a high chair with your own hands, first make a pattern. Traditionally, tracing paper or just paper is used for this. It is also possible to take ordinary inexpensive thin white fabric for these purposes. A white background will make your marks easier to see. You can use non-woven fabric or cellophane, perhaps it will be even more convenient with them.
Remove the old cover from the high chair. If you need to rip it apart at the seams, then we do it. If it is not required, then you don’t have to spank F). We lay the cover on the pattern material. We press it tightly to the fabric (paper) and draw the pattern according to the material. On the pattern we mark the places of folds and stitching, as well as the places of holes.
After this, we cut out the pattern itself. When cutting, you need to leave an allowance of 2-3 cm in all directions from the pattern for seams. When the pattern for the new high chair cover is ready, you can start cutting out the necessary parts from the fabrics of the cover.
Let’s say right away that as a result of your actions on the do-it-yourself highchair cover, you should end up with a sandwich: a soft filler, the top layer (the main fabric of the cover) facing it, then the lining. If this does not work out, then when you turn out the already sewn cover, you will see for yourself that you did it wrong, and you will have to unrip it. In principle, this can be checked in advance on scraps.
 Cutting begins with the lining and lapels. In addition, we separately mark a pocket on the lining fabric for attaching to the back of the high chair. We cut out the pocket and sew it to the lining. The lapels also need to be basted to the lining.
 We place the resulting design with the flaps up on the front side of the main material of the chair cover. After this, we baste the finished structure to the main material, and only after that we cut out the cover from it. You can, of course, first cut according to the pattern and then sew it, but then something will definitely warp when sewing.
 After this, place the entire new structure from the main material and lining with the back side of the main fabric on the filler - padding polyester and also baste it. And only after that cut out the filler.
When everything is cut out, sew the cover along the edges, leaving one part unstitched, through which the new cover for the high chair will be turned inside out.
 The future cover is turned inside out, after which you need to make markings for stitching on it according to the pattern. They can also be basted and machine stitched. Also, if you decide to use it with belts, then you need to make holes for the seat belts. To do this, a stitch is used to make loops.
 The hole through which the cover was turned inside out is sewn up, preferably with a hidden seam. You need to attach ties or an elastic band to the back and bottom of the cover.
That's it, you have sewn a new cover for the high chair. He's ready.
A little advice: if the old chair cover was not suitable for some reason, for example, it was too big, then the pattern should be made 1-2 cm narrower.
Do-it-yourself cover for a high chair - there is no old cover or we cover a new homemade high chair
 Nowadays it is quite rare to find a high chair without a cover. Still, this is the age of comfort and consumption, so manufacturers take into account all the little things. But if this happens, or you made the chair yourself, then in this case you will have to think about the cover. You will have to make a cover for the high chair with your own hands. The difference from the first option is that there is no ready-made, albeit damaged, sample in front of your eyes.
Therefore, in this case, before making a pattern, you need to hang thin paper or fabric, for example, a white diaper, on a chair (the drawing is better visible on a light one). And directly according to the size of the chair, draw the desired pattern. And it is advisable not to forget about the lines along the intended folds. And if you forgot, so be it. Still, there is no old cover, and it is not known exactly where the stitches should be. The rest is done in the same way as in the first option for a removable cover for a children's high chair.
DIY high chair cover – wooden chair cover
 The first two options for high chair covers imply that the cover will be removable. Most often, it is hung on a chair, similar to a mobile high chair. That is, it has a pocket sewn onto the back that fits onto the back of the chair. You can make the case universal, then you can do without a pocket, and use a soft filler that holds its shape, for example, foam rubber. We remind you that here the pocket is a short piece of durable fabric, repeating the shape of the upper part of the back, sewn to the cover from the back. Therefore, such universal covers will fit absolutely any model of high chair, you just need to sew them in accordance with the existing high chair.
For a wooden high chair, the cover is sewn slightly differently. First, let's look at the video, which simply and clearly shows the main points.
 Now let’s look in more detail at what and how. The third option for sewing a cover for a high chair with your own hands is designed for wooden chairs.
It can be used when making a high chair with your own hands, or even if the old cover is worn out.
The bottom line is that the chair is simply upholstered with a brightly colored oilcloth using a construction stapler. A soft filler is first attached to the hard parts of the chair. For a stronger structure, the filler can be glued to the back of the chair, but it is better to attach the oilcloth itself with a stapler. The process itself is very similar to upholstering the most ordinary chair with fabric. Perhaps this option will be even easier than sewing a cover. It has, perhaps, only one drawback - it will be difficult to remove, unlike the removable cover for a high chair.
High chair cover – summary
Today, many parents are puzzled by changing the cover on their high chair.  . But it seems to us that this is guided, first of all, not by common sense, but rather by the desire for aesthetics. Well, it’s not good for a child to sit on a dirty cover when it can no longer be washed. Or the cover is torn and has a hole. People also don’t like it when a baby sweats on oilcloth material.
However, there is a way out of this - when the child begins to eat in the high chair, it can be covered with a diaper in advance. Use it while feeding, and then remove it and put it in the wash. In this case, the cover on the children's high chair will not get dirty with food. And you can put a patch on the hole, sew it directly onto the old cover. The diaper will also save the baby from sweating on the oilcloth cover.
As for the covers painted by the child, creativity should be appreciated, there’s nothing you can do about it. Although the handle comes off well with regular soda or Pemolux, this is if the cover is made of washable fabric.
In general, the conclusion is simple: with the right approach, any cover can last more than one year. And if the chair does not have a cover, then you can sew a cover for a high chair with your own hands, or simply cover the chair with oilcloth, which is even easier.
It's no secret that one of the usual and necessary children's accessories is a high chair.
Each chair is a rigid frame with a soft cover on top.
The variety of models is very large. It is easy to find a detailed dossier for each item on the Internet.
For my part, as a mother, I have already empirically chosen several favorites that have proven themselves to be excellent.
The main thing is that the unit should be:
-stable,
-compact, easy to fold,
-there was a large removable table with sides,
The rest is “bows”.
It is better to give preference to plastic products. When iron parts are present, they rust over time. it won't lead to anything good. Of course, it’s enough for one child, but if you plan to use the chair for meals in the future, or pass it on to friends/by inheritance, it’s better to refuse such a candidate.
If the frame parts break (this happens extremely rarely), you can order them from official dealers or purchase the same model for spare parts.
Plastic chairs are easy to care for and last a very long time. Often, several generations grow up on one such throne, while nothing happens to it itself, only the plastic may fade slightly. And that’s only for Chinese companies. If we consider expensive well-known brands, a period of 15 years is just the beginning for most.
Therefore, many parents are in no hurry to fork out money for new special seats, but take them from friends or buy second-hand ones through advertisements (Avito, Yula, forums.). In this case, you can save a decent amount of money, but you need to be prepared to replace the cover (reasons are discussed below) - this is a smaller fraction of the cost of a new chair.
We've sorted out the fundamental support of the chair, now let's talk about its upholstery.
How do you think: -" Can the soft cover last as long as the seat itself?
»
Unfortunately no…
The cover is enough for a maximum of 1-2 children.
What happens to them?
They:
- crack,

- crumble,

- torn,

-absorbs odors of food and secretions,

- “innards” come out through the holes,

- scratch/stick to the body...

This is not because he was initially bad. Just like many things, they have their own service life. Even in luxury brands, eco-leather begins to creep and crumble over time - and everything that flies off sticks to the body of the owner of the throne. And where the oilcloth cracks at the fold, it begins to scratch the baby.

When the material has already dispersed, he quietly and peacefully continues what he has already begun, tearing off pieces one after another. As a result, decent holes are formed.
The fabric edging around its entire perimeter can cause quite a bit of discomfort in older cases. Even if it itself is waterproof, manufacturers cover the cuts with a fabric edging that collects absolutely everything that flies past the mouth. While the remains of porridge and puree can be wiped off from the cover, it is problematic to do this from the fabric side - the food is immediately absorbed. Washing such a thing is very difficult and only by hand. At the same time, most manufacturers warn against washing, otherwise safety is not guaranteed.
At home, many parents try to “keep” their babies without diapers and wear panties and rompers. If you often “do your business” while sitting (the little ones won’t tell you when they want to pee), the smell will be strongly absorbed. Washing it even with acetic acid does not help get rid of odors. To avoid this, you need to use disposable diapers. We have developed a special “seat against small surprises”. Its main task is to take everything that stands out into itself. It is pleasantly soft to the body, machine washable, the number of washes is unlimited. You can watch it .
This hit parade is closed by the protruding filler/or lack thereof. If there was foam rubber inside, it crumbles over time and turns into dust. The seat literally turns into a rag. The contents come out through the torn holes.

How to repair or repair a cover for a children's highchair?
This question arises for every mother who is faced with a supported replacement insert.
If you have good patience and nerves, I will offer effective repair options.
Unfortunately, there are not so many of them, because if the fabric itself is frayed and begins to crumble, you can’t think of anything to do with it.
After all, if the fabric on your sweater starts to creep, or your sweater begins to ripple, you won’t try to revive them, but go shopping for new things. The same goes for replacing the seat itself.
You can make an effort and put patches where required.
High chair: how to seal the oilcloth, what to do?
1
)The most common, improvised remedy is scotch.
Yes, yes, regular wide tape. They can cover cracked parts. First you need to clean the places that need to be repaired, then connect them as close as possible and apply adhesive tape.
2
)Repair kit from inflatable rings, mattresses, swimming pools...
If the cracked area is small, you can use this method.
How to use them is written in detail with illustrations in each instruction for the inflatable product.
3
)Hot glue gun.
This option is only suitable if there is a small crack.
Insert the glue stick into the gun and heat it up. We tightly connect the torn parts to each other, and without letting them go, we apply molten glue on top. We recommend trying to make the seam wider; if it is high, it will be uncomfortable to sit on.
4
) Sew the torn parts together or put a patch.
I would not recommend this method, since the oilcloth or leather has already begun to crack, and making holes with a needle will loosen them even more. And there is no guarantee that what you sewed on will not fly off with the next piece of the seat.
These four methods will help bring your cape back to life for a while. Just for a while (always unpredictable) since once she starts crawling, she will continue to do what she started, it’s a matter of time.
Let's now look at the shabby accessory through the eyes of a child!
For him, any holes are another reason to pick them out with his little fingers, developing fine motor skills. Even having closed them, the child can later discover them again and put in his back-breaking labor in tearing off what was sealed.

How comfortable will it be for a baby to sit on such upholstery? I think many adults themselves would not want to sit on this. So why give this to the delicate skin of our dear children?
It’s clear that you want to save money on everything. But saving should be economical, and not then run around looking for expensive creams and medicines to heal the skin, soothe your nerves.
If you find yourself in a similar situation, we recommend replacing the cover/seat. You can buy it from the manufacturer or choose tailoring from craftsmen.
If order a branded one - where is the guarantee that after a while the same thing will not happen to it what you already have, and not everyone can offer such replacement covers.
Choosing an individual order - You You decide for yourself what material you want the case from and its colors. As a rule, if you choose wisely, it will last much longer and will delight mother and child every day with its practicality.
At one time I myself was in such a situation. My friends gave me a chair, and a cover “without tears...” I couldn’t sit the little one on hard plastic; I put a blanket and a diaper on it, but it would slide off. I was patient and made my first cover.
The smallest details for each case model have now been perfected. They are hand-sewn by professional craftsmen with love and care, as if for themselves. All together allows you to get a quality product.
Many of our clients say that they regret that they did not immediately order a cover for the high chair, trying to revive it, they still came to the need to replace the cover.
You can use our tips for repairing a cover or buy yourself a new one. You can place an order
.
There's a
By
. Adviсe .
Their entire range of models available for order is located at.
Or you can - we will help you choose the case that will be more practical for you.
You can ensure comfort for your child by ordering a new children's cover yourself.
Let's create comfort together!