The pencil skirt is a classic model that can be worn both to work and in an informal setting. If you don’t already have such a thing in your wardrobe, find out how to sew a pencil skirt in different ways and choose the one you like.
How to sew a pencil skirt with your own hands - patterns
A pencil skirt, like all other clothes, is best sewn using a pattern drawn according to your own parameters. As a rule, when constructing, they use such values as the girth and half-girth of the waist, the girth and half-girth of the hips, and the length of the future product.
All other elements of the pattern are calculated depending on these numbers, in contrast to the godet skirt, in which you also need to calculate the length and width of the folds.
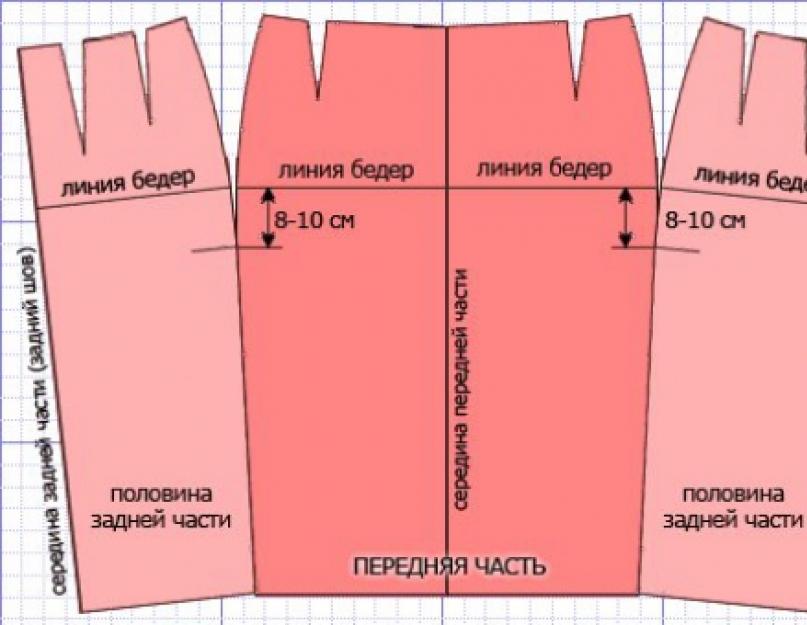
A standard pattern that makes it easy to do this kind of work, how to sew a pencil skirt, involves the construction of three parts - one part of the front and two parts of the back - which are connected by two side seams and one back.
- Draw a square ABCD, in which sides AB and CD will be equal to the half-circumference of your hips plus one centimeter.
- Sides AD and BC are equal to the selected skirt length.
- The side line of the skirt is drawn in the middle of segments AB and CD, perpendicular to them and parallel to AD and BC, with the designations of points T on AB and T1 on CD.
- From points A, T, B, put 20-22 centimeters down and draw a dashed line indicating the reed indicating points L, L1, L2.
- To calculate darts, determine the difference between the half-circumference of the hips and the waist: PB-PT=difference. Divide the difference into three parts in a ratio of approximately 7:3:4, where seven parts will be for the side dart, three for the front, and four for the back.
- From point T to the left and right, set aside half the length of the side dart. Rise from the obtained points about one centimeter above the overall pattern. From the top points above the pattern, draw dash-dot straight lines that connect at point L1.
- From the upper right point of the side dart, draw an oblique line about five to six centimeters long to the waist line, and from the point where these lines connect, draw a perpendicular to the hip level. From the intersection point on the waist line, step back to the left and right by half the size of the front dart. Go down about nine to ten centimeters to the hip line, step back half a centimeter to the side and put a point - straight lines from the points of the top of the front dart should meet there.
- Divide the segment AT in half and draw a perpendicular to the level of the hips in this place. Measure left and right for half the size of the back dart. Go down about 12 centimeters perpendicularly - at this point the lines from the top points of the back dart should connect.
So you have created a straight skirt pattern. You can learn more about how to take measurements and use them in the following video.
To sew a pencil skirt, you need to make some changes to the side seam - narrow it 2-2.5 centimeters from the hip line straight down if the length of the selected product is about sixty centimeters, and 1-2 centimeters if you want to sew a skirt forty centimeters long.
This product is interesting because a pencil skirt can be sewn with or without side seams, connecting the pattern pieces with only one seam - the back one. Use this pattern to build a virtually seamless skirt.

Most of the constructions in this option are based on the same measurements as the first drawing method. A noticeable difference is the doubled number of darts on the back parts - this need arises if the difference between the half-circumference of the hips and waist is more than fourteen centimeters.
How to sew a pencil skirt - step-by-step instructions
Correctly constructing a product pattern can mean half the success of the whole job. After you have made all the necessary measurements and put the drawing on paper, there are a few basic steps left to take, such as: how to sew a pencil skirt from several parts.
Be sure to add a couple of centimeters to the pattern depending on what fabric you choose so that the item does not turn out too tight.

For example, if the skirt is made of dense materials, such as linen, add up to two centimeters; a pattern on semi-stretchy fabrics can be created with an increase of 1-1.5 centimeters. There is no need to add extra weight to the pattern on stretchy fabrics - the material will fit the body well in this case.
- Transfer the paper pattern of the skirt parts onto the fabric, remembering to allow seam allowances.
- Sew the darts first, then connect the skirt parts using a sewing machine. The pieces need to be sewn from top to bottom.
- Fold the bottom of the skirt twice, 1-2 centimeters each, and stitch.
- You can sew a thick elastic band or zipper into the waistband of the skirt instead of a side dart.
This high-waisted, knee-length skirt, complemented with high-heeled shoes, visually slims and elongates the figure. Especially if the material from which the product is made is dark: black, blue, dark gray.
How to sew a pencil skirt without a pattern?
Unfortunately, many novice seamstresses find it difficult to work with constructions and draw a pattern correctly. In addition, there is not always enough experience with the machine, which is why complex seams cannot be obtained.

In this case, you can try this method of sewing a pencil skirt for beginners without a pattern! Many clothing manufacturing companies have recently been sewing skirts using this very principle. The basis is a well-stretchable fabric - knitted or stretch.
- Cut two squares of fabric - the side of each should be equal to the length of the product you have chosen.
- Sew the two sides of the square together to form a wide tube of fabric.
- Put the pipe on yourself and pin it tightly with sewing pins along the edge of the body so that the fabric fits tightly.
- Sew the parts to each other along the lines marked with pins.
Your skirt is ready! You can use it as an independent item of clothing or for making a dress pattern with your own hands.
To make sure that a pencil skirt is very easy to sew for both professionals and beginners, using only a few body measurements, watch the following video tutorial from the famous seamstress Olga Nikishicheva.
Take it for yourself and tell your friends!
Read also on our website:
Show more
Good afternoon, dear seamstresses. Today we’ll look at the most necessary and basic wardrobe item - pencil skirt. What is the beauty of this model, its advantages and nuances of sewing such a skirt? The pencil skirt model looks great on the figure; it can be sewn from a wide variety of fabrics - from classic suits to knitted fabrics with a bright texture. And the same model will look completely different from different fabrics.
Therefore, it is so important to understand the construction of the pattern and learn sew a pencil skirt.
And today we will look at this process in more detail.
In order for the skirt to fit your figure perfectly, we create a pattern for ourselves, according to the measurements we took.
If you have never done this before, you will need to go through three steps:
- Change the drawing by making the skirt straight pencil skirt
After you decide on the norm for narrowing the skirt to the hemline (usually 3-4 cm in the drawing on one side of the skirt), you need to decide on the cut - will it be just a cut, or a cut with a slot.
I am sewing a skirt with a vent, so we also add the vent to the drawing.
We determine the height of the skirt on your figure.
In other words: where will the belt be?
There are four options for processing the top of the skirt:
- Belt at the waist
- Belt below the waist (on the hips)
- Skirt with facing
- Skirt with elastic
Depending on the chosen option, we adjust our pattern.
I sew a skirt from stretch fabric with a belt, which is located 5 cm below the waist. The width of the belt is 3 cm.
How to sew a pencil skirt for beginners step by step
How to choose fabric for a skirt?
We choose the fabric for the skirt based on your clothing preferences and the fit of the skirt on your figure.
For example, if this is a classic version of a pencil skirt, then we choose a suiting fabric, the fit of the skirt is at the waist.
This model can also be sewn from stretch fabric with elastic, with the skirt fitting at the waist or hips.
Sew a pencil skirt
Cut out the front part of the skirt:

Cut out the two halves of the back of the skirt with the slot:

We cut out the front part of the belt (2 parts) and the back part of the belt (4 parts). We duplicate the details, since the belt consists of outer and inner parts.


We glue the upper cut on the parts of the outer belt with a fractional edge. The shared edge should clearly fall into the place where the machine stitching will then be laid. This is necessary to strengthen the belt, since I sew them with stretchable fabric (so that the belt does not stretch when worn).


Now you need to sew the belt to the top section of the skirt.

We sew all parts of the belt into one piece (we sew parts of the back belt to the part of the front of the belt).

We sew both parts of the belt (outer and inner) along the top edge, folding them face to face, using the machine needle to precisely hit the shared edge.

Then we turn the belt right side out, stitching the top edge of the belt so that it does not puff up.

We sew with an interlining stitch, stepping back from the edge 2 mm, leaving 3 cm on both sides of the belt (do not sew these areas with an interfacing stitch, as you will need to sew in a zipper and turn the belt inside out in these places).

You will get a beautiful top edge of the belt:

Then we sew the belt to the skirt. To do this, place the belt with the front side facing the skirt and stitch it.

Then we make an interfacing stitch along the front side of the waistband to secure the allowances (tuck the waist allowances to the top edge of the skirt so that the allowances on both sides are hidden in the waistband). 

We turn the open areas on the belt near the zipper inward and stitch them with a hand stitch.

With an elastic band, this skirt model looks best in my opinion:

The result is a wonderful pencil skirt that can become the basis of your basic wardrobe. Sew with me!
Watch the video to see how sew a pencil skirt without a pattern:
I have always had problems with skirts, ever since my pioneer childhood - I never liked the way skirts fit me. Those single instances that suited me are stored in my memory to this day. So, for example, knowing all the advantages of high-waisted skirts for my figure, I placed such a thing in my wardrobe only once, and even then at the dawn of my youth.... And I remember very well that I looked amazing in that skirt - I felt yourself not just a person, but a woman, a WOMAN with a capital W! (Did you smile at these formulations?). But it was difficult for me to choose blouses for a high-waisted skirt...
The idea of updating my wardrobe, and even sewing something myself, had been wandering in my head for a long time, and then I accidentally came across this article"High waisted skirts where they clearly explain how and with what to wear different models of such skirts correctly, that’s it - my fate is decided - I’ll try to sew a high-waisted skirt myself. I have already selected the model, pattern and comments for it. Who is brave, who will try to create this miracle with me? I just feel like I might not be able to cope, so I’m looking for companions and support.
And now into battle!

They say a high-waisted pencil skirt looks great on any figure. Let them say, don’t flatter yourself, you still need to be able to choose your own model. So in my case, it happens that a pencil skirt strongly emphasizes, even (sometimes) the missing tummy, and in the process of wearing such a skirt uncontrollably tends to crawl too high under the chest and it has to be constantly returned to its place, and persuasion does not help here and everything has to be done do it with your hands. Sometimes such an irresponsible skirt also pulls the blouse tucked into it, then in order to get yourself in order you need a secluded place to tuck the blouse.
I repeat, if you find your high-waisted skirt model, then it will only delight you with its impeccability.
Studying this topic, we create patterns for a conventional figure of size 48 (as an example), and you take measurements from your figure or from the figure of your client. In the previous article we looked at the option of constructing a pattern for a pencil skirt with a one-piece belt 3-4 cm high, and in this article (as an example) we will raise the waist line by 7 cm. This construction is similar to the first option, but it is still worth paying your attention to following. Depending on the amount of elevation of the waistline and the configuration of the top line of the skirt, some of the nuances of constructing the pattern will change.
Namely: if the height of a one-piece belt is more than 4 cm, there is a solution of darts in its upper part Maybe be reduced. The upper cut of the belt in the area of the side cut is also Maybe be expanded to about 0.5 cm. I write approximately 0.5cm, since there can be no clear recommendation on this matter. What should I do? The answer to this question will be given by your figure. Stand in front of the mirror and direct your attention to the waist area (from the front and in profile), you can use a centimeter as an assistant. And then analyze what you saw and make a decision by how much you should reduce the darts or expand the side cut to suit your figure. We are all different and the difference in girth is also different, and the configuration of the sideline is also different.
And now, the important thing: It is very easy to adjust the belt after the first fitting! If you doubt the correctness of your decisions, then the first fitting will put everything in its place. The main thing is not to forget about allowances!!!
The style in question is based on the pattern of a classic pencil skirt, which we created in one of our previous articles. A classic pencil skirt, in turn, is based on the basic pattern of a straight skirt. If you have not previously participated in mastering design with us, you can use our step-by-step instructions and make patterns for these skirts for your figure. In the future, you will need them more than once when modeling various styles of skirts. Or use any other pattern, the choice is always yours.
Main remember that You should start modeling only after you have checked the base, made adjustments (if necessary) and made sure that the skirt fits perfectly on your figure.
We will take the pattern of a classic pencil skirt and continue building on its basis. Copy the front and back panels of the pencil skirt onto a blank sheet of paper.

Rice. 1
NOTE: If you have a narrow waist and wide hips, in this case it is preferable to make two darts on each panel to ensure a perfect fit of the skirt on your figure. We will discuss this in more detail in one of the following articles.
In this example, we will raise the waistline by 7cm. By construction, we can say that a skirt with a high waistline in our case is a skirt with a one-piece belt, the height of which is 7 cm. The height of a one-piece belt can reach 10 centimeters or more, turning into a kind of corsage and requiring a specific processing technology in each specific case. It depends on the model of the skirt, on the properties of the fabric, on your plans, on the wishes of the client, etc.
The configuration of the top line of a one-piece belt can also be different.
In this option, the upper section of the belt runs parallel to the upper section of the base pattern of the skirt (waist line). In the following articles we will look at other examples.
From points T and B9, on the rear panel and from points B11 and T1 on the front panel, draw upward vertical lines, 7 cm long (inflated height). The ends of the lines will be designated by points P and P1 on the rear panel and P2, P3 on the front panel. We connect the resulting points with a smooth line parallel to the upper section of the skirt, as shown in the figure below.

Rice. 2
From points B7 and B6 on the rear panel and from points B3 and B2 on the front panel, draw vertical lines upward until they intersect with line PP1 on the rear panel and with line P2P3 on the front panel. We denote the intersection points as P5, P6, P7, P8. (See Figure 3).

Rice. 3
IMPORTANT! The resulting segments B7P5 and B6P6 should be equal to each other. The same applies to similar segments on the front panel B3P7 = B2P8. If necessary, align them in length and adjust the top line. (See Fig. 4)

Rice. 4
Along the upper cut we reduce the dart opening by 0.5 - 0.7 cm on each panel. To do this, from points P5 and P6 we put the reduction amount in the middle of the dart, designate these points with numbers 1 and 2 and connect them with points on the waist line B7 and B6. Similarly, we will reduce the dart opening on the front panel of the skirt and place points 3 and 4. See the figure below. The structure is indicated in red.

Rice. 5
It is recommended to raise the top line of the belt at the side cut of the skirt (points P1 and P2) by 0.5 cm so that the finished belt does not bend. To do this, we put 0.5 cm upward from the above points and designate the resulting points 5 and 6. See the figure below.

Rice. 6
Upper edge of the lateral line May be slightly widened to 0.5 cm. This is done when the waistline is significantly elevated and, first of all, depending on your figure or the figure of your client.
For example, let's imagine that the figure of our conditional client has all the data so that the upper cut of the side line is expanded by 0.4 cm. To do this, from point 5 to the right, and from point 6 to the left, set aside 0.4 cm, put points 7 and 8, respectively, and connect them with points on the waist line B9 and B11 and with points 2 and 3, respectively. See fig. 7 and fig. 8.

Rice. 7

Rice. 8
This completes the main changes.

Rice. 9
NOTE: The top line of a one-piece waistband should be smooth and should not have sharp bends. Align the waistband pieces along the vertical lines (closing the darts) and, if necessary, adjust the top edge of the skirt.
Please note that the technology for processing the upper cut of a high-waisted skirt depends on the amount of inflation, i.e. from the height of the one-piece belt. For example, padding of different densities is used, and with a high belt that resembles a corset, bones, etc. are inserted into the relief and side seams to maintain the shape.
In our example, we will process the upper section of the skirt with a hem.
To draw the facing of the belt, copy the upper part of the skirt onto a separate sheet, matching the lines of the darts. In our drawing, this part of the skirt is indicated in blue.

Rice. 10
We get two facings for the front and back panels of the skirt.
When cutting, do not forget about seam allowances.

Rice. 11
All. The pattern is ready. Based on this pattern, you can also model various styles of skirts.
In the next article we will describe the construction of a pencil skirt pattern with a high waistline with a curly top cut line in several options. This also has its own subtleties that should be taken into account when creating a pattern.
Follow the site news, subscribe to our RSS news feed and you will always be up to date.
 ), I could barely tear myself away from him the first time...
A figure-fitting, stylishly tapered, elegant pencil skirt has long been popular with women of all ages. Would you like to add this classic look to your wardrobe? Let's try to sew it with our own hands. After all, the pattern of a pencil skirt is based on the pattern of a classic straight skirt for beginners. And the lack of flashy decor makes this product indispensable for business occasions and relaxing parties.
Learning how to correctly create a pencil skirt pattern for beginners
Let's start work by constructing a basic pattern for a straight skirt.
Taking measurements:
- Half waist circumference - SWEAT;
We measure the waist with a centimeter and write it down? from the resulting figure.
- Half hip circumference - FOB;
Do we measure the hips in a similar way and take them into account? from full size.
- The front length of the product (along the midline) is DP;
- Product length at the back – DS;
- Side length of the skirt (from the waist line) – DU;
- Back length (to the waist line) – DST.
Seam allowance:
- At the hip line = 2 cm PB;
- At the waist line = 1 cm PT.
- Draw the main line.
On a sheet of graph paper we put a symbol - the letter “T”. From it we draw a straight line directed straight down.
- Draw out the bottom edge.
We set aside a segment of a certain length from the schematic letter “T”. Section length = the length of the skirt from the back of the waist. We get the letter "N". Formula: TN =?.. cm. Next, draw a line to the right horizontally.
- We draw the line of the hips on the drawing.
From the conventional letter “T” we lay a segment of a certain length. Section length = 1/2 the length of the back from the waist. From this figure we subtract 1 cm. We will schematically designate this place with the letter “B”.

Formula: TB = DST/2 – 1 cm =?.. cm. On patterns, the distance from the waist to the hips usually varies from 10 to 20 cm. From the letter “B” we draw a horizontal line.
We build a pattern for the front fabric:- We are looking for the middle line.
Formula: BB 1 = POB + PB =?.. see.
From the conventional letter “B” along the thigh strip we draw a segment of a given length. Length of the segment = half-circumference of the hips + seam allowance. We designate point “B 1”. We draw a line straight down through it. At the intersection with the lower line we get a new conditional point, designated “H 1”. From “H1” we follow vertically upward, laying off the next segment. Length of the segment = number of the size of the front length. We get point “T 1”.
- We build a line of side cuts.
Formula: BB 2 = (POB + PB) ? 2 – 1 cm =?.. cm.
From the symbol “B” we set aside a segment of a given length. Length of the segment = ? figures for the half-girth of the hips + increase for seams. From this formula we subtract 1 cm. We outline the letter “B 2”. Draw a vertical line from it. We get the next point at the intersection with the bottom straight line - “H 2”. From point “H 2” we measure the next segment vertically upward. Length of the segment = number of the skirt length size. Let's call the resulting intersection “T 2”.
- We draw the construction of the waist.
We connect the lines “T”, “T 1” and “T 2” using a long ruler. The waist line is marked.
- We outline the darts.
The pattern of a classic straight skirt includes side, front and back darts. In this case, the total area of the opened darts (?B) = the difference in the width of the product at the waist and hips.
Formula: ?B = (POB + PB) – (NOT + PT) =?.. see.
- Side dart.
The area of the side dart is half?B.
The dart should be located 2 cm above the hip line.
Formula: T T 2 = T 1 T 2 =? ? ?IN? 2 =?.. see
- Back dart formula:
T T 2 = POB? 4 – 2 cm =?.. cm.
- Front dart formula:
T 1 T 3 = FOB? 4 – 1 cm =?.. cm.
We place the front dart 7–8 cm above the hip line.
- We build cuts on the sides of the product.
We connect the symbols “B 2” and “H 3” using a ruler. The width of the back panel along the bottom line = the width at the hips + 4 cm.
We combine the names “B 2” and “H 4”. The width of the front panel along the bottom line = the width of the femoral line + 3 cm.
We study a detailed description of the construction of a pencil skirt pattern
Based on the basic pattern of a classic straight skirt, it is easy to create a pattern diagram for a pencil skirt. To implement this idea, it is enough to narrow the panels of the skirt downwards in the area of the side seams and create a vent on the back panel of the pattern to ensure a certain freedom of movement and increase the length of the step.
The diagram is shown very clearly in the attached photo:

The estimated narrowing can be from 1 to 3 cm.
Modeling a fashionable pencil skirt:

The posterior incision can be made in several ways:
- The simplest thing is to build an inverted triangular cutout by tucking the edges of the back cut inside the product and finishing them well.
- Make a slot in the back section.
To do this, an additional allowance of 8 cm wide is made on the pattern. The back panel is cut out from two halves. They are connected using a back seam. We make a slot on the right half of the back panel: fold the fabric allowance in half, getting a fold measuring 4 cm. We bend the slit on the left side of the product inward, and process the seams.
There are many sites on the Internet offering to download ready-made patterns for pencil skirts of any size. Suitable patterns can be found by both slender girls with a figure size 44 and women of average shape. Size 46 is considered especially popular.
Ladies with curvy figures also have a wide choice. In the photo shown, the pattern has been modified and specially adjusted to fit a female figure size 54:

A narrow skirt will favorably emphasize rounded assets and skillfully disguise annoying flaws of a non-standard figure if it is made correctly and in size. Therefore, the accuracy of the patterns cannot be neglected.
Imagine, create, enjoy - you will definitely succeed.
Video instructions on the topic of the article
Sewing a full-length skirt or circle skirt yourself is quite simple. This does not require patterns, special drawings, etc. Sewing a pencil skirt is a little more difficult, but it also looks much more beautiful and attractive. The advantage of sewing this type of skirt yourself is that such a skirt will meet all your parameters, which means it will fit you perfectly and fit perfectly around your waist and hips. We will look at all the nuances of sewing this type of skirt yourself in this article.
What does a pencil skirt look like?
A pencil skirt is a stylish item in every girl's wardrobe. This is a skirt that completely hugs your figure, its length usually reaches to the knees or slightly below. Since a pencil skirt is considered office wear, its length, according to the canons of the office dress code, most often covers the knees. It looks very feminine, the legs visually become longer and the silhouette is clearer. A pencil skirt also looks great in your everyday wardrobe. You can wear it with blouses and jackets, as well as with regular plain tops and turtlenecks.
How to cut a pencil skirt
In order to determine how the product will fit on you, you need to measure the parameters of your figure. First you need to tie any braid or thick thread at your waist, all other parameters will come from it.
- (chipboard): distance from the waist to the floor from the front side.
- (Dsb): distance from the waist to the floor on the side.
- (Dsz): distance from the waist to the floor from the back side.
- (Dia): distance from the waist to the fullest point of the buttock.
- (Du): The length of the skirt is measured from the waist to the front.
The pattern is always based on the so-called basic grid, which includes three horizontal lines (waist line, hip line and bottom of the product) and two vertical lines (side seams of the skirt).

The triangles in the skirt pattern (darts) on the top are needed to ensure that the skirt fits your figure tightly and tapers from the hips to the waist.
Remember that you need to leave a couple of centimeters so that the skirt fits your figure freely:
- along the hip line - 2 cm;
- along the waist line - 1 cm.
The patterns for the back and front of the skirt are, of course, different.
How to sew a high-waisted pencil skirt
If you want to sew a high-waisted pencil skirt, you need to position the pattern so that there is still enough space above it. To the already drawn pattern you need to add 4-6 centimeters, which will fit your waist tightly. Don't forget to leave extra for the seams and waistband. If you plan to make a skirt without a belt, but with a zipper, then you need to leave a margin of only 1 centimeter for the hem of the fabric.
The video below provides detailed instructions for sewing a high-waisted pencil skirt.
How to sew a pencil skirt from knitwear
Knitwear is a very pliable but stretchy fabric. When cutting, it is best to use needles to attach the pattern to the fabric. Otherwise, after cutting, parts of the future skirt may have uneven edges, which will add difficulty when connecting them.
At the same time, it is easier to sew a skirt made of knitwear than from other materials.
The front and back panels of the pencil skirt are exactly the same. There is no need to make darts at the waist.
You can draw the pattern directly on the fabric.
To do this you need to use the following parameters:
- hip circumference;
- waist circumference;
- product length;
- hip height;
- belt width.
- The first thing you need to do is draw a horizontal line, the length of which is equal to the half-circumference of your hips.
- Place a line vertically equal to the length of the product plus 3 centimeters for the seams.
- We measure the height of the hip from above, and the width of the belt is not included in this parameter.
- Then we calculate the half-waist circumference parameter. This will be the topmost line in the pattern and draw rounded lines to the waist from the hip width line. For clarity, the figure below shows a pattern.
The parameters for this pattern are as follows:
- waist circumference - 74 centimeters;
- hip circumference - 100 centimeters;
- hip height - 26 centimeters;
- length - 52 centimeters;
- The width of the belt is 4 centimeters.

How to sew a leather pencil skirt
If you decide to sew a pencil skirt from leather, then it is best to choose genuine leather. Artificial material can deteriorate very quickly. It is worth considering that not every machine can handle leather material. Special needles are also used in the sewing machine. In this case, the skirt should not be stretched, but should have a loose fit.
Below is a video on how to properly sew a leather skirt.
How to sew a pencil skirt with elastic
A pencil skirt with an elastic band is one of the easiest ways. To do this, you need to add 4-10 centimeters to the finished product at the top of the pattern, depending on the width of the selected elastic band. If the fabric is not heavy, then an elastic band 3 centimeters wide will do. In this case, 7-8 centimeters are added to the pattern. First, the finished product must be tucked at the waist by 0.5 centimeters and stitched from the inside. Then tuck it in 3 centimeters (the width of the elastic) plus 0.5-1 centimeter for the seams. In addition, the resulting “pocket” should be slightly wider than the elastic so that you can easily insert it. When stitching the “pocket”, you need to leave 10 centimeters in order to insert the elastic inside. Only after this is the seam of the belt sewn up completely.
How to quickly sew a pencil skirt
There are other, easier ways to sew a pencil skirt without resorting to complex drawings. Below is a video instruction for express sewing a pencil skirt.
How to sew a pencil skirt without a pattern
- To do this, you need to cut a rectangle of fabric that is equal to the width of the hip circumference plus 5-6 centimeters for allowances. The length of the rectangle is equal to the length of the product plus 1-2 centimeters for the folds. The skirt will have one seam at the back. We immediately insert a hidden zipper into it and sew it with a black seam (by hand).
- Next, lay out the resulting workpiece on the wrong side and measure the middle on the front of the skirt.
- We set aside 7-10 centimeters in each direction along the upper edge of the skirt - these are two future darts. The width of the dart should be 2 centimeters at the top point (that is, the fold is 1 centimeter wide), the dart decreases towards the bottom. The length of the darts also varies from 6 to 10 centimeters.
- The back darts have a length equal to the distance from the belt to the tailbone. But their width at the top is 6-8 centimeters, that is, the fold at the top is approximately 4 centimeters.
- After you “make” the darts, be sure to try on the skirt.
These are the main features of constructing a pencil skirt without a pattern. Next, you need to make all the darts the same and start sewing the skirt on a machine, starting with the zipper. Don't forget to decorate the waistband and bottom seam beautifully.
How to sew a belt to a pencil skirt
- To do this, you need to cut a strip, the length of which is equal to the waist circumference along the upper edge of the skirt. The width depends on what kind of belt you want.
- Fold one side over and place the strip face to face on the skirt, folding 1 centimeter over the edge of the zipper.
- Next, make a seam, retreating 1 centimeter from the cut.
- After this, you need to try on the skirt and also sew a strip on the front side, bending the edge by half a centimeter.
- You can fasten the belt with a button or hook.
How to insert a lining into a pencil skirt
The lining should be 2-3 centimeters shorter than the length of the skirt so that it is not visible. The lining is sewn using the same pattern and processed separately from the skirt parts. Baste all parts of the lining, overlock the edges, check that the lining fits well on your figure. After that, do the same with the skirt. The lining is connected to the skirt only at the waist line. First you need to baste the entire skirt with the lining, and then sew on a belt or elastic.
How to hem a pencil skirt
The video below provides a description of how to properly hem a pencil skirt. After all, in order for the bottom of the skirt to look even, its front and back parts initially have different lengths. After the product fits your figure, the bottom line of a well-tailored skirt should be equally level both in front and in the back.
How to lengthen a pencil skirt
- To lengthen a pencil skirt, you must first unravel the bottom seams.
- Then measure the width of the fabric from seam to seam. If the pencil skirt consists of a single piece of fabric and has only one seam, then you need to cut a rectangle of the same width and suitable length. The new fabric must be stitched from the inside out. At the same time, make sure that there is no trace left on the fabric from the previous seam.
- Finish the edges with an overlocker and your long pencil skirt is ready.
How to shorten a pencil skirt
- To do this, you need to turn the skirt inside out and measure the excess length from the bottom edge. This needs to be done in a circle, connecting the resulting points. If the pencil skirt had a slit, but you need to repeat it on a new product. Perhaps, when shortened, your skirt will no longer need a slit. In any case, you should be comfortable walking and moving in it.
- Carefully trim off any excess fabric.
- Close the hem on the sewing machine.
How to decorate a pencil skirt
You can decorate a pencil skirt in different ways and with details. You can sew ruffles or flounces that suit your style along the top or bottom seam. By the way, a pencil skirt with flounces is a very stylish and at the same time elegant wardrobe item that is suitable not only for work, but also for leisure. The pencil skirt is also decorated with patch pockets or inserts made of another fabric. Inserts into the side or bottom seams of the skirt are possible. In rare cases, a belt is made from a different fabric.
There are also more intricate decorative elements for a pencil skirt. An example is shown in the photo below. It’s not difficult to make such skirt decorations, but then the style of the skirt can no longer be called strict, and wearing it will most likely be appropriate for walks and parties.

How should a pencil skirt fit?
A pencil skirt should fit like a glove. At the same time, it should not ride up or become jammed while walking.
Pay attention to how the back seam looks when walking. It is designed to allow you to take your natural step, but the seam should not detract from the look of the skirt. It is important that the lining is not visible when walking.
At the same time, the main sign of a well-tailored pencil skirt is that it does not gather or wrinkle as it passes from the hips to the waist. This is why the pencil skirt has darts at the top. The skirt should not sag in front or back. At the level of the buttocks, the skirt should also fit tightly, hugging the figure. Otherwise, the pencil skirt will look like a straight skirt that does not emphasize the curves of the figure.