Many experienced needlewomen they even organized their own small (and, by the way, quite successful!) business and offer to order original amigurumi toys through the online store, crocheted And a wide range of textile soft toys. In this material you will find step by step photo master class on how to make a very popular tilde doll with your own hands, as well as patterns different models dolls All of these products look somewhat unique, but they are united by a special style that allows them to be unmistakably chosen among other options for soft toys. At first glance, Tilda gives the impression of a slightly awkward village doll with disproportionately thin and elongated limbs, a narrow face, on which only black beady eyes and rosy cheeks flaunt. But the beauty of the tilde doll lies precisely in this unobtrusive simplicity with clear lines on any detail of the product.
Absolutely every needlewoman who is familiar with the basics of sewing techniques can create a Tilda doll with her own hands. Using life-size printed patterns and sewing together individual parts of the product filled with filler (sintepon, padding polyester, holofiber), you can make this wonderful toy at home in just a few hours.
Some little girls love to play with tildes, dress them up in beautiful homemade clothes, and come up with funny names. Such dolls fit perfectly into a modern interior, filling the room with home comfort and positive energy. Tilda is often given to friends as a housewarming gift, complete with coffee topiaries and bouquets of soft toys. Recently, these wonderful soft toys are given to mothers of newborns after being discharged from the hospital, along with a luxurious cake made from diapers.
The style that unites all tilde dolls was invented and brought to life by designer from Norway Toni Finnager, who organized the production of unique interior accessories and soft toys that are popular to this day. Needlewomen often use life-size assembly patterns and patterns to sew such popular soft toys as a lop-eared rabbit, Easter Bunny, bear, snail. Often the textile fabric for sewing the shell of a Tilda doll is painted with natural dyes so that the air in the room is filled with a pleasant aroma (a dye option is coffee with cinnamon).
♦ HOW TO SEW A TILDE DOLL. STEP-BY-STEP MASTER CLASS:
Click on the photo.
♦ LIFE-SIZED TILDA DOLL PATTERNS AND ASSEMBLY DIAGRAMS:
♦ VIDEO LESSONS FOR BEGINNERS:
How to sew a tilde doll and fill the parts correctly with filler. Video lesson.
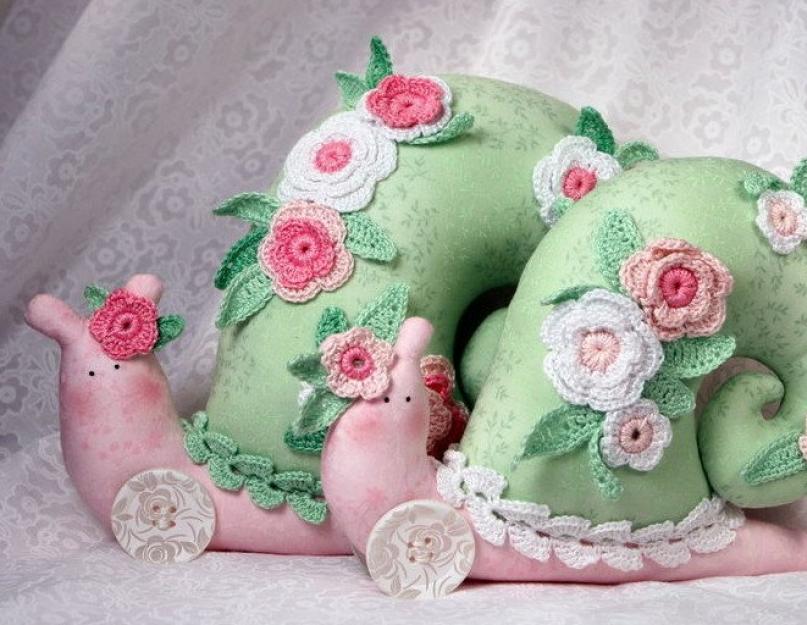
Tilda dolls have become popular quite a long time ago. And today we will show you a popular pattern for creating a tilde snail!
Their distinguishing feature is their appearance. Simple and whimsical faces, well-chosen textiles in warm colors show their zest.
In this article, we will talk about a pattern for creating a Tilda snail. Here you can also find a master class on making a Tilda snail from felt, fabric, or other material that you have at hand.
Making a Tilda snail with your own hands is very easy. Modern needlewomen can come up with all kinds of things, there are snails - pincushions, snails - bagels, snail pillows - you can see all this in textile stores and at attractive prices. But who wouldn’t want to have such beauty in their home, especially something created with their own hands?

The Tilda snail in the form of a pillow should always be in full size, so that the person who will sleep on it will be very comfortable. Unless, of course, it’s decor. Tilda snail patterns can be downloaded on the Internet, but it’s better to make it yourself.

Making patterns for sewing a toy snail Tilda with your own hands
You will need:- paper
- padding polyester
- pencil
- scissors
- threads
- needle
- textile
- beads
- black pen
- accessories for decoration.
Draw patterns. Transfer patterns to fabric. Cut out the resulting shapes from the fabric. Stitching right sides textile. Turn the craft inside out. Fill with filler. Sew together the resulting parts of the future Tilda snail.
Bring the product to its logical conclusion with the help of accessories. Your snail is ready. Now, you know how to sew a Tilda snail yourself. It will serve as a beautiful addition to your interior and serve its intended purpose.
It is also easy to make a completely simple snail - a pincushion.
You will need:- durable fabric
- scissors
- threads
- filler, can be synthetic padding
- accessories for decoration.

- Cut out the outline of a snail from fabric
- Sew the resulting parts together.
- Fill with padding polyester.
- Sew up the hole.
- You decorate, bringing your product to its logical conclusion.

Your snail-pincushion is ready. Enjoy it!
Felt snails, as a rule, simply serve as decoration for the interior, or for your apartment, cottage, house, car.
To make such a snail, you will need:- threads
- accessories with which you will decorate the snail
- padding polyester
- Cut out the necessary parts from felt.
- Sew them together right sides together.
- Turn them right side out.
- Sew the pieces together again
- Fill with padding polyester.
- Sew up all remaining holes.
- Decorate your snail with accessories.

The product is ready!
Video on the topic of the article
You can see the details of making the Tilda snail pattern, felt snail, and snail pillow in master classes with descriptions by following the links below:

Previously, we published patterns for Tilda snowmen and a master class on a snowman br-r-r in the Tilda style, and this another snowman is very similar to his brothers, but since he is from another book (Tilda's Christmas Ideas), we decided to give him a separate post . These snowmen without...


These angels have a charming homely and naive appearance. With their thin arms and legs, they are the Tilda version of primitive dolls. These angel dolls can hold sewing tools and can be given to a seamstress as a souvenir or can be used to decorate...

Without a doubt, these golden winged sheep hanging in your bedroom will bring you sweet dreams... Try it and see for yourself! These sheep are similar to the Hanging Reindeer, although the pattern is slightly different. YOU WILL NEED Fabric Threads for flesh-colored embroidery...

Lovely angels in dresses and with crowns from the New Year’s book “Tilda. Christmas ideas.” YOU WILL NEED: Flesh-colored fabric for Tilda Fabric for wings, legs and dress Hair for Tilda (yarn, wool) Crowns for Tilda (can be bought in stores with…

Sewing hanging deer is very easy, since they are only wearing a scarf in the form of a torn strip of fabric. The horns for them are made from twigs, so the next time you get ready for a walk, look out for suitable twigs. YOU WILL NEED DEER FABRIC...

The body of the pig is sewn in the same way as that of toy animals. And although it differs in shape, the base is sewn in exactly the same way, and we will tell you how the ears are attached below. YOU WILL NEED: Pig fabric Fabric with roses Metal wire/plant wire…

The source of inspiration for creating these little animals on wheels were old toys, however, with horns, twigs and angel wings, they are more suitable for decoration. If you want to make them into toys for children, remove the horns and wings and make sure all the parts are secure...


YOU WILL NEED Various fabrics Decorative ribbons Ribbon for hanging Metal rings for hanging Non-woven stuffing Material PROCEDURE Please note that these balls come in two sizes. For a larger ball, use a metal ring that is approximately...
Today, many needlewomen sew Tilda. These cute dolls decorate both children's rooms and ladies' boudoir. Do you also want to sew something similar? Then this article is especially for you. It contains 3 patterns of life-size Tilda dolls. Find all the details below.
Simple Tilde
Not only an adult lady, but even a little girl can sew such a toy. The life-size Tilda doll pattern is shown above. It must be printed on A4 format. If you want to do big toy, then you can double the pattern on the computer. After you have completed this simple task, you should cut out the parts from paper. The next step is to transfer the life-size Tilda doll patterns onto fabric. The body of the toy should be sewn from beige or coffee-colored material. If you want to make a natural doll, you can buy white cotton fabric and tint it with coffee or tea.
All the parts of the toy are cut out, all that remains is to sew them together. You need to start with the torso. Sew the two parts together, leaving a hole at the bottom. We turn the workpiece inside out and stuff it with padding polyester or cotton wool. All that remains is to sew up the left hole. Now, by analogy, you need to make arms and legs. We sew the stuffed parts to the body. Now from wool threads or from a dissolute satin ribbon I need to do my hair. You need to complete the production of the toy by embroidering two eye dots.
Tilda the angel
This cute craft will require a little more time to make than the previous version of the toy. given above. You should print it or redraw it. This pattern should not be enlarged; the cute angel should be small in size. We cut out the paper parts and transfer them to fabric. As in the previous option, you should use a beige or coffee color of the material.
How to sew a doll The patterns are ready, all that remains is to assemble them. First you need to sew all the parts. Let's start making the toy from the body, then make the arms and legs. There is one caveat here. If you want the doll to sit, you should stuff the legs loosely, and then use the finished parts to make a seam on the knee. Lastly, let's make the wings. Now we sew all the parts into place. All that remains is to make the hairstyle and embroider the eyes. You can dress this doll in anything. IN classic version all Tildas wear dresses, but this, of course, is not the law.
Tatiana Konne doll

Tildas with big feet have conquered the whole world. These cute girls, unlike classic rag toys, look more modern and relevant. The life-size Tilda doll pattern can be found above. These girls are made of beige material, but unlike the original ones, they consist of several parts. You should start making Tilda from the head. First we sew the back parts together, and then attach the front part to them. You can immediately turn it out and stuff the resulting face. We sew the body and attach the head to it. We assemble the legs, which consist of three parts. You can insert cardboard into the sole to make the doll stand better. We sew the arms and legs to the doll. Now you need to sew on Tilda’s beady eyes and rouge her cheeks with dry pastels.
The story of everyone's favorite Tilda doll began back in 1999, on the day when Norwegian artist Toni Finnanger had the idea to create something special. After this, a Tilda doll was created with my own hands: for beginners, patterns and a description of the process are provided in this article. You will learn the secrets of designing the face of a designer doll, and the types of fabric used to create a unique image.

What is Tilda?
Tilda is an amazing doll, different from the others with an elongated body, long legs, and button eyes. Tilda's cheeks invariably glow red, no matter who this interesting doll is. And the handmade toy has thousands of images: girls and boys, pot-bellied rabbits and colorful snails, funny cats. Each handicraft masterpiece has its own name and character; Tilda's clothes and accessories are never repeated.
Fabrics for designer dolls
Tilda, in its first appearance, was conceived by Toni Finnager as village designer doll. That's why there were fabrics for her natural ones were used. Despite the fact that the number of incarnations of the toy has increased, the fabric for needlework has remained the same. Use types of textiles and accessories when creating an individual look:
Body
The body of the Tilda doll is different beautiful tan or aristocratic pallor: suitable options will become flannel, calico, linen. If you can’t choose the color of the fabric, then take the material in white or pale beige and dye it the “tildin” color yourself.
Use natural dyes : instant coffee, onion peels or tea leaves. Boil the fabric with one of the listed ingredients for 10-15 minutes, then dry slightly and steam with an iron until completely dry.
Cloth
Use cotton fabric delicate colors: blue, white, pink, light brown. Colors can be very diverse, but most often for the Tilda doll, fabrics with roses, delicate wildflowers, polka dots, and fine geometry are used.
If you are planning to sew Tilda with your own hands in outerwear, then take a closer look at jeans and natural wool.
Hair
The most common option is ordinary colored yarn. To create individual looks, you can use natural or synthetic hair from handicraft stores.

Padding
The most popular option is holofiber. You can try stuffing the doll with cotton wool, but its mobility will deteriorate somewhat.
By the way, fabrics for beginning needlewomen should be purchased in a specialized store. They sell ready-made cuts that will free you from painful thoughts about combining fabrics. Buy fabric only for a specific Tilda: the variety of assortment can push you to make thoughtless purchases.
How to make a face for a doll?
To make a doll special person, it is not necessary to have a higher art education. And for secondary vocational students too. All you need is a little imagination and available products that you can find in your cosmetic bag.
Eyes
Start decorating the eyes after you sew on the hair. Otherwise, you may not guess with their location, and Tilda’s face will look unkempt.
To begin, outline the future button eyes with a needle or pencil: if you are satisfied with the result, then apply it to the fabric acrylic paint or black varnish for nails.

When you reach the professional level of sewing designer toys, it is recommended to purchase a special set “Tilda Kit Paint Fases”, which contains everything necessary tools and materials for creating the face of the future Tilda doll. Such a set will have to be ordered from abroad: Tilda branded materials are not widely used in Russia.
In addition to painting, eyes can be made using French knot embroidery or sewing black beads.
Blush
Do not apply blush with paints - unlike eyes, a failed result will be difficult to hide or redo. Use regular blush.
This completes the face of an ordinary Tilda doll. When sewing animals, you can add a mouth - it can be embroidered with thread.
DIY Tilda: patterns
Let's look at how to sew a Tilda using the example of a delicate and airy angel dolls. The pattern is presented on two sheets: print them out.
Remember - the Tilde size is determined independently, so before printing you can enlarge or, conversely, reduce the image.