A smooth transition from one polish color to another allows you to get a gradient nail design. Like any other manicure option, it has its advantages and disadvantages. And you need to create it following certain recommendations.
Peculiarities
Gradient nail design is remarkable because the transition in it is carried out not only between dark and light tones of the same color. A girl can choose absolutely any shades and try to combine them with each other. This is its advantage - an unexpected combination becomes an original solution and allows the owner to stand out. By varying the color scheme and types of gradient, you can get a unique design.
The use of various decorative elements (rhinestones or small stickers) will also add zest and even enliven an already boring design. In addition, no matter how complicated the technique may seem, such a manicure is very easy to do even at home.
One small disadvantage of this design is that not all colors combine well with each other. If a girl is young and bold, and is not afraid to be bright and noticeable, she can experiment without hesitation. Business women and modest women are better suited to pastel colors that will not create a sharp contrast.
Types of gradient on nails
A gradient, or stretching as it is also called, can be drawn in several ways. In this regard, it is divided into several types:
- Simple. This type differs from the others in that the gradient effect will not be created on each nail, but on the entire hand as a whole. It is perfect for manicure at home and is created using 5 shades of the same color. To do this, a darker varnish is applied to the thumb or little finger nail. Next, the nails are painted in increasingly lighter colors. Alternatively, 3 shades can be used. In this case, the middle nail will be either the darkest or the lightest.
- Classical. Here, a smooth transition between two or three colors is carried out along the width of the nail in its central part, i.e. across. This type is also called horizontal.
- Vertical. In it, the transition occurs along the surface of the nail, i.e. vertically.
- In style. The principle does not change, but or are used as flowers, turning into milky or.
- With painting. In this case, the gradient will be used as a basis for the pattern.
- Brilliant. There is no play of colors as such; only one varnish is used. Sparkles are added to it, the amount of which will decrease closer to the transition border.
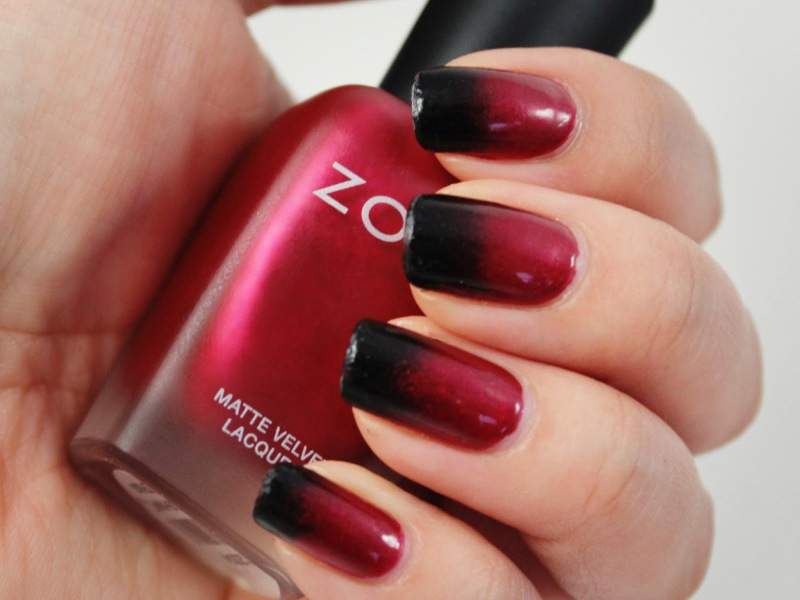
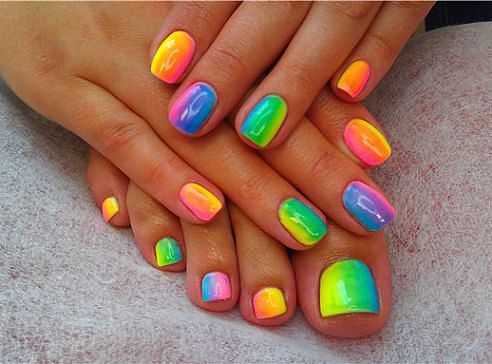
- Chaotic. The boundaries of transitions between colors can be located anywhere, and the colors themselves can change direction. A great example is the colorful Skittles design, which takes its name from the colorful candies of the same name.
- Linear. The design on the nails is often represented by vertical lines, which are carefully drawn with thin brushes. This type of gradient nail design does not imply blurring the boundaries between colors. A good example is the diamond geometric gradient.
Video "Geometric Gradient"
You can see how to correctly create a 2018 diamond gradient nail design in this video.
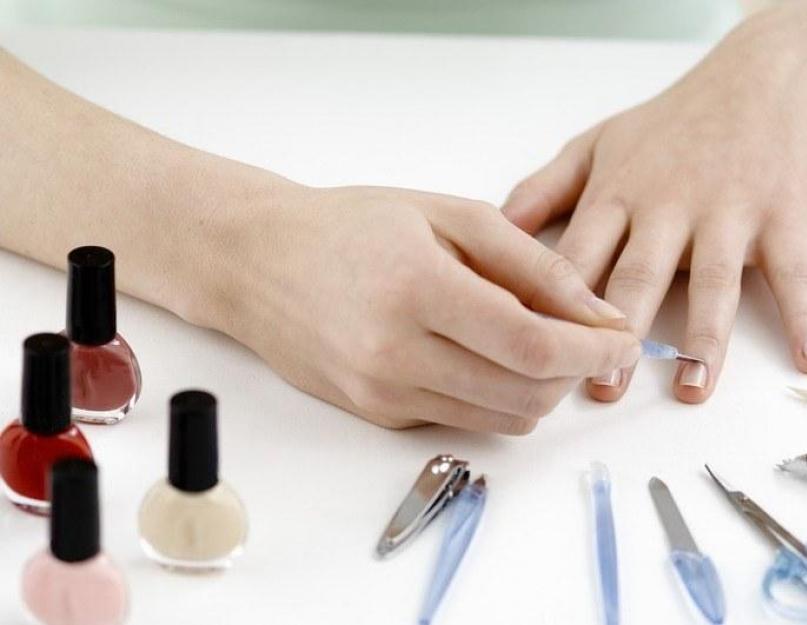
Required Tools

Preparation for creating a gradient manicure begins directly with the collection of tools and materials. An approximate set can be seen in the table.
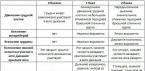
| Name | Purpose | Possible analogues |
| Degreaser | Provides stronger adhesion of the polish to the nail, thereby extending its wear time | Primer, clinser |
| Varnishes of several colors | Used to create designs | Gel varnishes or thermovarnishes |
| orange stick | Used in the process of pushing back the cuticle | Metal or plastic sticks |
| Cotton swabs and nail polish remover | Getting rid of nail polish on the skin around your nails | Corrector, tape (attached before applying varnish) |
| Fixative | Smoothes the surface, adds shine to the manicure, and helps make it more durable. | Any top coat |
| Sponges | Used to create a gradient before applying to nails | Foil, eye shadow applicator, dish sponge, etc. |
If the manicure is created using gel polish, you will additionally need a lint-free cloth, which will allow you to remove the sticky layer after polymerization, and a UV lamp directly.
Application rules
To get beautiful nails and not look funny or awkward, it is advisable to learn how to choose the right colors and type of gradient. Here are some recommendations on this matter:

- if your nails are short, but you still want to make a fashionable design, you should pay attention to vertical or simple stretching;
- a dark tone at the base of the nail plate is better suited to long nails, because can visually shorten them;
- when colors are contrasting, the boundary between them should be defined as clearly as possible;
- to get an interesting manicure, it is better to use more varnishes;
- the choice of matte varnishes will not be the most successful when creating a gradient design, while glossy ones will enhance the effect;
- The varnishes themselves should be of the same texture; the result from using thermovarnishes will be interesting.
Gradient design technology
Smoothly blurring the boundaries between the colors used is quite easy to do when using regular varnish. However, this manicure does not last longer than a few days. Gradient nail design with gel-based polish will be more durable, but it is also somewhat more difficult to make. There are several ways to create such a design; we will tell you about the most popular ones.
Using a sponge
This technology for creating a gradient nail design is possible with a sponge or a piece of kitchen sponge. It is performed as follows:

- First of all, you need to accurately determine the colors that will be used in the manicure.
- Next, you should apply a base coat, which will protect the nail plate and make the gradient long-lasting.
- Now we take the lightest of the selected varnishes, completely cover the nail with it and let it dry.
- The sponge or sponge must be slightly moistened so that the material becomes damp and does not absorb the varnish.
- We take the varnishes and apply stripes to the sponge, moving from one tone to another. This is done with confident lines that touch each other.
- At this step you will need foil or film, contact with which with a sponge or sponge will allow the boundaries between colors to blur. Before applying the gradient to your nails, it is also advisable to check the result on plain paper. Now you can finally transfer the pattern to your nails. If you have no skills in this matter, you need to start with several touches of one nail. In this case, the sponge moves a little to the side each time for a more interesting effect. A professional can handle multiple nails with just one touch.
- Remains of polish that gets on the skin around the nails should be removed before it dries completely. Here you will need the previously mentioned nail polish remover or corrector. In order not to remove the polish, you can stick stationery tape on your fingers before treating your nails with a sponge.
- At the very end, be sure to apply a top coat to seal the result.
There is one trick to this method - to get a gradient, just apply a base color to the nail, and a second color to the sponge, which will be printed on the free edge.
Using foil

This method is not too different from the first in its technique. Its difference is in applying varnishes to a sponge, because... in this case, the pattern is created first on the foil. A flat plastic surface is also perfect for this. The initial blurring of the boundaries occurs with the help of a toothpick, and the complete blurring occurs after the sponge is soaked in varnish.
With eyeshadow applicator
The technology of this method is also in many ways similar to the previous ones. An eyeshadow applicator works better here, but you can also use a regular sponge or sponge. The procedure is as follows:
- using a manicure set, the cuticle is removed or pushed back (in this case, an orange stick will do);
- nails are coated with a base product;
- after it dries, one of the selected gradient colors is applied;
- now a second color is applied to the applicator, which is carefully imprinted on the nails at a short distance from its base (the distance depends on the desired area and the number of colors);
- if the gradient consists of more than two colors, the previous action is repeated the required number of times;
- at the end, the remaining varnish is removed from the skin and a fixative is applied.

Using a brush
This method can be called the simplest, because... to create a beautiful manicure you only need a flat brush:
- the required colors of varnish are applied to the prepared nails in a thin layer;
- the brush is slightly moistened in the cleaner;
- immediately, before it dries, several movements are made along the nail in a direction that depends on the type of gradient;
- Now the nails need to dry, after which the procedure is repeated completely;
- At the end, a fixing agent must be applied.
After each shade, the brush should be wiped with a napkin, which can also be slightly moistened with clinser. In the case when a girl wants to create a gradient nail design on her own, but does not have the skills to work with such a tool, a fan brush will suit her. The procedure changes slightly:

- due to the fact that such a brush does not give a very smooth transition between colors, it is advisable to create a middle tone yourself by mixing the main shades on the foil;
- fully processed nails are covered with a base layer of varnish, which is the lightest of those chosen for the design;
- the nails need to be allowed to dry;
- With a brush damp from the cleaner, you need to make movements like a broom until the expected result is obtained;
- after the nails are dry, you can apply a second layer of varnish;
- The last step will also be to apply a top coat.
Gel polish
As already mentioned, such a manicure will last much longer. In addition, ordinary varnish tends to break off in small pieces and wear off along the free edge. The procedure for creating a gradient gel polish design is as follows:

- first, the cuticle is moved back, and the surface of the nail is slightly filed and polished;
- after removing the remaining nail dust, a degreaser is applied to the nail;
- hands are sent to an ultraviolet lamp to dry;
- Now the nails are coated with base gel polish, after which they polymerize;
- Next, you should remove the sticky layer, for which a lint-free napkin is suitable;
- gel polish of one color is applied to one half of the nail, and a second color to the other;
- take the first gel polish again and paint the smooth border between the colors with a thin brush;
- Now you can send your nails to dry again;
- a lint-free cloth is used again;
- All that remains is to apply the top fixing agent.
During polymerization, it is important to remember that holding your fingers under the light of an ultraviolet lamp for more than two minutes is undesirable.
Gradient Nail Design Ideas
As a result, we offer several examples with photos of gradient nail designs, for which we again recall its types.
Simple gradient.

Classical.

Vertical.

In French style.

With painting.

With sparkles.

Chaotic.

Linear.

Well-groomed nails with a beautiful and interesting design always attract attention. Today there are a great variety of nail design techniques.
Those who like to play with shades can choose techniques such as ombre manicure, gradient or dip dye. The idea of ombre nails is not new, but has not yet lost its popularity. This technique goes well with other equally effective design options. You can verify this by looking at the 2019 photo of the new product.
Ombre manicure 2019: fashion trends
The new season will allow every girl to stand out and emphasize her individuality. All stereotypes and templates have been erased. This is perfectly reflected by 2019 fashion trends photos:
Combined design
This is a great option for all occasions. It looks interesting and moderately laconic. You can combine contrasting shades, as well as the texture of the varnish coating. It can be glossy or matte.

Gradient manicure with rhinestones can be done both for a festive occasion and for everyday life. It all depends on the chosen pattern and the size of the rhinestones. You can make several color transitions. In this case, the manicure will be very impressive. Stylists do not recommend using a lot of shiny elements, as you risk making the manicure very vulgar.


Mixing contrasting shades of gel polishes
The ombre manicure technique allows for mixing contrasting shades, and in addition, in the 2019 season it is a real fashion bomb. Photos of the idea for such a bright, extraordinary fashionable manicure can be viewed on our website.


Delicate ombre manicure in pastel colors
Girls who prefer classics and minimalism can decorate their nails with an interesting, but at the same time laconic design, consisting of beige, peach, pink, blue, emerald, sand, cream, gray colors. A photo of an ombre manicure in classic light colors emphasizes all the tenderness and charm of this design.


Beautiful ombre manicure with a pattern
A great option for creating a light, airy look. A gradient pattern for summer can be made in cheerful shades. If you complement it with trendy geometric patterns or floral motifs, you can achieve an amazing result.


Ombre sand design
Not long ago, nail art masters began to use “velvet” sand for nail design, which allows you to create visual fluffiness. Using these two techniques together, you can create an amazingly beautiful design.


Another new product for diversifying design is the gradient. Very finely ground acrylic powder with the addition of micro-shine appeared. It is transparent, so after application the gradient will be clearly visible, but at the same time a beautiful shimmer will appear.


Beautiful ombre manicure with matte gel polish
This is a fashion trend for the new season 2019. The matte finish has not yet become boring and is of great interest to the fair sex. Matte ombre made in contrasting colors looks especially impressive.


Geometric ombre gradient
This design is not like a regular ombre. Rather, this is an innovation that appeared thanks to the popularity of geometric designs on nails. A geometric gradient can be made in the form of one wide stripe with a color transition or in the form of a pattern consisting of geometric shapes in shades close to each other.


How to do an ombre manicure at home?
Due to the fact that an incredible number of video lessons are posted on the Internet, many girls do without the help of nail technicians. So, how to make an ombre manicure at home with gel polish?
Ombre nail designs at home can be done in several ways. The most popular one is based on the use of water, foil and a sponge.

First you need to decide on the color scheme. This season, both pastel and rich, bright shades (red, black, blue, violet, green, purple) are popular.
Fashionable ombre manicure 2019 is best done using gel polishes. In this case, the stylish design will delight you for at least three weeks.
To work you will need:
- base coat;
- fixer(top);
- gel polishes;
- varnish remover;
- cotton pads and fatty cream for treating cuticles.
The initial stage of work involves preparing the nail plate
To do this, standard procedures are followed: the appropriate length and shape of the nails are selected, and this task is accomplished using a file. After which, using a special tool, the cuticle is removed.

Stages of design execution:
- Using a buff, the surface of the nails is treated, after which they need to be degreased.
- The base is applied (2-3 layers) and dried in a UV lamp.
- A background coating is applied to the nails. It is also dried in a lamp.
- Two shades of varnish are applied to the foil. Use a toothpick or needle to mark the boundaries.
- Use a sponge to blot the varnishes and smooth them over the nail.
- Excess varnish can be easily removed with a cotton swab.
- A finishing coat is applied and dried in a lamp.
Now there is a fashionable new product - an ombre brush! Using it to create a gradient is very quick and convenient. The cuticle area does not get dirty, no other materials are needed.
Ombre manicure with a brush is done in four stages :
- Base layer + background layer of gel polish;
- Applying a base shade to one half of the nail and a contrasting shade of gel polish to the other half (end-to-end);
- Shade the border with an ombre brush, then dry (repeat the procedure if necessary);
- Applying finishing varnish.

Video tutorial: How to make a gradient with a regular design brush?
The third way to quickly create ombre on all nails at once is to use an airbrush. However, this pleasure will cost you a lot.

How to make an ombre manicure at home with regular polish?
We figured out how to do an ombre manicure step by step using shellac, now we’ll look at the step-by-step process of how to do a beautiful ombre manicure using regular varnish. After all, not all girls have a UV lamp and gel polishes at home. And it’s easier to practice on regular varnishes. Our website contains step-by-step photos, with which you can study in detail the entire application process.
Standard procedures are carried out, when the nails are in order, you can begin the creative process.
- Nails should be covered with a light base.
- On a small piece of foil or polyethylene we apply two multi-colored stripes vertically or horizontally.
- The border is shaded using a brush or toothpick.
- Then, using a small piece of sponge, you need to carefully blur the resulting border. If the varnish gets on the skin, it can be removed with a cotton swab dipped in a special liquid.
- The result is fixed with a glossy or matte transparent coating.
The result should be an interesting and beautiful ombre manicure.
Ombre gel polish: video for beginners
Ombre nail designs in different colors
Ombre manicure can be done in various color combinations. Both nude shades and bright, contrasting colors look equally interesting.
Spring-summer ombre option
Manicure spring 2019 is associated with something gentle, unobtrusive and light. For spring design, you can use neutral shades such as white, pink, beige, cream, powder, soft blue, malachite. Manicure spring 2019 includes not only a delicate color palette, but also various decorations in the form of twigs, sparkles, and rhinestones. This glitter manicure will look spectacular and not boring at all.


Blue ombre manicure
This is the most popular option for the spring-summer season 2019. Most often it is combined with deep blue, white, soft pink, yellow, orange, lilac, black, slate, and light green.

Ombre manicure black and silver
This is the trend of the season. This combination is ideal under a business suit or a straight black dress with a strict silhouette. A red and black ombre manicure with gel polish looks no less impressive.

It is always relevant. Suitable for any look, occasion and occasion. Ombre manicure for short nails using the French technique looks neat, but experts recommend using this design on long or medium nails. In this case, it will look much more interesting.


Fashionable ombre manicure: a large collection of photos with ideas
An ombre manicure (photo of the idea below) is a great option to add an original design to your look. Look at the pictures on the Internet, and you will understand that ombre 2019 is a rather interesting and unpredictable nail design option. After all, this technique is not capricious and is combined with other methods of design, thanks to which the final result can turn out unrealistically beautiful.
2019 photos of new items will tell you how to combine colors correctly and what options are suitable for a particular occasion.


Take it to your wall:
Involves a smooth transition from light to dark shades.
It appeared in the fashion world several years ago and continues to hold its position, which is great, everyone loves the gradient on their nails and clothes.
Many fashionistas prefer this style because it allows you to combine as many colors as you like.
A gradient on nails with gel polish is a smooth transition from one color to another. You can imagine what nails with such a pattern look like: the colors penetrate each other, the boundary between them is blurred, a spectrum of shades is formed in the interval between the primary colors, as can be seen in the photo.
Ombre in French means shadow, but in the fashion world there are several synonyms for it: dégradé, balayage, etc. The word gradient is of Latin origin and is used specifically in relation to nail care.
There are several types of gradient, don’t worry, variety will allow you to be different from others and surprise others:
- Most often used classic, vertical manicure. The color transition occurs from top to bottom, it looks great on any hands.
- Horizontal manicure changes color from left to right, medium-length nails look especially attractive with this manicure.
- Beautiful manicure It happens when nails are painted with different varnishes, but the shades change from one finger to another; this manicure is suitable for short nails.
- French gradient manicure It looks like this: white varnish is applied to the edge of the nail, which turns transparent towards the back of the nail. Only graceful women with thin, long nails will suit this manicure.
How to make a gradient on nails with gel polish: basic methods
Many manicurists know how to create a gradient on nails with gel polish and are able to apply a beautiful and long-lasting manicure to your fingers, but you can try your hand at this yourself. In this case, you will need some knowledge about manicure techniques and basic equipment.
There are several ways to apply varnish with a gradient effect:
|
We take a sponge, select two colors, cover part of the surface of the sponge with them without a gap, then the sponge should be lightly pressed onto the nail several times, so that the color transition is smooth. If everything goes wrong the first time, we recommend practicing on paper. When the desired effect is achieved, remove excess varnish and apply a transparent layer on top. |
||
 |
We take the thinnest brush (zero), select 2 or 3 varnishes, the colors must, of course, be combined, apply them to the nail and begin to slowly rub them with horizontal movements until the desired effect appears; for durability, a transparent top should be applied on top of the gradient. |
|
 |
Pigments |
|
 |
Let's take a large sponge and a piece of aluminum foil, apply several strips of varnish of different colors without gaps on a piece of foil, use the sponge as a stamp, dip it in the varnish and transfer it to the nail. In this case, you can make both vertical and horizontal gradients. |
Before making a gradient on your nails with gel polish, lubricate your hands with a rich cream, this will make it much easier to remove droplets of varnish that accidentally get on the skin.
You can also prevent polish from getting on your skin by making a stencil of adhesive tape around your nail.
Gradient manicure with gel polish: step-by-step instructions for creating
 For a gradient manicure, it is not necessary to choose shades of the same color palette; for example, any combination of colors is possible: from blue-yellow to green-black, and to add zest to an evening look, you should use varnishes with glitter.
The smooth interweaving of rainbow colors will look extremely expressive; blanks of various combinations will greatly facilitate the choice before the manicure procedure itself.
The length of the nails is one of the deciding factors when choosing the number of colors and stripes. For example, long nails are more convenient to work with; more stripes can fit on them than on short nails. Combining two colors will give a short length elegance and neatness, because more colors will simply ruin the whole picture.
In manicure, you can use a gradient in both vertical and horizontal directions.
Gel polish is no less popular in the nail industry, and combining this trend with a gradient is the height of nail art. You can do a gradient manicure with gel polish at home. First, you should prepare the necessary accessories and materials for coating your nails with gel polish.
You will need: a dehydrator, a base, a primer, a topcoat, a UV lamp, gel polishes in two colors, a brush, and a set for painting nails.
 |
Step 1 |
|
 |
Step 2 |
|
 |
Step 3 |
|
 |
Step 4 |
|
 |
Step 5 |
|
 |
Step 6 |
|
 |
Step 7 |
|
 |
Step 8 |
A manicure using a gradient will take more time and effort than a regular manicure, but in return you will get a more durable and elegant nail design.
Nail design "Gradient" with gel polish using glitter
 Previously, a manicure made with various sparkles was appropriate only on the occasion of a holiday or a magnificent celebration, however, the world is changing, and “Gradient” nail design with glitter gel polish has found its niche in everyday life. Masters use both unpretentious shades and very bright ones; in addition, they use various shapes and sizes.
Many stores offer a selection of solid, crossed colors, and you can also purchase glitter with holographic patterns. Glitter can be either crumbly or included in the varnish itself. Many are sure that working with glitter is much easier, and the result looks more colorful and festive.
For stretching you need glitter of two different colors:
 |
Step 1 |
Gradient manicure (another name for it is ombre) is a nail design in which different shades of varnish smoothly flow from one to another.
Unfortunately, it is difficult to create such beauty on your own, but once you get the hang of it, you can perform simple versions of this manicure on your own. And our step-by-step instructions will help.
We prepare materials for work
We will be doing a gradient manicure at home, so we can do without professional products.
Prepare:
- Foam sponge. The one designed for washing dishes will do.
- New clear plastic bag, stationery file or foil.
- A few toothpicks.
- Base coat for varnish.
- Fixing coating.
- Tint varnishes.
- Nail polish remover, cotton pads, sticks or special pencils to remove excess polish.
For the first time, it is better to take two colors, since applying more shades requires honed skills. These can be two different but compatible colors or two shades of the same color. Chameleon polishes are very difficult to work with, so when creating a gradient manicure at home, you should avoid them.
Keep in mind that a gradient manicure requires a lot of polish.
Cut out small pieces from the sponge in advance - about one and a half centimeters wide and three to four centimeters long.

Preparing your nails
Before doing a gradient manicure, carefully treat your nails to give them a neat and well-groomed look. These are standard procedures: filing and polishing, removing cuticles, degreasing the surface with nail polish remover.
After this, apply the base and wait for it to dry. This can be either a special base varnish or some kind of colorless medicinal varnish (such as “Smart Enamel”).
Method one
Place a package (stationery file or foil) on the table. Apply the lightest polish to the entire surface of the nail.

While the layer is drying, make two blots of the selected varnishes on the surface of the bag or foil. The droplets must touch each other. Use a toothpick to blur the boundaries between them.
Apply the sponge to the color spot and immediately after that to the surface of the nail. Make sure that the arrangement of colors on the sponge matches the one you want on your nails.

Blend the color with light pressing movements. Repeat this step if necessary. Don't be afraid to stain the skin around your nail; any excess can be removed later.
Repeat the procedure for all nails.

Apply protective coating. You can use clear varnish with glitter.
After drying, clean the stained areas of the skin using a special pencil or a cotton pad soaked in nail polish remover.
Varnishes can be applied directly to the sponge. Don't skimp on the coloring material. Apply enough so that it can be well imprinted on the surface of the nail.
It is advisable to have several pieces of sponge in stock in case one begins to crumble during the painting process.
If a gradient manicure is performed using matte varnish, then there should not be any particular difficulties. If the varnish is glossy, it may become cloudy when you stretch it with a sponge. If this happens, you will have to cover the nail with several layers of a fixing coating.
Method two
The principle is the same, but instead of a sponge, an applicator (sponge) is used to apply eye shadow. The skin will get a little less dirty than using a regular piece of foam, and some people find it more convenient to blend the color using an applicator wand.
But in general, don’t be afraid to get dirty when doing a gradient manicure. The skin is easily cleaned with nail polish remover, but if you are too careful, you may not paint the entire surface of the nail, it will turn out ugly.
Method three
If you still dare to make more than two colors, you can apply the required number of shades to the sponge or proceed as follows.
- Apply the base color to the entire surface of the nail.
- After the first layer has dried, use a sponge to apply the second color from about the middle of the nail plate. Try to make the border between the colors a little blurry.
- Using another piece of sponge, apply a third coat to the outer edge of the nail, making sure the edge is blurred.
- Apply topcoat.
Method four
Suitable if you want to get a vertical gradient manicure.

- Apply two (or more) shades of polish to the nail at once in stripes so that the boundaries between them meet.
- Quickly, before the polish begins to dry, use a sponge to blur the boundaries between colors by lightly patting.
- Repeat steps 1 and 2 if necessary.
- Apply topcoat.
What problems may arise
If you don't get a smooth transition between colors, then perhaps you chose too contrasting shades. We'll have to find another combination. Or try applying several layers, letting each of them dry a little.
If bubbles appear after imprinting the sponge, use a finer-grained sponge. If this does not help, then after applying varnish to it, make prints first on foil or paper, and then on the nail.
If this does not work, then simply increase the number of layers of nail polish on the nail. Then the dots will become invisible.

Using gel polish for gradient manicure
A gradient manicure with shellac or gel polish looks more impressive and lasts much longer than using a conventional coating. The technique is similar, but if you do not have special equipment and cosmetics, then it is better to do this procedure in a salon.
A gradient manicure with gel polish is performed as follows:
- Nails are degreased with a dehydrator.
- An acid-free primer is applied. Then the base, which is baked for a minute under a UV lamp.
- A lighter gel polish is applied from the base of the nail to the middle. The remaining part is painted over with a dark shade. The joint line should be smooth.
- The border between colors is blurred with a thin paint brush or sponge.
- After erasing the boundaries, the nails on each hand are dried under a lamp for one and a half to two minutes.
- If it is necessary to obtain a more saturated shade, steps 3-5 are repeated.
- The painted legs are covered with fixing gel polish and dried again under the lamp.

Benefits of gradient manicure
A gradient manicure looks unusual, adds zest and is appropriate in any setting, provided the colors are chosen correctly. The coating can be done using both bright and pastel colors. For the same reason, manicure is suitable for women and girls of all ages.
Despite the rather complex technique, “smearing” the varnish is undoubtedly easier than painting flowers, patterns or letters with it. Once you learn how to paint your nails this way, you will be able to choose from a wide variety of options. After all, you can endlessly look for interesting color combinations, and every time the manicure will look new.
One of the most spectacular and incredibly beautiful techniques of fashionable nail design is ombre manicure. The soft transition of one shade to another gives the nails sophistication and tenderness. At the same time, the gradient manicure looks stylish and very attractive.
Fashionable ombre manicure 2019-2020 is content not only with classic variations of manicure with a gradient. It is always a search for new ideas and interpretations that become unique masterpieces of nail art.
You can experiment with different shades of the color palette, combine ombre manicure with designs and patterns, choose a glossy or matte finish. In any case, you will get a simple and at the same time unusual and elegant gradient manicure.
The incomparable ombre effect can be done on individual nails and the manicure can be complemented with rhinestones or a pattern; by the way, on a gradient basis they come out very bright and beautiful.
The bright new items of the newfangled ombre manicure 2019-2020, which you can see in our article and photo selection, will be a worthy alternative to an attractive nail design for all occasions. Moreover, you can create a fashionable manicure with a gradient at home.
Feel free to take as a basis any photo of a fashionable ombre manicure you like and go ahead and experiment. The most popular way to create an ombre effect on nails is using a porous sponge, which is soaked in shades and transferred to a plate.
To make your gradient manicure look perfect, choose a coating of the same texture for your design.
What a fashionable ombre manicure 2019-2020 could be in a modern design, let’s look at the latest trends and innovations in creating amazing gradient nail designs right now.
Classic gradient manicure - simple and elegant

Fashionable ombre manicure in the classic version involves a transition from a dark shade to a light one. The most striking example of such a manicure will be the traditional black and white gradient.
The classic gradient can be done in two manicure designs. In the first design, ombre is done on the plate itself, in the second, the transition from a dark color to a lighter tone changes from nail to nail. That is, each nail will be painted in a lighter tone from the previous one.

You can take any dark polish and gradually add droplets of white color to it the next time you apply it. In this style, the fashionable ombre manicure 2019-2020 looks very stylish and original.
A classic type of fashionable gradient manicure includes a French manicure with an ombre effect. A delicate pink or nude shade that smoothly turns into white towards the tip of the nail really resembles one, which many people like more than the traditional one, because such a gradient looks very gentle and romantic.
Play of shades in a fashionable manicure with an ombre effect

If you love unexpected and bold combinations of bright shades in manicure, the fashionable ombre technique gives you complete freedom to improvise. Trendy gradient manicure 2019-2020 can consist of the most unexpected color combinations.
In addition to the classic “light-dark” transition, the newfangled gradient manicure looks more original and chic in shades of different color palettes. A bold combination of blue and pink, yellow and green, red and black and any other color combinations form an incredibly beautiful gradient on the nails.

In addition, for a fashionable ombre manicure 2019-2020, you can select three or more shades. The application itself can also be very diverse.
Horizontal ombre manicure is the most popular, followed by vertical and diagonal gradient nail designs. Thanks to such combinations, your ombre manicure will always be fashionable and unsurpassed.
Fashionable ombre manicure 2019-2020 – linear and geometric gradient on nails

An amazing and unusual version of the fashionable ombre manicure 2019-2020 was the geometric and linear gradient on the nails. Such a design requires special skill, so it is better to entrust geometric ombre manicure to nail art professionals.
In this form, the gradient manicure looks stylish, discreet and very original. The most popular option in the form of honeycombs and stripes is created using a brush. For such an ombre manicure design, it is better to choose shades of the same color scheme.
An ideal tandem for such a gradient would be a single-color manicure. With linear ombre you can create more fashionable options. A special airbrush for nails and stencils are used for it.
New for the 2019-2020 season - marmalade ombre manicure

Surely you have already seen a photo of a beautiful gradient manicure with acrylic sand, which looks chic and elegant. This new 2019-2020 ombre manicure option is called a marmalade design.
Indeed, the appearance of the manicure resembles sugar sprinkles on colored marmalade. Only instead of sugar for nails they use transparent acrylic powder with micro-shine, which emphasizes the gradient rather than hiding it.
Manicurists love to complement a linear gradient with acrylic sand, offering clients creative ombre design options with stripes highlighted with glitter.
Spectacular gradient manicure with mirror rub

Rubbing will help give a fashionable ombre manicure 2019-2020 a metallic and mirror effect. Rubbed nail design today is among the main trends of the season, so its use in other types of manicure is very important.
A fashionable ombre manicure with rubbing looks complete and very stylish. Therefore, rhinestones and patterns are rarely used in the design of such a manicure.
Great nail design ideas with a gradient in combination with other popular techniques allow you to choose a truly unique and extraordinary nail design. The ombre effect looks beautiful on nails of any length and shape, and the gradient manicure itself never goes unnoticed.
The best examples and ideas of fashionable ombre manicure 2019-2020 – bright new items and trends in incredibly beautiful design options