Wicker items have been popular at all times. Only earlier they used birch bark, wicker, and willow twigs, but now they are replaced with ordinary newspaper, magazine and office sheets. Such products are coated with stain and varnish, thereby creating an imitation of the structure of wood.
This is the popular Master class for beginners will be devoted to the basics of this craft, since the information on it is scattered in pieces from various sources, and all the available lessons on weaving crafts are designed for people with basic knowledge.
Material
For weaving you will need paper, knitting needles, paint, stain, varnish, cardboard, glue. Newspapers, magazines, office and fax paper are suitable for the work. Softer tubes are made from newspaper, and thinner, elastic tubes are made from magazines and office paper.
Please note: from one newspaper spread you should get four tubes (the width of the segment is no more than 7-12 centimeters). Cut narrow strips 2-3 centimeters wide from office paper.
Experiment with different types material, then you will get an extraordinary paper weave. You can create a wide variety of crafts using this technique - from trays and panels to animal figurines and dishes.
Craftsmen use knitting needles of different thicknesses. The selection depends on the craft: for example, for a newspaper you need a knitting needle No. 2-3, and for office paper - a stocking needle. For the base of the craft, twist thick tubes, and for the braid - soft ones.
Choose a water-based paint or stain (alcohol-based paint dries quickly, but makes the tube brittle). Thin the paint with PVA glue (2:1 or 3:1). Either the product is painted after work, or the blanks are painted before the creative process begins. But the finished craft is always coated with glue and left to dry. Only at the last stage is it coated with varnish. Cardboard is used to create a finished bottom or container the desired shape.
Paper weaving: master class for beginners
How to prepare the tubes:
The tubes should not be soft or hard; ideally, a “medium” paper weave is obtained. There are a lot of video tutorials on twisting for beginners, but without practice they are useless. For example, for blinds and panels, craftsmen specially twist hard sticks; for decorative miniature objects, they prepare thin tubes, where the width of the strip can be less than the traditional seven centimeters. You need to experiment to find your own thickness of tubes.
Please note that when cutting with a knife, nicks are formed that interfere with proper twisting. Therefore, before work, carry out research work: try cutting two sheets of newspaper into transverse and longitudinal strips, determining which method produces fewer notches. It is from the segment with smaller notches that the tube rolls without problems.
Paper weaving: step-by-step instructions for twisting and painting
When twisting sticks, one end should be wider and the other narrower. So, when weaving crafts, a build-up occurs due to insertion, that is, a narrow corner is inserted into a wide one. If the ends are the same, then one edge is flattened, compressed and inserted.
Many artists do without glue when doing extensions; they simply insert a stick three centimeters deep into another. Other pros drop a drop of glue into a tube with a wide end, and push it three centimeters with a narrow stick.
There is also a secret how to make the twisting go faster and the weaving to be soft. Before work, newspaper tubes are laid out in a row and rolled over them with a rolling pin. It turns out that each craftsman has his own paper weaving.

Master class for beginners on painting tubes
- First way. Paint the sheets before work, then dry them, cut them into strips and roll them into tubes.
- Second way. Twist the sticks, then paint each one individually with a brush. Suitable for products that require an unusual pattern.
- Third way. You make a craft, then decorate it using weaving or randomly with a brush.
Mass painting methods

For paint you can use water emulsion, pigments, for eggs. If the color turns out to be unsuccessful, continue weaving from paper anyway. A basket, for example, can have any color, just complicate the weaving or resort to decoupage.
Secrets for working with straws
Please note that the color becomes lighter as it dries. By combining with other sticks, you create the desired pattern or paint the finished product with the desired shade. Do not dry until completely dry. Wrap the slightly damp sticks in a bag so that both ends are outside. In winter they can be stored in the cold.
When working, the sticks must be flexible, but after painting they become hard and brittle. Ideally, paper weaving should begin immediately after painting the tubes. A basket, boxes, and dishes can be made from dry painted tubes if, before work, you spray the middle of the sticks with plain water using a sprayer on all sides.

Wrap them in a wet cloth (ends outside) or put them in a bag. Prepare a large number of tubes at once, so as not to be distracted by twisting while working.
When weaving, an even and odd number of tubes are taken. It is in the side where the odd number of sticks is where the work begins. The “odd” tube entwines all the others. As soon as its length ends, grow a new stick.
Types of weaving
We’ve finished with the material preparations, now let’s look at paper weaving. A master class for beginners on its technique is given below.
- Simple ordinary weaving. With a braiding tube, like a snake, go around each base stick. That is, it either covers the base or hides behind it. If you need to go back, the weaving goes the same way, but in the opposite direction.
- Simple weaving in rows. The pattern changes after several rows. That is, take one stick and go through a simple weave. The next tube is laid in the same way as the first. Continue this way several times. Then you shift the pattern, that is, where the base was braided, it remains free, and the next one is braided the same number of times as in the first pattern.
- Simple diagonal weave. Each tube starts with a new base stick diagonally. The result is an oblique (oblique) pattern.
- Simple diagonal weaving in rows. Just as in a horizontal pattern, you weave with several sticks, and new circle move according to the drawing.
Types of weaving
We continue to look at paper weaving (master class on creating patterns):

Weaving techniques and secrets
To keep any pattern, it is braided with a rope or a braid. Let's take a closer look at the “protective” paper weaving (we will describe it step by step using the example of a basket).

Please note that weaving the tubes starts from the thick ends from left to right. To get the desired shape, the stands are pinched to the desired object (vase, bucket, box, etc.). The finished product is generously smeared with PVA glue (with or without paint), “put on” the item of the desired shape, and dried. Then, when painted and varnished, the product made from tubes will be beautiful and durable.
Making a basket
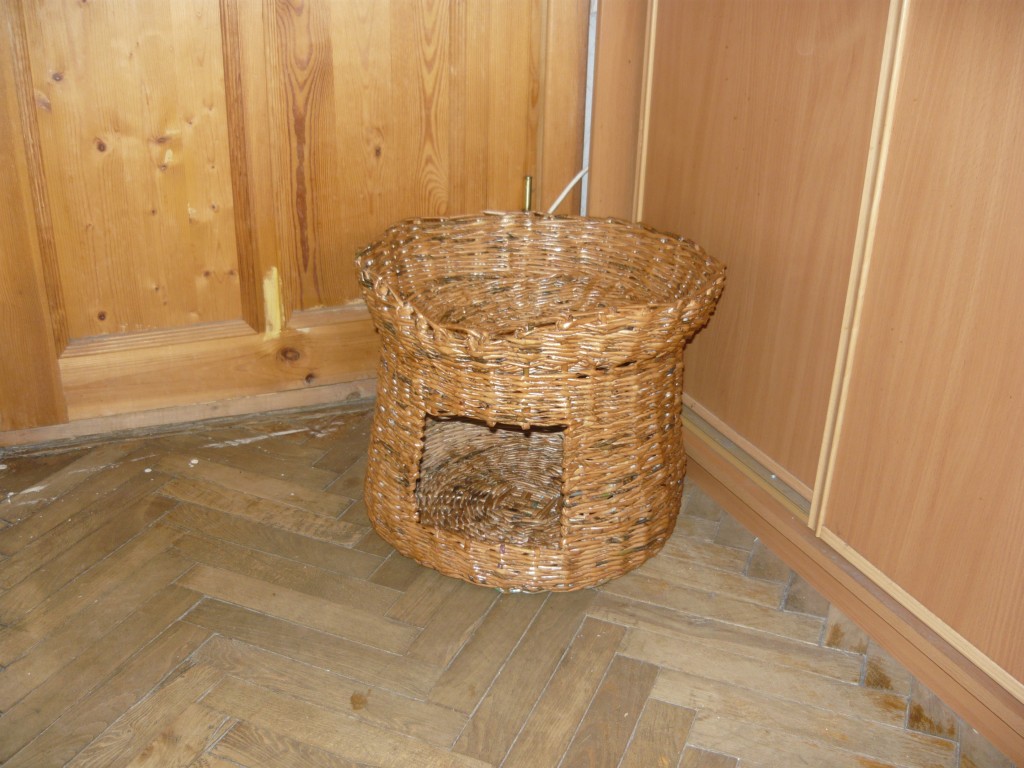
For beginners, it’s better to start with something simple (for example, blinds, frames, panels) to train your hand in twisting the tubes and weaving them together. Then you can move on to complex paper weaving (horseshoe, heart, box, bell). Consider a master class on weaving a simple basket without a lid or handle.
To save labor on weaving the basket, use a cardboard bottom. To do this, take an object of the desired shape and trace the bottom on thick cardboard. Cut out two pieces. Decorate them right away (cover them with wallpaper, paint them or use decoupage).
Attach the bottom half along the edge. Now glue the newspaper tubes onto it. The distance between them should not be more than 2-3 centimeters. This is the basic rule of such needlework (meaning paper weaving).
A stand for pens, a photo frame, a hat - any craft should have a distance between the posts of no more than three centimeters. The fact is that a larger gap between them leads to looseness and fragility of the product.
Continuation of basket weaving
Next, apply PVA glue to the bottom with the tubes, cover it with the second bottom, place a weight on top and leave it overnight. Now go through two rows with a “rope”, a simple interweaving of the racks. After this, place the form on the bottom along which you will weave, with a weight (the weight is needed to fix the bottom when weaving). If you immediately start weaving the walls from the cardboard bottom, you will end up with holes in the basket that will need to be decorated.
Raise the tubes up and continue working until you reach the desired height. Next, braid it up or braid it separately, gluing it to the base. The same principle is used to weave paper boxes with lids.
There is another way to weave a rectangular bottom using ribbons and newspaper tubes. This look is reminiscent of working with a rug made of paper strips. Only in in this case take not one tube, but two or three for one unit. For example, there are four groups of sticks below. Then place three sticks crosswise on them.

Place four groups of tubes on top so that their ends are between the bottom ones. Now you braid all the rows with ribbon or a soft stick. Then again lay a transverse group of sticks, braiding them with tape. Using colored tubes, you can get an original pattern.
The bottom in this case turns out to be voluminous, as if double. Then you lift all the joints and braid them with a “rope”, smoothly moving onto the walls of the product. For trays, this is the optimal paper weave. Step by step photo The weaving of a square basket clearly shows the essence of the work. Prepare some straws and get creative.
If you have never worked with newspaper tubes, start with simple types. For example, blinds. To do this, simply twist the thick sticks along the length of one half of the window. Tie each stick with a double knot on both sides, retreating 3-4 centimeters from the edges. While working, coat the “seams” with glue.
At the top you attach a curtain ring (the blinds will be attached to them) and a loop where you can put a rolled roll if necessary. Paint the finished product and varnish it. Now you can try simple weaving on small souvenirs and move on to baskets.
Some experts condescendingly claim that handicrafts are something bordering on art. Looking at the masterpieces of our craftswomen, we can say with confidence that such things have a place in an art gallery and this is precisely true creativity. Here there is a flight of fancy, exquisite taste and the most complex technique of execution. Today we will look at weaving from newspaper tubes step by step. New ideas for beginning needlewomen, basic techniques and useful tips- in this material.

In the finished work it will be difficult to paint all the weaves with high quality.
You should not use watercolors for painting. It gives a dull color. Gouache or acrylic paint is more suitable.
It is worth considering that acrylic cracks after drying, so if you decide to paint with acrylic, treat the finished product. To add color to the work, some craftsmen use spray paint, water-based composition and food coloring. For shine finished works

covered with several layers of varnish. In addition to its decorative purpose, varnish also serves as a hardener.
Weaving methods
- Spiral weaving. A simple option that even a child can master. The tubes are successively built up and threaded through the base in a continuous manner.
- Layer weaving. Two tubes sequentially go around the posts so that one passes in front of it, and the other behind it. This principle is used on cotton fabrics.
- Rope technique. The strips are intertwined with the posts on the product and with each other.
Mastering these basic techniques will lay the foundation for further experiments.

For more information about weaving techniques from newspaper tubes, see the video at the end of the article.
Related article:
In the article we will look in detail at the technology of making flowers from paper with a photograph of each step, as well as other original crafts that even a beginner can make.
Weaving from newspaper tubes for beginners step by step: different products
After mastering the basic techniques, you can begin your first job. It's better if it's a basket. This simple option will help you master the technology, and the finished product will certainly be useful in the household.
How to make a basket from newspaper tubes step by step
To make a basket you will need:
- newspaper tubes;
- base - pot or jar;
- for the bottom;
- acrylic paint;
Sequence of weaving a basket from newspaper tubes photo:


- Two circles are cut out of cardboard. Newspaper tubes for the stands are glued to one of them at equal distances. The structure is closed from above with a second circle. The tubes - racks are bent upward. A form is inserted inside the frame. The top of the posts can be secured with a wide elastic band. The frame is ready.
- We weave the walls. To do this, we take a tube, fix its edge at the base of one of the racks and begin to weave it around the racks. When the length of the tube does not allow you to continue weaving, you need to increase the newspaper vine. To do this, the ends need to be inserted into each other, after dropping glue at the junction.
Important! When you twist the tubes, one end is narrower than the other. Accordingly, when connecting, the narrow tip is inserted into a wide hole.
- To decorate the edges of the basket, the racks are sequentially intertwined with the main vine and secured with inside using glue.
- The last stage of work is decorating the product. To do this, the basket is completely covered acrylic paint and two layers of acrylic varnish. Then you can decorate the basket with ribbons, beads, braid and other accessories.
Advice! The base of the basket can be made not from cardboard, but from tubes. To do this, a flat base is woven, the axes of which become racks.
In the same sequence, you can make a vase from newspaper tubes:
Secrets of weaving a rooster from newspaper tubes
The rooster is not only a symbol of the year, but also a talisman for the home. In Russian culture, the symbol of the rooster signifies wealth and prosperity in the family.
To weave a talisman you will only need newspaper tubes painted in bright colors.
- It is necessary to create a basis. For strength, you can thread a wire inside the newspaper tube.
- The cockerel's body, head, beak and beard are successively entwined with colored tubes.
- The tail and paws are done last. If the weave is tight enough, the cockerel can be placed on its feet. For additional strength, it is better to coat the product with varnish.
Photo of a cockerel step by step (crafts from newspaper tubes for beginners).
Almost all of us have unnecessary newspapers and various magazines and other printed paper products. Many people try, of course, to get rid of all this, but they shouldn’t do this.
The fact is that from old newspapers you can make various crafts with your own hands, you can make various things necessary in the house or decorate the interior of your room well.

The newspaper is very easy to process and you don’t need to make any Herculean efforts to make any useful thing. Therefore, to make crafts from newspapers with your own hands, you can involve children as assistants, who will have a great desire and interest in doing something interesting and useful.
On this moment One of the most interesting and popular areas of DIY newspaper crafts is considered to be weaving crafts from newspaper tubes.

It should be noted that this task is not as easy as it might seem at first glance. Here you need to clearly understand all the subtleties and nuances of weaving, and if you study all this well, then you can do a lot of different and fun things that will appeal to both children and adults.

So, for example, you can make a variety of decorative boxes, caskets, baskets, vases and decorative saucers, in general, for anything that your imagination allows.
This article also presents many bright and colorful photos of crafts made from newspaper tubes.

However, before starting the creative process, it is necessary to prepare the source material from which the weaving process will begin.

How to make a vine from newspaper?
Many wicker elements can be combined very well with the interior of almost any room, so most owners of country or private houses would be especially happy to decorate their premises in this style.
However, the vine that is used for weaving can cost significant financial costs, but in this case you can turn your attention to cheaper and more accessible material - these are ordinary old newspapers, from which you can make wicker crafts, while the cost of the outlay will be minimal.

So, before you start, you need to make a large number of blanks, from which some kind of work will later be made. interesting craft. Therefore, first the newspaper must be cut crosswise into strips of the same size, after which we take a knitting needle and wind a newspaper strip onto it, resulting in a thin and beautiful tube, and so on until a large number of blanks are collected.

Souvenir basket made from newspaper
One of the most basic crafts made from newspaper tubes is a rectangular or square basket. This design is not particularly difficult; almost anyone can do it.

To make this product you will have to use a rectangular or square piece of cardboard, you will also need glue and scissors.

So, several tubes need to be glued onto the prepared cardboard form, and the distance between them should not exceed more than 2 cm.

Next, you need to bend each tube upward at the edge of the cardboard, but you need to do this so that the cardboard form is at the bottom and the tubes protrude upward. After which the base of the frame is ready and you can start weaving.

The weaving itself looks like this: from the very bottom horizontally we install the workpiece between the vertical elements and so on until the very top. If the tube runs out, then a new tube is put on its tip, pre-lubricated with glue, and we continue the weaving process further.

Note!

Upon reaching the required height, everything that is unnecessary needs to be firmly fastened somewhere, and glued somewhere well. For a longer service life of the product, it is coated with a special varnish.

Thus, from ordinary newspaper tubes you can make a rather interesting and beautiful basket, which will certainly be useful in the house.

At the same time, when you gain experience and skills in the weaving process, you can make new crafts from newspaper tubes, more complex and simple in shape.

In this case, you can use tubes to make almost any thing that may be needed in the house, for example, a wall shelf for storing small and light items or souvenirs.
Children's crafts
Very funny and exciting activity with paper you can also find for kids. In this case, we will talk about an interesting style of working with paper like papier-mâché.

This activity will not leave any child indifferent, and the child will learn certain subtleties of working with paper, scissors and glue. And most importantly, the child will like it and it will be educational.
Note!


So, first you need to take main element when creating paper crafts, this is a plate that will be the basis of the future product.

The plate itself is pre-lubricated with Vaseline, then small pieces of a white napkin soaked in water are placed on it; this process must be done until the napkin covers the entire plate, only after that it is recommended to use newspaper.

The newspaper also needs to be torn into small pieces with a diameter of 3-4 cm, but no more.

All pieces of newspaper soaked in water must be placed on the top layer of a napkin; this operation must be done in several layers; it is recommended to carry out no more than 7 layers.

After each layer, it is necessary to smooth the entire surface with a brush to evenly distribute the newspaper pieces. The last layer is applied with a white napkin, after which everything must be smoothed and leveled again with a brush, and only then the product must be left to dry for one or two days.
Note!


After complete drying, the product can be removed from the mold. It is clear that during the process there could be unevenness along the edges, but this can be carefully corrected with scissors.

And the finished product can be painted in different colors, or apply some kind of design, and finally, a thin layer of transparent varnish can be applied to the finished papier-mâché style plate.

The result will be an interesting and original craft with your own hands from newspapers, which can be installed in the most visible place.

Picture from magazines
Almost every home has old illustrated magazines; some people get rid of them by throwing them in the trash, while others store them and take them to a waste paper collection point.

But you shouldn’t rush into this, as you can make paper crafts from such magazines. In this case, the only thing that may be required is to cut out various pictures from a magazine and paste them on a piece of paper, resulting in a simple picture that is filled with a certain meaning.

Photos of crafts made from newspaper tubes


We will send the material to you by e-mail
Handicrafts are a hobby that will never become old-fashioned. Appears new technology and gadgets, we spend more and more hours at the computer, but we still want to do something with our hands. Create beautiful products Weaving from newspaper tubes will help you create unique souvenirs. New ideas in this technique appear constantly. Let's look at the features of making crafts and step-by-step instructions for several new products.
Basket made using this technique
The weaving technique arose a long time ago and was used natural materials, in the form of a vine or straw. If our ancestors had not mastered weaving, bast shoes, baskets and other necessary things in everyday life would not have appeared.
Now there is no need to make shoes or dishes yourself, and souvenirs self made are gaining popularity. They even try to make the symbols of the year themselves in order to give them as gifts. dear person. Handicrafts have no age; people are interested in them from early years and until old age. The vines and straw were replaced with improvised materials. Use old newspapers, painted in different colors and rolled into tubes.
Weaving from newspaper tubes, new ideas for which appear constantly, is based on several basic manufacturing options:
- simple weaving;
- layer-by-layer;
- openwork;
- square;
- string;
- by bending.
To understand how to create a real work of art from a simple newspaper, let’s look at the basic patterns and learn how to make the tubes themselves.
Table 1. How to make tubes from newspapers
| What need to do | Image |
|---|---|
| Gather materials for work: newsprint paper with a density of 60-65 g/sq.m; magazines, notebooks, cash register tape and newspapers are suitable. Glue, for example, PVA. If you want to make tubes to match the color of wood, then use stain (paint) or a mixture of primer and color. Varnish, scissors, knitting needles (diameter 1.5 - 4.5 mm), spray bottle (needed for softening), clothespins (for fastening) and an awl. |  |
| The newspaper should be cut along the long side into several pieces. The extreme options produce white tubes, and the rest can be painted. |  |
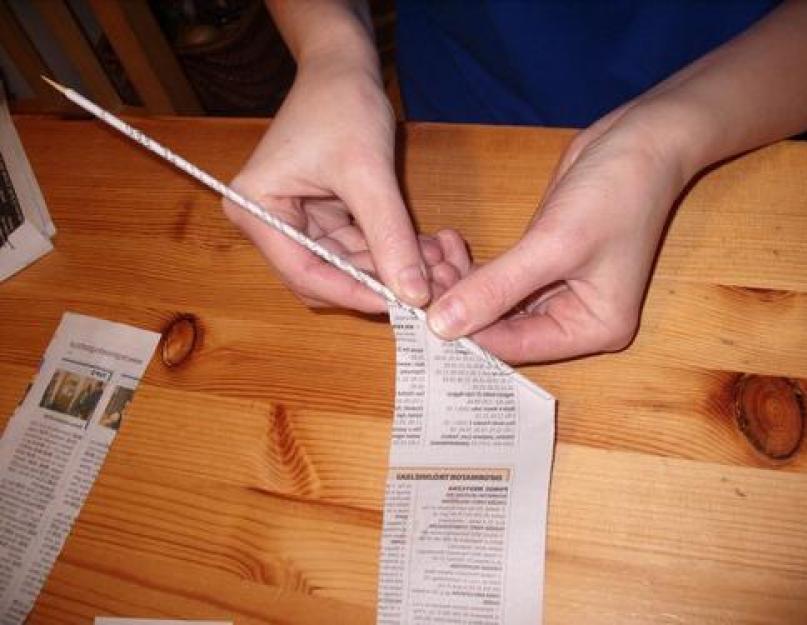
| We twist the elements on the table so that the surface is rough, it will be easier to twist. Place the knitting needle on one side of the paper at an angle of 30 degrees. |  |
| Press the corner and gradually twist the workpiece, holding the open edge with your left hand. |  |
| Apply glue to the remaining small edge and seal it. If you did it correctly, then on one side it will be narrower than on the other. |  |
| If you need to build them up, just insert one into the other and add a little glue. All that remains is to paint the blanks and that’s it. |  |
When everything is ready, you can start weaving newspaper tubes using new ideas. If you don’t know how to do this, we suggest you master the basic techniques using the example of several instructions and video material:
Weaving from newspaper tubes for beginners step by step with photo examples
With help simple weaving make a beautiful basket, picture or photo frame. Now that we've learned how to make tubes, let's move on to a master class on making crafts from newspaper tubes for beginners step by step.
Table 2. Master class on making crafts from newspaper tubes for beginners step by step
| Sequence of actions to complete the work | Photo examples |
|---|---|
| Having made multi-colored blanks, you need to make a frame for the bottom. To do this, you can trace a three-liter jar on cardboard and cut out a circle. If you need a lid, then two circles. |  |
| When preparing the tubes for the frame, you need to bend one edge by 3 cm. Then glue these edges along one of the circles at the same distance from each other, you will get a kind of flower. You can first put dots around the circle with a pencil for convenience. |  |
| Turn the product over and lift the glued elements, securing them with an elastic band for convenience. |  |
| Always use the same newspaper ribbon for weaving, braiding the remaining elements. Take it separately, flatten the ends, and glue it to the bottom. |  |
| Moving in a circle and passing the tube, first in front, then behind the others. Having completed one row, move on to the next. We continue to move up. When the newspaper strip comes to an end, lengthen it. |  |
| When you have weaved the desired height of the product, cut off the last piece and bring the edge inward. It must be secured with glue. |  |
| All that remains is to paint the product, if you did not use colored blanks right away. You can additionally weave a handle or add ribbon bows. |  |

To understand everything, it will be useful for novice needlewomen to watch video material on the topic:
Weaving from newspaper tubes: new ideas with photos and instructions
It is better for beginning craftswomen to practice longer simple models, gradually mastering new ways of connecting tubes. And for those who know how to weave and know all the features of the technique, you can try complex weaving of a basket from newspaper tubes, photos of several interesting options presented below:


Related article:
DIY stencils for decor: templates and techniques for making them. In this article we will look at the secrets of creating and using templates, as well as examples of decorating walls, mirrors and furniture.
Master class “Cockerel”
One of the most common images for reproduction among all areas of needlework is the symbol of the year. Consider a master class on weaving a rooster from newspaper tubes.
Table 3. Master class “Cockerel”
| The procedure for completing the craft | Photo example |
|---|---|
| To work you will need 10 tubes of red and 14 yellow color. Use strips 8 cm wide and 30 cm long. Use a 2 mm knitting needle as a base. You will also need PVA glue and stain for painting tubes in the colors “Larch” and “Mahogany”. |  |
| Make an outline (pattern or base) of the weave from red and yellow stripes (green in the picture is yellow in real life). |  |
| Take a yellow tube, secure it near the comb and make curls around the folds. In conclusion, the “eight”. |  |
| Make a beak and beard, then go down the neck, performing figure eights. |  |
| Having reached the middle of the body, use a red tube to make the legs. Then, continue to the tail, where you need to make two red feathers. |  |
| Braid the tail to the end, then separate the beak and paws. |  |
| The wings are woven separately from a red tube, a tail is attached, with which they are attached to the craft. The end result is very nice. |  |
The rooster is the symbol of 2017, however, not only this kind of crafts are common among craftswomen, but also others, photos of which are presented below:


All women in the world are trying to create a cozy nest from their home. IN modern world, you can buy a lot of little things to decorate your apartment. But now more and more representatives of the fair sex use the advice of our ancestors (wickerwork) to decorate their homes. The most chic items are considered to be products made from wood wicker, which is prepared in advance. This is a labor-intensive and time-consuming process; not every tree branch is suitable for weaving. Proper harvesting of the vine, soaking and drying is required. The most interesting method has been invented and is easier to make, simply by replacing the twigs with newspaper. Therefore, today you have the opportunity to learn how to weave from newspaper tubes for beginners, we will tell you everything step by step lessons skills, and we will teach everyone who wants to master this technique. And after several trial products, it will be very easy to create your own unique masterpiece!
How to properly prepare paper vine
The first stage of work, selection required material. You can work with regular blank paper, but since such paper is quite thick, it is difficult to work with. It's great if you know where to find the paper that printing houses use. As long as it is clean, it is easy to work with in terms of painting the product. But, if not, then we use regular newspaper in huge quantities. Using a utility knife or razor, cut the newspaper into wide strips, about 10 cm each, but no more. Weaving products is much more convenient and easier if the newspaper is cut into long strips.
We take one strip and place it near us; we place a thin, long metal object at the sharp corner. This could be a knitting needle or a bicycle spoke. We wind the strip onto this knitting needle, quite tightly.
Don't be alarmed if one end is thicker, it happens. But still, keep an eye on the thickness; the difference should be minimal. To ensure that the tube has a shape and does not unwind, wet the edge of the strip and secure the corner. This method requires winding about 50 tubes. How many of them you will need directly depends on how complex the product will be and what size it will be.
Before continuing work, you need to decide whether you will paint the woven product. Or paint the sticks first and then weave.
It is worth remembering that you need to select the appropriate varnish. If this is not done, the sticks will become brittle and harsh, the whole appearance will be spoiled. Most the best option, an acrylic varnish that is used for artistic purposes.
A basket made of tubes looks original, on which the text is clearly visible, with a one-color or two-tone coloring. This is a great option for a floor box, photo frame, or small change chest. If the product is not complex, you can paint it at the end of the work.
Weaving the bottom of the product
The bottom may be completely different shapes: square, rectangular, round. Let's start experimenting with a vase with a solid bottom. Prepare fairly thick paper, cardboard will do, and cut out 2 circles from it. You will need exactly two, since the ends of the tubes from future racks will be hidden between them. We take the first circle and make marks with a pencil, there will be fastening of the racks.
If you decide to weave a vase, then the distance between the posts can be quite wide. There is a type of weaving (oblique) where you are allowed to work on a small number of stacks. After this, glue the ends to the marks and immediately close with the second circle. In a similar way, the bottom is made into a square shape if you decide to make it solid. But the bottom looks much more interesting if it is wicker. From this bottom the work of weaving a box or basket begins. To do this, we cross some tubes, for example 5 and 7. We take one tube and start weaving from the center, moving in a circle, bypassing the main sticks either from above or from below.
After the tube ends, we build up the next one. The technology of this process is described below. This creates a circle of the required diameter.
A square-shaped bottom is rarely found in wicker form.
How to grow tubes and weaving
Vases are usually woven in a high shape; to obtain such a product, the paper vine has to be extended. If the tubes are connected correctly, the work process will be much easier. And the product itself will look much more attractive. Earlier in the text there was a description of how a paper vine has different sized ends. This is very convenient for an inconspicuous connection. To do this, you need to insert the thick end of one stick, the thin end of the other and carefully twist it. For a good connection of the joints, it is necessary to coat the thin end with glue. This transition is much more aesthetically pleasing and completely invisible when the product is painted.
Consider a simple weave made from newspapers, one strip. We attach a stick to the prepared bottom, next to any of the racks. Prepare suitable shape for braiding. As an option, a can or a bottle, if you want to weave a basket, then a box will do for weaving. Next, lift all the racks to the top and secure them with something, a clothespin would be good for this. We braid the racks with the previously secured vine. If you want to weave a basket with two sticks, then the weaving technique is the same.
It is more difficult and time-consuming to braid in rope style; for this purpose, they are braided with two tubes. They are placed on different sides of the rack, and then intertwined between the racks. Weaving from newspaper tubes made using this technique looks very beautiful, and the basket will be durable.
An interesting way of linear weaving, weaving obliquely (in a spiral). This way perfect option for weaving vases or glasses, in this weaving only stands are used, they are intertwined with each other and slightly shifted.
All main types of weaving are solid, each new row this is a continuation of the previous one. If the product has a lid, then its weaving is no different from the main craft, only the height is lower.
When the entire process of making a craft is completed, it must be painted. To do this, you can use a brush or a spray can, if you wish, you can decorate with patterns. What will the patterns be made of (from satin ribbons, embroidery or beads) and which ones, imagination will help with this. The last step in the work will be to coat the craft with varnish.
What is woven from paper vines?
Many people think that you can’t make many products of different modifications this way. And in the process of mastering this technique, they realize that they are making mistakes. They say “appetite comes with eating” and so it is here. When everything has been studied, all the work is completely clear, then your own imagination wakes up to come up with your own original crafts.
To weave a basket from newspaper tubes, weave the shape using regular weaving. Then weave a pair of tubes from opposite sides, which is the basis for future handles.
Weaving from newspaper tubes for beginners should be mastered with something simple: cups, coasters, candy dishes. Next, you will be able to create more difficult ones, such as a laundry basket, it will significantly big size and the frame must be strong enough.
You can make a chest for sewing supplies, its complexity lies in the weaving of the internal partitions. The most common wicker product is a vase. To make such a product original, make the edge openwork.
Products made from newspaper wicker are easy to use thanks to their simple technique; anyone can learn how to make them. And after looking at examples of such works at least once, you will definitely want to create such beauty at home.
Such weaving from newspapers for beginners simply cannot leave indifferent all those who have a craving for beauty. And this will become another one of your hobbies, and maybe your only one!
Weaving from newspaper tubes video lessons for beginners
Also, to visually familiarize yourself with the process of weaving from newspaper tubes for beginners, we recommend studying several videos from experienced designers and craftsmen. These reviews will talk in detail about the technology as well as visual examples of finished products.
Video: Lesson on rolling tubes from newspapers - secrets and nuances
Video: How to weave a basket with a rectangular bottom
Video: A basket of magazine tubes for beginners.
Video: Basket made of newspaper tubes for beginners
Video: Weaving a heart basket from newspapers
Turn your ideas into reality, and you will succeed, we wish you success in your endeavors!
Below we have put together a gallery of photo ideas for weaving from newspaper tubes that will help you customize and choose exactly what you like. We offer more than 50 photo options: