In a festive interior, these decorations look bright, extraordinary and even fabulous, creating a solemn, unique atmosphere, emphasizing the color and style of the room. The undeniable advantage of this type of jewelry is that they are easily and relatively quickly made, require a minimum of funds and effort from their creator, come in different types, shapes and sizes and can be made from any paper - even from ordinary napkins. At the same time, a hall decorated with garlands, hearts and pom-pom balls will always look elegant and original.
Pompoms can not only be hung in the form of bright garland balls, they are successfully used to make panels for photo shoots, zone space, make numbers, flowers and other crafts and compositions, and in this article we will analyze in detail how to make different types of pompoms for decorating your holiday .
The main thing in the article
DIY paper pom-poms: a step-by-step guide with a photo
Traditionally, to make a pom-pom with your own hands, you need a minimum set of tools:
The technology for making pom-poms is almost always identical.

Do-it-yourself corrugated paper pompoms: a master class with a photo
 Corrugated paper pompoms look especially elegant, because it itself has a wrinkled texture. Therefore, decorative balls from it seem even more fluffy and voluminous.
For the manufacture of pompoms, it is better to choose a corrugation of medium density, since too thin can break through during the manufacturing process, and too thick will look rough, it will be difficult to jam it, forming a pompom out of it.
The pom-pom manufacturing scheme remains the same as in the previous paragraph.

DIY napkin pom-poms
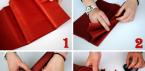
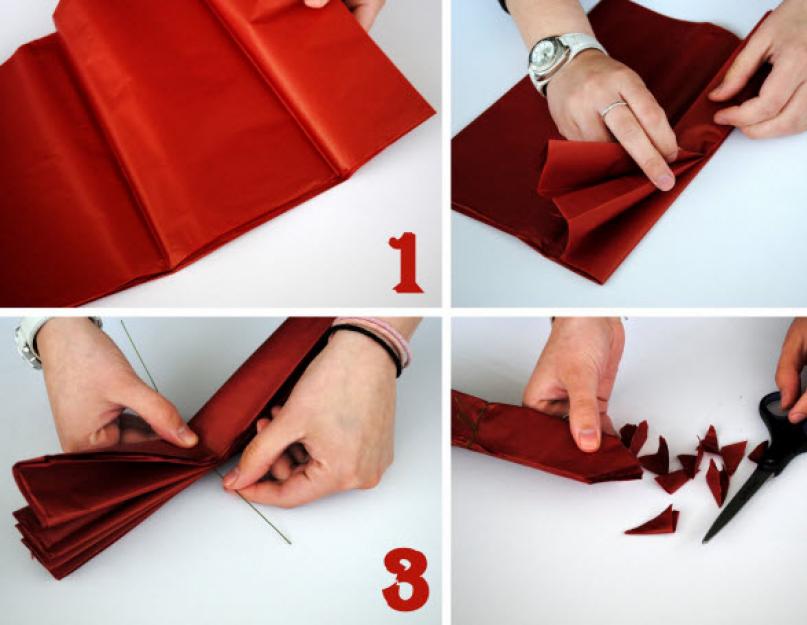
Even napkins are suitable for making pompoms; moreover, from this decorative balls available for each material, the most delicate and airy ones are obtained. Now you can buy napkins of any color, density and texture. Making pompoms from napkins is the easiest and fastest way, because this is a ready-made material where you don’t need to measure and cut anything - napkins already have a standard size and square shape. The scheme for making pompoms from napkins is simple: 
- We take 10 napkins, put them one on top of the other.
- We turn into an accordion, trying to keep the same width of the bends.
- We find the middle of the accordion and tie it with a colorless fishing line or thread to match the napkins.
- Round off the edges with scissors. If you see that the edges are not rounded enough, trim them further by spreading the fan a little.
- Gently straighten each napkin on both sides of our accordion. It turns out a fluffy and delicate pompom.
You can make your napkin pom-poms even more elegant if you take the material of two or more colors, alternating multi-colored napkins with each other, or you can do as in the photo below, making a beautiful flower pom-pom out of them.

DIY crepe paper pom-poms
DIY pompoms: video master class
Tissue paper - smooth, delicate, rustling in a festive way, is the best suited for making pompoms, which turn out to be the most elegant, lush and durable. In addition, usually this paper is already on sale in sheets, for example, 25x35 cm and is great for making large pompoms.
Small handmade pom poms
It is not always necessary to make voluminous pompoms for decorating a room. There are times when you need to make exactly small pompoms, for example, to paste over a number with them, make a bouquet, a garland, some kind of craft out of them, attach them to a suit and for other purposes.
The size of the pom pom will depend on the size of paper you are using.
To get a small pom-pom with a diameter of 7-8 cm, take 4 ordinary napkins (standard size 23x23 cm), fold two of them and put them on top of each other.
- Fold the napkins into an accordion shape, moving along the length of the material to get as many folds as possible.
- Secure with a thread in the middle and round off the edges with scissors.
- Spread the petals towards the center, and the miniature fluffy pom-pom is ready.

How to make big pompoms with your own hands?
For making large pom-poms, thin corrugated paper or tissue paper is best. To make a giant pompom, stock up on a lot of paper - for such a product you will need a whole package of tissue or crepe paper, with a total roll length of 10 m. The standard width of such rolls is 42-45 cm.

Do-it-yourself pom-poms from bags
Pompoms are used today in many areas of life - they not only decorate the halls and make all kinds of crafts out of them, they are also actively used in dancing, gymnastics and other leisure activities. It is not uncommon for children to return home from school with the task of making pompoms from bags, most often they are used for cheerleading, a sport that combines dance, gymnastics, acrobatics and show elements.
Many girls join so-called "cheerleading groups" primarily to dress in bright colors and dance with puffy pom-poms in their hands. Pompoms for cheerleading are most often made from packages, and we will teach you how to make them quickly and beautifully.
How to make DIY cheerleading pompoms?
 To make 2 bright, fluffy cheerleading pompoms, prepare:
- 2 packs of plastic bags - 2 different colors will be enough, although one is possible;
- Scissors;
- Scotch;
- Wooden or plastic stick.
- Fold the packages one by one, cut off the sharp corners and cut the places of their soldering.
- Fold the bags in half, defining the middle.
- Make cuts on both sides without cutting to the fold line. Try to make the stripes the same width. If your task is to make a fluffy pompom, measure the stripes narrower.
- Fold the stack of bags in half, twist and tape around the stick to make a pom pom handle. Ready!
Particularly bright, colorful and lush are pompoms made from garbage bags, especially since the size of the material allows you to make them the most voluminous.
How to make the most fluffy paper pom-pom with your own hands?
To make a mega fluffy and voluminous paper pompom, you need to take as much paper as possible for it, which is divided into equal parts - squares or rectangles - at least 20 sheets.

The only thing you may have difficulty with is the rounding of the edges of the pompom, scissors are unlikely to cope with such a thickness of paper layers right away. Therefore, make a stencil according to the size and thickness of your fan, for example, from cardboard, and round off the edges of the pom-pom not all at once, but in parts, using a stencil.
What can you do with paper pom-poms?
Pompoms are good and beautiful both as an independent decoration of the interior, and as part of other decorations and crafts. Create original products from pompoms using our tips and master classes.
Do-it-yourself pom-pom flowers: a master class with a photo
Paper pom-pom flowers can be made in many ways. The pompoms themselves already look like lush flowers in full bloom, but you can further enhance this effect.
- Take napkins of three colors - 2 pieces of each color.
- Fold in half, and then one by one, you get a rectangle.
- Make an accordion along the long side of the rectangle.
- Mark the middle and wrap tightly with fishing line.
- The edges can be rounded with scissors, or you can make the petals triangular.
- Gently straighten the flower petals from one side and the other, bringing them to the center, while the lower part of the pom-pom will also “go” into the upper “inflorescence” and you will get not a round pom-pom, but a lush flower.
 Here's another easy way to quickly make paper carnations and even a pom-pom bouquet.
 But in such a simple technology for making pompom flowers, you can create poppies that simply cannot be distinguished from real ones.

Decorating the hall with paper pom-poms


Do-it-yourself photo zone from paper pom-poms
Multi-colored pompoms are a simple, original and very effective solution for decorating a photo zone. Taking a picture against the backdrop of a stand decorated with pompoms in the style of the holiday will come in handy at a wedding celebration, and at an incendiary youth party, and at a fun children's holiday.


Do-it-yourself pompom figure
Now it is very important to congratulate children on their birthday, decorating their holiday with a voluminous figure of pompoms. Such products look very bright and elegant, raising the mood of the birthday man and all the children at the holiday. It will be especially touching if the parents themselves make such a magnificent, multi-colored number, and we will tell you how to do it simply and easily.

DIY pom-pom heart
Such an exposition looks very touching and romantic, and photographs taken against the background of such a photo zone look especially bright and original. Please your loved one with such a surprise, for example, on, or on, but for now, be inspired by our photo ideas.


DIY paper pom-pom balls
Pompom balls made using the “honeycomb” technique look very beautiful and unusual. For such a product, you need to stock up on a fairly large amount of paper and devote at least 30 minutes of your time until you fill your hand, but the result will be worth it.
 You will need:
- paper in silence;
- glue (preferably NOT hot);
- scissors;
- cardboard (or thick sheet);
- Double-sided tape;
- rope;
- 2 colored pencils.
DIY pom-pom garland
And of course, pompoms are “asking” to make a garland out of them - New Year's, or for any other holiday. This is done very easily, because pompoms, thanks to their fluffiness, are quite simply put on a thread or fishing line using any glue. And how elegant, festive and harmonious it looks, see for yourself.


 An alternative to classic pompom garlands are compositions of bright and playful tassel pompoms, which you will spend a minimum of costs, time and effort on making.


Crafts from paper pom-poms: ideas with photos
Ordinary paper pompoms can decorate your home in a completely unique and original way, and not only during the holiday. You can make absolutely incredible things from pompoms - original interior items. And children's crafts from pompons are an affordable and easy option for your child to bring to kindergarten not just a “duty” souvenir, but an unusual handicraft, especially since even a child of kindergarten age can make a simple pompom. Get ideas from the photos below.


Used in the decoration of various items and clothing, pompons are most often made from threads, strips of fabric or tulle. The simplest technique involves collecting a large bundle of textiles and pulling it in the middle with a strong thread.
Do-it-yourself pompom from threads is almost ready. It remains to trim the edges with scissors to form a neat ball.

Using Forms
There is also a more complex technique that allows you to make a neat pom-pom of any size. As a form, you should take 2 circles of cardboard with cut out centers.

The size of the pom pom depends on the wall thickness of the mold. The bases are folded together and wrapped with thread. Then the forms are moved apart, the threads are tightly pulled together in the center and the workpiece is cut between the cardboard inserts. So the product is more accurate.

Pompom on a fork
A convenient basis for creating original small-sized balls is a fork. This decoration will be an excellent solution for scarves, baby booties and blouses. They are also used as an unusual decor for blankets and bedspreads.

To create a pom-pom, the thread must be wound around the teeth to the desired volume and pulled with a fastening thread between the central teeth of the fork. You get a kind of bow, the arcs of which can be cut both on the device and by removing the product from the fork.

paper decoration
Beautiful voluminous paper pompoms are most often used in holiday themed decor. Formed balls may differ in material, color, size, density and edge design. The lighter the material used, the better, the more airy and beautiful the decor will be.

The most commonly used corrugated pompoms are made of thin corrugated paper. This material is available in a wide range of colors and has an original structure that makes the pom-poms look like flowers.

For manufacturing, it is necessary to cut out 8-10 squares of the desired size from paper, folding them one on top of the other. The resulting stack is folded with an "accordion" and pulled in the middle with a fastening thread.

Then, scissors form the edges, rounding them or vice versa, forming an acute angle, and straighten the paper, forming a ball.

An even more affordable option are napkin pom-poms. The principle of operation is the same as in the case of using paper, only the squares are already formed, and the material itself is lighter and more pliable. The disadvantage of napkins is the excessive fragility of the material and a limited choice of colors.

Pompoms from bags
For outdoor use, decorations are made from weather-resistant material - plastic bags. Such products can serve as decoration or be used by cheerleading teams at various competitions.

Depending on the purpose, choose the type of packages that are best suited for the task.

So pompoms for cheerleading are best made from packages of "t-shirts", which will allow you to form comfortable handles on the product. And products from garbage bags will be more voluminous and strong.

When creating pompoms for a support group, a stack of bags is folded in half, collecting the handles into one bundle. The handles are fixed with tape, thus fixing the pompom itself.


As you can see, you can make an original decoration at a minimum cost. Material for creating an unusual decor can be found in every home. It can be plain or craft paper, napkins, fabric, tulle, rain, mock-ups and much more. And the principle itself is extremely simple.
Step-by-step guide: how to make a DIY crepe paper pom-pom
We took crepe paper only because it was easier to find. The pompom turned out beautiful, rustling and strong. However, pompoms made from tissue and crepe paper are lighter and more airy. Maximalists and perfectionists will have to look for tender varieties.
Training
To create a fluffy and beautiful paper pom-pom, we need:
- corrugated paper, crepe or tissue paper
- scissors
- thread, ribbon or cord
The maximum diameter of your pom pom is limited by the width of the paper. However, if you decide to make a huge paper ball, the entire width of a roll of corrugated paper, be prepared for the fact that one pom-pom will take almost 2 rolls!
Making one pom-pom takes 10 to 20 minutes. 2-3 large balls may be enough to decorate a room. But a large hall requires large-scale time costs.
So let's get started.
6 simple steps and you will make a paper pompom with your own hands.
Step 1
Cut out 8 identical square sheets from the selected paper. Once again: the side of the square will determine the diameter of the future pompom! And stack them up. 
No, we did not measure with a ruler. Corrugated paper is too naughty for that. Square "by eye" - this is our method.
Step 2
With a confident hand, we take the entire stack and begin to fold them with an accordion in increments of 1.5-3 cm. If the pom-pom is large, then the step can be increased to 5-8 cm. The principle of the accordion is super simple: one bend on one side, the second on the other etc. to end. This is what an accordion drawing looks like when you straighten the paper: 
Step 3
It turned out a narrow strip-stack-accordion, the width of the selected step. We determine the middle and carefully drag it with a thread, without damaging the integrity of the paper. 
Step 4
Carefully round with scissors or vice versa, sharpen the ends of the resulting strip. We have rounded:
Step 5
We straighten the halves in different directions and begin to fluff our butterfly. 

Gorgeous decorative paper pompoms are a simple and original decoration for any holiday or event.
Such decor creates a festive mood and emphasizes the style and originality of the design.
For the safety of the paper and the safety of transportation, paper pompoms are delivered assembled and in order to straighten them, it will take a little time and accuracy.

When assembled, a paper pompom looks like a wide strip of thin tissue paper folded several times.

1. Tie the pompom with one end of the ribbon in the middle. But do not overtighten the ribbon as this may damage the paper.

2. Gently fan out the folded pompom on both sides.

3. Separate the paper layers one by one, but be careful and careful, thin and fragile paper can be torn with sudden movements. But even if such a nuisance happens - it's okay, this will not be visible in the assembled and straightened pom-pom.
 4. Give the straightened pompom a round shape and a magnificent decoration for your holiday is ready.
In this material, in detail, with all the secrets and nuances, we will talk about how to make pompoms from corrugated paper with your own hands. Corrugated paper is an affordable material for everyone to make spectacular crafts. It is inexpensive, and bright and unusual colors allow you to create truly original decor options.
First you need to understand and understand the simplest way how to make pompoms. It is he who is described in this article. But then, when the hand is already “stuffed”, your unique pom-pom can be made in different ways. Someone combines different colors, others play with sizes. In general, it all depends on the desire and imagination to create. How to make from napkins.
What is required for work:
* Standard size corrugated paper roll (typically 0.5 meters wide and 2.5 meters long).
* Scissors.
* Pencil, ruler, thread.

Take the roll as a whole and use a ruler to determine its middle. Now draw a thin line in the center with a pencil.
line. Next, without unwinding the paper, immediately cut it into two parts of the same size. There was one long roll, now you have two rolls in your hands, but short ones. This photo tutorial helps you understand how all the work is done.
Now unfold the paper in rolls and cut into identical rectangles. These rectangles can be of any size. It is recommended to start with a size of 35 * 50 cm, as in the photo. Then you get five rectangles of colored paper from each mini roll. If you make the rectangles smaller, you get six pieces, but the pompom itself will end up being smaller in size (although more magnificent due to more stripes).


Advice! This method is perfect for making stylish and bright mini Christmas balls. They can be used for decorating a Christmas tree, and simply for decorating a room, a car interior.
Fold all the prepared rectangles into even piles. If the paper tries to curl back, this is normal. You just need to press it on both sides. Fold the sheets into one large accordion, then determine its center and tie a thread or ribbon tightly there. And leave one end of the thread long, so that later it would be convenient to hang the pompom.


Advice! You can additionally cut the ends of the accordion so that later the pompom will turn out to be more round and look like a flower, but, in principle, you can leave the ends rectangular, the finished product in this case will also look beautiful.
This is already the final blank, which, after opening, will help to get incredibly beautiful and voluminous corrugated paper balls. You will need to do everything carefully so that the paper does not tear. First, unfold the ball in the form of a fan, and then lift each layer of paper in turn. Flip the fan over and fluff it out here. You will get a stylish pompom that can be used for any holiday decor.


In order for the pompom to end up with the perfect shape of the ball, you can safely correct it with your hands, as your sense of your own artistic taste suggests. These rectangles will make a medium-sized pompom. The more layers of paper will be used for work, the more voluminous the product will be in the end. Pompoms of the same color, but of different sizes, look beautiful in the decor. This is how quickly and cunningly do-it-yourself paper pompoms are made step by step. Other beautiful options