To create the image of a well-groomed housewife, crochet robes are suitable. They will be discussed in this article.

All young girls, mothers and grandmothers will definitely like the wonderful “Snowflake” model, crocheted No. 4 made of light cotton threads.


According to the pattern, the robe is assembled from individual motifs, which are made according to scheme 13-2. During the knitting process, snowflakes are connected to each other in places marked with red arrows. The motifs are arranged in a checkerboard pattern, and a unique model is obtained without seams.
To increase the volume of the robe, just add additional snowflakes. For sizes 36-38, the width of the product consists of 7 motifs. For large models, new openwork snowflakes are inserted evenly between the pattern pieces.


The length of the sleeve and robe can also be varied by adding or subtracting motifs. The final touch to the dressing gown is a cute trim, which is knitted using the 13-2 pattern. The result is an ideal model, fastened with a strap, which can be worn at home, in the country, and on a summer resort vacation.
Crochet beach robes: beauty and temptation
Fashionable girls will not be able to resist such original crocheted knitted beach robes.


To protect during summer holidays delicate skin from the hot sun and emphasize your sophisticated style, it is advisable to buy cotton or linen threads in advance. Using a hook No. 2-2.5 easy pattern knit a chic robe with elements fillet knitting. Decorate the sleeves and bottom of the robe fashionable fringe, and use a thin lace with tassels as a tie. It will turn out stylish, elegant and simply wonderful!

Another model of a beach robe knitted using an original triangular pattern. According to scheme No. 1, 17 motifs are made, which are connected to each other during the knitting process. Flower squares are arranged in a checkerboard pattern according to the pyramid principle. And only on the shelves are two empty spaces filled with triangular motifs made according to scheme No. 2.
The model is decorated with fringe along the lower edge, and the 4 upper parts are connected to each other by two thin straps.

The result is a chic model that can be worn to the beach, or, if desired, decorate a feminine look over a summer top and jeans.
Another model of a beach robe from an Italian knitting magazine. To create such a magnificent airy thing, the designers used individual motifs.
According to patterns No. 1 and No. 2, beautiful openwork details are knitted, which are connected to each other during the knitting process. The motifs are different in design and are combined into a beautiful canvas in a checkerboard pattern.


Empty spaces are filled with small knitted details, made according to schemes No. 3 and No. 4. The bottom of the robe and the straps are decorated with openwork frills, and the shelves and back are connected by thin straps.
On a note! The fashionable Italian robe is designed with an open back. To do this, knitted motifs are placed only up to the shoulder blades, and the edges of the product are decorated with a delicate “Crawfish Step” binding.
Knitting a baby robe: easy as pie
Easy circuit and detailed description process will help beginning needlewomen start knitting baby robe using a hook.

You will need some leftover yarn to work with. different colors and any texture, tool – hook No. 5. The original circular pattern allows you to knit a robe-cape in one single openwork piece. In the 9th row from the beginning of work, loops are skipped and chains are knitted from air loops, thanks to this technique, slits are formed - future armholes for the sleeves.
The sleeves are knitted according to pattern No. 2 in circular rows, and according to pattern No. 3, finishing is done along the entire edge of a cute children's robe. The shelves can be fastened with large buttons or fastened with ties, the ends of which will be decorated with small flowers, knitted according to pattern No. 4.

Advice! To increase the size of the robe, you need to add rows to the armhole and place the model on the back, and then knit additional circular rows after the armholes, so that the cape meets and fastens on the front side.
House dressing gown - simplicity and convenience
Any needlewoman can make a knitted robe using a crochet hook.

To work you will need 350-400 g of high-quality yarn, a hook No. 2.5 and 8 bead buttons. Knitting begins with a part that is located below the waist. A chain of air loops is cast on around the hips and 19 rows are knitted. openwork patterns"Popcorn".


The third stage is knitting the lace hem. From the edge of the product, according to pattern No. 3, an openwork fabric is knitted to the desired length. Finally, a placket is made for the bead buttons and a delicate trim along all the edges of the robe.
Robe “Zigzag”: cape, jacket, coat in one model
Using the universal, effective Zigzag pattern, needlewomen will be able to knit a wide variety of patterns. And according to the proposed pattern, you get a cape that can easily replace a robe, a jacket, and a day off stylish coat. The main thing is to choose the right yarn for your future bright and fashionable item!

The Zigzag pattern looks beautiful when knitted from plain yarn. But a special effect is achieved by changing the threads and obtaining a contrasting color scheme.
To start working with crochet No. 7, cast on a chain of 39 loops + 4 rises, and knit the sleeves according to the “Raglan” pattern. The back and shelves are made in one piece According to the “Zigzag” pattern, a fabric is knitted from a chain of 159 loops + 4 rises with a change of contrasting colored threads.

A bright robe can be fastened with buttons or tied with a belt. In any case, a spectacular cape will look beautiful and truly stylish. In conclusion, to the delight of hardworking needlewomen, a video that will teach novice craftswomen how to knit a Zigzag or Chevron pattern in 15 minutes. An experienced knitter will teach you how to form teeth and show you how to correctly connect the thread for color transitions.
Video: Crochet home dress
Several example schemes


Using different yarns and patterns, you can knit light summer a thing or even a warm one that will warm you up on winter evenings. First decide on the threads. For a house robe, it is best to use cotton natural yarn. But synthetics and wool are unlikely to be suitable for these purposes, since they can cause irritation and allergies to the skin.
To knit a housecoat, you will need:
- yarn;
- knitting needles or crochet hook;
- tape measure.
How to knit a housecoat
To determine the required number of loops for the set, you need to knit a 10x10 centimeter sample from the selected yarn, using the same pattern and with which you will make the product itself.
Usually knitting starts from the back. To do this, cast on the number of loops calculated according to the sample (adding 2 edge loops) and knit with a pattern for a 6-10 centimeter strip. After this, add 2-4 loops and knit the fabric with the main pattern to the length you need. At the end, close the loops, breaking working thread. Then start knitting the right front. Cast on the required number of loops (including 2 edge loops) in accordance with taken measurements and associated sample.
If you are knitting a dressing gown for another person, you should first take accurate measurements. If the item is intended for you, you can try it on as you go.
Next, knit 6-10 centimeters with a plank pattern, then add 2-4 loops in the last row and knit the fabric of the desired length with the main pattern. Without finishing 6-7 centimeters, begin to design the neckline. To do this, in each even row along the left edge of the shelf, close once - four loops, three, two, one. When the fabric is the desired length, bind off the shoulder loops. Knit the left front symmetrically.
The next stage of work is knitting the sleeves. Cast on the required number of loops and knit with a pattern for 12 centimeter strips. To get side bevels, add one loop five times on each edge of the fabric in every 15th row. Having knitted the fabric of the required length, close the loops. Tie the two sleeves this way. Sew the connected parts.
If you wish, you can complement the knitted robe with a belt, hood and patch pockets.
Along the neck with front side cast on the calculated number of loops and knit the collar bar. Close the hinges. Following this description, you can knit a housecoat and crochet it.
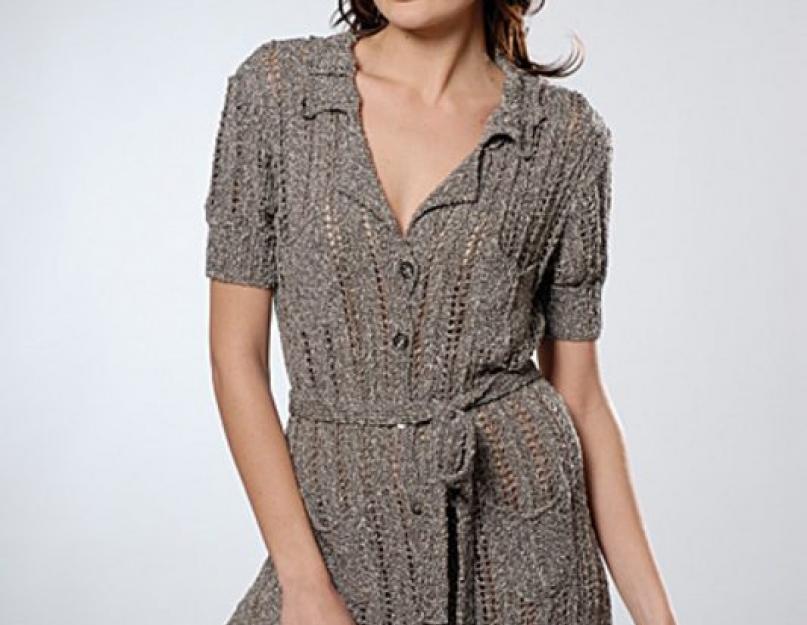
This beautiful knit robe from Sue Whiting is knitted from machine washable yarn.
The description is given for sizes S (M, L, XL, XXL). Bust 81-86 (91, 97-102, 107, 112-117) cm. Length: short version 90 (91, 92, 92, 93) cm; long version 130 (131, 132, 132, 133) cm. Sleeve length 43 (44, 44, 45, 45) cm.
To knit this wonderful robe you will need Sirdar Country yarn (40% nylon, 30% wool, 30% acrylic, 115 m/50 g). For short version 6 (6, 7, 7, 8) skeins, for long version 8 (8, 9, 9, 10) skeins. To work you will need knitting needles 3.25 mm, 4 mm and 4.5 mm; markers and stitch holders.
Knitting density: 22 p. and 32 r. = 10x10 cm with the main pattern using 4 mm knitting needles.
DESCRIPTION.
Back.
On 4.5 mm needles, cast on 107 (115, 123, 131, 139) sts and knit with the main pattern as follows:
1st r. (LS): 1 person., *2 persons. together, knit 1, yarn over, knit 1, knit 1, knit 1. and stretch it through the removed stitch, k2; repeat from * to the last 2 persons.;
2nd r. and all even rows (IS): purl all;
3rd row: *2 persons. together, k1, repeat twice, slip 1 st, k1. and stretch it through the removed st.; repeat from * to last 3 persons;
Row 5: K2, *yo, k3, yo, k1, slip 1, k1. and stretch it through the removed stitch, knit 1; repeat from * to the last 1st person.;
7th row: 4 persons, *2 persons. together, knit 1, yarn over, knit 1, knit 1, knit 1. and stretch it through the removed stitch, k2; repeat until the last 7 sts: k2, together, k1, yarn over, k1, slip 1, k1. and stretch it through the removed stitch, knit 1;
9th row: 3 persons, *2 persons. together, k1, [yo, k1] repeat twice, slip, k1. and stretch it through the removed st.; repeat from * to the end of the row;
11th row: 2 knits., *2 knits. together, knit 1, yarn over, knit 3, yarn over, knit 1; repeat from * to last 1 person;
12th r. (IS): purl all over.
12 rows of the main pattern.

Pattern diagram
For the short version:
Knit with the main pattern 30 cm, finish in purl row. Switch to 4 mm needles and knit another 30 cm (60 cm from the cast-on row), finishing on the purl row. Switch to 3.25 mm needles and knit another 10 cm (70 cm from the cast-on row), ending in a purl row.
For the long version:
Knit with the main pattern 50 cm, finish in the purl row. Switch to 4 mm needles and knit another 50 cm (100 cm from the cast-on row), finishing in the purl row. Switch to 3.25 mm needles and knit another 10 cm (110 cm from the cast-on row), finishing on a purl row.
For both options:
Keeping the pattern pattern, close for the armholes 5 (6, 6, 7, 7) sts at the beginning of the next 2 rows = 97 (103, 111, 117, 125) sts. Then decrease 1 st on both sides in the next row. 5 (5, 7, 7, 9) rub. , then follow. 4 (6, 6, 7, 7) rub. [total decreased loops 18 (22, 26, 28, 32) sts.] = 79 (81, 85, 89, 93) sts.
Continue straight until armhole height reaches 20 (21, 22, 22, 23) cm. Finish on purl row.
Keeping the pattern pattern, bind off for the shoulder 7 (7, 8, 8, 9) sts at the beginning of the next 4 rows, then 7 (8, 7, 9, 8) sts at the beginning of the next 2 rows. Cast off remaining 37 (37, 39, 39, 41) sts.
Left side front.
On 4.5 mm needles, cast on 62 (70, 70, 78, 78) sts and knit with the main pattern as follows:
1st r. (LS): 1 l., *2 knits. together, knit 1, yarn over, knit 1, slip 1 stitch, knit 1. and stretch it through the removed stitch, k2; repeat from * to the last 13 sts: k3, repeat 5 times (in square brackets);
2nd r. and all even rows (IS): k1, repeat 5 times, then purl to the end of the row;
3rd row: *2 persons. together, k1, [yo, k1] repeat twice, slip 1 st, k1. and stretch it through the removed stitch, repeat from * to the last 14 stitches: k4, repeat 5 times;
7th row: 4 persons, *2 persons. together, knit 1, yarn over, knit 1, slip 1 stitch, knit 1. and stretch it through the removed stitch, k2; repeat from * to the last 18 sts: k2. together, knit 1, yarn over, knit 1, slip 1 stitch, knit 1. and stretch it through the removed stitch, k2, repeat 5 times;
9th row: 3 persons, *2 persons. together, k1, [yo, k1] repeat twice, slip 1 st, k1. and stretch it through the removed stitch, repeat from * to the last 11 stitches: k1, repeat 5 times;
11th row: 2 knits., *2 knits. knit 1 together, yarn over, knit 3. Yarn over, knit 1; repeat from * to the last 12 sts: k2, repeat 5 times;
Knit 12 rows of the main pattern (+ 11 p. stripes).
For the short version:
Knit with the main pattern and stitches in 30 cm strips, finishing in the purl row. Switch to 4 mm needles and knit another 30 cm (total 60 cm from the cast-on row), finishing in the purl row.
For the long version:
Knit with the main pattern and stitches for 50 cm strips, finishing in the purl row. Switch to 4 mm knitting needles and knit another 50 cm (total 100 cm from the cast-on row), ending in a purl row.
For both options:
Switch to 3.25 mm needles and knit as for the back, but 29 rows less before the beginning of the armhole, finishing on the front row. ??
V-shaped neckline on the left side of the front.
Track. R. (IS): knit 11 stitches of the strap and transfer them to the holder (for the collar), then knit according to the pattern = 51 (59, 59, 67, 67) stitches;
Maintaining the pattern, decrease 1 stitch at the end of the next row, then in each row. On the 4th row, decrease 1 stitch 4 (6, 4, 6, 5) times and in the next 6th row, decrease 1 stitch 1 (0, 1, 0, 1) times = 45 (52, 53, 60, 60 ) p. Knit another 5 (3, 5, 3, 1) rows, ending in a purl row (here the left side of the front is equal to the height of the back to the armhole).
Armhole.
Keeping the pattern pattern, close off for the armhole 5 (6, 6, 7, 7) sts at the beginning of the row and decrease 1 (1, 1, 1, 0) sts at the end of the next row = 39 (45, 46, 52, 53) p. Knit 1 row. Next, decrease from the armhole side to the trail. 5 (5, 7, 7, 9) rubles, then next. 4 (6, 6, 7, 7) even p. At the same time, decrease 1 p. from the side of the neckline in the 5 (3, 5, 3, 3) row and in each next 6 (4, 6, 4, 6) row = 28 (30, 33, 33) p. Then decrease 1 stitch from the neckline side only in the 4th (2, 4, 2, 4) row and 0 (2, 0, 3, 0) in the next 4 rows, then in every next 6th row , to last 21 (22, 23, 25, 26) stitches. Next, knit straight, focusing on the height of the back. Finish on a purl row.
Shoulder.
Maintaining the pattern, cast off 7 (7, 8, 8, 9) sts at the beginning of the next and next even row. Work 1 row and bind off 7 (8, 7, 9, 8) remaining stitches.
Right side front.
On 4.5 mm needles, cast on 62 (70, 70, 78, 78) sts and knit as follows:
1st r. (LS): repeat 5 times, k2, *k2. together, knit 1, yarn over, remove 1 stitch, knit 1. and stretch it through the removed stitch, k2; repeat from * to the last 2 persons.;
2nd r. (IS): and purl all even rows until the last 11 sts: repeat 5 times, k1;
3rd row: repeat 5 times, k1, *k2. together, k1, [yo, k1] repeat twice, slip 1 st, k1. and stretch it through the removed st.; repeat from * to last 3 persons;
5th row: repeat 5 times, k3, *yo, k3, yo, k1, slip 1 p, k1. and stretch it through the removed stitch, k2; repeat from * to the last 7 sts: k2. together, knit 1, yarn over, knit 1, slip 1 stitch, knit 1. and stretch it through the removed stitch, k1.
9th row: repeat 5 times, k4, *k2. together, k1, [yo, k1] repeat twice, slip 1 st, k1. and stretch it through the removed st.; repeat from * to the end of the row;
11th row: repeat 5 times, k3, *k2. together, knit 1, yarn over, knit 3, yarn over, knit 1; repeat from * to last 1 person;
12th r. (IS): knit as 2nd r.
Knit as left side from?? before??.
V-shaped neckline on the right side of the front.
Track. R. (IS): knit according to the pattern until the last 11 stitches of the strap, turn the work and transfer 11 stitches of the strap to the holder (for the collar) = 51 (59, 59, 67, 67) stitches.

Pattern
Sleeves.
On 4.5 mm needles, cast on 83 (83, 83, 91, 91) sts and knit as follows:
1st r. (RS): k1, *p1, k1; repeat from * to the end of the row;
2nd r. (IS): knit as 1st row.
Knit repeating 2 rows of the pattern for the next 16 rows, finishing on the purl row. Next, knit starting from the 1st row of the main pattern as for the back 15 cm. In the last row, decrease 1 (1, 0, 1, 1) stitches on both sides, finish in the purl row = 81 (81, 83, 89, 89) p.
Switch to 4 mm needles and continue until the sleeve length is 30 cm. Decrease 1 (0, 0, 1, 1) stitches on both sides in the 30th row, finish in the purl row = 79 (81 , 83, 87, 87) p.
Switch to 3.25 needles and knit until the sleeve length is 43 (44, 44, 45, 45) cm. Decrease 1 (0, 0, 1, 0) sts on both sides in the 30th row from the previous decrease, finish with in purl row = 77 (81, 83, 85, 87) sts.
Keeping the pattern pattern, cast off 5 (6, 6, 7, 7) sts at the beginning of each next row = 67 (69, 71, 71, 73) sts. Then decrease 1 st on both sides in the next 5 rows, then in each even row up to 33 stitches on the needle. After this, decrease 1 stitch on both sides in the next 7 rows and cast off the remaining 19 stitches.
Completion.
Lightly steam the parts, following the yarn care instructions. Sew shoulder seams.
Left side of the collar.
Transfer 11 stitches from the left side of the front from the holder to 3.25 mm knitting needles, attach the thread from the front side and continue with the pattern according to the drawing. Add 1 stitch at the beginning of the 3rd and next 9 even rows, then in every 4th row until there are 35 stitches on the knitting needle. Include the added loops in the pattern. Continue straight ahead. Baste the finished part of the collar, without stretching it, to the neckline up to the shoulder seam.
Track. R. (RS of the collar, IS of the product): knit 31 sts according to the pattern and turn;
Knit 2 more rows. Then repeat the last 4 rows 5 more times. Then knit the first 2 rows again. Next, knit straight until the length of the collar reaches the middle of the back neckline.
Right side of the collar.
Transfer 11 stitches from the right side of the front from the holder to the 3.25 mm needles, attach the thread from the wrong side and knit according to the pattern. Add loops as for the left side of the collar, but not at the beginning but at the end of the row. Finish as the left side of the collar. Sew the center seam of the collar and sew it to the neckline.
Execute side seams and sleeve seams. Sew the sleeves into the armholes.
Belt.
On 3.25 mm knitting needles, cast on 11 stitches and knit in a pattern for a 150 cm placket. Cast off the stitches.
Note! The rules of the HOMEBODY club prohibit the posting of site materials on third-party resources in their entirety. Only announcement is allowed ( short description), photo and direct link to the source.
The material was prepared and retold from in English Homebody.
Tags: