When you imagine a chilly autumn or cold winter evening, and you have to settle under the covers, childhood memories of cozy warm pajamas that your mother put on you at night immediately come to mind.
Pajamas are a type of home, even sleeping, that took root in our everyday life not so long ago. During the colonization of India, the British borrowed for their homeland the “progenitor” of this type of clothing, which was called pajamas. Initially, “pajamas” was a word from the Turkic language: in Persia they wore loose-fitting pants, belted with a rope, which were called footwear, which in Persian sounded similar to the word “pajamas.”

After the Europeans mastered the mentioned bloomers, they did not become a weekend outfit, but became established as comfortable clothes for relaxation and most of all for sleep.
Many representatives of the fair half of humanity probably want to have pajamas. But you can sew pajamas yourself. Want to try your hand at it? Then consider classic version warm pajamas.

Standard warm pajamas resemble a suit, because they are a set of comfortable trousers with elastic and a shirt that does not restrict the body, having almost all the attributes of a regular one. men's shirts: long sleeves, collar, placket and buttons.
For example, let's take pajama pattern for size 46-48.
Deciding on the fabric. First of all, sleepwear should preferably be made from natural material, which “breathes” and washes well. For the pajamas you need for, you can choose flannel, warm knitwear, cotton textiles, mixed fabric with a pleasant short pile that will give the desired warmth.
Matter calculation is as follows: for panties we measure the length along the side seam 1 m 10 cm. For a blouse - the length according to the back pattern is 85 cm. We take into account long sleeves. Total: with a fabric width of 1 m 50 cm, the cut length is no more than 5 m, even taking into account the higher height of the pajama owner. Any color that will attract the eye. Classic flannelette pajamas come in stripes or checkered patterns. Don't forget to buy small buttons for a shirt (4-6 pieces) and a wide soft elastic band for panties. As an auxiliary material, you can purchase non-woven fabric to seal the collar, sleeve cuffs and button placket.
Preparing a pattern for your model
Blouse it is assembled from a couple of shelves, a back, a pair of sleeves, a collar from a couple of parts and, finally, pockets - one or two, as you like. For pajama pants, a pattern is prepared from two or four parts. If the prepared fabric is solid, then it is better to do without extra side seams.
A pattern corresponding to the specified size is presented in the pictures.

Shirt back pattern

Pattern of shelf and collar pajama shirt
.jpg)
Pajama shirt sleeve pattern

Pajama trouser leg pattern
We make the pattern on paper—it’s better to use graph paper—and get to work cutting out the fabric. Reminder: The vertical lines of the product should correspond to the vertical threads of the fabric.
Cutting the fabric taking into account a seam allowance of one and a half centimeters. If we start sewing from a blouse, then we sew the seams along the shoulders and sides. All seams that are visible on the inside are on the blouse and then processed using an overlocker or a zig-zag seam. We fold and stitch the bottom seams along the front and back. We fold the two parts of the collar facing each other, sew them along the outside, turn them inside out, the remaining unstitched inside part needs to be stitched to the neck formed by the shelves and the back with a folded edge. But before we do this, we bend the edges of the shelves, tuck in the edges of the collar area and sew on the second edge of the collar.

Next we line shoulder seams, attaching the sleeves. We sew the sleeves along the seam, after which we make the cuffs of the sleeves in the same way as the collar. To simplify things, you can simply fold the edges twice and stitch them, hiding the cut of the fabric inside.
Now it's time for the pockets. We tuck the edges of the flaps and sew on the pockets. The pajama shirt is ready.

Co panties things are simpler. When sewing trousers from two parts, only the inner seams of the trouser legs should be sewn; of four parts - also external seams. Fold the top edge of the trouser legs, stitch and insert an elastic band inside. We also fold and stitch the lower edges of the trouser legs.
The work is done. Now you can spend a cozy night in warm pajamas for the cooler months.
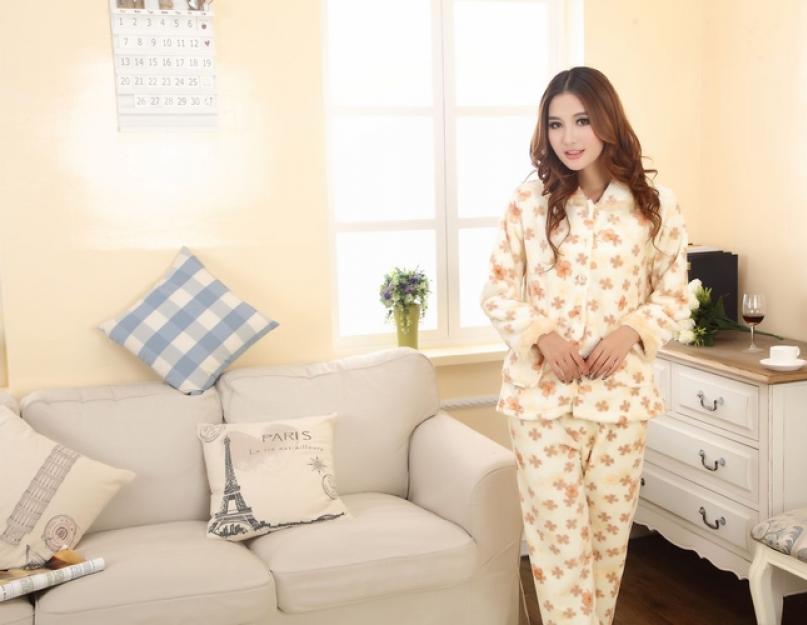
The stores now have a huge selection women's clothing, but if you don’t like anything or the price of the item is too expensive, then you can use this master class and sew yourself beautiful silk pajamas. Having spent very little effort and money on materials, you will delight yourself with a new thing that is comfortable not only to sleep in, but also pleasant to walk around the house, feeling irresistible.
Sewing silk pajamas is not at all difficult if you have at least some sewing skills. Such clothing should be comfortable and loose, so taking measurements is not difficult. Matter itself is capricious and tends to “slip” and move, so for beginners It is better for craftswomen to start with a simple pattern.
What you need for work
 Not many tools and materials are needed for the job. You need to buy silk fabric of your choice, about 1 meter long, an elastic band for shorts about 50 cm and a width of 55–60 cm, the length will depend on your waist size. You can also purchase a lace ribbon for decoration for lining the top of a T-shirt or the bottom of shorts. Otherwise, you will need standard tools: scissors, pins, needles, chalk, sewing machine and the pattern itself.
Important!
You need to buy more than 1 meter of fabric; perhaps the rest of the fabric will be useful for some detail.
Selecting a model
The choice of model depends on your body type and preferences. In addition, it is better to make silk pajamas a little more spacious so that they do not restrict movement and are comfortable for sleeping. Main models:
Pajamas with short shorts. It is suitable not only for sleeping, but also for a cozy home pastime. The model is ideal in the summer because it will keep you cool to sleep in; silk is one of the fabrics that cools quickly.

Pajamas with long pants. Now this model has become fashionable for social occasions. But for the home it is suitable for girls with large figures, as it will hide the excess. Although these pajamas in interesting colors can be used for themed hen parties and photo shoots, they look very stylish.

Pajamas with a tank top or T-shirt. Here the difference in the models is small; girls who want a more seductive night ensemble of clothing should choose a T-shirt; lace can be sewn to the top of the T-shirt, which will give it more charm and allure. Pajamas with a T-shirt are a casual style, and long pants will suit this top.

Sewing silk pajamas: a step-by-step guide
Below is a step-by-step and detailed master class cutting and sewing pajamas and silk.
Taking measurements
 Before you start sewing the product, you need to take measurements. Using a centimeter, you can measure your volume yourself or ask someone to help. To sew the product you will need the following parameters - chest, waist and hips. Everything is very simple.
Important!
Seam allowances can be made much larger, since home clothes look better when they are loose and do not restrict movement.
Making a pattern for silk pajamas with shorts
 The next step will be the pattern. It's very simple for silk pajamas and only has six pieces. This is the front half of the shorts, consisting of 2 parts, the back also consists of 2 parts. The top pattern includes two parts - these are fabrics with a fold on the front and back sides. When drawing a diagram on a sheet of paper, you need to remember about seam allowances. It is advisable to leave 1–2 cm on the sides, and it is better to leave about 3 cm at the bottom of the product; at the top of the shorts, let there be an allowance of 5 cm, so it will be easier to tuck the fabric and raise the elastic thicker.
Cutting the fabric
After all the manipulations with taking measurements and drawing the pattern, you need to start cutting the canvas. P Before sewing, the silk must be thoroughly steamed, but very carefully so as not to spoil the fabric. Cut out the pattern and attach it to the fabric, carefully pin it with pins or needles to the fabric so that it does not move, and trace the diagram in chalk, cut out the part field very carefully.
Creating individual parts
Set aside the details of the bottom and top of the silk pajamas separately, and prepare the elastic for the shorts. You can start sewing any part: either shorts or a top, everything will take about an hour. Silk fabric folded in several layers is suitable as straps, or you can buy ready-made straps that are adjustable in height; they will be much more convenient.
We carry out the assembly
First you need to sew shorts: 
- Sew the two halves of the shorts along the side seams.
- After sewing along the inside seam, two half legs should emerge.
- Next, insert them into each other and stitch along the central seam.
- Turn the product inside out, fold it over and finish the bottom.
- Fold the top of the shorts in the place where the elastic will be and sew, leaving holes for its entry.
- Insert rubber band.
Let's move on to sewing the top:

- First you need to sew the darts on the front fabric.
- The front and back of the fabric are sewn along the side cuts.
- Sew the finished ribbons to the top of the top. If the straps are homemade, then you need to cut out two strips of material about 1.5 cm wide, and measure the length according to your measurements and sew them.
- Sew on the facing for the top; its pattern completely follows the top front and back of the main pattern, but it will be approximately 4–5 cm wide.
- Finish and fold the bottom of the T-shirt, sew on lace if desired.
Final stage
Silk pajamas can be decorated at your discretion: sew lace to the bottom of the shorts or to the top of the top along the neckline, or decorate with sequins or rhinestones. After all the manipulations with decoration, you need to check whether the product is sewn well, whether there are any protruding threads and how even the seam is.


Tips for needlewomen on how to easily sew silk pajamas
Here are a few tricks for sewing silk pajamas:
- Silk is a capricious and slippery fabric; before sewing, you need to steam it thoroughly.
- Do not choose flashy colors, as plain and calm prints are better for home pajamas.
- For decoration, you should choose expensive and high-quality lace, otherwise the product will quickly lose its attractive appearance.
- The pattern can be used not only for pajamas, but also for regular shorts and trousers or a top. They are no different.
Cozy pajamas made of flowing silk are ready, it will be pleasant to sleep in them and can be easily used as home clothes.
Women's pajamas made of thin fabrics will be very relevant in the summer. And also a set made of satin will look beautiful in combination with light summer a robe made from the same fabric, but perhaps in contrasting colors. Because satin fabrics have the ability to cool, they are very comfortable when wearing the product in hot weather.
Download pattern for women's short pajamasYou can use the following links for free:
| Russian size | Bust | Waist circumference | Hip girth | |
| size 42, height 168 cm | 84 | 65 | 92 |
Payment for goods Buy |
| size 44, height 168 cm | 88 | 68 | 96 |
Payment for goods Buy |
| size 46, height 168 cm | 92 | 74 | 100 |
Payment for goods Buy |
| size 50, height 168 cm | 100 | 82 | 108 |
Payment for goods Buy |
| size 52, height 168 cm | 104 | 85 | 112 |
Payment for goods Buy |
| size 56, height 168 cm | 112 | 92 | 120 |
Payment for goods Buy |
* As a result of payment, you will automatically be sent a file with a pattern to the email you specified. If the file has not arrived, you need to check whether you entered the correct postal address when paying. If the postal address is correct, but the file has not arrived, you must immediately contact the address [email protected]
If the payment method does not suit you, you can offer your option at [email protected]
Patterns are given without seam allowances.
Difficulty: medium.
Cut:
. shelf - 1 child. with fold;
. back - 1 child. with fold;
. strap - 2 children;
. front half of shorts - 2 children;
. back half of shorts - 2 children.
When cutting the parts of the upper part of the pajamas, it is necessary to leave allowances for seams and cuts - 1.5 cm, for the hem of the bottom - 3 cm.
When cutting out the parts of the shorts, you need to take into account the allowance on the top of the shorts for the waistband and leave it at 6 cm, at the seams and along the cuts - 1.5 cm.
To process the armholes and necks of a T-shirt, you will need additional bias tape of the required size, based on the size of the product. And also an elastic band for the waistband of shorts 3 cm wide
Stages of working on the pajama top:
1. On the front and back parts along the neck sections, lay double stitches with light thread tension in order to evenly gather the neck sections.
2. Using the free ends of the threads, gather the sections of the neckline of the front and back to the required length.
3. Fold the parts of the shelf and back right sides inside and sew side seams. Press the seam allowances to the back and finish them with an overlocker.
4. Fold each strap lengthwise with the right side inward and stitch at a distance of 7mm from the fold.
5. Turn the straps out, iron them and baste them to the front at the upper corners.
6. Apply bias tape to the cut of the armholes and neckline of the front, starting from the side seam, right side to right side. In this case, the fold of the binding is located on the part at a distance of 1 cm from the seam. And the ends of the straps, pinned to the upper corners of the front, remain between the front and the trim itself.
7. Stitch at a distance of 1 cm. Cut seam allowances close to the stitch. Turn the binding to the wrong side, iron the edges of the armhole.
8. Turn the straps sewn to the front corners with a single stitch upward. After trying on, measure the required length of the straps, and pin the back ends to the upper corners of the back, right side to right side.
9. Baste the remaining binding to the top edge of the back neckline up to the side seam where the stitching began. Stitch the ends of the binding at the level of the side seam.
10. Stitch along the back neckline at a distance of 1 cm. Cut seam allowances close to the stitching. Turn the binding to the wrong side, while turning the stitched straps up and stitch to the inner edges of the neckline and armholes.
11. The ends of the stitched straps are hidden between the binding and the main parts.
12. If desired, you can stitch the top along the edges of the armholes at a distance of 7 mm.
13. Turn the hem allowance on the bottom to the wrong side and, if desired, on the front side, you can stitch it with a double needle at a distance of 2 cm.
Stages of working with shorts:
1. For shorts, sew side seams up to the cut marks.
2. Make step seams. Place the shorts halves inside one another, right side to right side, and sew the front and back middle seams with a single stitch. Iron the sections.
3. Turn the upper allowance for the belt to the wrong side, tuck the cut or process it on an overlocker and stitch at a distance of 4 cm, leaving a hole for threading the elastic band.
4. Thread an elastic ribbon into the waistband and sew the ends of the ribbon together. The finished length of the drawstring should correspond to your waist size.
5. Iron the hem allowances at the bottom and the allowances along the edges of the cuts to the wrong side, turn them under and baste.
6. Topstitch the bottom edges and cut edges of the shorts. At the upper ends of the cuts, depending on the type of fabric, you can sew a cross stitch.
7. As an alternative, depending on the fabric chosen, the lower sections of the shorts can also be finished with bias tape, which can be contrasting in color and serve as a decorative feature. But then, it must match the processed trim of the top.
Master Class according to this pattern:

Sewn using this pattern:

The pattern for the Casket website was prepared by Marina Breus.
After reading the article, you will learn how to sew pajamas with your own hands for a girl or woman. The process of creating such a wardrobe item is much simpler than it seems at first glance, even if you are new to sewing. Creating a pattern and sewing pajama shorts is described in detail and step by step. You can always complement night shorts with any top or bodice. The article also lists all the materials and tools you will need when sewing pajamas.
- centimeter - 1 pc.;
- elastic band 50-100 cm long – 2 pcs.;
- scissors – 1 pc.;
- dark marker or felt-tip pen – 1 pc.;
- pattern paper – 1 roll;
- ruler – 1 pc.;
- any fabric – 1 m;
- sewing machine – 1 pc.;
- pins – 15-20 pcs.;
- tailor's chalk - 1 pc.;
- thread color of fabric - 1 skein;
- iron – 1 pc.;
- overlock – 1 pc.;
- elastic band 2.5 cm wide - according to your own standards.
Step-by-step pattern for women's pajamas
At first glance, sewing cotton, silk, flannel and lace pajamas for girls, women or girls may seem like a daunting task. But, using ready-made patterns for women’s pajamas with shorts and step by step description process, you can easily create a similar wardrobe item with your own hands.
- First of all, you need to take measurements. To do this, you will need 2 elastic bands 50-100 cm long, which we tie at the hips and waist. First, we measure the circumference of the thigh (Ob) at the most convex points and the length of the seat (DS) with a centimeter. We measure the last parameter with a centimeter from the top elastic band to the bottom along the side.

- After all the measurements are taken, a pattern is made for women's pajamas with shorts. To create a pattern for pajama shorts with an elastic band, you will need special paper and a dark felt-tip pen.

- You can sew homemade shorts and a T-shirt or sleep top from satin or choose silk fabric. To make a pattern on a sheet of paper, place a dot on top, marking it with the letter T. From this point downwards we draw a straight line corresponding to the intended Ds. We put point B and add another 3 cm, fixing point H. From point B we put point B up, which is calculated as follows 0.1*(0.5*Rb) + 4 cm. From point B we put 2 to the left and right sides points: B1 and B2. We calculate them in this way - Ob/4 + 2 cm. We draw vertical lines from points B1 and B2.

- Then you need to carry out horizontal lines to the left and right of points T, B and H, marking them T1, T2, B1, B2, H1, H2, respectively. From point B2 we move point B3 to the right, counting 0.1*0.5*Rb+1.5 cm.

- From point T2 we count 1.5 cm to the left. This will be point T3. Using a ruler, we connect points T3 and B2 with a straight line. We connect points B2 and B3 with a smooth curve.

- We put 3 centimeters down from point B3, draw a vertical line and put point H3. We set aside 3 cm from H3 and connect the resulting point to B3 with a straight line.

- From point B1 we lay off a segment that is equal to Ob/10. This will be point B4. From point T1 to the right we count 4 cm and place point T4. From this point we set aside 5 cm straight up, drawing a vertical line. We place point T5, which we connect with a straight line to B1. A smooth curved line connects B4 and B1.

- From point B4 we draw a straight vertical line down, fixing point B5. From it to the right we set aside 1 cm and connect it to point B4. At the end, we connect points T5 and T3 with a straight line. This is the waist line. Constructing a pattern is not difficult, so this simple circuit will be understandable and doable even for beginners.

- Since we don’t wear sleep shorts at the waist, we need to step back 5 cm from point T3 and connect the resulting point to T4. This way we get a new waist line. Before sewing women's pajamas with your own hands, the resulting patterns must be cut along the contour with scissors.

- We sign the pattern, fixing where the top of the shorts is, the back part and the front. It is also necessary to sign where the middle seam of the back and front is.

- You can make summer night shorts from any fabric that you like in color and feel. Fold the fabric in half face to face. Lay out the pattern parallel to the bottom of the fabric. Leave about 3 cm at the bottom for the seam. We pin the pattern at the bottom with pins. In total, about 15-20 pins will be required to secure the pattern. We also fix the top part of the pattern.

- It is necessary to leave allowances for the seams and at the top. Leave approximately 5 cm for the width of the elastic and seam allowance. We fix everything with tailor's chalk. Along the middle seam of the front and back, you also need to leave 2 cm per seam. We also leave 2 cm along the crotch seams and at the bottom of the shorts. We also trace the pattern along the contours, while cutting out the shorts according to the allowances.

- After the pajamas are cut out and cut out on the fabric with your own hands, we pin the pins, fixing them along the middle seam of the back and front. Remove the paper pattern. Using a machine, we sew a seam along the marked line along the middle seam of the back and front. Iron the resulting seams and overlock them with an overlocker.

- After sewing the seams, iron them again. The seam along the butt needs to be stretched a little to turn it into a straight line.

- Next you need to sew the crotch seam. To do this, we combine the fabric together, secure it with pins, sew it on a machine, then overlock it and iron it.

- When the women's pajamas with shorts are almost ready, all that remains is to process the top and bottom. We start from the bottom, putting 2 cm from the edge on the wrong side. Draw a line with soap or tailor's chalk. We fold the fold along the line, iron it and sew along the edge of the fold with a straight stitch.

- We put 2 cm up along the wrong side, drawing a line with chalk. Fold the edge with the marked line and iron it. From the fold we set aside double the width of the elastic. Since our elastic band is 2.5 cm wide, we measure 5 cm and draw a line. We bend it to it and iron the previous fold. We pin everything with pins and stitch it. Don't forget to leave a hole so you can thread the elastic through it later.

- After everything is stitched, all that remains is to insert the elastic. Measure out the required amount of elastic on yourself and cut it off with scissors. We thread a pin through the elastic and pull it along the entire seam of the shorts. Make sure that the elastic does not twist. Finally, we sew the 2 ends of the elastic together. Straighten the elastic so that it is evenly distributed.

- The pajama shorts are ready. If desired, they can be supplemented with lace or a beautiful insert can be made. In the same way, you can sew pajamas for girls with your own hands using beautiful children's fabric.

Video instruction
From the video you will learn how to easily and simply sew children's or adult pajamas with your own hands. You will learn how to make a pajama shorts pattern. The whole process is described in detail and detail, so even if you have not tried sewing before, you can easily make satin and any other pajamas.
I have long wanted to sew pajamas for my daughters myself, and the other day it happened. For pajamas in the summer, a sweatshirt is suitable, for the winter and mid-season, interlock, and warmer fabrics are also suitable for the winter, for example: fleece footer. I have interlock, soft and delicate knitwear. The fabric was provided by the online store martapillow.ru.
Free pajama pattern from the website mamashilamalishu.ru (size 68-152 cm). The pattern is suitable for both girls and boys. My daughter is 103 cm tall, I took the blouse (sweatshirt) pattern for a height of 104 cm (the size fits perfectly, there is even a small reserve), but for the panties pattern it is better to take a size larger, since this one turned out to be close to us.

So let's start with the pajama top. Cut out all the pattern pieces + 0.8 cm for the seams: front, back, 2 sleeve pieces in a mirror image. It is better to sew cuffs and neck from ribbed or cash-corse. Don't forget to transfer the marks from the pattern to the fabric.

Lay out the details of the front, back and sleeves as shown in the photo below.

Sew the sleeves to the back and front, aligning the marks. A total of 4 seams need to be made. Iron the seams. I sew pajamas using an overlocker, but you can also use an overlock stitch on a sewing machine using knitwear needles. If in this case the knitwear stretches a lot, then you can put paper under the foot of the sewing machine and stitch along it.

Then we place the front and back with the right sides on top of each other, straightening the sleeves and sewing the sleeves and the front with the back, where marked with a dotted line, making only 2 seams.

Let's move on to the cuffs. We bend the parts and sew them into a ring, where it is marked with dotted lines.

We bend the cuff parts in a circle so that the seams remain inside.

Sew the cuffs into the sleeves, aligning the marks. At the same time, stretch the cuff a little so that it coincides with the neckline of the sleeve.


Let's move on to the neck. We bend the strip in half and sew it where it is marked with a dotted line.

We bend it in a circle in the same way so that the seam remains inside.

Divide the neck of the blouse into 4 equal parts and make marks on it. We combine the facing so that the marks on it and the blouse match. The neckline facing is slightly smaller than the neckline on the blouse, so the facing needs to be stretched a little when we sew it on.

Iron the neckline, giving it a finished look.

If you want to close the seam on the back of the neck, you can proceed as follows: measure the distance between the seams at the back of the neck, add a couple of centimeters to the hem and cut a strip 3 cm wide. In my case, the size of the strip was 14x3 cm.

Sew one edge to the seam, folding the edges, as shown in the photo below.

We bend the second edge and sew it below.

Ironing. This creates a neat seam on the back.

We decorate the bottom cut of the blouse. If you don’t have a cover stitching machine, then first process the edge using an overlocker.

Then we bend the edge by 2-3 cm and sew a straight line on a sewing machine. If you have a cover stitching machine, this will make the task much easier. Iron all seams.
Such clips for fixing fabric can be used.

The blouse with raglan sleeves is ready.

Let's move on to the pants. I changed the pattern of the trousers a little by connecting the front and back so that there was no seam on the side. We cut out all the details of the pattern + 0.8-1 cm for the seams: 2 parts of the legs in a mirror image, 2 parts of the cuffs and a strip for the belt. It is better to sew cuffs and a belt from ribana or cash-corse.

We place both parts of the legs with their right sides on top of each other and sew the central seams where marked with a dotted line.

We place the front and back of the legs with their right sides facing each other and sew a crotch seam where marked with a dotted line.

We also sew the cuffs of the trousers into a ring and bend them in a circle so that the seams remain inside.


We sew the cuffs into the pants.


All that remains is to sew on the belt. We bend the strip for the belt in half and stitch it where it is marked with a dotted line.

We bend it in a circle so that the seam remains inside.

At this stage, you need to insert the elastic into the waistband (between the layers of fabric). The length of the elastic is usually 1-2 cm less than the circumference of the tummy, but this depends on the ductility of the elastic itself.
We sew the belt to the pants, connecting the marks.

To prevent the elastic from turning over during washing, it can be sewn to the belt itself from the back, where it is marked with a dotted line.


Children's pajamas are ready.

Katerina is 4 years old.

I used the same pattern to sew pajamas for my eldest daughter. Veronica is 7 years old. I ordered Ladoshka interlock knitwear from the “1 meter of fabric” store.