Knitting box website
HOW TO DISTRIBUTE Raglan stitches from top to bottom
Before making calculations for raglan (however, as for everything else), you need to tie a control sample to determine the knitting density. Important! To avoid errors, do not be too lazy to tie a sample of at least 15cm x 15cm. After that, we determine how many loops are per 1 cm. To do this, we count the number of loops in 10 cm. Suppose there are 30 loops per 10 cm. Then 1cm \u003d 3p.
We measure neck circumference \u003d 36 cm.
These loops must be distributed to the sleeves, front, back and raglan lines.
Let the raglan line be 1p. Because there are four raglan lines, then 4 * 1p. \u003d 4p. set aside for raglans. 108p-4p left \u003d 104p. We divide these loops into 8 parts: 104p .: 8 \u003d 13p. We take one part on the sleeves (13p.) And in three parts - on the front and back (13p. * 3 \u003d 39p.). For myself, I mark all the calculations on the diagram, it turns out more clearly and understandably.
Important! If a pattern is used in knitting, its rapport must be taken into account when distributing loops. To preserve the beautiful addition of the pattern along the ragged lines, you can slightly change the calculation of loops in the details, while maintaining their original number.
So that a fold does not gather at the front of the neck in the finished product and the product does not pull back, it is imperative to make calculations for the neck
CALCULATION OF THE REGLAN FOR TIEING THE NECK IN extended rows
So that a fold does not gather at the front of the neck in the finished product and the product does not pull back, it is imperative to knit the neck in elongated rows, i.e. include all loops in the work gradually, following the corrected raglan calculations. This is what will be discussed now.
A bit of theory. The neckline consists of the following parts: back, front and top of the sleeves. The neck of the back is a straight line. The upper part of the sleeve is a curved line. It is divided into 3-4 parts. The neck of the front is a curved line. In the middle of the neck of the front, a horizontal part is left \u003d 4 cm (for an adult). Each part from the middle is divided into 3 equal parts. If there is a remainder, then it is added to the 1st part, counting from the middle of the front. Further, the loops of each part are divided into groups: the 1st part - into threes, the 2nd part - into twos, the 3rd part - into ones.
The knitting of the neck begins from the back with two rear raglan lines and gradually the loops of the sleeves and the front are included in the work. By the time all the loops are turned on, their number on the back and front should be the same. It should be remembered that while only the back and sleeves are knitted, the loops are added in the ragged lines of the back, and in the ragged front lines the number of loops remains the same. To avoid this difference, it is necessary to recalculate the loops: to the front loops add the number of loops \u003d the number of parts into which the sleeve line is broken, and from the back loops subtract the number of loops \u003d the number of parts into which the sleeve line is broken. From a practical point of view, the number of parts into which the sleeve line is broken is the number of tricks for which all the sleeve loops will be included in the work. 
Now let's move on to adjusting the calculations.
Initial calculations were as follows: 13 loops for the sleeves and 39 loops for the back and front. We divide the loop of the sleeves into 3 parts: 13: 3 \u003d 4 and in the remainder 1 loop, so the layout of the loops on the sleeve is 5, 4 and 4 loops. Then for the back, 39 loops are obtained - 3 loops \u003d 36 loops, for the front 39 loops + 3 loops \u003d 42 loops. The middle of the front neckline is 4cm * 3loops \u003d 12 loops. The remaining number of loops 42p-12p \u003d 30p is divided by half, it turns out 15 loops for each half of the front neck. We divide 15 loops into 3 groups: 15: 3 \u003d 5p in each group. Further, following theoretical calculations and slightly adjusting the breakdown into groups, we get the following combination of loops: 3p 3p 2p 2p 2p 1p 1p 1p. We will reflect all changes in the diagram for the raglan.
How to knit a neck
All calculations and adjustments have been made, now you can start knitting directly. It is convenient to start knitting with short circular knitting needles, if they are not available, they can be easily replaced by stocking knitting needles (they are also called knitting needles for knitting socks, the set includes 5 pieces). Later, when the number of loops during knitting increases so that they do not have enough space on the stocking needles, you need to switch to circular needles with a long line. It is ideal to use knitting needles with adjustable line, but I haven’t come across any. We also need marking rings to mark the raglan stitches and start knitting. If you don't have them, you can do this: make several rings from contrasting yarn and use them for marks.
So. Cast on 108 stitches on the knitting needles. In order to make it easier to understand the principle of knitting raglan, we will knit with the front stitch. I remind you that we will knit in a circle, so we close the knitting in a circle and knit one row with the front ones. Why do this, you ask? This technique will better fix the knitting needles and they will not dangle and twist so much. Personally, my attitude to knitting with knitting needles spoils this very initial moment. And after 3-4 connected rows, the fabric rigidly fixes the knitting needles and knitting becomes a song. You just have to be patient a little, and then it will go on the knurled one. Therefore, if you are just learning to knit, I advise you to knit this zero row, let's call it that. Then we knit, following the principles of partial knitting in elongated rows.
1st row. We put a ring on the knitting needle, this marks the beginning of knitting. We knit: 5 persons. left sleeve, yarn over, put a ring (thereby marking the raglan line), 1 person. raglan, yarn, 36 persons. backs, yarn, put a ring, 1 person. raglan, yarn, 5 persons. right sleeve. Expand knitting.
2nd row. We knit: 5 N. p. right sleeves, crochet knit out of item, 1 out of item raglan, crochet knit. ex.p., 36 n.p. backs, crochet knit. out of item, 1 out of item raglan, crochet knit. out of item, 5 out of item left sleeve. Expand knitting.
3rd row. We knit: 6 persons. left sleeve, yarn, 1 person. raglan, yarn, 38 persons. backs, yarn, 1 person. raglan, yarn, 6 persons. right sleeve + we include 4 more persons in the work. right sleeve. Expand knitting.
4th row. We knit: 10 out. right sleeves, crochet knit out of item, 1 out of item raglan, crochet knit. ex., 38 ex. backs, crochet knit. out of item, 1 out of item raglan, crochet knit. out of item, 6 out of item left sleeve + we turn on 4 more out of work. left sleeve. Expand knitting.
5th row. We knit: 11 persons. left sleeve, yarn, 1 person. raglan, yarn, 40 persons. backs, yarn, 1 person. raglan, yarn, 11 persons. right sleeve + we include 4 more persons in the work. right sleeve. Expand knitting.
6th row. We knit: 15 out. right sleeves, crochet knit out of item, 1 out of item raglan, crochet knit. N.p., N.p. 40 backs, crochet knit. out of item, 1 out of item raglan, crochet knit. out of item, 11 out of item left sleeve + we turn on 4 more out of work. left sleeve.
At this stage, all sleeve loops are included in the work. Next, we turn on the loops of the ragged front lines and the loops of the front neckline according to the same principle. When all the loops are included in knitting, we close the knitting in a circle and continue to knit in a circle, adding loops in every second row along the raglan lines to the desired size of the canvas.

A series of messages "":Part 1 -
Part 2 -
Part 3 -
Part 4 -
Part 5 -
Part 6 -
Part 7 -
Part 8 -
Part 9 -
Part 10 -
Part 11 -
Part 12 -
Part 13 -
Part 14 -
Part 15 -
Part 16 -
Part 17 -
Part 18 -
Part 19 -
Part 20 -
Part 21 -
Part 22 -
Part 23 -
Part 24 -
Part 25 -
Part 26 -
Part 27 -
Part 28 -
Part 29 -
Part 30 -
Part 31 -
Part 32 -
Part 33 -
Part 34 -
Part 35 -
Part 36 -
Part 37 -
Part 38 -
Part 39 -
Part 40 -
Part 41 -
Part 42 -
Part 43 -
Part 44 -
Part 45 -
Part 46 -
Part 47 -
Part 48 -
Part 49 -
Part 50 -
Part 51 -
Part 52 -
Part 53 -
Part 54 -
Part 55 -
Part 56 -
Part 57 -
Part 58 -
Part 59 -
Part 60 -
Part 61 -
Part 62 -
Part 63 -
Part 64 -
Part 65 -
Part 66 -
Part 67 -
Part 68 -
Part 69 -
Part 70 -
Part 71 -
Part 72 -
Part 73 -
Part 74 -
Part 75 -
Part 76 -
Part 77 -
Part 78 -
Part 79 -
Part 80 -
Part 81 -
Part 82 -
Part 83 -
Part 84 -
Part 85 -
Part 86 -
Part 87 -
I want to show you a scheme by which it is easy to calculate, how to closeneck loops. Let us analyze with examples how calculate the loops for the neck backrest, as well as for the round and V-shaped neckline of the front.
Neckline on the back.
1. Determine the number of vertical decreases. Let's determine how many rows in height we need to close, i.e. determine the depth of the cut. It is convenient to do this as follows: measure the depth of the cutout on the pattern with a ruler, or on a thing of a suitable style, for this, build a perpendicular from the shoulder line. Then calculate how many rows there will be in this dimension.
Example: the depth of the neck is 3 cm, this is 8 rows. Since we will close the loops in every second row, the number of rows in which the loops will decrease \u003d 4 (8: 2 \u003d 4). Those. number of vertical decreases \u003d 4.


2. We count the number of horizontal loops that need to be closed. To do this, measure the width of the neckline and determine the number of loops to be reduced. It is also easier to use a ruler and measure how many loops will be in the desired number of centimeters.
In my example you need to close 16 cm. The number of loops included in this length \u003d 38.
3. We divide the neck loops into 2 equal parts.
In my example this is 38: 2 \u003d 19 loops.
4 ... Further calculations are only for half of the loops.
These 19 loops must be closed in 4 times as follows:
The number of neck loops is divided by the number of vertical decreases. If you get an uneven number, then the remainder must be added one loop at a time to the part of the loops that is closer to the middle of the back.
In our example Divide 19 loops by 4, we get four blocks of 5, 5, 5 and 4 loops.
5. We close the neck loops symmetrically, on both sides from the middle, as follows: in every second row we close the resulting block of loops.
In our example in every second row we close 3 times 5 loops, then 1 time 4 loops.
Front neckline
Round neckline
1. We count the number of rows to be decreased vertically. We do this in the same way as in the first paragraph of the scheme for closing the back neck loops.
Example - the height of the neck is 9 cm, the number of rows \u003d 20. Since the loops are closed through the row, the number of decrease should be approximately equal to 10.
2. We count the number of horizontal loops to be reduced. As a rule, it is equal to the number of loops closed on the back, but in some cases, these numbers may differ.
In our example this is 38 loops.
3. We divide the neck loops into two equal parts.
Our sample: 38: 2 \u003d 19
4. All further calculations will be only for this half of the loops.
We divide the loops into 4 parts, if an uneven number is obtained, then the remainder must be added one loop at a time to the part of the loops that is closer to the middle of the back.
In our example: 19 stitches we divide into 4 parts, we get four blocks of 5, 5, 5 and 4 stitches.
5. We close the loops of the first part in 1 reception.
6. We close the hinges of the second part in two steps. If this number is not evenly divided, then more loops should be closer to the middle of the cut.
In our example: in every second row, close 3 loops 1 time, then 2 loops 1 time.
7. Close the loops of the third part in 3 steps.
In our example: in every second row close 2 loops 1 time, 2 more loops 1 time, 1 loop 1 time.
8. Close the loops of the fourth part 1 loop in every 2 row.
In our example: close in every second row 4 times, 1 loop.
This pattern works well for knitting a standard neckline. If you knit a deeper cut, then by reducing the loops according to the pattern, then we knit the remaining loops without decreasing the remaining number of rows.
V-neck 

1. We count the number of vertical rows. To do this, measure the height of the neck, calculate the number of rows in this segment. This can be done in two ways.
10 rows - is - A cm
x rows - is - B cm,
where A is the number of cm, in which 10 rows are placed, and B is the number of cm, which is the height of the neck (the depth of the cut).
Let's solve the proportion: x \u003d 10 multiplied by B cm and divided by A cm.
For instance, 10 rows we fit in 5 cm. The desired depth of the neckline is 25 cm. Let's count the number of rows to subtract: 10 multiplied by 25 and divided by 5. We get 50 rows.
2. Determine the number of loops in half the width of the neckline. The easiest way to do this is to apply a ruler to the knitted fabric and count how many loops are contained in the required number of centimeters.
Let's say in our sample 8 cm contains 20 loops.
3. We divide the number of rows by the number of loops. You get a number that shows how many rows you need to close the loops. If the number is not an integer, it must be rounded. If it turned out 2, this means that you need to subtract one loop in every second row, if 4, then in every fourth, and so on. If you get an odd number of loops, then you need to calculate the number of loops as in the example.
For our example 50: 20 \u003d 2.5, round up to 3. That is, we must close 1 loop every third row. But since it is more convenient to subtract the loops after one row, we will subtract as follows: subtract 1 loop in the second row, subtract 1 loop in the fourth row, repeat also further, i.e. alternate decrements in every second and every fourth row.
It is very convenient to close the neck loops simultaneously in two directions from two balls, so it is easier to make equal reductions, and thereby close the neck halves symmetrically.
Knitting on five needles is one of the most popular types of circular or tubular knitting. Most often, it is used to create small items such as mittens, gloves, mitts, socks, knee-highs, products for pets and dolls, items for knitted toys and others. In fact, for knitting compact things, 5 knitting needles are much more convenient than twin knitting needles on a flexible connection (on a tube or fishing line).
Knitting on five needles, like any other, begins with a set of loops. The number of loops required for the product should be calculated in advance. For five knitting needles, it is usually a multiple of four. In order to dial the loops, take two knitting needles, put them together and type the required number of loops on them. Then we take out one of the knitting needles, and distribute the loops equally on four knitting needles. The fifth needle remains free, we will use it as a working one.
It is best to spread knitting needles with dialed loops in a square, making sure that the hem is at the bottom of each knitting needle, and the loops "look" up. In this case, the needles should not be wrapped around the edges with threads anywhere, otherwise the row of the set of loops will turn out to be twisted. For a better understanding of further actions, we conditionally number the knitting needles, assigning the first number to the one on which the beginning of the set of loops is located, respectively, the knitting needle with the last dialed loops and the working thread will be the fourth.
Now in the left hand we take the needle number 1, and hold the working thread from the fourth knitting needle on the index finger of the left hand, leaving it behind the needle. We take the fifth (working) knitting needle in the right hand and knit the first loop from the beginning of the set, closing the circle. This loop should be made as tight as possible so that the distance between the last loop on needle # 4 and the first loop on spoke # 1 is minimal. Pulling on the working thread can make the loop tighter, otherwise the beginning of knitting will not look neat.

We continue knitting until the first knitting needle runs out of loops. Now the freed spoke becomes a working one. We shift it to the right hand and knit all the loops from the second knitting needle. In the same way, we continue knitting, each time using the free knitting needle as a working one.

Circular knitting has its own little tricks. So, there are ways to secure the beginning of knitting more tightly. The first of them is that at the very beginning of knitting, simultaneously with the working thread, the tip remaining from the set of loops is used, i.e., the first 3-4 loops are knitted in two threads. The second method is to knit the first loops not with a working one, but with a fourth knitting needle, this will allow you to tighten the thread that closes the circle. So you need to knit 2-3 circles, then distribute the loops evenly over the knitting needles.
Another nuance that you need to remember is that with tubular knitting, all front loops are knitted for the upper lobes, unless otherwise indicated in the description of the pattern.
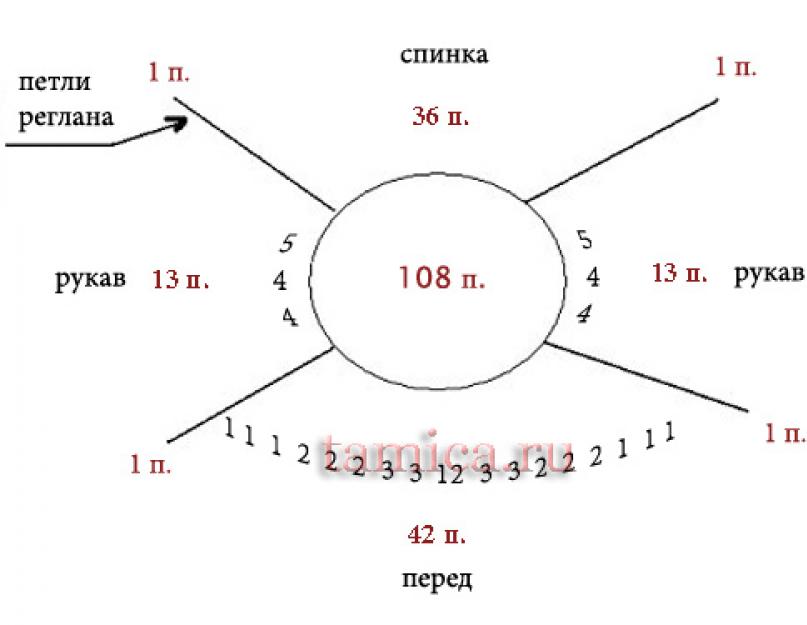
How to distribute the loops when knitting raglan from top to bottom

Before making calculations for raglan (however, as for everything else), you need to tie a control sample to determine the knitting density. Important! To avoid errors, do not be too lazy to tie a sample of at least 15cm x 15cm. After that, we determine how many loops are per 1 cm. To do this, we count the number of loops in 10 cm. Suppose there are 30 loops per 10 cm. Then 1cm \u003d 3p.
We measure neck circumference \u003d 36 cm.
Now you can count the number of loops for the initial row: 3p. * 36 cm \u003d 108 loops.
These loops must be distributed to the sleeves, front, back and raglan lines.
Let the raglan line be 1p. Because there are four raglan lines, then 4 * 1p. \u003d 4p. set aside for raglans. 108p-4p left \u003d 104p. We divide these loops into 8 parts: 104p.: 8 \u003d 13p. We take one part on the sleeves (13p.) And in three parts - on the front and back (13p. * 3 \u003d 39p.). For myself, I mark all the calculations on the diagram, it turns out more clearly and understandably.
Important! If a pattern is used in knitting, its rapport must be taken into account when distributing loops. To preserve the beautiful addition of the pattern along the ragged lines, you can slightly change the calculation of loops in the details, while maintaining their original number.
So that a fold does not gather in the front of the neck in the finished product and the product does not pull back, it is imperative to make calculations for the neck. This will be my next article "Raglan calculations for knitting the neck in elongated rows" in the "Knitting Techniques and Techniques" section.
Raglan from above in a circle: how to knit a neckline
This article is the logical conclusion of the articles "How to distribute the loops for knitting raglan from top to bottom" and "Calculations of raglan for knitting a neck in elongated rows."
Raglan calculations for knitting the neck with elongated rows All calculations and adjustments have been made, now you can start knitting directly. It is convenient to start knitting with short circular knitting needles, if they are not available, they can be easily replaced by stocking knitting needles (they are also called knitting needles for knitting socks, the set includes 5 pieces). Later, when the number of loops during knitting increases so that they do not have enough space on the stocking needles, you need to switch to circular needles with a long line. It is ideal to use knitting needles with adjustable line, but I haven’t come across any. We'll also need marking rings to mark the raglan stitches and start knitting. If you don't have them, you can do this: make several rings from contrasting yarn and use them for marks.
So. Cast on 108 stitches on the knitting needles. In order to make it easier to understand the principle of knitting raglan, we will knit with the front stitch. I remind you that we will knit in a circle, so we close the knitting in a circle and knit one row with the front ones. Why do this, you ask? This technique will better fix the knitting needles and they will not dangle and twist so much. Personally, my attitude to knitting with knitting needles spoils this very initial moment. And after 3-4 connected rows, the fabric rigidly fixes the knitting needles and knitting becomes a song. You just have to be patient a little, and then it will go on the knurled one. Therefore, if you are just learning to knit, I advise you to knit this zero row, let's call it that. Then we knit, following the principles of partial knitting in elongated rows.
1st row. We put a ring on the knitting needle, this marks the beginning of knitting. We knit: 5 persons. left sleeve, yarn over, put a ring (thereby marking the raglan line), 1 person. raglan, yarn, 36 persons. backs, yarn, put a ring, 1 person. raglan, yarn, 5 persons. right sleeve. Expand knitting.
2nd row. We knit: 5 N. p. right sleeves, crochet knit out of item, 1 out of item raglan, crochet knit. ex.p., 36 n.p. backs, crochet knit. out of item, 1 out of item raglan, crochet knit. out of item, 5 out of item left sleeve. Expand knitting.
3rd row. We knit: 6 persons. left sleeve, yarn, 1 person. raglan, yarn, 38 persons. backs, yarn, 1 person. raglan, yarn, 6 persons. right sleeve + we include 4 more persons in the work. right sleeve. Expand knitting.
4th row. We knit: 10 out. right sleeves, crochet knit out of item, 1 out of item raglan, crochet knit. ex., 38 ex. backs, crochet knit. out of item, 1 out of item raglan, crochet knit. out of item, 6 out of item left sleeve + we turn on 4 more out of work. left sleeve. Expand knitting.
5th row. We knit: 11 persons. left sleeve, yarn, 1 person. raglan, yarn, 40 persons. backs, yarn, 1 person. raglan, yarn, 11 persons. right sleeve + we include 4 more persons in the work. right sleeve. Expand knitting.
6th row. We knit: 15 out. right sleeves, crochet knit out of item, 1 out of item raglan, crochet knit. N.p., N.p. 40 backs, crochet knit. out of item, 1 out of item raglan, crochet knit. out of item, 11 out of item left sleeve + we turn on 4 more out of work. left sleeve.
At this stage, all sleeve loops are included in the work. Next, we turn on the loops of the ragged front lines and the loops of the front neckline according to the same principle. When all the loops are included in knitting, we close the knitting in a circle and continue to knit in a circle, adding loops in every second row along the raglan lines to the desired size of the canvas
Raglan calculations for tying the neck in elongated rows
I continue to talk about knitting raglan on top. For the beginning, see the article "How to distribute the loops for knitting raglan from top to bottom."
So that a fold does not gather at the front of the neck in the finished product and the product does not pull back, it is imperative to knit the neck in elongated rows, i.e. include all loops in the work gradually, following the corrected raglan calculations. This is what will be discussed now.
A bit of theory. The neckline consists of the following parts: back, front and top of the sleeves. The neck of the back is a straight line. The upper part of the sleeve is a curved line. It is divided into 3-4 parts. The neck of the front is a curved line. In the middle of the neck of the front, a horizontal part is left \u003d 4 cm (for an adult). Each part from the middle is divided into 3 equal parts. If there is a remainder, then it is added to the 1st part, counting from the middle of the front. Further, the loops of each part are divided into groups: the 1st part - into threes, the 2nd part - into twos, the 3rd part - into ones.
The knitting of the neck begins from the back with two rear raglan lines and gradually the loops of the sleeves and the front are included in the work. By the time all the loops are turned on, their number on the back and front should be the same. It should be remembered that while only the back and sleeves are knitted, the loops are added in the ragged lines of the back, and in the ragged front lines the number of loops remains the same. To avoid this difference, it is necessary to recalculate the loops: to the front loops add the number of loops \u003d the number of parts into which the sleeve line is broken, and from the back loops subtract the number of loops \u003d the number of parts into which the sleeve line is broken. From a practical point of view, the number of parts into which the sleeve line is broken is the number of tricks for which all the sleeve loops will be included in the work.
Now let's move on to adjusting the calculations.
Initial calculations were as follows: 13 loops for the sleeves and 39 loops for the back and front. calculations of raglan for knitting the neck with elongated rows Divide the loops of the sleeves into 3 parts: 13: 3 \u003d 4 and 1 loop in the remainder, therefore the layout of the loops on the sleeve is 5, 4 and 4 loops. Then for the back, 39 loops are obtained - 3 loops \u003d 36 loops, for the front 39 loops + 3 loops \u003d 42 loops. Middle of the front neck 4cm * 3loops \u003d 12 loops. The remaining number of loops 42p-12p \u003d 30p is divided by half, it turns out 15 loops for each half of the front neck. We divide 15 loops into 3 groups: 15: 3 \u003d 5p in each group. Further, following theoretical calculations and slightly adjusting the breakdown into groups, we get the following combination of loops: 3p 3p 2p 2p 2p 1p 1p 1p. We will reflect all changes in the diagram for the raglan.


