Construction of collar patterns- this is a vast topic, the beginning of which I want to start with the simplest collar, namely, a stand-up collar with a side fastening to the top.
This type of collar has become widespread due to its simplicity of construction and classic shape.
Such collars are sewn on almost all types of clothing - from blouses to coats.
According to the principle of constructing a pattern drawing, collars are divided into three groups:
1 - Standing: standing-turn-down and turn-down with the side fastening to the top and open.
2 - Turn-down for products with open sides.
3 - Flat-lying (undercut).
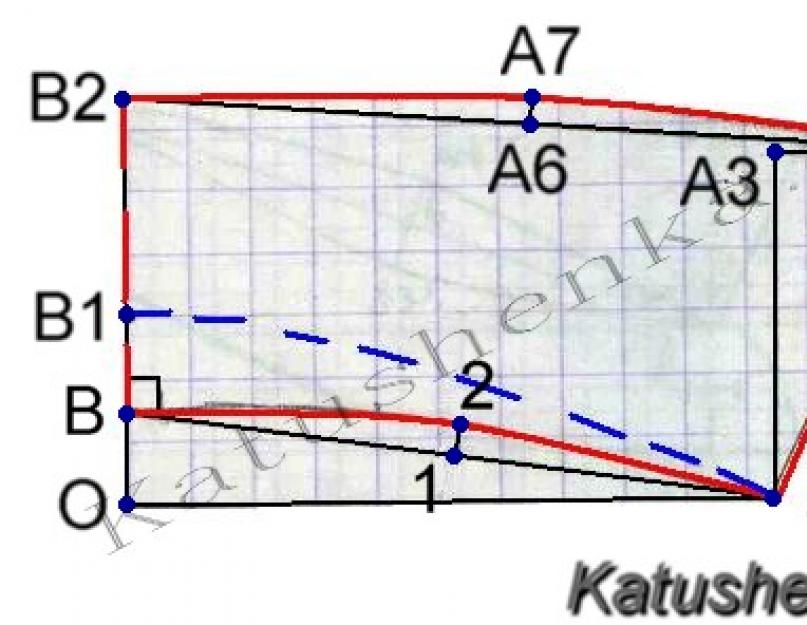
Stand-up collars with side fastening to the top (EMKO method):
2. From point O upward, set aside 1.5 - 10 cm (rise of the middle) and place point B.
4. We connect points A and B with a straight line, in the middle of which (point 1) we build a perpendicular upward, equal to 1 - 2.5 cm (depending on the rise of the OB) - point 2.
The greater the rise, the greater the deflection at point 1.
5. Draw the stitching line in a smooth curve through points B, 2 and A.
6. Rack height.
BB1 (up) = 2 - 3.5 cm
7. Collar width in the middle.
BB2 (up) = 8 - 14 cm
8. AA3 (up) = BB2 + 1 cm
9. A3A4 (right) = 4 - 5 cm
10. Connect points B2 and A4 with a straight line. At its middle A6A7 = 1 - 1.5 cm.
11. We draw the departure line with a smooth curve.

The construction of the collar pattern can be slightly modified, depending on its width.
==============================================
 There is such a separate group of collars as flat-lying. Or they are also called undercut.
They are called that because they are hemmed and follow the line of the neckline, and the flap is shaped according to the model.
The principle of their construction is the same - it depends on the neck.
I will show this below with an example.
The construction of flat collars is carried out using the EMKO method.
To construct the collar, we combine the patterns of the back and front along the shoulder lines so that the top of the back neck (point A2) coincides with the top of the front neck (point A4), and the top points of the armholes P1 and P5 overlap each other by 1 - 1.5 cm.
With a greater approach, we increase the rise of the stand, constructing the collar with closed darts and shoulder lines.
The stitching line of the collar follows the line of the back and front neckline.
The width of the collar at the back and at the ends, the shape of the flap is designed according to the model.


The variety of flat collars is achieved through different neck cuts and the shape of the collar flap.

 There is one such collar that looks majestic and beautiful, and is simple to the point of disgrace.
This collar is a one-piece stand-up collar with a bodice and a dart.
You can use it like blouses And dresses, and on jackets And coat.
Especially often such a collar is built on wedding bolero.
This type of stand is built on an extended neck.
Neck extension:
A2-O (right) = A4-C (left) = 0.5 - 1.5 cm.
To build the back, connect point A to point O with a straight line.
From point A and point O to direct O-A upward we restore the perpendiculars on which we set the height of the stand:
A-O1 = O-O2 = 3 - 4.5 cm.
We connect points O1 and O2 with a smooth line, and smoothly transfer point O2 to the shoulder line.
If the middle of the back is intact, then point O2 is shifted to the right by the amount O1-O11, and the resulting point O21 is smoothly connected to the shoulder line.
We take the excess width of the neck into the dart along the neck. The shape of the dart and its location are determined by the model and body type.
In general, the dart is located in the middle A-O distances, its solution is approximately 1 cm, length = two heights of the stand.
When constructing the front stand, we connect point C and point A5 (A6) with a straight line, and from points C and A5 (A6) we restore perpendiculars, on which we plot the height of the stand and get points C1 and C2.
We connect point C1 to point C2 with a smooth line - the upper cut of the front post.
If the front is solid, then we draw its center line vertically, and we design the neckline in the same way as on the back, with C1-C11 = C2-C21.
We take the excess width of the front neck into a dart (we design it in the same way as on the back).

You can make a tuck, or you can do without it.


==============================================================
 In one of the previous posts I talked about collar on a deep neck in a product with a fastener .
In the same post I want to talk about building a similar collar, but without a front fastener.
This collar differs from the previous one in that it contains no stand- it lies flat on the back.
Although... you can modify this pattern and add a stand along the back - this is also possible.
But that’s not about that now.
Construction of a collar on a recessed neckline in a product without a fastener (according to the EMKO method):
1. From point A5 downwards we set aside the size of the neck recess A5-L - according to the model.
2. Connect point A4 with point L.
3. From point A4 upwards, along the continuation of the straight line L-A4, set aside the length of the back neck - place point B.
4. From point A4, with a radius equal to:
R = A4-B to the right we draw an arc on which we set aside the height of the stand B-B1 = 2 - 2.5 cm.
We connect point B1 with point A4, and restore the perpendicular from point B1 to the left.
We set aside the width of the collar at the back B1-B2, which is equal to twice the height of the stand (which is 1 - 1.5 cm), which means:
B1B2 = 2 * stand height + (1 - 1.5 cm) = 5 - 6.5 cm
5. Lengthen the collar along the flight.
B2-B3 = 1 cm
We connect point B3 with point B1 and continue this line 0.5 cm to the right - put point B4.
6. Draw a line for sewing the collar into the neckline:
a) Connect point A4 to point B4 with a smooth line.
b) Divide the segment V-L in half - put point B5.
c) To the left of point B5 we restore a perpendicular along which we lay a segment equal to B5-B6 = 1.5 cm
d) Through points B4, A4, B6, L we draw a line for sewing the collar into the neck.
7. We design the departure line according to the model.

You can get such a cute little collar:

 There is such a wonderful collar like turn-down collar with recessed neck with clasp.
This is what we will talk about in today’s post.
What's good about him?
Yes, it’s not noticeable in anything special, it’s just that there’s this collar, and I’d like to tell you a little about it.
You can’t see him as often as, for example, english collar, but not that rare either.
The collar looks better on thick fabric.
It stands up a little at the back, but is flat towards the front.
These collars look great on blouses and dresses.
Construction of a turn-down collar on a recessed neck with a fastener (according to the EMKO method):
1. Lower the neck A5-A6 = 10 - 13 cm.
2. Connect point A6 to point A4 with a straight line.
3. Divide the segment A4-A6 in half, the division point is a.
4. Deflection in the middle of the segment A4-A6 to the right and left by 1.5 cm.
a-a1 (left) = 1.5 cm
a-a2 (right) = 1.5 cm
5. We continue the line A6-a1-A4 up and set aside the length of the back neckline from point A4, and place point Z1.
6. From point A4 draw an arc to the left, with a radius equal to:
R = A4-Z1
7. We set aside 3.5 - 5 cm in an arc to the left, and put point Z2.
8. We draw the stitching line through points Z2, A4, a2, A6.
9. Z2-Z4 - collar width according to the model.
10. We design the departure line and ends of the collar according to the model.

===============================================================
 Below is pattern of a stand-up collar for products with a combined fastener to the top and open to the style.
These collars are most widespread in shirt-style blouses and dresses.
What makes it special?
And the peculiarity is that, unlike turn-down collar patterns with a slight rise, this collar has a kind of one-piece stand-up and looks good both when buttoned and when unbuttoned.
The pattern of a stand-up collar is constructed as follows:
1. Construct an angle at point O.
2. From point O upward, we lay off a segment equal to 2 cm and place point B.
3. From point B up, set aside a distance equal to 3 - 3.5 cm (height of the stand), and
put point B1.
4. From point B up, set aside a distance equal to 8 - 10 cm (collar width), and place point B2.
5. From point B on the horizontal we make a notch:
R = BA = neck length - (minus) 0.05*OB
7. From point A upward we set aside a distance equal to OB2.
8. Distance A3A4 - according to the model.
9. The collar stitching line touches the line OA at point (A1), located at a distance of 1/3 of the segment OA, from point A to the left.
We trace the collar along the control points.

====================================================
 Below is described constructing a turn-down collar pattern with a slight rise in the middle.
It is built almost the same way as this collar.
And they are very similar in appearance.
There is only one small distinguishing feature - they have different stand rises.
Such a collar is sewn on in the same way as that one on almost any type of clothing. Only now, probably, in a coat less often.
The construction of a turn-down collar (EMKO method) looks like this:
We design the stitching line with a slight convexity towards the ends of the collar.
1. Draw a right angle with its vertex at point O.
2. From point O, set aside 2 cm upward (rise of the middle) and place point B.
3. From point B on the horizontal we make a notch:
R = BA = neck length - (minus) 0.05*OB
4. Connect points A and B with a straight line.
We divide this line into three equal parts: AA1 = BB = AB/3
5. Aa = AA1/2
6. From points (c) and (a) we draw perpendiculars.
From point a downwards along the perpendicular we lay off 0.2 - 0.3 cm.
From point B up perpendicular we set aside 0.4 - 0.5 cm.
7. Rack height.
BB1 (up) = 2 - 3.5 cm
8. Collar width in the middle.
BB2 (up) = 8 - 14 cm
9. AA3 (up) = BB2 + 1 cm
10. A3A4 (right) = 4 - 5 cm
11. Connect points B2 and A4 with a straight line. At its middle A6A7 = 0.5 cm.
12. Draw the stitching line in a smooth curve through points B, b1, A1, a1 and A.
And the turn-down collar pattern looks like this:

===============================================
 I was organizing the folders on my computer and found these interesting collars.
There are a lot of them here, and perhaps even small, but maybe they will be useful to someone.
As you know, fashion is cyclical, and if these collars are not in fashion today, this does not mean that they will not be in demand in 5-10 years.
What I mean is that there is no need to write that they are too old-fashioned - everything comes back in fashion!1. Collar with a detachable stand for a men's shirt .
 Below is a pattern of perhaps the most common collar - shirt collar.
And it's not even that important women's shirt or men's - one construction.
According to different methods, of course, it differs, but this construction (EMCO method) is quite successful (although there are some angularities and shortcomings).
The shirt collar pattern consists of the collar itself and the stand.
Construction of the collar pattern:
1. Construct an angle at point O.
2. From point O upward, we lay a segment equal to 7 - 8 cm, and place point B.
3. From point B up, set aside a distance equal to 6 - 8 cm (collar width), and place point B2.
4. From point B on the horizontal we make a notch:
R = BA = neck length - (minus) 0.05*OB
5. We connect points A and B with a straight line, in the middle of which (point c) we build a perpendicular up and down, along which we put 1.5 cm in both directions, and put points at b1 and b2.
6. At point B we build a right angle.
BB1 = AA2 = 3 - 4 cm.
Draw the bottom of the rack parallel to the top. We complete the ledge equal to the width of the half-skid. The corner can be rounded or left as an angle - according to the model.
The width of the collar at the front and the design of the ends according to the model.
7. AA3 (up) = BB2 + 1 cm
8. A3A4 (right) = 4 - 5 cm
9. Connect points B2 and A4 with a straight line. At its middle A6A7 = 1 - 1.5 cm.
10. We draw the departure line with a smooth curve.

Happy building and sewing!
It consists of two parts - the stand and the collar itself.
In general, this advice to everyone: if you want to cut out a collar and don’t know how to do it, what kind of collar would be better suited, but you don’t want to cut the fabric, then it’s best to cut out the collar you like from fake fabric (fabric that you don’t mind cutting, it’s better to choose the most suitable texture), and figure out how you like its shape and how it lies.
In this case, you will not spoil the fabric, and you will be able to evaluate the collar
 Quite often you can see shawl collar in clothes.
Such a collar is in demand in blouses, dresses, and even coats, although, probably, most often such a collar can be seen in a robe.
The shawl collar looks very dignified and can be made from almost any fabric.
Pattern it is also not complicated and can be built very quickly.
Constructing a shawl collar pattern (according to the EMKO method):
1. On the continuation of the shoulder line, set aside a distance equal to A4-B = 2 - 3 cm.
2. Connect points B and L, at the intersection with the neck line we place point F.
3. From point A4, on the continuation of line A3-A4 to the left, set aside a value equal to the length of the back neckline and place point O.
4. From point O we lift up a perpendicular to the line A4-O, along which we set aside the amount of rise in the middle of the collar = 4 cm - for stooped figures, 6 cm - for kinked figures, and we get point B3.
5. Connect points B3 and A4.
6. From point B3, perpendicular to B3-A4, draw a line to the middle of the collar.
7. Stand height:
B3-B2 = A4-B = 2 - 3 cm.
8. We set aside the width of the departure according to the model, but not less than B3-B2 + (3 - 4 cm), and we get point B4.
9. We draw up the departure line according to the model.

Shawl collar in clothes:


 is presented below and is not anything complicated or scary.
So you don’t need to be so afraid, you can just read it carefully and everything will become clear.
Where can we see an apache collar?
Most often these are blouses and dressing gowns.
But such a collar can often be seen on a wedding bolero.
So, if you decide to sew wedding bolero, then take note of this collar.
He classical and looks appropriate on many models.
This is, so to speak, a classic that never goes out of style.
Apache collar pattern (according to the EMKO method):
1. On the continuation of the shoulder line, set aside the height of the stand A4-B = 3 cm.
2. Connect points L and B, at the intersection with the neck line we place point F.
3. Let's continue L-E line up and put it away from point B to the length of the back neck - put point B1.
4. From point F we draw an arc to the left with a radius equal to F-B1, along the arc to the left we lay off a segment B1-B2 = 5 cm.
5. Connect point B to point B2 with a straight line and, perpendicular to it from point B2, draw a line from the middle of the collar up and down.
6. From point B2 to the left on the line of the middle of the collar we lay off a segment:
B2-B3 = A4-B = 3 cm, and to the right B2-B4 = the width of the departure according to the model.
7. Position of the front end of the collar.
Point C - according to the model.
8. We draw the departure line and the edge of the collar to the inflection line L-B according to the model.
9. We draw the line for sewing the collar into the neck through point B3 tangentially to the neck, with A4-A41 = 0.5 - 0.8 cm.

This apache collar pattern may vary slightly, depending on the height of the stand.
You can make a turn-down stand:

Or you can make it so that the collar stands at the back, and only its ends are bent:

And you can even do something in between the two options described above:

 There is a whole group of collars called "fantasy".
Fancy collars are obtained by spreading out the flap of a flat-lying collar of any shape.
These include a collar, which will be discussed below - this is a “mould” collar.
It is usually built on recessed neck.
I will give the construction using the EMKO method.
It is best to make a mold collar from silk fabrics, because... they will flow and lie very beautifully.
Its construction and pattern is very simple.
A2-B1 = 10 cm
A5-O = 9 cm or more

From the drawing we translate the collar pattern, draw cut lines on it, divide the pattern into 8 parts, along which we cut the pattern from the flyaway side and spread it apart.
The amount of expansion depends on the thickness and structure of the fabric, and can range from 10 to 20 cm.
We draw the departure line with a smooth line so that the collar fits nicely into the folds; it should be cut along the bias thread towards the middle of the collar, i.e. to the line A-B at an angle of 45 degrees.

Most often, such collars can be seen on blouses made in romantic style, but you can also find coats with the following collars:

=============================================================
 Women's collars can be absolutely different shapes and content.
For different types clothing and for different fabrics. For each you can find a collar, as they say, “your own.”
Somehow earlier I wrote about collar collar. The pattern of which was a simple rectangle.
This was the simplest collar.
Not long ago I found so many women's cowl collars that my eyes lit up!
So many ideas! So many models!
These collars are more suitable for soft, easily draped fabrics. Preferably not very wrinkled, but better yet, not wrinkled at all.
They will look great on knitwear.
These models are true women's collars endowed with grace and charm.
This is just a godsend in some sense of the word.
Before, I didn’t know what to come up with with knitwear. I didn't know what kind of collar to make.
I'm tired of the same type, but this just saves me.
After all, by sewing on different collars, the clothing models will look completely different.
That is, using one base (say, for a badlon, for example), you can do a lot different models. I used to have a problem - all the badlons had regular stands.
I'm tired of it already.
Now there is something to create and somewhere to roam
Still, women’s collars are not men’s, there are so many of them
And these are just clamps!
If anyone has the same problem as me, then you can also solve it like I did.


 There is one such wonderful collar - a “collar” or, as it is also called a “collar”.
This collar looks quite impressive.
We also need to say a little about fabrics!
In such a collar, what kind of fabric is used is very important.
Fabrics should (preferably) be wrinkle-resistant and easily draped so that they lay beautifully and do not cling.
Perhaps this is such a feature of this collar, and you need to pay special attention to it.
Construction of the cowl collar pattern:
1. Cut out the shape of a rectangle.
2. Place the stitching line into the neckline at an angle of 45 degrees to the warp threads, while expanding the neckline according to the model.
3. Stand height OB = AA1 = 4.5 cm or more.
4. OA = neck length
The depth of the neck for this stand can be increased, and accordingly, the length of the collar too.
Cowl collar pattern:

This stand is used mainly in light clothing: blouses, dresses, badlons, etc.
Here are just a few examples:


=======================================================
 Today I want to talk about pattern of a narrow one-piece stand and its pattern.
First, about what kind of collar this is and whether it is a collar.
The stand is one-piece, without darts, and therefore it is cut narrow.
This is a kind of collar, although it is narrow.
It is found very rarely, but there are such models.
I don't really like him.
There's another one one-piece stand, but it has darts and is wider.
Constructing a pattern for a one-piece stand:
A narrow one-piece stand with a bodice up to 4.5 cm high is built on the drawing of the back neck and shelf.
On the back:
1. From point A up, set aside a distance equal to the height of the stand = 3 cm, and place point 2.
2. From point A2 up and to the left we draw an arc with a radius of 3 cm.
3. Through point A2, draw a vertical upward until it intersects with the resulting arc - we get point A7.
4. Along an arc to the left of point A7, set aside a distance equal to 1 - 1.5 cm and place point 1.
5. Connect points 1 and 2 with a smooth line, and point A7 with the shoulder section of the back.
On the front:
1. We continue the line of the shoulder cut to the right, and at its continuation we put aside
A4a21 = 3 cm.
2. From point A4 with a radius equal to 3 cm, draw an arc upward and from point a21 we set aside 1 - 1.5 cm - we get point a22.
3. Connect point a22 with a smooth line to point A4.
4. From point A6 upward, draw a vertical along which we set aside 3 cm - we get point a23.
5. Connect points a23 and a22 with a smooth line.
Pattern of a one-piece stand-up collar with a bodice:

==============================================================
 Miracle collar funnel shaped stand presented below in all its glory!
What kind of collar is this and where is it used?
This is a very beautiful collar, but it’s very impractical, and due to its impracticality you can find it in few places.
Basically, these are some carnival costumes or simply products intended for special occasions.
Its peculiarity is that this collar is very different from all its brothers.
Differs in shape.
But it exists, and even sometimes appears, so why not make a pattern for it?
Construction of a stand-up collar of the “funnel” type:
1. Construct a right angle with the center at point O.
2. From point O up, set aside a distance equal to 2 - 4 cm (more is possible - according to the model), and place point B.
3. From point B up, we set aside the height of the stand = 3 - 4 cm, and we get point B1.
4. From point B, with a radius equal to the length of the neck (approximately 21 cm), we make a notch on straight line O - we get point A.
5. Connect points B and A with a straight line. Divide this segment in half and put point 1.
If you have chosen a collar style, then you need to cut it out and sew it, and then sew it correctly onto a blouse, dress or shirt, this is especially important if the collar is under . The processing method and sewing method depend on the shape of the collar. Collars are always made double, for this they are immediately cut out on the fabric in two layers, but the collar should be 3mm smaller at the bottom and the toe line, this is done so that the corners of the collar do not bend upward. Sometimes, to make the collar firm, a padding is inserted into it; when sewing, the corners of the padding are cut off to prevent thickening, then the corners will turn out well and be sharp. When we baste the collar, we will add an additive in the corners, and for round collars we will add an additive on the curves.
 If the collar is round, it can be sewn immediately, other styles with sharp corners are sewn in three passes. We start by stitching the sides and make the shape of the corners the same. Then the collar must be smoothed out and one side of the seam folded over to the lower collar, the corners cut off and turned towards the collar. After this, sweep the collar 0.5 cm from the edge and mark its middle.
 The collar can be sewn using several methods, the method depends on the shape of the collar and the quality of the fabric. You can sew the collar directly to the fabric, to the neckline of a blouse or dress, or you can use bias tape. To sew a collar adjacent to the neck, we will do this: we will apply the sewn collar with its upper side to the wrong side of the neck of the product and stitch, notch and iron the seam, bending it towards the collar. Fold the free edge of the lower collar by 0.5 cm and tuck it behind the machine stitches so that it is unnoticeable. If the blouse or bodice of a dress has a fastener in the front, at the edges of the collar, you need to make notches, which we will tuck in and close with hidden stitches. We sew turn-down collars together with the lining, placing the collar between the neckline and the lining.
 Collars can be sewn to the neck of a blouse or dress using bias tape. It is applied to the neck along with the collar. We baste collars with bias tape to the product, aligning the middle of the collar with the middle of the back neckline, aligning the ends along the sewing line with the middle of the front. Fold the collar to the wrong side along the fastener allowance line and baste the bias tape equal to the circumference of the neck and neckline. Then we sew the collar, neck fabric and bias tape. Now we fold the collar inside out of the product and baste it along the stitching line and along the edge of the binding to the product, sew the free cut of the binding to the product with an invisible seam.
The tendency to wear a separate collar on top of clothes is far from new; since the Middle Ages, fashionistas and fashionistas have paid great attention to starched stand-up collars and demonstrated neat overhead collars.
Modern needlewomen, lovers of original things and exclusive accessories, have gone much further in their imagination and skill, thinking about how to sew a collar. In many ways, talented designers come to the aid of modern accessories and an endless variety of handicraft products. Therefore, making invoices today is not so much difficult as it is exciting and interesting.
How to sew a collar will be interesting not only to a professional designer, but also to a novice amateur. By performing this detail using different techniques, you can independently choose the level of difficulty and try to create a cute gift for yourself for your beloved.
Well, let's look at how to sew a collar and what variations there are.
One of the methods, the simplest and fastest, is to decorate a ready-made collar from an old shirt to your taste. A classic shirt with a stand-up collar works well for this.
So, you need:
Find a shirt that matches the color and style,
Carefully cut off the collar from the main part of the product,

Process the cut edge by hand or by machine - the basis for creativity is ready,

Now the fun begins - decorating the collar and transforming it with the magical movements of your hands into a work of art and a beautiful elegant accessory.

There are an infinite number of options: you can play on contrasts, you can design a collar in one color scheme, playing on the play of halftones of the material with which you decided to decorate. It can be beads, large pearl beads, rhinestones, small and large sequins, handmade or cross stitch. You need to imagine what clothes you are going to wear with the finished product. With or as an addition to an everyday pullover.


The next option is a little more complicated, it involves how to sew a collar yourself.
To create your own from scratch, do the following:

Copy the inside of the collar and the collar from the drawing. Check the length of the top cut of the collar. Correct the cuts at the junctions and indicate the direction of the warp thread
Figured stand, one-piece cut with shelf and back  This model with a figured one-piece stand looks especially impressive. Thanks to such original details, the product takes on a fashionable ease.
Cut the front from the neck to the center of the chest. Connect the sides of the bust dart; Transfer 0.7 cm of the chest dart solution to the neckline to increase it, and temporarily transfer the remainder of the solution to the waist.
For this one-piece collar, widen the neckline of the front and back along the shoulder by 2 cm; deepen the neckline in the middle of the front by 1.5 cm and in the middle of the back by 1 cm. Draw a new neck line, on the back - at a right angle to the middle line. Draw auxiliary lines through the extreme points of the new neck of the shelf and back
 From the top of the new neck of the shelf and back, draw perpendiculars to the auxiliary lines, along which set aside the height of the stand - 4 cm. Extend the middle line of the back up and set off the height of the stand along it - 4.5 cm.
Draw the top cut of the post. Draw a collar on the shelf in accordance with the model (see drawing).
From the middle point of the section of the upper cut of the collar on the back, draw a cut line to the end of the dart on the convexity of the shoulder blades
Details of the cut of the figured stand
 Cut the back along the cut line to transfer the dart to the convexity of the shoulder blades. Move the dart to the convexity of the shoulder blades to the upper cut of the stand.
After transferring the dart to the upper cut of the collar on the back, add 0.7 cm to each side of the dart, this will further expand the collar at the back. Shorten the dart to the convexity of the shoulder blades to 9-10 cm from the back neckline.
Copy the inside of the collar and the collar from the drawing. Check the length of the top cut line of the collar. Correct the cut lines at the junctions and indicate the direction of the warp thread
Stand, solid cut with shelf  This model shows the construction of a stand, cut entirely with only a shelf. The advantage of this type of collar is that you can change the length of the line of the upper cut of the collar by changing the angle of the back of the collar.
Connect the sides of the chest dart and temporarily transfer the solution to the side line.
Extend the neckline along the shoulder of the shelf and back by 1.5 cm; deepen the neckline by 1 cm in the middle of the back. Draw a new neckline on the back at a right angle to the center line
 Draw an auxiliary line through the extreme points of the extended neckline only on the shelf. Extend this auxiliary line by an amount equal to the length of the new back neckline.
From the last point obtained, draw a perpendicular to the auxiliary line 1 cm long (for this model). The greater this value, the greater the angle of inclination of the back of the collar, the greater the length of the line of its upper cut and, accordingly, the less the collar fits to the back of the neck.
Draw a line for the lower cut of the stand-up collar on its back. At right angles to the resulting line, draw the center line of the rack.
From the top of the widened neckline of the front, draw a perpendicular to the auxiliary line, along which set aside the height of the stand - 4 cm. Set aside 4.5 cm along the center line of the collar. Draw a line for the upper cut of the collar.
Details of the cut of the stand, one-piece cut with a shelf
 Copy the collar, completely cut out with the inside of the collar, from the drawing. Check the length of the top cut of the collar.
Stand, one-piece cut with shelf and back and shawl lapel  Based on solidly cut stand-up collars, you can design a variety of models, using different shapes of the neck, sides, lapels, etc. In the model presented below, the stand-up collar turns into an original lapel, reminiscent of a shawl collar.
Cut the front from the neck to the center of the chest. Connect the sides of the chest dart, transfer 0.7 cm of the chest dart solution to the neckline to increase it, temporarily transfer the rest of the solution to the waist.
For this collar, widen the neckline of the front and back along the shoulder by 1.5 cm; deepen the neckline in the middle of the back by 1 cm. Draw a new neckline on the back - at a right angle to the midline.
 Draw auxiliary lines through the extreme points of the neckline of the front and back.
From the tops of the new neck of the shelf and back, draw perpendiculars to the auxiliary lines, along which set aside the height of the stand - 4 cm. Extend the middle line of the back up and set aside the height of the stand along it - 4.5 cm.
Parallel to the middle of the front, draw a line for the edge of the edge and the bend of the lapel, mark the location of the buttons. Decorate the lapel and collar sections.
From the middle point of the section of the upper cut of the collar on the back, draw a cut line to the end of the dart on the convexity of the shoulder blades. This line is needed to transfer the dart solution to the upper cut of the collar on the back and to lengthen the upper cut.
Shawl lapel stand detailing
 Cut the back along the cut line to transfer the dart to the convexity of the shoulder blades. Move the dart to the convexity of the shoulder blades to the upper cut of the stand.
After transferring the dart to the upper cut of the collar on the back, add 0.7 cm to each side of the dart, this will further expand the collar at the back.
Shorten the dart to the convexity of the shoulder blades to 9-10 cm from the back neckline.
Copy the inside of the collar and the collar from the drawing. Check the length of the top cut of the collar.
Correct the cuts at the junctions and indicate the direction of the warp thread.
Cutting stand in a product with lapels  Cut-off stand-up collars in products with different lapel options always look unique. If the expansion of the neckline on the front and back along the shoulder line is significant or the size of the collar on the front is very different from the size of the collar on the back, then you should copy the front part of the collar and use it when constructing a cutting stand.
Expand the neck along the shoulder of the shelf and back by 2.5 cm, deepen the neck in the middle of the shelf by 4.5 cm and in the middle of the back by 1 cm. Draw a new line for the neck of the shelf and back.
 Draw a line for the edge of the side parallel to the middle of the shelf. Draw a fold line for the lapel and mark the location of the buttons/loops. Draw the contours of the lapel and collar on the shelf.
Construct a cut-off stand-up collar based on a right angle. To do this, measure the length of the new neck of the shelf and back and set aside the resulting value according to horizontal line from the starting point. From the resulting point, set aside 3 cm vertically to determine the amount of rise in the front part of the collar and draw the lower section of the stand.
The height of the collar along the center line is 4 cm. Copy the front part of the collar from the front drawing and combine it with the collar drawing (shaded area on the collar drawing). Finish the design of the collar sections.
Cutting details of the cutting stand in a product with lapels
 Copy the collar and collar from the drawing. Check the length of the top cut of the collar. Increase the size of the outer part of the stand-up collar by the amount of the edge of the facing seam.
Correct the cuts at the junctions and indicate the direction of the warp thread.
Cutting stand built on a greatly enlarged neck of the shelf and back  If the product model has a greatly enlarged neckline and a high stand-up collar, then such a collar is first drawn on the front and back, then the constructed parts of the collar are copied and combined to obtain a separate collar part. This way, a collar is obtained, the shape of which is adapted to the model neck of the product.
Connect the sides of the chest dart, temporarily transfer the solution to the waist.
 The shoulder length of the shelf and back in this model is 2 cm. Draw a line for the model neck in accordance with the drawing. This line is also the bottom cut of the collar.
At a right angle to the bottom edge of the collar upwards, draw a line corresponding to the line of the middle flange on the collar, 7 cm long. Parallel to this line, draw the contours of the collar clasp.
At right angles to the lower cut of the collar from the shoulder of the front and back, draw the sides of the collar parts, 7 cm long.
Extend the middle line of the back upward and set aside the height of the stand along it from the model neck - 7 cm. Draw sections of the stand-up collar through the resulting points.
Cutting rack details
 Copy parts of the collar from the back flange, align them along the lines of the sides - you have obtained a detail of one part of the collar. Copy this part of the collar and draw the allowance for the collar fastener in the form of an angle.
Correct the cuts at the junctions and indicate the direction of the warp thread.
Cutting stand of a soft shape, cut on the bias, in a product with lapels  For this model, the stand-up collar is cut out in one piece along the top edge in the form of a rectangle. The collar is cut in the oblique direction of the warp thread. When the finished collar is sewn into the neck, its lower sections are slightly stretched. Thanks to this, the collar curves beautifully around the neck. The length of the lower cut of the collar is determined in the drawing.
Connect the sides of the chest dart, and temporarily move its opening to the side line.
 The shoulder length of the shelf and back for this model is 2 cm. Draw a line for the edge of the side at a distance of 8 cm from the middle of the shelf. Draw a model neck in accordance with the drawing.
Draw on the front the contours of the collar and the figured insert of the front, seamlessly cut out with a lapel and hem. Draw the back of the collar on the back in accordance with the drawing. The height of the stand-up collar is 7 cm.
Measure the length of the upper sections of the collar parts on the front and back.
Cutting details of the soft-shaped cutting stand
 This stand-up collar is cut in the oblique direction of the warp thread, one piece along the flight, in the form of a rectangle. The length of the lower cut of the collar is equal to the length of the upper cut of the parts of the collar on the front and back, which is measured in the drawing.
Copy the figured shelf insert, completely cut out with lapel and hem, from the drawing and mirror it relative to the fold line. Connect the sides of the bust dart.
Correct the cuts at the junctions and indicate the direction of the warp thread.
Flat collars.
This is one of the types turn-down collars.
Flat collars are characterized by a small stand-up or its complete absence. This type of collar is mainly used in women's blouses and dresses, as well as in children's clothing and can come in a wide variety of shapes and sizes.
The drawing of a flat collar is built directly on the drawings of the front and back. First, we decide on the model of the dress or blouse and match the neckline, i.e. if necessary, we deepen, expand or change the shape.
For convenience, during construction, we close the chest dart on the shelf, and on the back - the shoulder dart.

Rice. 2
Then on Blank sheet paper, we apply the patterns of the back and front, combining the shoulder sections so that the points at the base of the neck (A4 and B3) coincide, and the points at the ends of the shoulder lines (P1 and P5) overlap each other by 1 - 3 cm. The smaller the approach, the lower the height of the stand. With greater approach, the rise of the rack increases.

Rice. 3

Rice. 4
We trace the outline neck, partially middle front and back seams, and armhole line.
Look at the drawing to have an idea of which lines of the drawing are involved in the construction. 
We remove the back and front patterns and continue constructing the collar itself on the sheet of paper where we drew the outline.
Stitching line The collar should exactly follow the line of the neckline of the back and front.
Collar width in the middle (distance АШ) and at the ends (В4К), the departure line (ШК), as well as the starting point of stitching (К) in the middle of the front are determined by the model of your dress or blouse, i.e. you yourself. The collar flap is formed by a smooth line connecting points W and K.
It should be remembered that the departure line should approach the line of the middle of the back at right angles.

Rice. 5
Important: When making patterns, you should know the following.
The pattern of the upper collar along the departure line should be 1-3mm larger than the pattern of the lower collar. The thicker the fabric,  the greater this difference should be. This is done so that when turning the turn-down part away from the rack top collar could freely go around the lower collar without tightening or deformation - that’s it. So that during the basting process the stitching line does not peek out from the side of the upper collar, i.e. for the formation of perekant throughout the entire flight - that's two. And ultimately, to ensure a good fit of the collar, and hence appearance of the entire product.
Therefore, first copy one part of the collar from the main drawing clearly along the line, this will be the collar. And then, on a separate sheet of paper, enlarge this pattern by adding the required amount along the outer contour
- this will be the top collar. Look at Fig.6
Fig6 Cutting details.

Rice. 6
The share line basically always corresponds to the fold line. Why mostly? Because you can place the midline obliquely. And if you are sewing a product from fabric with a pattern (check, strip, coupon or simply large drawing), then you are guided by the need to match this pattern.
When copying on the pattern, it is necessary to put marks (notches) that determine the control points of connection of the collar with the neck at the level shoulder seam and the middle of the back.
The last step is to copy the collar pattern itself onto a separate sheet of paper. We will end up with two cut pieces with a fold. Upper and lower collar or aka collar.
Ready!  You can start cutting. Don't forget to allow seam allowances when cutting. It is usually customary to add 0.75cm along the entire contour of the collar. If you are new to sewing or think that you do not have enough experience, make a pattern with allowances on the seams. In this case, you will just have to chalk the pattern on the fabric and cut along the chalking line.
After making the pattern, it is better to test it on inexpensive fabric to make sure that it looks exactly as you expected.
The departure line, and hence the shape of the collar, can have a wide variety of configurations. Figure 6 shows 4 types of flat-lying collars with different departure line configurations. You can add to this collection.

Rice. 7
We offer as an example several options for flat collars.
In this example, we deepened the neck slightly.

Rice. 8
In the next example we will widen the neck.

Rice. 9
And one more option, in which the starting point for sewing in the collar is slightly offset from the center of the front. This option is used if, for example, a ruffle is sewn along the edge of the collar. Or if you intend to attach any decoration (accessory), such as a brooch, bow or flower, etc., in the center of the neckline. Or if you just decided so, your desire alone is enough.

Rice. 10
Having mastered the principle of construction itself, you will be able to design any shape of a flat-lying collar on this basis. Starting from school, sailor and ending with an unlimited number of fantasy collars.
Be creative and enjoy your creations.
I draw your attention to the recommendations highlighted in words Important or Main. Be sure to take them into account. Usually they do not refer to a single episode, but to the total amount of information or to a significant part of it. In order not to repeat ourselves, we highlight it, focusing your attention on it. Although we will still remind you of this from time to time.
Don't forget to add it to your bookmarks. The bookmark buttons are below.
The rights to this article belong exclusively to the author. Full or partial use of the materials of this article in electronic publications on the Internet is possible only if the following conditions are met:
Information about the author must be preserved. In the title or at the end of the published reprint the source must be indicated: www.site, the Internet resource "Sewing Crafts Master" with a direct, active, visible to the user, not blocked from indexing by search engines hyperlink to this article.
Republication of texts in newspapers, magazines or other replication outside the Internet is possible only with the written consent of the author.
Admin 2015-06-03 at 3:52 am
This new article is devoted to the design features of collars various types and cuts, methods of their processing and connection with the neck. And with this post I’m opening a new section on my blog: 100 collars. I will fill it until I describe exactly 100 collars.
I don’t know if I’ll get that much in my memory - well, there’s the Internet - I’ll look there. And you, dear reader, will help, if anything. So send in your designs - I love understanding clothing designs.
Today I will describe the first collar - like this:
And I’ll tell you how I used perforated glasses for the first time today to improve my vision.
So, how many designs of collars are there, their shapes, sizes, processing methods and the number of included parts?

Studying the varieties of collars from fashion magazines, catalogs and simply samples of finished products, I always pay attention to what the shape of the collar depends on:
First, I look at the shape of the collar.
Second, I decide how it connects to the neckline (set-in or one-piece).
Third - how the collar fits to the neck - tightly, at some distance or even flat on the bodice.
And fourth - how the collar is connected to the clasp - whether there is one at all, whether the clasp is up to the top or to the bend of the lapel.
Structurally, the collar most often consists of an upper and lower collar part, as well as a gasket part.
In total, there are several varieties of collar cut: flat with different stand-up heights, set-in stand-ups (vertical and inclined), solid stand-ups with front and back details, shirt collars, collar-clips, turn-down collars with a stand-up in the middle, and collars for products with an open fastener: jacket-type collars, shawl collars, apache collars.
A lot, right? We will slowly consider all these designs in the following articles of this new column of mine.
Now let’s start with the simplest collars to design, these are:
Turn-down flat collars:
This is a collar that completely follows the shape of the neck and shoulder area of the product - turn-down, flat-lying.
A distinctive feature of this collar is the absence of a stand. That is, the collar lies flat on the figure.
The pattern of such a collar is based on basic basis shelves and backs of the product.
The shape of such a collar varies depending on the shape of the neck.
The line of sewing the collar into the neck completely follows the contour of the neck of the product. The flap of the collar may have different shape– rounded or pointed edges, different collar widths.

The clasp in products with such collars can be either on the shelf or on the back. There may also be no clasp at all.

Let's consider the most common model of such a collar - round or, as it is now called “Peter Pan”.

The pattern of such a collar is simpler than all others - directly based on the neck of the product.
In the drawing of the shelves, set aside 6 cm along the contour of the neck in order to outline the contours of the collar. The contour of the collar's departure is rounded to the center of the neck in front of a smooth line. The width of the collar is usually the same along the entire contour and varies depending on the model. IN baby dress 4 – 5 cm, in women's dress or in a blouse 5 - 6 cm, in a coat 7 - 10 cm or more.
On the back, along the contour of the neck, you also need to set aside the width of the collar, in in this case 6 cm. If there is no fastener on the back, then the collar may have a seam located in the center of the back. If there is a fastener, then the collar along the back is not sewn, but is decorated with rounded lines. And thus, two parts of the collar are formed - left and right.
The design of the collar lines on the back should be done with the shoulder dart. This dart can be temporarily closed and transferred to the armhole, or it can be conditionally considered closed by extending the shoulder seam in a straight line from the neckline point towards the shoulder.
There should, of course, be no seam along the shoulder line on the collar.
The contour lines of the collar are copied onto a separate sheet of paper, combined along the shoulder seam line and a collar pattern is obtained.
For the collection, I offer slightly different neckline shapes, suitable for a flat turn-down collar, without a stand-up collar:
The algorithm for constructing a pattern for such collars is simple - we change the neckline according to the model, then draw the lines of the collar.
Using the open neckline as an example, I’ll note once again that the key changes in the neckline are its width and depth. And also the shape of the neckline on the chest - round or U-shaped:

The neckline of the next dress is formed similarly to the previous model, but Y-neck there is also on the back. The shape of the ends of the collar is also different - they are not round, but sharp. The width of the collar is figured and gradually narrows closer to the shoulder.

Detachable collar - decorated with beads and rhinestones.


The neckline is designed in a boat shape, the right collar piece is overlapped with the left one, and then sewn into the neckline as one piece.

Let's continue the topic of collars in the next article -.
My reader and training group participant Tatyana sent me an interesting letter. Quote:
“Ellen, I see you are wearing plus glasses. My mother, who is over 70, restored her near vision in three months. Her eyesight has been good throughout her life. So, she is a “non-believing Thomas,” and until she checks it herself, she won’t believe it.
I bought her glasses with perforations, like “holes.” During this time, she read for an hour a day, looked at something on the Internet, and suddenly, once again, she puts on strong glasses, and they blur everything. She went and wiped them, but there was no result.
I put on other glasses, weak ones, which I hadn’t worn for a hundred years - and then I immediately began to see! Well, we moved on. This is already the second little man who, in my presence, began to see well up close - “far-sighted.” And the first grandmother, she is 80 years old, and she has restored her vision and reads small letters calmly. The witness herself is where it all started. But I’m myopic and I can easily watch movies in them. So if you are interested, as they say, this is the result first-hand.”
My vision really began to deteriorate - I can’t see well at close range. Without glasses I can’t even see the phone button.
Thanks to Tatyana - I bought these glasses today - they have perforations - these are small holes on... I wanted to say, on the glasses. But these are plastic “Glass”. In general, here is a photo of what these glasses look like:
And now I’m reporting on my impressions: (I bought it, by the way, at an optician. They cost 890 rubles.) I ask the seller - “How do they work?” She - “You will read the instructions.” And asks to put on these perforation glasses and read. I say: “I won’t see such small letters.” She says, “put on your glasses.”
Well, I put it on - I look and see! Small letters. I see! You can read directly through the perforation and letters and objects become sharper. But it’s unusual, really - the image seems to split into two and you have to somehow align it.
Right now I’m writing these lines with new glasses. And what’s interesting is that when I was reading these instructions for the glasses, I tried to bring the text very close to my eyes - almost end-to-end - 5 cm distance - and it was still visible.
I spent about an hour in them today in total. Then I took it off - and when reading my mail, I could see the text - although it was blurry, but I could read it without glasses at all. Marvelous! Are your eyes rested in these glasses? In general, I am a Thomas believer, so I will continue to study them.
I’ll write about the results if you’re interested. So, no don't miss it. And that’s all I have for today.
A flat collar lies flat along the neckline and is characterized by a small stand-up or no stand-up collar. This type of collar is most often used on children's clothing, bouquets and dresses, jackets and coats.
The construction of a flat collar is carried out directly on the combined front and back of the product with a slight overlap of shoulder sections in the armhole area. To do this, combine the tops of the neck at points A 1 and A 2, and the end shoulder points P 1 and P 2 should overlap each other by 1-3 cm.

Thanks to this construction, the length of the collar's flight is maximum, so the collar lies flat on the product.
To build a collar bust dart on the shelf should be moved to the side seam or to the waist line.
The stitching line of the collar exactly follows the line of the neckline of the back and front.
The width of the collar and the departure line (its shape) are determined from the model.
Pattern of a flat collar with rounded ends

1. Temporarily move the dart on the bulge of the chest to some section of the front, for example, to the side.
2. Attach the back to the front, matching the shoulder sections at the neckline and overlapping them at the armhole by 1-1.5 cm. A slight overlap of the front and back shoulder sections at the armhole eliminates the flat collar from unsightly slack along the fly line.
3. In the drawing of the basic base of the product, expand the neckline along the shoulder line by 1 cm; deepen in the middle of the front by 2 cm, in the middle of the back by 1 cm. Draw a new neckline at a right angle to the middle of the back.
4. Draw a collar with a width of 6 cm in accordance with the drawing.
5. To improve the fit of the collar, lower the front middle section of the collar 0.7 cm below the front neckline.
6. Copy the collar from the drawing of the front and back.
Below is detailed video on how to sew a flat collar.