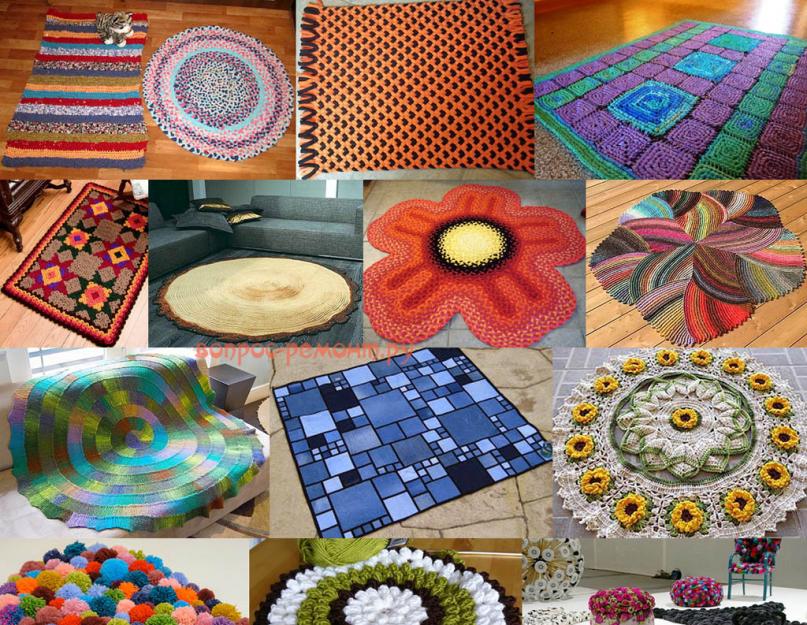
There is no need to explain why there is a carpet in the house. Many DIY enthusiasts make rugs with their own hands, making useful products from leftover threads, yarn, or simply unnecessary rags. Among the examples of home carpet weaving there are not only those that are not inferior to the best industrial designs, but also unique, highly artistic ones that are not subject to machine technology, see fig. And all this with minimal costs, or even for nothing.
Archaeologists consider a carpet to be the oldest household item: before realizing that one could wear the skin, a person laid it out for himself. Carpet weaving and carpet weaving are also the most ancient crafts, and here handmade still firmly holds its position. For example, a mat made of pom-poms lends itself very difficult to automation. But at home, you can make a bedside rug from pompoms in half a day, and it will be more convenient than a factory one, and it will look better, see below.

Homespun and homemade rugs
The same applies to rugs made from old things. Their disposal using industrial methods is not very profitable and purchase prices for used rags are not encouraging. And unwanted clothes transformed with your own hands into a carpet will still serve usefully on the farm.
In this article we will look at what and how to make rugs for your home and garden with your own hands. But, unfortunately, large floor and wall carpets and rugs will have to be touched upon only in passing; this is a separate big topic. And napkins, table runners, furniture covers and small wall rugs woven using the macrame technique will only have to be mentioned - this is an equally extensive topic, technologically weakly related to carpet weaving.
In this publication we will deal with small rugs, colloquially called rugs. As you can see in the photo above, they are not necessarily “grandmother’s”, nestled in the kitchen or in the nook by the door, although rugs are needed there too. A rug can be a highly aesthetic product that decorates the living room, and a durable hygienic product in a room with high humidity and/or in a room prone to pollution. Or even street, if the rug is intended for the dacha. All this diversity rests, in general, on three pillars: material, execution technique and supporting base.
Technique and basis
The variety of homemade floor mats is mind-boggling. But according to the technique of execution, they are divided into a relatively small number of varieties:
- Sewn- technologically the simplest, but requiring additional materials (threads) and industrial equipment: a sewing machine. On an ordinary household 1-needle machine with a needle up to No. 100, it is possible to sew quite good and beautiful rug.
- Braided (knitted) rope mats- no extras no materials needed. Very practical, stable, but the appearance is quite monotonous, although elegant. They require increased attention and accuracy in work, but to a connoisseur the product speaks volumes about the skill of the author.
- Woven from scraps of fabric– they require quite a lot of labor, but not complicated; The material is suitable free waste. The appearance of patchwork carpets made from skillful hands can be simply stunning. To make them you need a simple hand loom - a crosny - see the video below. Crowns for small rugs can be made at home in half an hour to an hour from scrap materials, see below and at the end.
Video: do-it-yourself rug made from shreds
- Braided (crocheted). Rugs are not knitted on knitting needles, because... knitted products are designed primarily for vertical loads. Whole-knit rugs are most often made round (see figure below); A round rug made using a different technique will not be durable. Whole-knitted rugs require quite a lot of skill, but a novice craftswoman can quickly and easily crochet blanks for sewn rugs.
- Knitted on a woven or semi-rigid mesh base– these are fleecy carpets up to “real” patterned and “grass” rugs for the bedroom or nursery, in which the foot gently sinks. “Grass” rugs are no more complex in technique than sewn ones and are less labor-intensive, but you need a purchased base; however, inexpensive, see below. Patterned fleecy carpets, not inferior in appearance to Persian or Khorasan ones, can be woven at home on bedsteads, but a lot of work, attention and artistic taste will be required.
- Knitted without warp– are most often made from pieces of plastic film, for example, used bags. It is possible to discern the artistic merits in them only with a fair amount of imagination; the service life is up to 6 months, but such a rug can be made in literally half an hour. They are hygienic, have shoe-cleaning properties and are easy to clean: dry them, shake them thoroughly - and that’s it. Ideal as door guards at the dacha and in the shower/sanitary block there. Not recommended for living rooms: static accumulates intensively in a dry room with a non-conductive floor.
- Composite from natural solid mineral or elastic organic materials or their imitation with or without a base. Natural mineral ones are very expensive, and if made independently, very labor-intensive. Organic materials (wood, cork; occasionally horn and bone) on the floor are not very hygienic; when wet, they are slippery and wear out quickly. Imitating minerals is quite labor-intensive, but can be done at home (see below), the raw materials for it are inexpensive, and the aesthetic effect can be magnificent. Mats made in this way are suitable for both indoor and outdoor use with virtually no restrictions.
Rags and rugs
Homemade rugs are made mainly from natural plant textile and knitted materials: old clothing, yarn, thread, rope (twisted rope) or cable (braided rope). Synthetics in rugs for indoor use should only be used for wearable items due to the same static electricity; it, through bare feet or in slippers, has a very bad effect on health. We will return to imitation of natural mineral materials later, but enough of what has been said above about solid/elastic organics.
Jeans
In terms of all its qualities, the best material for a floor mat is denim, especially since old jeans Quite often a lot accumulates in the house. And the easiest way to sew a rug from jeans is to cut them into pieces of the desired shape and sew them from the inside out, top left in Fig. The denim rug (above right) will look acceptable in any interior, as well as denim clothing in any setting, except prim and official.

If you’re not too lazy to “give the jeans a cooler style,” you can trim the blanks around the edge with braid contrasting color(left in the middle), such a rug will suit a modern interior. And for rooms with an archaic-rustic design or, say, a dacha, you can weave a “grandmother’s” rug from jeans unraveled into ribbons by whipping up crosses (see at the end). Elementary techniques of “grandmother’s” weaving are shown in Fig. down. 2 denim colors, face and back, are enough to get a nice pattern. A torn old sheet will be used as a basis; the strips are twisted into bundles.
Note: In the process of weaving a denim carpet, it may be necessary to connect strips of weft, either to bring out the pattern, or simply not enough. The weaving knot is not suitable in this case, because The fabric is dense and the knot will be large. Jeans ribbons are connected in the same way as when weaving a patchwork rug without a machine, see below.
Tights
The second class of items suitable for rug wear are tights. How to make a rug from tights, see the tutorial video below:
Video: DIY pantyhose rug
Other junk
Light wearable items can be placed on the mat by the most in various ways, see eg. next video. However, when they are trampled while lying on the floor, the wear resistance of the products leaves much to be desired.
Video: how to make rugs from old clothes
If the original item is knitted, say, a rug made from old T-shirts, then larger pieces are cut out of it without seams, piping, etc. Pockets are paired. Then the blanks are unraveled into ribbons, braids are woven from them, and a rug is sewn from the braids, see fig. Threads – no thinner than No. 20. Hemming the base made of technical fabric is mandatory; without it, the tights will soon stretch and quickly fray.


This technique is not suitable for printed fabrics: threads will crawl along the edges of the tapes, and holes will creep under the fastening threads. In this case, the workpiece is first cut into even strips 5-7 cm wide, each strip into 4 more identical strips, without cutting all the way through. Then the straps are woven (see the picture on the right), and from the straps a rug is woven/woven on a sheet base, like a “grandmother’s” denim rug. The finished rug turns out respectable: the double texture indicates a high-class workmanship.
Note: sometimes one-piece rugs are woven using the same technique, cutting the workpiece at once not completely into 8, 16, 32, 64, etc. narrow stripes. But due to the displacement of the transitions of the ribbons, the carpet turns out to be either oblique or with a zigzag edge, depending on how the adjacent quadruples are woven, one into one or mirrored.
Here the question arises: how to cut thin fabric into strips of the same width, especially narrow ones? To do this, the workpiece (and then the wide ribbons) are folded like an accordion, leveled (ironing doesn’t hurt) and pinched with clothespins. Next, little by little, cut through all the bends at once, starting from the end, and remove the clothespins as you cut.
Braided mats
Rope mats are distinguished by their enviable resistance and durability. They look good too. They are mainly used as bedside footrests and tabletops, because... their length is 40-45 rope diameters, and their width is approximately 1.25-1.5 times less. You don’t need any materials other than rope, or any special experience. Schemes for weaving rope mats are shown in Fig. Based on the first, pos. 1-5 – regular straight knot. It is woven with one end (running) in 5 passes. The rope will need 35-37 mat lengths, i.e. 1200-1500 of its (rope) diameters. It’s not scary, in meters it will be 13-17 m.

The sea rug (pos. a-f) is so named because it was an indispensable accessory to the sleeping place of a sailor of old times. In the sailing fleet, a sailor who did not know how to make himself a hanging hammock bunk and weave a mat for his feet as part of the set was considered a loser, regardless of any merits and length of service. The sea rug is knitted in 3 passes while hanging. The rope (approx. 20% longer than the previous one of the same length) is bent in half and braided with 2 ends. The sea rug is narrower and longer, its weaving is more frequent and finer. The labor intensity is the same as before, because You need to straighten not 5, but 3 ends.
The variety of rope rugs woven using the same or other flat knots is not limited to these samples, pos. 1-3 on the next rice. But this work is much more complicated, the details of which are not possible to dwell on here. Regarding rope carpets decorative elements(brandenburs, etc.), sewn onto a woven base (pos. 4) or glued from a single piece of rope, pos. 5, then in terms of strength and durability these products are more decorative than for everyday use.

Let's try to weave...
To make a small, approx. up to 40 cm long, a woven rug made of threads, yarn or fabric ribbons/bundles is not needed at first. A rectangular piece of cardboard and a dinner fork will be enough. Using a fork, immediately poke holes for the base: lines are drawn along the short edges of the cardboard “machine”, at a distance of 3-5 cm from it. The first 4 holes are pierced along the line with a fork, then the fork is shifted by 3 tines so that the outer one falls into the last hole that has already been pierced, 3 more holes are pierced, etc. The cardboard is cut to the holes; The warp thread is drawn in one piece, placed in a loop under the edge petals - “pegs”. Leave the ends of the base free for approx. 10 cm each.
Note: There is no need to take cardboard longer than 40 cm; it will bend under the tension of the threads during work.
Then we weave, as usual, pos. 1-2 Fig., but instead of a shuttle you will have to use a gypsy needle; the shuttle will not fit between the cardboard and the fabric. Having carried out 4-10 threads of weft, depending on its smoothness, we tamp the fabric with the same fork, pos. 3. We obviously unwind the wefts in excess, because the missing thread is tied from the inside out, which is not possible in this case.

Next, the ends of the worked weft threads are left at approx. 10 cm and glued to the “camp” with tape, pos. 4. When the entire warp is woven, they are carried out with a needle under at least 8-10 weft transitions from the wrong side to the face, pos. 5, and trimmed.
The next stage is to remove 3-4 loops from the petals at one end of the base and insert the free end into them, pos. 6. We tighten it a little, but don’t cut off the “tail” yet! We do the same with the other end of the warp thread.
Now the base can be completely removed from the pegs. Place the rug approx. for a day flat smooth surface for self-tightening of fabric under the influence of residual stresses in the threads. If the loops of the base have not yet tightened completely after this, smooth the rug, tighten it, and shake it until they tighten. Now you can cut off the “tails” of the base - the product is ready for use!
In a similar way, you can weave rugs from leftover yarn or patchwork rugs from ribbons/strands (remember - jeans, tights, rags?) Both materials can be used together, but the warp and weft must be uniform. They are assembled from separate threads/ribbons, secured with knots, on the left in Fig. It remains to decide how to connect threads/ribbons that are not long enough, or to bring out the pattern. As for the threads, there is no way on a cardboard “loom”, you need to take whole ones. And 2 ways of connecting tapes are shown there in the center and on the right. You can connect very short ribbons first, but the joint will be visible. The second joint is invisible, but the ends need to be overlapped by 4-5 cm.

... and knit
Carpets, as already mentioned, are crocheted. In general, this is no simpler than knitting, only the properties of the finished products are slightly different. There are many patterns for crochet rugs on the Internet, but for beginners to at least understand symbols loops and operations, one would have to learn too much training material. So let's start with the basics.
How the first loop is made when crocheting is shown on the left in Fig. This is already enough to, by passing a loop into a loop, tie braids for sewn rug. And on the right there it is given how to tie the next row to the previous one.

This way you can make a whole knitted rug, even a round one, see another video:
Video: knitting a round rug
Here and at experienced craftswomen Sometimes a problem arises: I knitted it exactly according to the pattern from the recommended material, but he took it and pushed it out with a hump (cap, dome). The fact is that you can only increase the length of the outer rows by passing 2 of their loops into one of the previous ones by using an integer number of loops. It cannot be irrational, like π. The exact length of the row is adjusted mechanically by an experienced knitter by tightening the loops. But a person is not a robot, everyone’s working skills are different. A scheme developed by someone under their own hands may not be entirely correct for another.
However, there is no need to unravel the finished rug and bandage it, and it won’t do any good. If it doesn't look exactly like a jester's hat, you can align it using the following instructions:
- We prepare hotter water for soaking, 55-60 degrees (the hand can barely tolerate it);
- We dilute PVA in it at the rate of 1.5-2 tbsp. spoons per 10 l;
- Soak the rug without creasing it;
- While it gets wet, prepare a hard, smooth, moisture-resistant substrate. Ideally - a piece of plywood covered with plastic film in 2-4 layers;
- When the water has cooled to lukewarm (32-35 degrees), remove the mat and lay it out on a mat to dry. There is no need to keep it in water until it has completely cooled down, the effect will disappear;
- If the backing is plywood or wood, we additionally spread out the mat with pushpins;
- Once completely dry, the mat knitted according to a proven pattern will definitely level out. No - look for flaws in your work. An insignificant admixture of PVA will not prevent the product from dissolving.
This method of molding woven products was once invented by Soviet black market workers and underground workers in order to make “homemade” jeans stand up like a “firm”. At the same time, knitting lovers also adopted it. The quality of jeans of that time is long gone, but the PVA doesn’t seem to have deteriorated...
More about round rugs
Round rugs made from shreds can be excellent and even outstanding in aesthetics, see fig.

They don't necessarily have to be all-knitted. Firstly, they can be sewn, as described above, on a coarse textile base from braided or knitted braids (in this case, only from braids), wound in a spiral. But the strength and durability will not be higher than that of other sewn carpets.

The second method is to braid braids along a radial base of rope on a hula hoop, see fig. on the right, gives a good-quality product, but the “blob” in the center is a rather difficult problem, as a result of which this technique is rarely used.
Very beautiful and quite durable round rugs, and patchwork sewn ones, are obtained in the so-called. patchwork technique. Its essence is that patchwork parts are sewn into fragments of a pattern, which are sewn onto a coarse woven base, see the plot:
Video: rug for home in patchwork technique
Fluffy grass
Real patterned fleecy carpets are an immense topic, like the entire history of carpet weaving. But making a small, simple grass mat at home won’t be too difficult. The first method is tying with knots to a construction mesh. Propylene (this plastic is practically not electrified) or nylon fluffy cord allows you to get a pile up to 5 and even 10 cm high, pos. 1 on next rice.
If you don’t want grass, but something like a densely planted lettuce, you can knit a fluffy rug from scraps. In this case, so that the pile does not fall off, the scraps are taken wider so that the knots slightly expand the mesh cells, and knit in a checkerboard pattern, pos. 2.

In both cases, if there is a pattern, it is drawn in advance along the base grid, pos. 3. Knit a simple bayonet in knots. This knot is very reliable, cannot be felt with bare feet and is easy to knit either by hand or by crochet, pos. 4 and 5.
The second method, firstly, gives a soft mat that can be rolled up and washed in a machine. Secondly, ordinary knitting yarn produces a dense, non-falling pile up to 7 cm high. How such a rug is made is clear from the poses. 6-9. The width of the cardboard mandrel for winding pile strips is according to its desired height. The finished strips are attached to a coarse woven base.
Some explanations, however, will be needed regarding pos. 6 and 9. If sewing is not intended to be done immediately after winding the strips, then you need to baste the uncut edge of the layer using a basting of 1 full and 3/4 of a half eight, this is the so-called. eight 7/4. How it is done is shown in pos. 10. The number of turns in one tack is not necessarily 4, it can be 10 or more, depending on the smoothness of the yarn. The hairier it is, the more turns you can grab with one figure eight loop. A strip swept in this way can lie in the chest of drawers as long as you like without spreading.
During final sewing, the first strip of pile is attached, straightened. Then its threads are bent to the non-working side and the next one is attached as close as possible, etc. The edge of the base in the finished rug will show through a little, so it is trimmed with braid.
Rug made of pompoms
It's time to remember such cute, soft and original pom-pom rugs. They are made as before. case: pompoms are tied to a construction mesh or sewn to a fabric base. But how to make the most pom-poms? Are there many of the same or given sizes, beautiful, neat?
There is no need to look for drawings and descriptions of certain devices or machines for making pom-poms, as some sources advise. Excellent pom-poms are obtained as shown in Fig. “Technological equipment” made from a couple of reusable cardboard scraps; In any case, it’s enough for a whole carpet of pom-poms.

Pompoms can also be multi-colored if they are wound from threads different colors, just the same thickness. There is no need to connect the ends of the threads somehow; the twist will be cut anyway.
What if you want the pompoms to be smooth? Also no problem: take a piece of padding polyester or fleece, crumple it into a ball, cover it with a suitable fabric and tie the tail with a thread. The fabric, by the way, can also be silk: padding polyester and fleece have antistatic properties and will remove electrical charges.
Video: do-it-yourself pom-pom rug - master class
Video: an alternative option for making a rug from pompoms
Where and how is plastic good?
Hobbyists sometimes make amazing rugs from plastic film. appearance and subtleties of work. But we still cannot recommend them for residential premises. In dry rooms, plastic is easily electrified, and, say, in a bathroom, water stagnates in its folds. What kind of living community will soon form there is best not to look under a microscope. Especially those familiar with the principles of microbiology.
Plastic film mats can find other uses, e.g. as door and/or street at the dacha. A properly made plastic bag mat removes dirt from shoes, although not as well as special cleaning mats. Cleaning it comes down to drying and shaking it out, the material costs pennies, and you can make a new rug like this in 10-30 minutes as follows:

- The package is rolled into a flat roll and tied with tape; You can also use a rope made of film, pos. 1 per rice;
- The tourniquet is pulled tightly, the edges of the bag are cut off, pos. 2;
- The workpiece is fluffed by hand, pos. 3;
- Several blanks are tied into something like a pompom, pos. 4;
- If the diameter of the pompom (20-35 cm depending on the size of the bags) is too small, several of them are tied together or tied to a construction net.
Rug made of... stone

The stone mats are original, see fig. on the right, and massage the feet. True, standing barefoot on a cold stone is not always pleasant, but that’s not so bad. The main thing is that it is simply unrealistic to find in nature as many smoothly rounded pebbles of equal thickness as needed, and it is unrealistically expensive to buy a choice.
In all respects, a rug made from substitutes for rounded pebbles made from polymer clay (plastic, cold porcelain) is better than a natural stone rug. Do polymer clay you can do it yourself at home in the kitchen; starting materials (starch, PVA) are inexpensive. One starter (leavening) is enough for 1-3 pebbles, depending on their size, and you can imitate not only cobblestones, but also many semi-precious stones, see pic: selenite, jade, amazonite, jasper, onyx, carnelian, agate, even lapis lazuli, malachite, heliotrope and charoite. A rug made of gems that doesn’t even keep your feet cold – who’s to say that’s not cool?

The use of plastic for the manufacture of stone rugs has, in comparison with its other applications, some features:
- Prepare a substrate in advance - a solid shield covered with film.
- The base of the mat made of construction mesh is laid on the substrate.
- Containers (vessels) are also prepared for ripening a mass of total volume, obviously greater than the total volume of stones, in an amount equal to the number of flowers used.
- The mass of required flowers is prepared quickly so that they all ripen at about the same time. Each color ripens in its own separate container.
- Immediately after the mass has ripened, without putting it into storage, stones are sculpted and placed on the base of the mat, pressing lightly so that the mesh is pressed into them. This should be done wearing latex gloves that are thick enough so that there are no palm marks or fingerprints left on the stones.
- After 2-3 hours, when the crust has dried on the stones, they are leveled in height, pressing down the protruding ones. Be careful not to crack the thin crust!
- Transfer the drying tray to a warm, dry, shaded place.
- Dry until completely dry, based on a complete hardening rate of 2 mm per day.
- The almost finished rug is carefully turned over. Falling stones (rarely, but it happens) are glued with PVA.
- Apply 1-2 drops of PVA from a medical syringe without a needle to the crosshairs of the mesh that fall on the stones.
- Dry for another 2-3 days, and the rug is ready.
What next?
Carpet weaving has always been and is a highly profitable occupation among all peoples, under any political system and economic system. A margin (rise) of 200-300% is an ordinary phenomenon in this business. But do not rush to get into the credit swamp to purchase equipment and start a cottage industry based on theory alone: the requirements of potential buyers for the quality of carpet products are also traditionally very high.
To get started, it wouldn’t hurt to watch a master class on making homespun carpets.
Video: making homespun rugs - master class
Then, get a carpet weaving loom. Simple and inexpensive, but suitable for the production of commercial-grade products. Its basis is a strong frame; wooden - from timber from 40x40 or plywood from 20 mm, pos. 1 in Fig. If you have an old window frame lying around somewhere, carpentry work is no longer necessary.

The following are guide pins for threads and pegs. Here, modernity is better than antiquity: push pins-markers with a long neck (item 2) are just what you need. For handicraft work, they have a number of advantages compared to steel and wooden pegs:
- Cheap per piece.
- Installed by feminine forces. Screwing in several hundred threaded steel pegs or installing the same number of wooden pegs is a job even for a hardy man, and even a child can push buttons into pine.
- They are easily rearranged, practically without damaging the wood.
- The size, if inserted close to each other, is just right for weaving rugs.
- By placing the pins in a checkerboard pattern, you can give the warp and/or weft to the fabric more tightly, and by placing them at intervals - less often.
- When installing pegs from buttons, both the thread and the plait or braid will pass as tightly as possible into the windows between the necks.
- Smooth, slippery necks of the buttons will ensure uniform tension of the fabric threads.
Your dearest believer can and should also be involved in making a machine: let him make a comb the entire width of the frame window for stuffing the weft from a wooden (preferably oak) block and pieces of knitting or bicycle needles. In extreme cases, you can stuff it with a fork, as described above, but with a comb the work will go faster and better.
Next is the shuttle. A fishing shuttle is not suitable for weaving nets; it is designed for rather complex manipulations of knitting knots. When weaving, you will have to turn it over all the time, and throw off the consumable loops, making movements with your fingers, which is very tiring in an already difficult weaving job. A salted and tanned fisherman who has just tied his net can be recognized by his gnarled “crab” hands. The smooth spool shuttle easily dives into a very dense base, but it also needs to be turned over, which slows down the work, and the manufacture will require high-quality materials and metal work.
For weaving rugs, the old-style handloom weaving shuttle is best suited. Its drawing is given above at pos. 3. Material – hard wood, plywood, hard plastic 2-4 mm thick. How the thread is wound onto this shuttle is shown in pos. 4. The consumable skein is thrown onto the beak with loops alternately on one side and the other. To remove the next loop, the shuttle is pushed back, it will come off the beak itself. This should be done when the shuttle is outside the base.
Finally, tying a new thread to the end. How to extend tapes and strands was described earlier. And the thread is tied with a simple weaving knot, pos. 5. There are other weaving knots, but for fairly thick and strong carpet thread, this is the most suitable.
Well, if things have gone well, you liked your creations, and the buyers liked your creations, then you can think about how to make or order a real weaving loom for carpets with your own hands.
Crochet rugs have recently become very popular: square (as in the photo below), rectangular carpet, round, oval, made from threads (yarn), twine or leftover rags, on a chair or on the bathroom floor. All options are good. The most important thing is this magnificent carpet you can crochet it yourself, using the diagram and description, step by step instructions, or relying on a video tutorial on YouTube or MK (master class: How to crochet a rug, diagram and description).
In addition to decorating your home, creating a cozy atmosphere in it is also a good way for any needlewoman to practice and develop her creative abilities. Everyone remembers grandma's knitted products all over the house, I would really like to make these myself: on bedside tables, a stool, in the hallway, in the kitchen. Lace motifs are very airy and immediately attract a lot of attention.
Crocheted rug: patterns and description
As we wrote above, the carpet can be tied completely from any materials, be it a model from old things (T-shirts), from plastic bags (from cellophane and garbage bags) or from regular yarn . Any option will look beautiful in your home on the floor or on a chair. Often, in addition to rugs, they create beautiful blankets made from scraps of fabric, covers for a stool, multi-colored pillows made from knitted or crocheted squares, original napkins on furniture or under vases from knitted circles for comfort . There is a lot of excitement around products made from knitted yarn - the models turn out to be very “homemade” and unusual.
In order for you to be able to knit a beautiful carpet with your own hands, you can use any material , any mating (semicircle, fillet stitch) and pattern (star, cat, owl, tiger cub, sun, turtle,). You can do it the same way in different ways, then decorate as desired. Look at the photo selection below and choose the option for yourself and your home.
How to crochet a rug using yarn?
First you need to select necessary And correct materials . If you are knitting for the first time, you may need help from already experienced needlewomen (such as your mother or grandmother). You can knit items following step-by-step instructions for beginners from a master class, for example.
Everyone knows what are the most beautiful rugs , crocheted– Japanese. The secret here is right choice colors of the future product. It doesn’t matter whether the carpet is large or small - it should be beautifully knitted and harmoniously combined with the furniture in the room. Also, no need to use a light color - beige (avoid milky shades), it will get dirty quickly . And also - thin threads so that your creation lasts longer.
So now we will provide detailed diagram and a description of how to crochet a rug with your own hands step by step. Openwork version “sun”
- it’s better to choose for him yellow thread
. Do not use acrylic or wool - only cotton
! Also, you may need one hook No. 7
, and such an amount of yarn that would be enough for the entire carpet. We recommend knitting with yarn in two folds. 

Crocheted rugs with patterns and descriptions
How to do crochet rug - the diagram is shown below
. We knit with a popcorn pattern using multi-colored threads. Products of this shape are very popular with young children: they are comfortable and cozy to sit on,play
. little child will be delighted with the tactile sensations. Animals will also be happy with the new “inhabitant” of the house - they can sharpen their claws or sleep on him.
Take several colors of thread, a hook and follow the diagram below: 

Oval crochet rug
Making a beautiful oval masterpiece is very simple. We knit it with simple loops according to the pattern. This children's rug will fit well into any room.

How to crochet a round rug for beginners: video
There are many video lessons about that how to learn to crochet it for free. This can be made from thick thread, woven with elongated loops, sewn from several motifs, stripes, making it shaggy, terry and voluminous. Such handicrafts can be sold or given as a birthday or housewarming gift.
How to knit square and rectangular rugs?
In order to succeed nice even square – in each row, make increases in 4 corners: 2 S.T., 2 V.P.. 2 S.T. In the following R. The hook is inserted under V.P. This is a more rustic option, but will also be suitable for the city if you change the knitting style.
The easiest way to crochet a square rug:
- Take yarn from knitwear. Color - optional.
- Chain from V.P. the required length.
- 1 R.: all loops S.S.N. Turn over the canvas.
- 2 R.: all loops S.B.N. into the anterior wall of P. Turn the knitting over again.
- 3 R.: S.B.N.
- 4R. = 2 R.
- 5 R.: for rear wall S.S.N.
- 6R.: all rows. Starting from the sixth knit a pattern from 2 to 5 R.
- In the video you can see an example of such a product.
A rectangular rug is knitted in the same way.
DIY knitted floor mats
Look interesting selection with ideas for inspiration . There are carpets here too modern style, consisting of roses and flowers, from rags, rags, two or more flowers - they are all good in the interior.
How to crochet a rug from threads for beginners: video
Crochet rug made from old things: step-by-step instructions
Very often we have a large amount of knitted clothing left over, which we we're going to throw it away . But what if we tell you that you don't have to do this? You can make her beautiful knitted yarn and weave many unique designer items . Before we start weaving, let's learn how to create the yarn itself. For this you will need a rag, a T-shirt, and so on. From such material it is possible make a variety of patterns .
Crochet rugs: master class
We will attach below video for beginners : how to crochet rag rugs. In the meantime, for more experienced needlewomen, our master class.
To begin with cutting old T-shirts into threads . It is better to do this in one continuous spiral so that you have to tie fewer knots. After this, you need to take a large and thick hook and start casting on loops. It's as if you were threading them with regular thread. Close V.P. into a chain and sew the junction for strength. The knitting pattern is attached below. Using this and simple yarn you can knit a round rug.
Rug made from old T-shirts
Materials: knitting yarn in lilac and purple colors, hook number 15, scissors, needle and thread.
- A piece of yarn, folded in half, tie 10 S.S.N. and close the ring.


- 2 S.S.N. in each P. of the previous R.

- From each P. 2 S.S.N.


- S.S.N., 2 V.P., S.S.N. after 1 P. Repeat this pattern until the end of R.


- S.S.N. all around the circle.
- The lilac thread should be secured after the previous row. Now we knit in purple. Make 1 p. on the hook. S.S.N all around the circle.


- S.S.N., 2 V.P., S.S.N after 1 P.


- 1 S.T. in P., 2 S.T. into the hole below, then again into P.
- Change the threads. The entire series of S.S.N.


- Repeat the pattern above with holes in this row.
- S.S.N. all around the circle.

- Changing the color. Openwork holes all around.


- S.S.N.
- Lilac thread: S.T. – 1 R., openwork pattern – 1 R., S.T. – 1 row.

- At the very end there is a “teeth” pattern. From 1 P. 6 S.B.N. = repeat every 6 p. You're done! The same option can be made from cord.
Evgenia Smirnova
To send light into the depths of the human heart - this is the purpose of the artist
Floor coverings for your home can not only be purchased, but made with love with your own hands. Many needlewomen can sew a rug from scraps with their own hands in just a few hours if they use little tricks in making it.
How to make patchwork rugs with your own hands

There are many techniques to make your own fabric rug. Each allows you to fantasize and be creative on the topic of flooring. In special classes and master classes, they teach you how to create voluminous or flat rugs, pleasant to the touch or the simplest, “rustic” ones. When choosing any technique, it is important to prepare many scraps of fabric, for which old things, unnecessary yarn, or even T-shirts and T-shirts purchased at a minimal price will be useful.
Basic techniques for making rugs:
- Knitting - prepared here natural yarn or narrow strips of fabric that are knitted according to the classical pattern.
- Patchwork is the creation of a mosaic from different patches that are sewn together into one whole.
- Weaving is similar to knitting, only here knitting needles with a hook are not used, but there is a base on which threads or scraps are applied.
- Stitching - either braids from shreds are used, or balls with padding polyester inside - this is how volume is obtained.
DIY knitted rug from shreds
To make a rug from strips of fabric with your own hands in knitted style follow the instructions:
- Prepare material for work - you can take old T-shirts, T-shirts, from which the bottom seams are cut off.
- The material is cut with scissors into long narrow strips. The cutting proceeds in a spiral or like this: strips are cut in the folded product (slightly short of the seam), then the item is opened and cut into one continuous strip.
- It can be used for knitting, but it is more convenient to do it with crochet.
- The rug is knitted from the simplest air loops Single crochet stitches - you get a rectangular shape of the product.
- If you take 5 loops, close them in a ring, and add loops on each row, you will get round shape.
- For variety, you can mix colors - the rug will turn out bright and intricate.
DIY carpets using patchwork technique

The “patchwork” products are beautiful and original. It’s easy to make rugs from scraps of fabric in a patchwork style. To make them, follow the instructions:
- Prepare material - scraps of fabric, scraps, themed pieces with prints specially purchased in stores or on the Internet.
- Wash and steam new fabrics, starch and iron old scraps.
- Thick fabrics - tweed, gabardine, drape - are perfect for rugs.
- For a longer service life of the product, take a lining - it can be foam rubber, synthetic padding, batting or a dense carpet base.
- Bring all pieces of fabric to the same size and shape; use a template for this; no seam allowances are needed for dense materials.
- Take the base, stitch all the pieces of fabric onto it in a chaotic order or following certain patterns and images. Patterns for patchwork can be found in specialized magazines or on the Internet.
- Once you have mastered simple sewing, you can try making rugs with curved lines or complex patterns.
- A type of patchwork is the knitted type, in which the patches are not sewn, but tied together.
- To obtain a soft, voluminous rug, you can use the quilting technique, in which 2 fabrics are sewn together, and a padding polyester is laid between them.
How to weave a rug from scraps without a hook
If you are not a master of crocheting, then you have the opportunity to weave rugs from scraps of fabric with your own hands without it, using small tricks. How to do it:
- Take a special large photo frame or make a base for the future product according to the desired dimensions from wood.
- Place nails on two opposite sides in 2.5 cm increments.
- For threads, use the same old T-shirts or T-shirts, preferably knitted ones.
- Pull the threads onto the nails - this will be the base.
- Take working thread– let it be contrasting, pass it alternating under the base and above it.
- Continue weaving the threads, incorporating different colors.
- To obtain fringe, you can tie the threads together and not cut the ends; for a smooth weave, it is better to cut them.
- Periodically, the weaving will need to be pulled up to the first row to achieve the desired density.
- Having finished weaving, remove unnecessary parts to the wrong side and remove the finished product.
- If desired, the rug can be decorated.
Volumetric rugs made from shreds

Making voluminous rugs from scraps of fabric with your own hands will take more time and fabric, but it's worth it. The coating turns out to be original, cheerful and children really like it. There are several types of making volumetric rugs:
- The base is made of pompoms - for this, take square pieces of fabric, form them into balls filled with padding polyester, and sew them together.
- Grandmother's rug - braids are woven for it, which then need to be sewn together in a spiral or in any other order with a thick, strong thread.
- Cut thick knitted fabric (sweaters) into strips and let them curl on their own - to speed up the process, you can wash the strips in washing machine only with water. The twisted strips are sewn together to form a voluminous rug.
- You can knit a long ribbon of yarn 10 cm wide and several meters long; in each row, knit the last loop as a purl so that the fabric twists. Then arrange the material in the desired order (spiral, circle) and sew together.
- It is possible to immediately knit a spiral - to do this, you need to grab and knit the outermost loop of the finished fabric.
- To create a grass-shaped rug with your own hands, you need to prepare a base - a rigid mesh, which is sold in hardware stores. It is better to take one with large cells where the hook would go. We prepare the fabric - knitted strips or cotton. It is better to start weaving from the center - you need to place the strip under the mesh and pull both ends to the front surface with a hook, then tie a tight knot on the wall of the cell with a pull. After filling all the cells, you will receive a fluffy rug.
An original rug made from old things.
Do you want to make your home cozy and original? Don’t rush to throw away your used items; you can use them to make exclusive, very useful crafts for everyday life. Homespun wicker rugs never go out of style; their main purpose in the interior is to give warmth and comfort.
Designers look for inspiration in original history, creating truly extraordinary products. There is no need to rush to the store to buy exclusive products; there are many ways to weave a rug with your own hands at home.
Making rugs has a double benefit: you empty your closet of unnecessary things, and your home acquires a bright and original accessory. This home accessory is practical; just wash it and it’s like new again! The work is simple, interesting, and in just a few hours, beginners can make a useful hand made masterpiece. We offer several lessons on how to create woven rugs with your own hands.
 Very soft and practical rug
 Simple weaving lesson
You will need unnecessary things for work. It could be an old cotton robe, wool threads, unusual ribbon. The more diverse the material is selected, the more elegant the product will be.
Rugs made from old and unnecessary things


Stages of work:
- Draw a circle on a sheet of cardboard and divide it into segments. The number of segments on the template determines the density of the weave.
Advice! We make cuts along the contour of the circle and pull the threads onto the sectors. The base of the weave should be as strong as possible. We carefully tie the middle on the back side of the circle.
- Take a working wool thread, draw it under the first warp thread, then draw it over the second warp thread, and then to the end of the circle. We form several circles, this will be the middle of the carpet.
- We take a chintz ribbon, twist it into a rope, and braid it in the same way. So we add all the elements to the weaving one by one until we finish the work.
- At the end, we cut the warp threads on the sides and process the edges. You can trim it with trim, crochet it, make fringe.
- Iron the finished woven rug from the wrong side.
 Fun bathroom rug
 The weaving should not be too tight, otherwise the rug will curl up like a plate; for practicality in use, we recommend hemming the fabric base.
Cute rug made from old things
Hula hoop mat
A hula hoop is a sports equipment that, in the skillful hands of craftswomen, turns into a convenient device for weaving. To work you will need a hoop with a diameter of 84 cm, several old T-shirts, and scissors.
 Bright rugs can be placed both by the bed and by the door
 Work algorithm:
- We cut strips from old T-shirts without cutting the edges. The length of the strip should be equal to the diameter of the hoop.
- We stretch knitted strips onto the hoop; the piece resembles a bicycle wheel with spokes. All threads should be taut.
- We straighten the “spokes” so that they are at the same distance from each other. There are twenty sectors in total on the hoop.
- We cut ribbons from colored T-shirts and pull them out a little to make laces. For convenience, you can pre-link them together or intertwine them new thread in the process of work.
- We tie the end of the thread in the middle, where all the “spokes” intersect. We begin weaving, to do this we draw the thread first under the stretched ribbon, and then over the next one, and so we continue in a circle.
Advice! When starting to weave a new circle, be sure to move the previous rows close to each other to ensure a tight rug.
- When weaving is completed, it is necessary to remove the finished product from the hoop. Carefully, so as not to damage the weaving, cut the loops on the side and release the hoop. We process the edges as desired, for example, with fringe or simply tie the cut loops into knots.
In a similar way, you can make not only rugs, but also panels, coasters, and napkins. For smaller-scale weaving, we recommend using an embroidery hoop.
Rug for the hallway
Simple woven rugs for the hallway should be practical and beautiful. This attribute greets the owners and guests of the house at the doorstep. We offer a simple master class on making a rug from threads. To work you will need strong threads, twine, clothesline, twine. It is recommended to weave on a flat surface, so the product will not curl.
 Hallway rug
 To weave a carpet with a diameter of one meter, you will need 70 meters of rope. First you need to divide the thread into three equal sections and braid the braid. Be sure to secure the end so that it does not unravel. Now we begin to roll the braid in a spiral, making sure that it lies evenly and does not curl. Each turn must be secured by tying the threads together with twine. When the entire braid is laid in a spiral, secure the end with glue. It turned out to be a beautiful, practical rug. It’s easy to make woven bathroom rugs in a similar way, using ribbons from old terry towels for braiding.
DIY rug
Stylish Japanese rug
Kumihimo - Japanese technology weaving cords. Rugs made using this technique are at the height of fashion today. Bright, slightly eccentric, stylish and original products will adequately decorate a living room, nursery or bedroom. It is noteworthy that you can make a rug from leftover threads. How brighter colors, the more varied the texture of the yarn and the decor from the simplest pompoms, the more impressive the product looks. A carpet product consists of many individual elements.
 Unusual rug made of pompoms
 How to make such a rug at home?
- Draw a circle on a sheet of thick cardboard. We choose the diameter ourselves; you can make several elements of different diameters. We cut out as many templates as there are elements in the rug.
- Separately, we will prepare materials for weaving. These can be braids or knitted ribbons, fleecy yarn, thick clothesline, bright satin ribbons, woven into strands and everything that your imagination tells you. The greater the variety of textures and materials, the more original the product will be.
- Separately, we make multi-colored pompoms from threads.
- Several warp threads are stretched onto a cardboard circle; the workpiece resembles a cart wheel. We begin work by bringing the working thread into the middle. Weaving is carried out according to a simple algorithm, when the thread is wound first under the bottom, and then over the warp.
- When weaving in a circle is completed, cut the threads on the side of the template and process the edges. We braid all our pieces in the same way.
- When all the elements of the carpet are ready, we sew them together and tie the pom-poms to the base. A beautiful, bright, hand-woven rug is ready.
Soft pompom rugs
Useful tips
You can make a large number of useful crafts from old threads, fabrics, T-shirts and other clothes.
One of these crafts is a rug that can be laid in any part of the house: at the doorstep, in the room, in the kitchen or in the bathroom.
Making such rugs is not at all difficult, you just need to know some simple technology and stock up the necessary materials and patience.
Read also:
Here is just a small part of the rugs that you can make with your own hands and decorate your home:
Soft rug made from old fabrics (photo)

You will need:
Scissors
Pieces of old (unnecessary) fabrics, maybe old clothes
Bath mat (with holes)
1. Cut the fabrics into small strips (see image)
2. Using tweezers or a hook, begin pushing the strips through the holes.
3. Tie all fabric strips with a simple knot.


Ready!
How to make a knitted rug

You will need:
Black marker
Threads of different thicknesses
Scissors
Decorations (optional)
1. Cut out a large circle from cardboard.

2. Draw lines on the circle as shown in the image. Start with a line going horizontally, then vertically. Next, divide the quarters of the circle into halves, etc.


3. Once you have the desired design, make 2-3 cm cuts at the edges of the cardboard circle (where your lines end).


4. Start tying the thread around the cardboard circle, passing it through the cuts. On the front part of the circle everything will look neat, but on the back side the pattern may be a little chaotic - that’s okay, because... we only need the front side.
5. When you have passed the thread along all the lines, tie it in a knot.

6. Prepare all the threads of different thicknesses and start knitting in a spiral, starting from the center of the circle. Insert each thread as shown in the image (above the knitting needle - under the knitting needle). To begin with, you can insert the thread through 2 knitting needles at once.


7. In the end you will have a beautiful rug that can be decorated with pom-poms, for example.

DIY rug made from old towels (master class)

You will need:
Old towels
Scissors
Sewing machine (needle and thread)
1. Cut your towels into several strips. In this example, each strip is about 3 - 4 cm wide.


* For convenience, you can fold each towel in half and cut it into 2 halves. Fold each half in half again and cut along the fold line, etc.
* It is advisable that all towels are approximately the same size.


2. Place 3 strips of different colors together and secure them with thread (stitch the ends). Start braiding these strips. After finishing the weaving, stitch the ends again.


3. Make several of these “braids” and then connect them into one long strip using a needle and thread (or a sewing machine).


4. Start rolling your long strip into a spiral, securing it with a thick thread.


5. Secure the entire structure and turn it over so that the seams are on the bottom.

How to make a rug "French bracelet"

You will need:
Old fabric in 2 colors (you can use old T-shirts)
* The width of each piece of fabric is 20-25 cm and the length is 3 meters. If you are using old T-shirts, you can join several pieces together with a thread and a needle.
Scissors
Needle and thread
Adhesive tape

1. Arrange 5 strips of different colors in the order in which you want them to look on the future carpet.
2. Next to the 5 laid out strips, place another 5 strips in a mirror image.

3. Take the first strip, in this case the pink one, and tie it as shown in the image. First, fold the fabric to form a number 4.
4. Continue tying the pink strip around the remaining strips until you reach the middle.

5. Start doing the same on the opposite side, tying another pink stripe around the other 4 stripes. Start also with the number 4, but in a mirror image.
6. When the two pink stripes meet in the middle, tie them together.
7. Repeat the same with the subsequent remaining strips.
*Choose the length of the mat yourself.

8. Start another rug, choosing the same colors. After this, connect both rugs with thread and needle.
* If you wish, you can make one or more similar rugs, which can then be sewn into one large rug.

9. Excess parts can be cut off and the ends secured with thread to prevent them from unraveling.

Rug woven from shreds

You will need:
Thick fabric (carpet base)
Pieces of fabric
Black thread
Scissors
Fabric glue
Adhesive tape
Aerosol for protective coating (if desired)

1. Select the size of the carpet and prepare a cloth of the appropriate size.
2. Prepare long strips of fabric. Each strip should be approximately 6-7 cm longer than the main part of the carpet.

3. Prepare several bundles of 3 strips and start braiding. You need several blanks so that you can combine them into one carpet.
* For convenience, secure the ends of each piece with adhesive tape.
* Don't weave all the way through - leave some fabric unwoven.
4. Apply glue to a thick canvas. No need to skimp on glue.
5. Carefully place the blanks on the canvas so that they stick.
6. Connect all the pieces together using a needle and thread.
7. Remove the adhesive tape from the ends. Trim the ends so they are even.

Round foot mat made with a hoop

You will need:
Lots of threads
Old T-shirt