It is best to sew your first gloves from WELL-STRETCH fabric. When you become aces, you can sew from anything
Further. How to make a pattern? If you are sewing gloves on medium-sized ladies' hands, then an A4 sheet is enough for the pattern. Fold the sheet in half. Put your hand on this sheet so that thumb turned out on the side of the fold

and trace it around the contour (I think many had fun with this in childhood). In this case, it is necessary that the fingers are not pressed against each other and are not spread apart. They should be in a free and natural position. In addition, everything is circled, with the exception of the thumb, which will be cut out separately. Next, mark on the fold point "A" - the upper base of the finger and point "B" - the lower base of the finger.

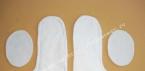
After that, you can cut out the pattern without unbending the leaflet. At the same time, do not forget that the fold does not need to be cut. You just need to cut the pattern along the contour and cut an oval on ONE side of the pattern. The result should be this:


Cut out the oval.

Now the pattern can be transferred to the fabric. Do not forget that we have a RIGHT hand and a LEFT hand, that is, we need to cut out two parts in a mirror.
Separately, the thumb is cut out. The thumb pattern looks something like this:

The "CFD" line should be the same length as the full length of the oval cut on the main piece of the pattern.
Further, since our fingers are not flat, but have a certain volume, then for the fingers it is necessary to cut out an additional ribbon (or several ribbons) for sewing them along internal parties where the fingers touch each other if they are pressed against each other. The width of the tape should be approximately 0.8 - 1.0 cm (but in general, it depends on the thickness of the fingers and the allowances for the seams, and beg according to the situation)
Now, the actual sewing. If you are cool and sew very well on a typewriter, small parts, then you can sew everything on a typewriter with some kind of knitted seam. I personally am not capable of such virtuosity, so I sew gloves by hand with a “back to the needle” seam.
It is convenient to start sewing with the little finger (although you can also use the index finger). If you start sewing from the little finger, then you must first sew PART of the side seam of the glove.

I draw your attention to the fact that you should not immediately sew the entire side seam if you later plan to somehow decorate the edge of the glove (for example, sew lace to it)
You can sew on a single ribbon, or you can make separate ribbons (only three pieces for each glove) at the intervals between the fingers. It makes sense to make separate ribbons if the fingers are thin. In this case, it is desirable to reduce the ends of the ribbons to nothing at the ends of the fingers so that the fingertips of the glove do not turn out to be thick. If the fingers are quite large or just plump and even from the base to the tips, you can sew a single tape along the entire length from the little finger to the index finger.


After you sew all four fingers, you can start sewing in the thumb. First you need to fold the part in half with the wrong side out, aligning
points "C" and "D" sew the part along the line "CE". Then I recommend basting your finger to the hole cut out for it, and only then carefully sew the needle back with a seam.
After the thumb has been sewn in, you can decorate the bottom of the glove with lace, or decorate the glove itself in some other way. At the end, sew the side seam to the end and the glove is ready.


In the last photo, I had to move the edge of the glove to the brush, because I was photographing own hands very uncomfortable, and the whole glove does not fit into the frame.
I hope that my instructions will help someone to master the tailoring of gloves.
A long time ago I bought a piece of beautiful thin leather. And I did not dare to start working with her))) I was afraid to spoil it. It always happens when you do something completely new. The leather is truly amazing. With a very beautiful natural texture. From it, I decided first of all to sew unusual gloves. There are many stores now beautiful accessories made of leather, but roleplayers always want something unique. And I am no exception.
Since the work has not been completed yet, I, like you, do not know what will happen in the end))) Over the course of several articles, I plan to talk about how things are progressing. This is my first leather sewing job. So I hope everything will be as planned in the beginning.
In this article, I will show you how to make a glove pattern. Before embarking on cutting, I read many articles on this topic. There are many ways to cut gloves. I have only used one of them. Looking ahead, I will say that after my glove was sewn according to this pattern, it sits on my hand like a glove! So I can vouch for this method of construction. Moreover, it is the most simple and ancient.
So, let's begin!
It turns out that it is customary to start cutting with the left glove. Since this is how it is, then I will start with it)))
Before you start building, carefully examine your hand. If you are wearing long manicure, then it may be worth making the length of the fingers with a small margin. See where your fingers start. (For me, for example, the little finger starts much lower than the index and middle fingers) All this information will come in handy not only when cutting, but also while sewing. Because leather is a very flexible material.
Take a sheet of paper and fold it in half. Then place your hand palm down so that the index finger is adjacent to the fold. Then circle the hand so that the borders of the fingers and palm are displayed on the pattern.


Note that the fingers are close together. Do not crush them under any circumstances. Otherwise, there will be wrinkles on the finished glove.
Now make a mirror image of the resulting template on the second half of the sheet of paper.
Now the pattern does not have a front or back side. Straighten the sheet of paper. Divide in half the image of the index finger located in the left half of the pattern. Draw a line along the entire pattern through the middle of your index finger. Let's call it the axis.

Now it is necessary to mark the position of the thumb on the axis. Turn your hand slightly and bend your thumb so that it is about 80-90 degrees with your palm (that is, you need to bend your finger as far as you like). Where the thumb intersects with the axis, mark two points. Mark the third point in the most protruding part of the base of the thumb (the so-called hill of Venus).


Construct point 4, symmetrical to the third about the axis. Put point 5 where the axis intersects with line 3-4. Through points 1,2,3,4 draw an oval. Then draw a sector coming from point 5 to the borders of the oval as shown in the figure. This pattern will give freedom of movement to the thumb.

Now let's build patterns for the fingers. Let's start with the big one. This construction is the trickiest))) Again we bend the sheet in half. The height of the pattern is equal to the height of the thumb. The width of the upper part is equal to its half-girth. To the bottom, the pattern should be slightly expanded and rounded as shown in the figure.
The resulting image needs to be duplicated. You can check the correctness of the construction by attaching a pattern to your finger.

The remaining fingers must be applied to the paper with the side.

To avoid unnecessary work, combine the resulting side patterns in order. Little finger-ring, ring-middle, middle-index. Get 3 side patterns. On the pattern, the fingers are at an angle, since the length of the fingers on the back of the hand is slightly longer.

Let's check the pattern. Measure the circumference of your palm. The width of the pattern should not be less.

Leave no seam allowance!
Now we have a scan of the hand on paper! But that's not all. Now you can model the glove. Mark the required length and draw the shape of the bell. It is by changing these parameters that you can get a different design of gloves.
Here is an example of my design

Since leather is an expensive material, cut a glove on a plain fabric and sew it. This short procedure will allow you to practice and check the quality of the pattern. If you find inaccuracies, correct the pattern.
Now the pattern is ready!
If you are not afraid, you can start cutting the material))) Gloves can be sewn from different materials. For example, from leather, suede, silk, velvet, etc. Since I chose leather, I will describe the features of working with it. Moreover, this material is the most difficult to process.
If the leather you choose has a pronounced texture or pattern, then this fact must be taken into account when cutting. In addition, note that the cut parts of both hands should look the same.


To avoid mistakes, it is advisable to sign the names of the fingers on the reverse side of the cut parts.

So, we cut out the details of the gloves. Hope you get it right the first time. Good luck!
To be continued…
Leather gloves can be an expensive accessory, but if you're good at sewing, you can save some money and make your own. Creating your own pattern will ensure that the gloves fit perfectly on your hands.
Steps
Part 1
pattern making- The connection point of the large and index finger should be in the middle of the paper.
- After outlining the contours of the hand, you need to put points at the base of the gaps between the fingers. To do this, alternately spread your fingers and put a small dot at the bottom in the center between the fingers.
- Pass a ruler between your fingers. Draw straight lines from the dots to the top of the fingers.
- Remove the ruler and check that all lines are parallel.
- Add 5 cm of extra length to the pattern. Draw on the outer side of the hand (opposite the location of the thumb) from the wrist a line slightly receding to the side.
- On the this stage you should get clear contours of the hand. However, do not cut out the pattern yet.
-
Make a second pattern. Fold a piece of paper in half along the outer edge of your index finger. Cut out the outlines of the hand on two layers of paper at once, leaving the fold intact.
- Please note that at this stage you will lose the section of the pattern with the thumb.
- After cutting out the contours of the hand, also cut the slits between the fingers. The slits on the palm of the pattern should be 6 mm shorter than on the pattern on the outside of the gloves.
-
Make a hole for your thumb. Unfold the fold connecting the two patterns and mark the location of the thumb joint. You will need to draw and cut out an oval for the thumb on the second pattern.
- Mark the point of the base of the thumb, the point of the membrane between the thumb and forefinger, and the point of the joint of the thumb. Position the fourth point symmetrically to the third.
- Draw an oval connecting all four available points.
- At the top of the oval, draw an inverted triangle. The lower peak should reach strictly to the middle of the oval.
- Cut out the oval except for the triangular part.
-
Draw the outline of the thumb. Fold a sheet of paper in half and insert your thumb inward along the fold line. The fold should run parallel to the outside of the index finger and wrist. Outline the outer contours of the thumb.
- After sketching the thumb, unfold the sheet and draw the same mirror image on the other side of the fold line.
- Cut out the thumb pattern and attach it to the oval hole in the palm of the pattern. Both parts should roughly match. Otherwise, you will need to redo the thumb pattern to fit the thumb hole better.
-
Make patterns for the middle parts of the fingers. They will be sewn between the fingers.
- Fold a piece of paper in half and place it between the index and middle fingers of your non-dominant hand. The place of the fold should be located at the very bottom between the fingers.
- Outline the outlines of the index finger and add longer outlines of the middle finger.
- Cut out the pattern.
- Repeat the process two more times, making medium details for the gaps between the middle and ring fingers, and also between the ring finger and little finger.
Part 2
Skin preparation-
Look for correct type skin. It is easiest to work with thin smooth skin of uniform grain.
-
Check skin elasticity. Pull the skin to check its extensibility. If, after your stretching, the skin immediately returns to its original shape, then no further preparations are required. If the skin starts to sag a little or is stretching too much, then you need to tighten it up to control the stretch.
- Extensibility itself is a good property, but with an excessive amount of it and without correcting this fact, gloves can become too big for you after a few wears.
-
Moisturize the skin and stretch it. Wet the skin, and then stretch it along the lobar to the limit. Let dry.
- After drying, wet the skin again and stretch it laterally. This time, do not stretch it to the very limit. Let dry.
-
Cut out the details. Pin the patterns to the prepared skin, cut out the details with sharp scissors along the contours of the patterns. Don't forget to cut a hole for your thumb and middle fingers.
- The share direction of the skin should be parallel to the fingers. The skin stretches more in the transverse direction, and you need to take advantage of this property so that when you bend your fingers, the leather of the gloves stretches.
- The leather doesn't flake, so you don't need to overcast it and use anti-fraying agents.
- Cut out all patterns in duplicate so you can make two identical gloves. Since the outer contours of the parts of the gloves are the same, you don’t have to worry about turning the patterns into a mirror image when cutting. The main thing is to subsequently correctly perform all the necessary cuts on the details for the corresponding hands.
Part 3
Sewing gloves-
Sew the side seam of the thumb. Fold the thumb piece in half and sew the side up to the top. The suture should come from the end point of the fold of the membrane.
- If you want the seams not to be visible, then they must be done from the wrong side, folding the parts face inward, and subsequently turning them out.
- Alternatively, you can lay all the seams from the face. In this case, when sewing, folds the parts with the right side out.
- Both hidden and open seams are acceptable when sewing from leather, so it's just a matter of personal taste and sense of style.
-
Pin and sew on the thumb piece. Insert the bottom edge of the thumb piece into the holes on the palm of the hand. Peel off the cuts and then sew them together.
- The part of the finger inserted into the hole must be turned up.
- The edges of the finger part and the hole for it should match well enough.
- You can sew a thumb part with a hole by aligning the front sides of both parts, or you can put the wrong side of the hole on front side thumb. Both are acceptable and depend only on your preferences.
-
Insert the first middle part of the fingers into the gap between the fingers. You need to connect it to both the outside of the glove and the palm side of the glove. Insert the piece and sew the seams.
- First, attach the middle piece to the palm side of the glove. After completing the appropriate seam, attach the piece to the outside of the glove.
- Sew from the tip of your index finger down and then up again to the tip of your middle finger.
- When sewing the middle piece to the outside of the glove, start the seam at the tip of the middle finger, move down and then up to the tip of the index finger.
-
Repeat the procedure with the two remaining middle parts of the fingers. After sewing the first middle piece between the middle and index fingers, move on to the pieces between the middle and ring fingers, and between the ring finger and little finger. The sewing technique is completely identical to that indicated above.
- Next, sew the middle piece between the middle and ring fingers. Next, sew the middle piece between the ring finger and little finger.
- Work in the same way, sew the part first to the palm side of the glove, and then to the outside.
-
Sew the side seam of the glove. If necessary, chop off the edges so that they lie flat. Sew up any holes left around the fingers on the glove.
- The only hole left on the glove after this step should be the entry hole for the hand.
- If you want to hide the side seam of the glove, be sure to align the edges of the glove with the right sides inward before doing it. After completing the seam, turn the glove right side out. If you want to make the side seam visible, leave the wrong side of the glove inside when sewing.
Try on gloves. They are ready and ready to wear.
Trace the outlines of your hand on paper. Place your non-dominant hand evenly on a piece of paper, keeping your fingers closed. In this case, your thumb should deviate from the palm at a natural angle for it. Outline the entire arm, starting on one side of the wrist and ending on the other side.
Gloves made of thin material, sitting on the hand, have an amazing charm, emphasize grace, fragility and femininity. How to sew gloves with your own hands if you cannot find something that fits well on your handle in stores?
Do not be afraid to sew gloves with your own hands. There are no particularly complex knots in their manufacture. The only thing you should be prepared for is that the seam allowances will be very small and you will have to sew almost along the very edge. But it's not as difficult as it seems.
We are preparing a pattern
The easiest way to remove a pattern for gloves with your own hands is to remove them from old gloves by tearing them at the seams. But you can also draw yourself. Measure the circumference of the hand around the knuckles without the thumb, divide this figure in half. Half of the glove pattern should have this width. If the pattern is smaller, increase all the details while maintaining proportions. It is most convenient to do this in some graphical editor.
Choosing a fabric
Gloves made of thin leather are better protected from cold and wind. But in sewing, leather requires not only special skills, but also special equipment. The standard metal sewing machine foot does not slip on the leather, so you will have to purchase a special foot for leather or a walking foot. You will also need skin needles.

You can sew long leather gloves in the spirit of Grace Kelly
Sufficiently warm and beautiful do-it-yourself gloves can be sewn from thick knitwear, fleece, and even from costume fabric with added elastane. The main requirement for the fabric is that it should not crumble much. Otherwise, all the work will go to waste before it even starts.
We cut details
The main part of the glove should be cut with a fold along the index finger, but the thumb hole should be cut on only one side. Do not forget that your hands are different, so the patterns should be mirrored. This applies to all details. Do not make too large seam allowances on individual parts of the fingers, sewing them in will be inconvenient. Let all allowances be the same - 3-5 mm.

One pattern for all occasions: gloves for the bride
We sew gloves with our own hands
The main question that will torment at this stage is how to sew gloves with your own hands and not mix up the details? On the pattern, each detail is marked with letters and color. After cutting, carefully lay them out on the table in order, you can mark the letters on the details with a disappearing felt-tip pen on the fabric.
You need to start with your thumb. Sew it along, insert into the hole. Make sure that the front and back do not get mixed up. Then stretch the index and middle fingers in one line and sew the first strip first to the top of the glove, then to the bottom. If you succeeded, then it will work a few more times.
Last, close the seam along the edge of the palm from the end of the little finger. To make gloves fit better on the hand, it is better to cut off excess allowances to 3 mm. Turn the gloves inside out and tuck the ends of the bells inward.

Gloves to evening dress or short "kissing gloves"
"Biker" looks very stylish.
Is it difficult to sew gloves with your own hands?
Such an accessory to clothing as gloves has existed since ancient Egypt. Then they were worn in order to show their high position in society. It was believed that gloves are a symbol of power and wealth.
Why do you need hand clothes?
In today's world, everyone can wear gloves. Moreover, needlewomen who know how to sew gloves create interesting options various kinds this accessory.
There are a lot of varieties: ordinary, without fingers (the so-called mitts), long, wedding, boxing, surgical, and so on.
Ordinary ones are worn so that the hands do not freeze.
Mitts are convenient in that they protect the hands themselves from the cold and at the same time allow the fingers to hold something or perform any movements. That is, when exactly open fingers are needed (for example, it is convenient to press the touch screen of the phone in them).
Long - suitable for women as an evening accessory to the dress.
Surgical (sterile) - allow you to ensure the safety of the patient and medical staff.
Boxing - allow you to protect the hands of a boxer during fights.
How to sew gloves with your own hands
Each type of gloves has its own pattern. In order to find out how to sew gloves, you can turn to book sources, the Internet, or your beloved grandmother or mother. They know for sure!
The most important thing is to choose the right material from which sewn gloves will be created. The pattern is drawn on paper, then applied to the selected material. In addition to sewing, you can use other types of needlework. For example, knitting, crocheting and so on.
Consider several options for creating different types of gloves.
Beginning of work
In order to sew regular gloves, you need a stretchy material. If, due to lack of skill, the material was taken in a smaller size, then the stretchy fabric should be stretched to the desired size. And this will save the situation.
To measure the size of the future glove, you can choose two options. The first is to measure the girth of the palm, thumb, length from the tip of the middle finger to the wrist and the length of each finger. The second option (the easiest) is to put your hand on a sheet of paper and draw a contour in the shape of a hand. Get a stencil of the future glove.
The pattern of one glove consists of five parts. One is the outer part of the glove and the inner part with a hole for the thumb (from the fingers to the wrist). Three parts are finger wedges. The fifth part is the thumb.
When all the details of the pattern are ready, they should be sewn together.
First, the thumb is sewn from the wrong side. At the same time, we must not forget to retreat one and a half centimeters from the edge of the seam (so that the seam does not open later).

The next stage of work is the wedges of the fingers are sewn to the patterns of the inner part and the outer part of the glove. The most important thing is to carefully sew the wedges at the base of the fingers (otherwise a hole may form there). Next, the inner and outer parts are sewn together.
Most of the work has been done. It remains only to sew the finished thumb to the main hole in the inside of the glove.
The final touches in creating an interesting design of gloves are decorating them with fur, rhinestones, beads, beads. You can add thin straps made of leather material. Or flowers. You can make a wonderful volume embroidery stitch. In any case, it will be a unique masterpiece.
How to sew non-ordinary gloves?
From leather material you can sew a beautiful original accessory. For example, mitts.
They are suitable for young people, emphasizing their individuality and lifestyle. Usually they are worn by bikers, rockers and so on.

Mitts - you can make them from ordinary gloves. You cut off the unnecessary part of the fingers and, bending the edges inward, sew them together. This is the easiest way.
You can also make mitts using a pattern (just like gloves, you just need to take into account the dimensions without fingers). This method is more complicated, but interesting. A rich imagination will allow you to create a unique thing that the coolest biker or rocker can envy.
From beautiful openwork lace, you can sew wedding or evening gloves. They are long, graceful, and emphasize the femininity of the person wearing them.
Primary requirements
To learn how to sew gloves correctly and get the desired result, you must follow the basic requirements. First of all, choose the right material, threads and needles. It is also important to choose correct dimensions patterns and in the process of work, do not forget about the obligatory indent from the edge of the seam by one - one and a half centimeters. Success is guaranteed by accuracy, attentiveness, and the ability to combine colors correctly.
If you follow the rules, you can get a wonderful original product that others will envy.
From this article, we learned how to sew gloves with our own hands. Patterns after the completion of the creative process must be saved in a certain place. They can still come in handy, and more than once.

In addition, unique gloves created with your own hands can be presented as a gift to relatives and friends. Surely they will appreciate it.