Many of us wear mittens. Now you can knit them in different ways. The knitting method is especially interesting. mittens with a wedge for a thumb. This is an extension that goes right after the gum. And we will knit such mittens in this master class.
Mittens, finger wedge
For knitting mittens we need:
- Yarn;
- Knitting needles;
- Needle.
We collect thirty-six loops on the needles. And we distribute these loops on three knitting needles (maybe four).
Then we knit in a circle several rows of ordinary elastic two by two. That is, we knit two loops with the front and the next two with the wrong. We knit elastic at the desired height.
To make it more interesting, you can change the color of the yarn and knit elastic with stripes.
Photo 1
After we have finished knitting the elastic, we will continue knitting in a circle with the front stitch.
But we will immediately begin to knit a wedge for the thumb. And for this, we knit the first four loops on the first spoke. Then we put a mark and knit two more loops. Put the label again. We knit the rest of the loop and the whole row.
Photo 2

We start a new row and knit our first four loops to the mark. The label is thrown onto the right knitting needle.
Then make an increase. From the broach we knit the front loop. We knit further all the loops to the second mark. And here again we will tie the front loop in a broach. We change the mark on the right knitting needle. And we finish the row with the front surface.
From label to label, we now have four loops.
Photo 3

We knit a new row simply in a circle without increments.
Then, in the next row, we again knit the front loop after the mark in the broach, that is, we perform an increase. Then we knit all the loops to the second mark and again knit a loop (increase) in the broach.
We will already have six loops from mark to mark. All other loops are simply knitted to the end of the row.
We knit a new row without increases.
That is, we will alternate a series with increments and a series without them. We always add after the first mark and before the second mark.
All we need is to get sixteen loops from tag to tag.
Photo 4

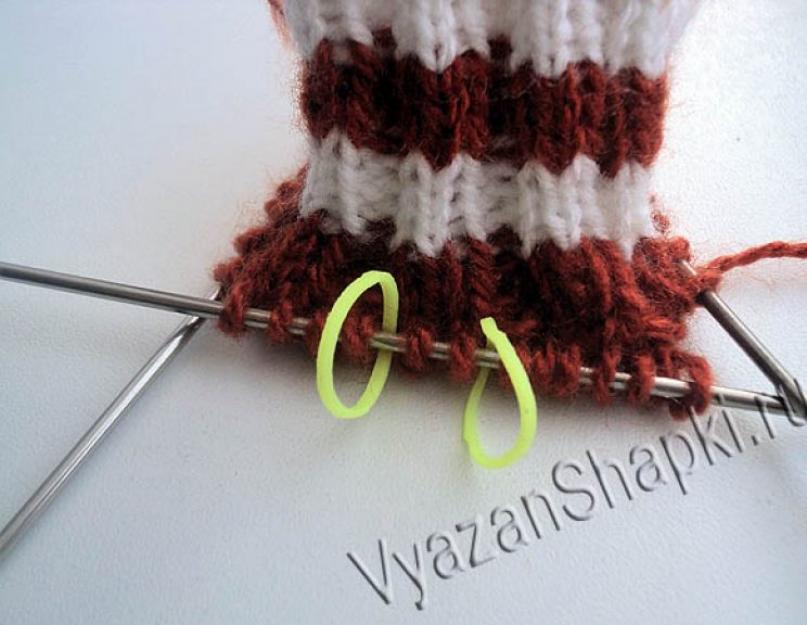
Next, we knit the first four stitches in a new row. And sixteen loops from mark to mark, we lower to an additional thread. We will return to them a little later.
Photo 5

We collect three more loops on the right knitting needle and knit further in a circle the mittens with the front stitch.
Photo 6

We have to distribute the loops on four knitting needles.
And we tie to the end of the little finger.
Photo 7

From the first knitting needle, remove the first loop, knit the second and thread through it our first untied loop. We just knit all the other stitches from the knitting needle.
We knit the stitches from the second knitting needle, leaving two stitches at the end. We knit the first of them and return to the left knitting needle. Pass the last loop through this loop and lower it. And the loop from the left knitting needle is transferred to the right.
Next, we knit the stitches from the third knitting needle in the same way as with the first. And we knit stitches from the fourth knitting needle, as we knitted from the second. And so we knit until on each needle there are two loops left. We collect these loops on a needle and tighten.
You can reduce it easier.
To do this, we knit the first two loops from the first knitting needle together.
From the second knitting needle we knit the last two loops together.
From the third knitting needle we knit the first two loops together.
From the fourth knitting needle we knit the last two loops together.
And so in every row.
Photo 8, 9


Go back to the finger. We put on eight loops on one knitting needle and eight on the second. We take the third knitting needle and on it from the bottom of the finger we dial two loops.
Then we knit in a circle with the front stitch to the nail. Loops are distributed equally into three knitting needles.
Photo 10

We tie to the nail and begin to reduce.
Photo 11

To close the finger, we will in all rows knit the first two loops together on each spoke.
We tighten the thread at the end and hide it in knitting.
Like these ones wedge mittens get out!
Photo 12

Hello!
They are waiting for the promised three years? And no! Promised - showing!
A huge request! If you drag it to yourself and post it somewhere afterwards, do not forget to indicate the name of the author and the active link to the message!
I imposed a lot of mittens on for my long knitting life, of course, not so much as the old women who sell them on the market and knit themselves, essno, yyyy. But I have my own achievements, which I will share with you today.
Here is my semi-finished product, Alize Lanagold yarn.
Closer photo closer: 
Now about how I knit out the wedges. The principle is simple: we begin to knit the wedge at the base of the tubercle of the thumb, knit 5 loops with the wrong ones, while 1-3 more loops should remain on the side of the mittens (on the side on which the finger will be knitted). In the next row we make increments, knitting a loop from the previous row from the broach, to the next. we knit the added loop along the crossed front so that there are no holes. We knit: 1 out, 1 persons, increase, 1 persons, increase, 1 persons, 1 out. I made the next increase in 3 rows. The amount of increase depends on the fullness of the hand and the thickness of the yarn. More often, my increase goes through a row or two, I add up to about 13-15 loops. In this case, I did not have to add a lot - only 3 times, that is, I got 6 loops of increase. We put all the front loops on the knitting needle, with the exception of the extreme purl. So, 9 loops are postponed, I collect 2 loops less than the delayed ones - 7. I knit 1 row, then the starts to decrease: I knit 2 cm front with a slope to the center of the wedge in every second row until 3 loops remain from the wedge. In the next row, the extreme wrong side are knitted with facial ones.
Finger. We collect 7 loops on the upper edge of the hole for the finger. 
I distribute the loops for the finger into 3 knitting needles: I distribute the deferred loops on two knitting needles, newly dialed on one knitting needle. Well, this is how convenient it is for someone.
Most often, I type 1-2 more loops on the sides, but it depends more on the thickness of the yarn. So that there are no holes on the sides of the base of the finger, I knit like 2 faces together. extreme loops of the lower needle, capturing the thread on the side: 

We knit 3 rows. Then we make decreases on the sides of the finger: we knit 2 cm. facial 4 times, along the edges of the lower loops (those that were put off) and along the edges of the knitting needles with newly typed loops. We knit directly longer until almost the whole nail is covered (for lovers of long nails - the same thing, just the mittens will be longer). In the next row we knit all the loops 2 VM. facial. Loops tighten, cut the thread and hide. All! 

In real life, there are no holes, and the hand does not shine through - the flash “highlighted”.
That's all, perhaps. I hope I was able to convey and not confuse.
I’ll post the photos of the finished mittens later))).
Yarn - “Village” from Troitsk, natural color (1508), 100% wool, 170 m / 100 g., Consumption 60 gr. 5 stocking knitting needles No. 3 Knitting density 1.7 loops per cm. Girth of the hand 20 cm.
We bring to your attention a step-by-step master class in knitting mittens with the most common way - from the cuff to the toe. Since this tutorial is for beginners, we will connect the simplest mittens.
Before knitting, measure the circumference of the hand.

Mittens are knitted on 5 needles round, from top to bottom. We calculate the number of loops that need to be put on the knitting needles: 20 x 1.7 \u003d 34 loops, where 20 is the girth of the arm, and 1.7 is (Pg). Distribute them into 4 knitting needles: 34: 4 \u003d 8.5. We round and get: all you need to dial 36 loops, 9 for each spoke. We will knit a mittens. When knitting in a circle with loops made in the second way (grandmother's), knitting can be twisted. Mentally assign numbers to knitting needles to make it easier to explain the progress of work. Closing the circle, we knit four stitches of the 1st knitting needle together with the end of the yarn remaining on the 4th knitting needle from the set of loops so that the circle closes around the edge more tightly.

Start with right mittens. We will assume that on the 1st and 2nd knitting needles are the loops of the lower part of the mittens, and on the 3rd and 4th needles are the upper ones. We start the work with a cuff that we knit with a 1x1 elastic band. The cuff is trimmed with stripes: these are strips of red yarn through three rows: three rows along the edge of the main yarn, then three rows of red, again three rows of the main and then three rows of red. Cuff height 7 cm.

We will knit the right mittens on the 1st needle, for the left - on the 2nd. To do this, we knit the first loop with the first color of thread in the first needle. All other loops, except the last one, are knitted with facial colored thread. Then we return the loops connected by a colored thread to the 1st knitting needle and once again we knit the main thread. We get a colored stroke. This will be the hole for the thumb in the future.


Then proceed to decrease loops on the toe of the mittens. On the 1st and 3rd knitting needles at the beginning, we knit the first two loops together with the front in the second way (behind the back walls), after first turning the 1st loop. On the 2nd and 4th knitting needles we knit two loops together at the end of the knitting needle face first way (for the front walls). So, we decrease the loops through the circle until half the number of loops appears on each spoke (in our case, when the number of loops on each spoke is odd, we reduce the smaller part through the circle - 4 loops), then we reduce the loops in each circle (5 loops). At the same time, on the 1st and 3rd knitting needles, in those rows where the loops do not decrease the first loops, we also invert and knit in the first way. When there are 2 loops on each spoke, we tighten the loops and fix them on the wrong side.
Now proceed to knitting thumb mittens. To do this, carefully pull the colored thread out of the thumb hole. Then we introduce two knitting needles into the loops, we get 7 loops on the lower needle, on the top 6.

We begin to knit a finger, distributing the loops into 4 knitting needles: on the first 4 loops, on the second 3 and pull one loop from the side edge of the hole, on the 3rd and 4th needle there will also be 4 loops (3 + 1 from the side edge of the hole) . To make it more convenient, the end of the working thread can be lowered into the hole (on the wrong side of the product).

We continue to knit the finger in a circle to the middle of the nail, and then we begin to lower the loops in the same way as when knitting the toe of the mittens: on the 1st and 3rd knitting needles at the beginning, on the 2nd and 4th knitting needles at the end, but decreasing do in each row. When the first loop remains on each spoke, we tighten the loops and fasten them on the wrong side.
Left mitt fits in the same way as the right one, but in a mirror image: we knit the hole for the finger on the second needle.
Mittens for childrenfit in the same pattern as for adults, in accordance with the measurements of the hand.
I love knit mittens. Until recently, the thumb hole was knitted in the usual way, but today there is an incredible amount of chic schemes with a wedge for the thumb, I had to master it. It turned out to be much simpler, and the mitten on the hand sits more conveniently, and the pattern on the finger is beautiful.

To perform a wedge of the thumb, we determine the midline of the wedge, which may consist of one or more loops - depends on the thickness of the threads and the size of the mitten. It is more reasonable to position the finger on the inside of the mitten, along the line of connection of the set of loops, at the level of the lower phalanx of the thumb.

In each third row we add one loop to the right and left of the line. By adding loops, the wedge of the thumb will increase.

The additions are as follows:
The first row - on the first needle we knit half of the loops with the front ones (to the point of the midpoint of the wedge line), then we make the yarn. Next, we knit a number of facial loops.
The second and third row - perform facial.
The fourth row - again we knit in a circle facial, then we make the crochet, 1 front, and - again the crochet. Together with the yarn we got three loops of the future thumb wedge.
The fifth and sixth row - facial.
Seventh - in a circle facial, yarn, three facial, yarn, facial.
Thus, in every third row two loops are added, which in the future will be the wedge of the thumb of the mittens.


The number of additions depends on the thickness of the thread and the size of the product, in some cases, additions are made in every second row.

At the level of the base of the thumb, we remove the wedge loops on a pin or thread of a different color, continue knitting the mittens in a circle.


We knit a finger in the usual way.


The photo (above) shows that when adding loops with the help of yarn, holes are formed, which is not advisable when knitting mittens, but we pursue the goal - to keep the hands warm. At the end of the article, watch a video that shows how to knit additional loops without forming holes.

Knitting a mittens thumb with a wedge is not at all difficult. Now, having mastered all the wisdom of this science, you can take on knitting mittens with a beautiful ornament. Here is a wonderful scheme (from free access on the Internet). Pay attention to what a beautiful pattern fits on the wedge of the thumb, for me it’s just such an amazing drawing!

Now you can safely take up knitting mittens of any complexity, it’s no longer scary))).

They can become a worthy decoration of any wardrobe, a wonderful gift for the holiday. Friends and relatives will appreciate even elementary mittens, especially in this cold winter. So take the knitting needles and get to work.
Wishing you inspiration and creative success!
How to knit mittens with knitting needles in different techniques and with different patterns for every taste and color.
Almost everyone had knitted mittens from their mother or grandmother. Many people, mostly women, learn how to knit warm mittens for their children, relatives, or themselves over the years. It is much nicer to have in your wardrobe a thing done by your own hands or by the caring hands of your loved ones.
Mittens - a symbol of warmth and coziness
How to learn to knit mittens with needles?
Being able to knit something yourself is a very good and useful skill. You never know when you want a new scarf, gloves, socks or mittens. There are always people who love to create something with their own hands, it is not interesting for them to buy finished products in stores. It is these people who create masterpieces that are amazing in their beauty.
Mittens can also be beautiful and stylish. If you knit yourself, then in the right to decide absolutely everything that relates to the model yourself. And about where to start and how to learn to knit, we will write in this article.

 Mittens are something no winter can do without
 Step 1. You need to learn from high-quality materials, so choose the most comfortable knitting needles for yourself. They can be made of metal, bamboo, bone, plastic. As a rule, they choose knitting needles made of metal, because they provide the necessary sliding of the thread. And metal knitting needles do not catch yarn, which is very convenient.

 each yarn needs its own knitting needles
 Step 2 Choose a good yarn. It all depends on what exactly you want to connect and on your initial skill. If you are holding knitting needles for the first time in your life, then keep in mind that it will be difficult for you to work with threads that stretch very much or not at all. Usually, in such cases, they recommend half-woolen threads, they are quite elastic, and finished products from them hold their shape well. Beginners are also not recommended to work with threads that go in three or more additions - a large number of puffs are provided to you.


Step 3 Decide on the knitting technique and the pattern. It is best to start with the basics: a set of loops, front loops, wrong. Further more. Learn to knit with different techniques. Learn the rules for knitting braids, patterns, elastic bands and other elements.
Step 4 A set of loops is the very beginning of knitting. If you make a mistake at this stage, then, most likely, it will not work to realize your idea for knitting a product. To correctly dial the first row of loops, use the diagram below.


Step 5 Now you need to master the technique of facial smoothness. This is the foundation of knitting.


Step 6. After you understand the technique of knitting facial loops, begin to study the wrong technique. They are not very different from each other, but both of them must be mastered masterly.


This was the most basic knowledge that a person who wants to knit beautiful things in the future should possess. Master them, and only after that start manufacturing a full-fledged product.
Calculation of loops for mittens with knitting needles
First of all, you need to determine the size of your hand - calculate the length of your wrist, hand, fingers. If you count all the sizes incorrectly, then the product will turn out unpretentious, crooked, so pay special attention to this step.

For the back:
- Type on the two needles the number of loops needed for the mittens (half less). How to find out the exact amount to be used is described earlier in the article.
- Be sure to dial one additional loop on each side. They are useful for stitching at the very end.
- Tie an elastic band, 7-8 cm long.
- According to the technique chosen in advance (drawing), continue knitting to the tip of the little finger.
- After that, start to reduce the number of loops as shown earlier in the article (to connect two loops into one).
For the inside:
- Do all the same work that you did with the first half, but only until the end of the gum. Further the circuit will change.
- Now 3 quarters of all loops to dial on a pin.
- On the stitches remaining on the knitting needles, add the same number of stitches that were removed. Of these, an element of the future thumb is knitted in a rectangular shape.
- Knit the loops that remained on the pin with an even cloth to the little finger.
- Next comes the decrease according to the standard scheme.
- Two sides are ready. Now you need to sew them from the inside with the help of ordinary needles and threads.
- Mittens are ready.

How to tie an elastic band on mittens
An elastic band, or cuff (cuffs) - this is the name of the part of the mittens that fits snugly on the wrist and reaches the wrist. Elastic band is needed, first of all, for better fixing the mittens on the hand. It is thanks to the cuff that the mittens do not fall off at the first wave of the hand.
It is not necessary to make mittens with an elastic band. But otherwise, be prepared for the fact that the product quickly stretches and loses its "salable" appearance.


Several options for knitting gum for mittens, we have already given in this article, nevertheless we will give more.


In the case when you want to make a beautiful gum, but you don’t have time or skills to weave patterns, you can use a tricky technique - you can sew fur on the gum. Then the mittens will look completely different.


How to knit finger mittens with knitting needles for beginners?
The finger on the mittens always fits separately from the main product, or they return to it when all the main work is already completed.
In this part of the mitten, be especially careful if you tie the brush perfectly, but make mistakes in knitting your finger - the product will have to be re-bandaged.


The thumb can be knitted either with a wedge or without a wedge. Mittens in which the thumb is made with a wedge look neater than those mittens in which the thumb is made without a wedge.
Knitting pattern for thumb with a wedge mittens.


Knitting pattern of the thumb without a wedge.


This is how mittens look, in which the thumbs are made with wedges.


How to reduce and finish the mittens with knitting needles?
There are several ways to finish knitting mittens. In this article, we have revealed only one. Therefore, we’ll tell you more about some of the ways that you might like more.
Method number 1. So that the toe at the mittens comes out rounded, decreases are made only at the end and in the middle of each of the spokes. The last loops are collected in a ring and tightened from the inside.
Method number 2. On the first and third knitting needles, knit every 2 first stitches with peroxide, pulling one loop through the second. And on even (2, 4) knitting needles, together, in the usual way, only knit the last 2 loops.

 loop reduction scheme
 How to close the loops on mittens with knitting needles?
Close knitting mittens from above where the so-called "toe". Do this by pulling the thread in a ring through the remaining loops. Then the thread is tied on the back and cut.
If you tie the thread on the front side, you can get an ugly seam, from under which the trimmed thread will stick out. Therefore, do not forget to tighten the mittens from the inside.
Knitted mittens for beginners
The mittens made using the scarf knitting technique always consist of two halves - the outer and inner sides. Therefore, any mittens on two knitting needles can be performed in this technique.
Now we will tell you how to knit such mittens.
 part 1


Fingerless mittens with knitting needles for babies: diagram and description
To keep your baby always warm - tie him mittens with your own hands. To very young children knit mittens without fingers, so that children's hands do not freeze. In another way, such mittens are called scratches.
Fingerless mittens fit very simply. Even a novice will knit such a product without problems in just a few hours.
Fingerless mittens fit on 5 needles in a way you already know.

How to tie fingerless mittens for fingerless kids:
- Pull 32 loops into 2 knitting needles, distribute them over 4 knitting needles.
- Tie a small elastic band about 4-5 cm long. Knit, alternating one front and one wrong loop.
- Now only knit about 6-8 cm with facial loops; you do not need to make a hole under the finger.
- When the main part is finished, start reducing 1 loop on each side of the knitting needle. Knit so 6 rows. Scratches for kids in the marine theme Part 2

A simple pattern for mittens with knitting needles for beginners: a diagram and description
To simple patterns usually include braids, tows and all kinds of lines. To knit such patterns for a beginner, just stick to any of the schemes below.


And here is a detailed description of knitting braids for mittens using knitting needles.


Video: How to knit mittens with needles? | How to knit mittens.


