Mittens evoke the warmest associations for every person. Comfortable, practical, beautiful and functional - all this is about mittens. Mittens are worn by children and adults, experiencing the most grateful feelings for this carefully warming winter wardrobe item.
Today there are many different models in stores, but the most pleasant sensations are given by things made with your own hands. Classic knitting knitting mittens - this is the simplest and quick way learn the wisdom of needlework.
Knitten things- it is always original and original. In addition, on beautiful sets made with your own hands, you won’t have to spend a lot of money, and the process itself will bring a lot of pleasure.
A warm accessory with an exclusive pattern will become a luxurious highlight of your winter look, a useful gift to yourself, as well as to your loved ones. We offer beginners in the art of knitting several detailed lessons and diagrams with descriptions of how to create luxurious mittens with ornaments.
Knitting lessons
No matter how many couturiers try to change mittens to gloves, knitted mittens still remain trendy winter item wardrobe Mittens are worn with pleasure by children, young girls and confident businesswomen, and the stronger half of humanity is no exception. Designers have recently increasingly included such an accessory in their collections, using leather, knitwear, wool or fur to create it.
The designer item is expensive, and the mittens hand made are valued for original idea and priceless manual labor skilled craftswoman. Do you want to learn how to knit beautiful mittens with your own hands? We offer several simple and interesting lessons with step by step instructions for beginner needlewomen in knitting mittens with patterns. We will use the following abbreviations:
- P – loops;
- LP – facial loops;
- IP - purl loops.
Beginners are offered simple schemes with detailed description. All models are original and universal in their own way.
 Even a novice needlewoman can knit simple but comfortable mittens
 Seamless mittens
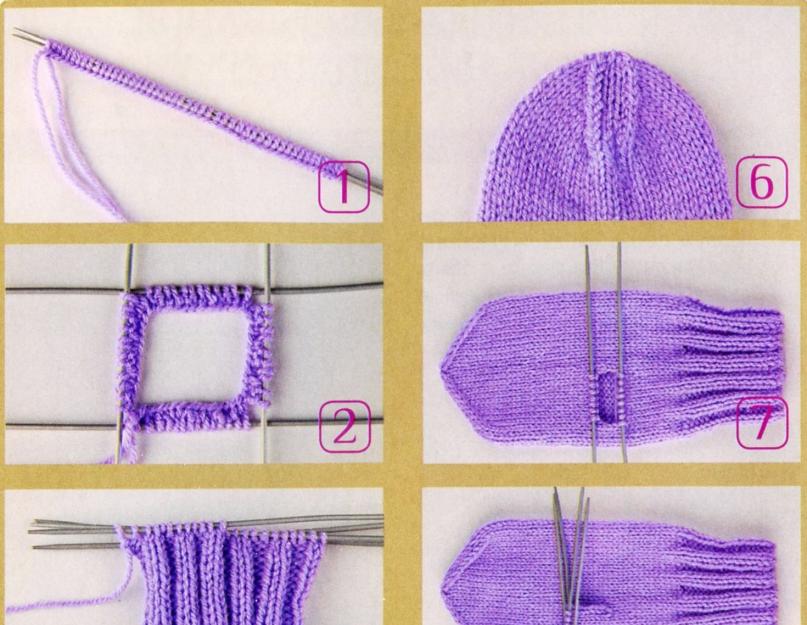
A basic lesson on knitting mittens that even a beginner can handle. The peculiarity of this model is the absence of a characteristic seam. The product will require only 70 grams of wool, as well as five needles No. 3.
Before you begin the creative process, you need to determine the knitting density. The optimal indicator for this model is 1.7 loops in one centimeter.
Measure the circumference of your hand; the standard measurement for a woman’s hand is 20 centimeters. Work on 5 knitting needles, this is how the mittens will turn out seamless.
Step-by-step algorithm:
- We cast on loops at the rate of 20 * 1.7 = 34 loops. All 34P are distributed over four knitting needles. For ease of calculations and multiplicity, dial 36 P, which are distributed in nine for each of the 4 knitting needles.
- Conditionally number each knitting needle. Knit, closing the circle more tightly, 4p of the 1st knitting needle together with the end of the yarn that remained on the 4th knitting needle from the set of loops.
- We start knitting with the right mitten. On the 1st and 2nd knitting needles we will count the loops of the lower part of the mitten, on the 3rd and 4th - on the right. Tie with an elastic pattern 1LP*1IP, the cuff height is approximately 7 cm.
- Knit the warp, moving in a circle, row by row, to the base of the thumb. The distance is 5-7 cm depending on the size. The finger is knitted on the 1st needle for the right mitten, on the 2nd needle for the left.
- Having reached the base, begin to decrease the loops at the toe of the mitten. On the 1st and 3rd knitting needles, the first 2P are knitted together with 1LP behind the rear walls with a 1P turn. On the 2nd and 4th needles we knit in a mirror manner, that is, behind the front walls. Decrease until half the number of stitches remains.
- Tie the thumb hole. Insert two knitting needles so that the bottom one is 7P and the top 6P. Distribute them onto the knitting needles and knit in the round. Having reached the nail area, decrease the loops, as in the toe. When there are 1p left on the knitting needles, pull them together and fasten them from the wrong side.
- When the right mitten is ready, we knit the left pair in the same way, but mirrored.
Master class on knitting mittens in a seamless way (part 1)
Master class on knitting mittens in a seamless way (part 2)
Master class on knitting mittens in a seamless way (part 3)
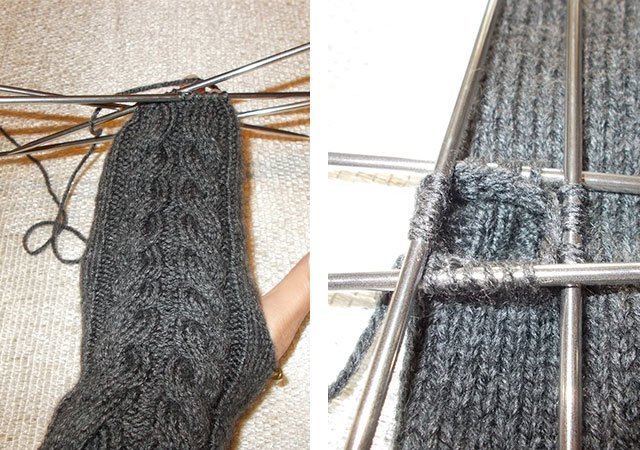
Long mittens with two knitting needles
A stylish model with an elongated cuff will not only warm you up, but will also become an original detail of the winter beauty’s image. These mittens are knitted on two knitting needles.
There are two ways: the first - two separate parts are knitted and then sewn together, the second - continuous knitting with one invisible seam.
We suggest knitting the mittens using the second method. The process is more labor-intensive, but the result will be visually more accurate. To work you will need a skein of yarn, knitting needles, a pin, a hook, a needle, and a tailor's yardstick. Instructions:
- Start with the right piece. Take measurements and determine the knitting density in 1 centimeter. For standard size it turns out 40P-4P=36P, plus 2 edge loops.
- Tie the cuff with an elastic band according to the 2LP*2IP principle. There are approximately ten rows for a length of 15 cm.
- For the main one, take knitting needles of a smaller diameter. Add 4p evenly, knit to the base of the thumb.
 Besides the original appearance, the advantage of such mittens is that they warm your hands perfectly
 Many beginners mistakenly leave room for their thumb on the side. In fact, the pipe is knitted closer to the palm, so your hands will be warmer and more comfortable.
- We knit 2 loops from the edge, and then remove them with a pin. For the finger, take 6P, knit them, remove them with a pin. On working knitting needle 6P of the thumb will remain. Knit in height, multiply the length of the finger by 2, then enter the loops from the pin into the work.
- Tie to the little toe, move to the toe. To do this, you need to divide all the loops into 2, remove one part with a pin. We begin to shorten and knit according to the principle “edge, 1 loop, then 2 loops together.” Reduce until there are 6-8 stitches left on the needle.
- We close the remaining loops and work the other side in the same way. When the toe is finished, carefully sew up the hole at the base of the mitten.
Knit the left mitten similarly to the right one, in a mirror image. The master class will certainly appeal to beginners, because knitting or crocheting mittens is a fascinating creative process.
Master class on knitting long mittens (part 1)
Master class on knitting long mittens (part 2)
Master class on knitting long mittens (part 3)
Mittens with a pattern for children and adults
Mittens with a pattern are the next level for beginner craftswomen. The ornament is an original detail that turns an ordinary winter accessory into a designer item.
To embody creative idea It was easier for needlewomen; there are many diagrams with detailed descriptions. We offer an interesting tutorial on how to create stylish mittens with a classic pigtail pattern.
To work you will need 70 g of soft yarn, you can take angora or acrylic, as well as stocking needles. Don't forget to take the necessary hand measurements!
 Original knitted mittens
 Work algorithm:
- We start, as usual, with the right mitten. Knit a standard rib knit 2*p 2. Cast on 48 stitches, distribute equally on each of the 4 knitting needles and knit.
- Let's move on to the braid pattern.
The basic principle of creating a three-dimensional braid ornament: 8 loops cross to the left. To do this, 4 loops remain on the auxiliary needle, and the other 4 loops. knitted with an auxiliary knitting needle.
- From rows 1 to 6, knit according to the formula 1LP, 2IP, 8LP, 2IP, 8LP, 2IP, 1LP. Knit the loops on two knitting needles from the palm side.
- We knit the seventh row like this: 1LP, 2IP, 8P cross to the left, then 2IP, 8P cross to the right, 2 IP, 1LP. Knit the stitches on two needles from the palm side, repeat rows 1 to 7.
- Leave a hole for the thumb. To tie it, 2 persons. Slip 6 loops onto a pin, cast on 6 stitches, knit 4 stitches.
- We form the toe. To do this, we decrease the loops by knitting two loops together on each knitting needle, rounding the mitten towards the base. Carefully sew up the small hole in the thumb and toe with the same yarn.
Knitting Bella's mittens from the movie Twilight
Warm patterned mittens can be knitted for a child. For babies, choose soft, warm yarn so that it does not “bite” and cause allergies. Children especially like mittens knitted by the caring hands of their mother or grandmother. To turn a simple accessory into an interesting fun, decorate the mittens with beads, beads or embroidery.
Any of the master classes offered to beginning needlewomen is interesting to perform. Knit with pleasure, wear hand made items, it is always relevant, original, warm and beautiful. Finally, we offer a few more master classes on knitting interesting mittens
Owl pattern knitted
Another option for knitting mittens with owls
If you know how to hold knitting needles in your hands, then mastering the technique of knitting mittens will not be at all difficult. Just study this one detailed master class with a description and believe in yourself. As knitters say: the eyes are afraid, but the hands do.
Master class on knitting mittens on 4 knitting needles:
First, measure your hand size and use the table to determine the number of loops.


Mittens can be plain, with multi-colored stripes, applique or jacquard. It all depends on your skill. To begin with, I suggest knitting the most simple mittens, and then add various decorations.
For work we will need wool thread (70 g), 5 double needles No. 3.
Knitting density = 1.7 loops in 1 cm. Next, you need to measure the girth of the hand, but we will knit for a hand whose hand girth is 20 cm.
The product is knitted from top to bottom on five needles, as a result of which it will turn out without a seam. Calculation of the number of loops: 20 x 1.7 = 34 loops. Distribute 34 stitches onto 4 knitting needles. I suggest rounding up and casting on 36 loops, so we get 9 each.
To make the explanation easier, let's give each knitting needle a serial number. Closing the circle, we knit four loops of the 1st knitting needle together with the end of the yarn remaining on the 4th knitting needle from the set of loops, so that the circle closes tightly around the edge.
Let's start with the right part. We will assume that on the 1st and 2nd knitting needles there are loops of the lower part of the mitten, and on the 3rd and 4th knitting needles - the upper ones. We start the work with an elastic band, which we knit 1×1 (1 knit, 1 purl). The height of the elastic band or cuff is 7 cm.

The thumb will be knitted on the 1st needle, for the left - on the 2nd. To do this, knit the first loop on the 1st knitting needle with a thread of the main color. All other loops, except the last one, are knitted with colored thread. Then we return the loops connected with the colored thread to the 1st knitting needle and knit again with the main thread. We get a colored touch. This will be the hole for the thumb in the future. Next, we simply knit up to the little finger (about 8 cm).

Then we begin to decrease the loops on the toe of the mitten. On the 1st and 3rd knitting needles, at the beginning, we knit the first two loops together with the front one in the second way (at the back walls), having first turned over the 1st loop. On the 2nd and 4th knitting needles we knit two loops together at the end of the knitting needle using the first method (behind the front walls). So we decrease the loops through the circle until each knitting needle has half the number of loops (in our case, when the number of loops on each knitting needle is odd, we decrease the smaller part through the circle - 4 loops), then we decrease the loops in each circle (5 loops). At the same time, on the 1st and 3rd knitting needles, in those rows where we do not decrease the loops, we also turn the first loops over and knit them in the first way. When there are 2 loops on each knitting needle, tighten the loops and secure them on the wrong side.
Now let's start knitting the thumb. To do this, carefully pull the colored thread out of the thumb hole. Then we insert two knitting needles into the free loops, we get 7 loops on the lower knitting needle, 6 on the upper knitting needle. We begin to knit the finger, distributing the loops on 4 knitting needles: 4 loops on the first, 3 on the second and pull one loop from the side edge of the hole, on the 3rd and the 4th knitting needle will also have 4 loops (3+1 from the side edge of the hole). To make it more convenient, the end of the working thread can be lowered into the hole (on the wrong side of the product).

We continue to knit the finger in a circle until the middle of the nail, and then begin to decrease the loops in the same way as when knitting the toe of the mitten: on the 1st and 3rd knitting needles at the beginning, on the 2nd and 4th knitting needles at the end, but decreasing We do it in every row. When there is 1 loop left on each knitting needle, we tighten the loops and fasten them on the wrong side.
The left mitten is knitted similarly to the right one, but in a mirror image: we knit the hole for the finger on the 2nd knitting needle.
Mittens have always been the most practical and comfortable for cold winters. Today there is a huge selection of mittens in stores for the whole family, but it is much more pleasant to wear things that were created with love with your own hands.
Having learned to knit, you can create entire sets: hat, scarf, mittens. They will harmonize beautifully with each other if they are made in the same style with the same pattern.
I propose to go directly to the discussion of the topic: “how to knit mittens with knitting needles - step-by-step instructions.”
How to knit mittens with knitting needles (step by step for beginners)
In order to learn how to knit beautiful stylish mittens, you need to learn how to knit the simplest ones, on the basis of which you can create the most original models for the whole family.
Seamless mittens - master class with detailed description (photo)
The most interesting thing is that even the lazy can handle this model. They can be plain, but the author suggests adding a few red stripes for variety.
Popular articles:
For work we will need wool thread (70 g), 5 double needles No. 3.
The product is knitted from top to bottom on five needles, as a result of which it will turn out without a seam. Calculation of the number of loops: 20 x 1,7 = 34 loops. Distribute 34 stitches onto 4 knitting needles. I suggest rounding up and casting on 36 loops, so we get 9 each.
To make the explanation easier, let's give each knitting needle a serial number. Closing the circle, we knit four loops of the 1st knitting needle together with the end of the yarn remaining on the 4th knitting needle from the set of loops, so that the circle closes tightly around the edge.

The thumb will be knitted on the 1st needle, for the left - on the 2nd. To do this, knit the first loop on the 1st knitting needle with a thread of the main color. All other loops, except the last one, are knitted with colored thread. Then we return the loops connected with the colored thread to the 1st knitting needle and knit again with the main thread. We get a colored touch. This will be the hole for the thumb in the future. Next, we simply knit up to the little finger (about 8 cm).

Then we proceed to decreasing the loops on the toe of the mitten. On the 1st and 3rd knitting needles, at the beginning, we knit the first two loops together using the front stitch in the second way (at the back walls), having first turned over the 1st loop. On the 2nd and 4th knitting needles we knit two loops together at the end of the knitting needle using the first method (behind the front walls). So we decrease the loops through the circle until each knitting needle has half the number of loops (in our case, when the number of loops on each knitting needle is odd, we decrease the smaller part through the circle - 4 loops), then we decrease the loops in each circle (5 loops). At the same time, on the 1st and 3rd knitting needles, in those rows where we do not decrease the loops, we also turn the first loops over and knit them in the first way. When there are 2 loops on each knitting needle, tighten the loops and secure them on the wrong side.
Now let's get started thumb tying. To do this, carefully pull the colored thread out of the thumb hole. Then we insert two knitting needles into the free loops, we get 7 loops on the lower knitting needle, 6 on the upper knitting needle. We begin to knit the finger, distributing the loops on 4 knitting needles: 4 loops on the first, 3 on the second and pull one loop from the side edge of the hole, on the 3rd and the 4th knitting needle will also have 4 loops (3+1 from the side edge of the hole). To make it more convenient, the end of the working thread can be lowered into the hole (on the wrong side of the product).

We continue to knit the finger in a circle until the middle of the nail, and then begin to decrease the loops in the same way as when knitting the toe of the mitten: on the 1st and 3rd knitting needles at the beginning, on the 2nd and 4th knitting needles at the end, but decreasing We do it in every row. When there is 1 loop left on each knitting needle, we tighten the loops and fasten them on the wrong side.
Left mitten knitted similarly to the right one, but in a mirror image: we knit the hole for the finger on the 2nd knitting needle.
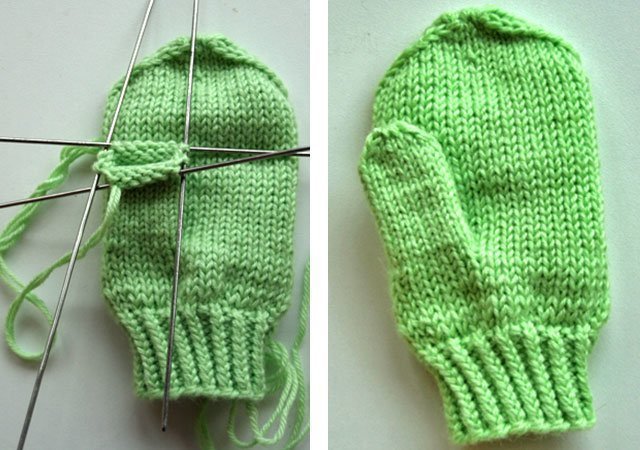
Step-by-step instructions for knitting on two needles
These long mittens can also be knitted on two knitting needles. You can knit two parts separately and then join the halves, but we will consider the option where you only have to make one invisible seam (this will be correct and visually more beautiful).
Needed: yarn, knitting needles, regular and knitting pins, tape measure, hook, needle.

Let's start with the right part.
We measure the circumference of the wrist, the length of the palm and thumb. It is also necessary to measure the knitting density by knitting a little. We measure how many loops there are per 1 cm. My girth is 20 cm, there are 2 loops in 1 cm. You need 40p-4 = set of 36p + 2 edges.
We start from the bottom with a 2x2 elastic (knit 2, purl 2). It turned out to be approximately 10 cm (15 rows).

Next, we move on to the main fabric, where you can choose knitting needles of a smaller diameter. In the second row, add 4 stitches evenly. Next we simply knit 7 rows to the base of the thumb. You can try on and knit more/less if necessary.
The finger in the mitten is not on the side, but somewhat closer to the palm, so for the right mitten we knit as follows.

- A. - edge, 2p. We knit according to the drawing and remove it with a regular sewing pin.
- B. - For a finger, take 6-7 loops. Depending on completeness. We knit 7 loops according to the pattern, and remove all the remaining ones with a pin.
- V. - we only have 7 thumb loops left on the working knitting needle.
We knit in height with the main pattern, without edges!!! We multiply the length of the finger by 2. My finger is 6 cm * 2 = 12 cm in height. 21 rows came out. WE KNIT THE FIRST AND LAST ACCORDING TO THE DRAWING!!! We return the loops from the large pin to the knitting needle.


Divide all the loops by 2. Slip one part onto a pin.

Let's start cutting down.

We knit the purl row according to the pattern. I don't have 20 stitches on my needle. I knit like this: edge, knit 1, knit 2 together, knit 12, knit 2 together, knit 1, purl 1. Total 20 stitches. We shorten this way in each front row until there are 6-8 loops left on the knitting needle. I have 7.

Close the loops and do the same procedure with the second half. To finish correctly, simply knit two stitches together, transferring the knitted one to the main needle.


From these lessons we can conclude that knitting is not that difficult. Knitting mittens requires basic knowledge and a little free time.
Knitted mittens with a pattern (diagrams and description)
Having learned to knit the most simple models, you can dilute them beautiful patterns, giving free rein to your imagination. In the article “” you will find them in large quantities.
And now I suggest switching to more complex mittens with knitting needles (diagrams and descriptions will help you understand this difficult task).
How to knit beautiful mittens with braids for women
Mittens with braids, knitting patterns and descriptions for lovers of the classics.
The braid will be the main decoration. We chose a simple braid, but if you are not afraid of difficulties, you can choose a more complex and original option.
Yarn - acrylic (can be made from angora), approximately 70 g; stocking needles No. 3.5.

Elastic pattern: K2, P2.
Knitting a braid pattern: 8 loops cross to the left (leave 4 loops on the auxiliary needle before work, knit 4 and knit loops from the auxiliary needle).
Cross 8 loops to the right (leave 4 loops on the auxiliary needle while working, knit 4 and knit loops from the auxiliary needle).
Cast on 48 stitches and distribute them onto stocking needles, resulting in 12 stitches on each needle. Knit with a 3.5 cm elastic pattern (if the elastic is not enough for you, knit more than cm).
Then, we start knitting the main pattern. For the convenience of knitting the “braid” pattern, I transfer the loops from the 1st and 2nd knitting needles to one knitting needle. Those. I have the loops distributed over 3 knitting needles (not 4 knitting needles), on the first knitting needle there are 24 loops of the main pattern, and on the 2nd and 3rd knitting needles from the palm side there are 12 loops each.
So, the first row after the elastic begins with a knitting needle with 24 loops, we begin to knit the main pattern.
Rows 1-6: K1, P2, K8, P2, K8, P2, K1, knit stitches on 2 knitting needles from the palm side.
7th row: K1, P2, 8 loops cross to the left, P2, 8 loops cross to the right, P2, K1, loops on 2 knitting needles from the palm side we knit. Repeat rows 1-7 throughout the entire work.

At a height of 10 cm from the beginning of knitting (you don’t have to have 10 cm, everyone’s hands and fingers are different), we form a hole for the thumb. Let's start with the left mitten. On the knitting needle from the side of the palm (3rd knitting needle) we knit 4 knits, remove 6 sts on a pin, put 6 sts on the knitting needle (so that there are 12 left, as before), k2.
We knit the hole for the thumb of the right mitten symmetrically, i.e. on the second knitting needle from the palm side: knit 2, knit 6, slip onto a pin, and knit 6, knit 4 on the knitting needle.
Toe formation carried out after the little finger on the hand is closed.

For a rounded toe, knit two middle stitches together on each needle.
Decrease stitches in each row until only 1 stitch remains on the needles (4 in total). After this, tear off the thread of the ball and thread it into the needle. Use a needle to pick up all 4 stitches, pull them off and fasten them from the inside of the mitten.
After the two mittens are knitted, we begin knitting the thumb. To do this, remove 6 sts from a pin onto a knitting needle, cast on 6 sts on a parallel row and cast on 4 sts on two side rows. In total, we got 20 stitches, distribute them onto 4 knitting needles (5 stitches per knitting needle).
And we knit circular rows of faces. to the required finger length. We form the toe of the finger similarly to the formation of the toe of the mitten.
Knitting mittens for children
Children really love it when their mother creates, for example, beautiful foxes or bears with her own hands, which they can put on their hands and go play in the snow.
Knitted children's mittens with owls
There is nothing more interesting for a child than mittens with a pattern. He wears such things with great pleasure, so I propose to please the child with wonderful owls.

Materials and tools:
1 skein;
stocking needles No. 1.5;
additional knitting needle or special stitch remover;
yarn needle;
four beads;
thread and needle for sewing on beads.
The mittens are knitted in two threads.
So, we cast on 32 loops, distribute them onto 4 knitting needles (8 on each).
Rows 1 - 10: knit 1 rib. x 1 purl.
11th row: faces.
Row 12: knit; add 2 persons from the broaches. on every spoke
13 - 18 rows: faces.
Row 19: we begin to knit the “owl” on 12 loops of the third and fourth knitting needles. The first knitting needle is knitting; second knitting needle - faces; third needle - knit 4, purl 6; fourth needle - purl 6, knit 4.
Row 20: same as row 19.

21 row: first knitting needle - knit.; second knitting needle - k2, slip 6 stitches onto a pin for the thumb hole, cast on 6 additional stitches, k2; third needle - k4, p2, k4; fourth needle - k4, p2, k4.
22, 23 rows: first knitting needle - knitting needle; second knitting needle - faces; third needle - k4, p2, k4; fourth needle - k4, p2, k4.
Row 24: first knitting needle - knit; second knitting needle - faces; third knitting needle - knit 4, purl 2, remove 2 loops for additional stitches. knitting needle at work, knit the next two knit stitches, then knit stitches. spoke - persons; fourth knitting needle - remove two loops for extra. knitting needle before work, knit the next two knits., then loops on extra. knitting needles, knit 2, knit 4.
25 - 31 rows: first knitting needle - knit, second knitting needle - knit, third knitting needle - knit 4, purl 2, knit 4; fourth needle - k4, p2, k4.
Row 32: same as row 24
33 - 35 rows: first knitting needle - knitting needle; second knitting needle - faces; third needle - k4, p2, k4; fourth needle - k4, p2, k4.
36th row: same as 24th and 32nd.
Row 37: first knitting needle - knit; second knitting needle - faces; third needle - k4, p2, k2, p2; fourth needle - p2, k2, p2, k4.
38 - 41 rows: first knitting needle - knitting; second knitting needle - faces; third needle - knit 4, purl 6; fourth needle - purl 6, knit 4.
Row 39: we begin to decrease. First knitting needle - knit the first 2 stitches together. behind back wall; second knitting needle - knit the last 2 knit stitches. behind the front wall; third needle - knit the first 2 stitches together. behind the back wall; fourth needle - knit the last 2 knit stitches. behind the front wall. Knit the remaining loops according to the pattern (knit and purl)

When there are only 8 loops left on the knitting needles, tighten them with a needle. For the thumb, transfer the 6 loops removed on the pin to the knitting needle, and cast on 2+6+2 loops from the edges onto three knitting needles.

We knit 12 rows in a circle. Then we transfer all the loops to two knitting needles and begin to decrease: on each knitting needle we knit the first 2 loops together behind the back wall, the last 2 - behind the front wall. We knit the second mitten in exactly the same way - only we leave the hole for the thumb not on the second knitting needle, but on the first.
Sew on bead eyes and enjoy this wonderful new product for winter.
Ideas with bullfinches (embroidery)
Having simple mittens on hand, you can decorate them with original embroidery, which will look great in a children's set.


Video lessons from the best masters
YouTube today has become a real treasure trove where you can find a huge number of educational videos. For example, on Svetlana Bersanova’s blogs you can watch a video lesson for free. And there are quite a few such good authors. You can find a mentor to your liking and receive valuable knowledge absolutely free.
Original mice or white hedgehogs for kids
How to knit mitts
Warm openwork for girls (double mohair)
Interesting two-color minions for a boy 7-8 years old
Jacquard products (video tutorials)
Jacquard with a winter theme is a classic that will always be relevant, so I suggest moving on to the most complex options, which require maximum time and attention to detail.
Original knitting with ornaments (Norwegian patterns)
For girls with deer
If you want to learn how to knit a difficult, but very original pattern“deer”, this lesson with a detailed description will help you.
Men's mittens with arans for little men
If you learn all the lessons we offer, you will be able to fantasize and create products of any complexity: ladies gloves fingerless, flip top, false pattern, thick yarn and embroidery. Good luck in your endeavors. Try, experiment and pamper your family with pleasant fagots.
In winter frosts, it is especially important to keep the child’s hands warm. Therefore, you will probably find the master class useful, how to knit double mittens(with lining), prepared by Vera Ponomarenko. In addition, Vera’s turned out to be very beautiful and elegant, you can see them in the photo. The description of the work is designed for the age of a child: 3-4 years, but using this principle you can also knit mittens of large sizes.
Double mittens (knitting)
Do you want to knit mittens for your child, but don’t know how? The master class on knitting children's double mittens will help you find the answer to your question. Use your imagination and it’s no longer just everyday life Everyday life in frosty weather, but also an excellent gift for your favorite holidays. After all, we have been taught since childhood: “The best is made with your own hands!”
- Yarn: Moscow LAMA “Russian motif” (100 g / 300 m, yarn composition: 40% wool, 60% acrylic)
- Marker: piece of contrasting thread – 12 cm
- Needles: two sets of double needles 2.5 mm and 3 mm.
Description
To keep the mittens on the wrists and not slide down, which is especially important for children, knitting must begin with an elastic band. In this example, one of the popular options is used - k2, p2. And so that the product does not lose its presentation during subsequent wear, the elastic should be knitted with knitting needles of a smaller size than the main part is supposed to be knitted.
On double needles with a diameter of 2.5 mm, cast on 40 sts. Evenly distribute 10 sts on each of the four knitting needles and knit 2x2 rib for the next 50 rows. As the product begins to add row after row, it may seem that at the 20th row it is time to stop and move on to knitting the palm and thumb. But since the presented sample of mittens is double (with lining), this number of centimeters of elastic will fold in half.
So, after 50 rows it was the turn of stockinette stitch. At the same time, it is necessary to replace the knitting needles with a 3 mm diameter. Continue knitting another 8 rows. Will start at 9 thumb.
The methods for knitting the thumb of a mitten are varied. IN this master class the simplest of them is described. To do this, knit 4 knit stitches on the first knitting needle, insert a thread of a different color (marker) and knit the remaining 6 knit stitches on the knitting needle.

Return to main color yarn, complete current row with knits, plus 28 more circular rows(total - 37 rubles from the elastic band).
In the next row, i.e. 38th, starting from the first needle, start decreasing along the edges. At the same time, on the 1st and 3rd knitting needles, re-slip the penultimate loop to right knitting needle. Knit the last loop and pull it through the removed one (i.e. 2 stitches along with a tilt to the right). But on the 2nd and 4th knitting needles the inclination should be to the left, i.e. Knit the first loop and pull through the second. Thus, decrease until there are two loops left on the knitting needles (total: 8 stitches). Cut the thread at a distance of 5 cm and tighten the remaining loops. The remaining piece of yarn will be needed later to fasten the outer and inner mittens together.

Return to marker. Using a knitting needle, pull the thread out of the fabric. Cast on the dropped stitches on the knitting needles. Total: 6 sts at the bottom and 7 sts at the top. On the bottom row, pick up one more side loop on each side. They must be knit crossed in the first row to avoid the appearance of holes in the fabric. In total, knitting the thumb is carried out on 15 loops for the next 17 rows.


The outer one is ready. It's time for the "lining". To do this, cast on 40 stitches along the bottom edge of the elastic so that the outer loops remain behind the work.

Work the next 8 rows in stockinette stitch. In the 9th row, knit 6 loops with a thread of a different color parallel to the thumb on the outer mitten. Return to main yarn. Continue working with knit stitches for the next 26 rows. In total, the elastic band should make 35 rows. Make reductions. Pull the last 8 loops together with thread, leaving a 5-centimeter tip.

Knitting the thumb of an inner mitten is no different from the method described earlier. The only difference will be the number of rows, which are half a centimeter less (15 rows in total).
In the end it turned out double mitten.

Using the previously left ends of the yarn, fasten both parts with inside and turn the fabric out. This must be done so that the child does not suffer in the future when putting on and taking off gloves, because the lining will remain in place under any circumstance.
Perform the right mitten following the example of the left one.

The only exception would be the choice of knitting needles for thumb knitting. So, on the outside of the fabric, insert a marker at the beginning of the IV needle. The inner thumb, accordingly, will be located parallel to the outer one. The choice of knitting needle in this case will depend on the beginning of the set of loops along the edge of the elastic band.
Make a twisted lace. To do this, you need to cut the thread to the required length. Fold the piece in half. Secure one end with a heavy object, and start twisting the thread with your fingers on the other side. The longer you twist the piece, the tighter the lace will be. Next, fold it in half again, straightening it along its length. Tie one end into a knot to prevent deformation. Using a hook, pull the lace behind the front stitches at a height of 10 rows from the front stitch.

Decorate the ends with pom-poms.
The final step will be applique on the outer mitten. It could be a flower or a butterfly if the children's mittens are intended for girls.


A boy's pair of mittens will be decorated with a snowman or a bear. It all depends on the author’s imagination.

Happy creativity!
More interesting:
See also:
Children's mittens "Kittens" (crochet)
In winter, it is simply impossible to do without such a simple piece of clothing as mittens. However, they can be made...
Elegant spring set for girls: scarf and mitts
Knitting children's clothes for girls is a great pleasure for the needlewoman. You can enjoy the bright...
Men's mitts crocheted
We have a master class on knitting women's mittens. In anticipation men's holiday- Defender's Day...
Gloves, knitted. Master Class
New master class on knitting gloves from Olga Arisep. With this step-by-step instructions...
 1. First, let's make a set of stitches for four knitting needles. To do this, we cast on 40 loops on two knitting needles (40 loops should be obtained taking into account the first, double loop). Then evenly distribute the cast-on 40 stitches onto 4 knitting needles. We get 10 loops on each knitting needle. Fold the four knitting needles into a square, with the loops facing up. In this case, the outer tail of the thread (which remains from the set of loops) meets the working thread.
 2. We begin to knit mittens with the fifth knitting needle in the direction from the cuff to the fingers. We knit the first row with knit stitches, and with the subsequent rows we will form the elastic band of the cuff. So, we knit the first 4 loops of the first row so as to grab both the working thread and the tail of the thread with the fifth knitting needle. This way, the end of the thread will be imperceptibly secured, and all we have to do is cut it off. Next, we knit a whole row with facial loops.
 3. We knit the subsequent rows with an elastic band 2 by 2: the first 2 loops will be purl, then 2 loops will be knit, then again 2 purl, 2 knit and so on. We continue to knit the elastic in the round, focusing on the “2 by 2” pattern.
 4. We knit an elastic band until the cuff reaches a length of 3 cm. After the cuff we move on to another type of knitting - this will be facial surface. We knit not 2 by 2, but continuous facial loops. We add two loops to each knitting needle so that the hand is free in our mitten. To add loops, before starting knitting, make two yarn overs on each knitting needle.
 5. Next we knit the front loops in a circle, measuring the mitten from time to time. If we have already knitted to the place where the thumb begins, we proceed to knitting the finger. We have 12 loops on each knitting needle. Select a knitting needle that will form the finger. We knit the first loop of this knitting needle in the usual way, and remove the 10 subsequent loops with a safety pin. Fasten the pin.
 6. Then we cast on 10 yarn overs on the same knitting needle and knit the last, 12th loop of the knitting needle. Our mitten creates a hole for the thumb.

7. Next, we knit facial loops in a circle until the length of the mitten reaches the tip of the little finger (be sure to measure the product!). We move on to knitting the mitten triangle, which will be on the fingertips. We begin to knit a triangle from the knitting needle, which is located in front of the knitting needle from which we removed the finger loops. We knit the first two loops together crossed knit stitch. This loop is knitted very simply: we stick the right knitting needle inside the loop from right to left. Having passed the knitting needle through the back wall of the loop, we catch the working thread and form a loop from it. This is the crossed facial loop. So, after two loops knitted together, we knit all the remaining loops of the knitting needle with regular knit stitches. We knit the next knitting needle like this: all the loops are knitted with regular knit stitches, and the last two loops are knitted together with regular knit stitches. The third knitting needle is knitted in the same way as the first, and the fourth in the same way as the second. In this way, we constantly reduce the number of loops and form a triangular tip of the mitten.
 8. When there is one loop left on each knitting needle, we will cut the working thread (leaving about 10 cm) and crochet it through all these loops. We put the knitting needles aside and see that we have a mitten (for now, instead of a finger, there is a hole).
 9. The finger of the mitten is knitted very simply. With one knitting needle we cast on 10 stitches from a pin. We hook another 10 loops onto the second knitting needle (we simply hook 10 loops located above the finger hole). Between these two knitting needles (top and bottom), around the hole we hook 2 more loops from the fabric on the sides. Next, evenly distribute the resulting 24 loops onto 4 knitting needles.
 10. We knit ordinary knit stitches in the round with the fifth knitting needle - exactly the same way as we knitted the entire mitten.
 11. Trying on the mitten. If it’s time to cover your finger, we do it with exactly the same triangle as the tip of the mitten. All that remains is to pull the ends of the threads to the wrong side, fasten them and trim them.
 12. We knit the second mitten in the same way. Knitted mittens for beginners are ready!
Video instructions for knitting mittens: