The arrival of spring in itself is long-awaited and evokes joyful feelings. And the presence of a gentle and beautiful women's holiday this season - March 8 - causes even more positive emotions! Flowers and sweets are sold everywhere, there are long lines in shops, not only in those that sell cosmetics and jewelry, but also in craft stores. After all, it’s no secret that giving gifts is very pleasant, and if they are made with my own hands, then it’s doubly pleasant. Such a gift will definitely be unique and memorable.
In this master class I will show you 10 options on how to make crafts for March 8th with your own hands with step-by-step instructions. unique photos. Such crafts will be a wonderful gift for your mother, grandmother, friend or colleague.
Spring women's holiday implies the presentation of gifts to all representatives of the fair sex. We have been following this tradition since childhood, when we started giving gifts to our mothers and grandmothers in kindergartens. After all, a gift made by children's hands is always highly valued and evokes only positive emotions.
At the same time, the process of making such gifts has a beneficial effect on the child himself, as it develops fine motor skills his hands, contributes to the manifestation of imagination and creative self-realization.
DIY crafts for mom on March 8
Sweet gift - candy grapes
In this master class we will make such a sweet gift.

For this we need:
- candies;
- wire;
- scotch;
- scissors and pliers;
- artificial grape leaves.

To give the candy the shape of a grape, use double-sided tape to glue one tail to the candy.


Using pliers, make a loop on the wire and screw on the candy.

Secure with tape.


We begin to collect 3-4-5 candies into a bunch.


Now we begin to collect a bunch of grapes.

We wrap the twig with green adhesive tape.


We attach the leaves.

All that remains is to decorate our gift - a low-tall basket is best for this.


Our candy grapes are ready!

Box “Dear Mommy” using decoupage technique
You can make such a box with your own hands as a gift for your mother using the decoupage technique. It is necessary to prepare suitable decoupage cards or napkins in advance.

We will need an empty box, we took a metal tea box.

We cover it with acrylic primer.

These decoupage cards can be ordered online.

We tear the map into uneven fragments.

Place it in water for a few seconds.

We transfer it to transparent film (file) front side down.

And carefully apply it to the box.

Cover the top with a brush with PVA glue.


When the box is dry, coat it with clear varnish.


Chocolate maker “To Mommy on March 8th”
A beautiful chocolate card, where you can put your sweet surprise, will complement the main gift in an original way. In addition, the chocolate bowl can also be used as an envelope for money, or you can put tickets for a concert or trip into it.
If you give just sweets, then after they are eaten there will be no memory of the gift, but if you present them in a chocolate bowl, then after the tea party there will be a memory of the gift. beautiful card and a sea of pleasant impressions. Your beloved mother will be pleasantly surprised by an unusual handmade gift.

To make a chocolate maker using scrapbooking technique, we will need:
- Thick white cardboard;
- Blue paper with polka dots;
- A sheet of paper in a box;
- Glue;
- Ruler;
- Awl or sharp scissors;
- Scissors;
- The inscription “To Mommy”;
- Decorative paper flowers;
- Stamens;
- Gauze;
- Hair fixation spray;
- Pastel purple and of blue color;
- Half beads;
- Ribbon;
- Double-sided tape;
- Pendant "Heart".
To begin, draw a diagram of the chocolate bowl on a checkered sheet of paper, or print it out on a printer. This master class has a ready-made template. The dimensions of the postcard correspond to a standard chocolate bar.

Place a ruler along the fold line and draw the awl firmly to mark the fold lines so you can easily bend the cardboard.


Glue the chocolate bowl together.

Glue the chocolate bowl together. Glue a small strip of tape on the bottom to prevent the chocolate from falling out.


Let's start decorating the front side. Cut the cardboard with the pattern to the required size, cut out the inscription.

Now you need to tint the edges of the decorative cardboard. Use the sharp edge of a pair of scissors to rub together the blue and purple pastels. Dip dry cotton swab into pastel and rub it along the edges of the picture.


Cut a piece of gauze, spray it with hairspray and scrunch it up.


Twist the stamens together and glue them to gauze. Plant decorative paper flowers on the glue, add an inscription, and decorate the whole thing with half beads.


Using a ribbon, tie a metal heart to the gauze, tie a bow, and scorch the edges of the ribbon with a lighter so that they do not fray.


Make a bow at the bottom of the card and decorate it with half beads in the shape of a flower. Hide the edges of the tape under the back of the cardboard.


Using thick double-sided tape, glue the decor to the chocolate card. Thanks to this tape, a space is created between the card and the decor, and the finished product looks more interesting and voluminous. WITH inside Glue thin satin ribbons to the edges of the card so that it can be tied.


Now you can write the warmest and most sincere words, put a chocolate bar inside, tie on both sides and the gift is ready!


DIY gift for grandmother on March 8
DIY paper teapot
This teapot will be a wonderful gift for your mother or grandmother. Every housewife has beautiful plates and a salad bowl in her arsenal, in which she serves delicious holiday dishes to the table when guests arrive. An ordinary tea party with visiting friends is a completely different matter. It does not provide for the use of plates with appetizers and meat dishes, so it will not be possible to surprise guests with beautiful dishes.
What do you usually serve tea bags in? In a box or on a platter? This master class will tell you original idea unusual and beautiful presentation of tea bags.

You will learn how to make an extraordinary paper stand for tea bags. It is made in the form of a teapot. Interested? Then quickly prepare the necessary material:
- a piece of wrapping paper with a bright print;
- a sheet of white cardboard;
- glue stick;
- scissors;
- pen (pencil);
- stencils in the form of a teapot and a small cup;
- heat gun;
- ruler;
- braid, openwork flowers, bows and other ready-made decorative details.
First, take a sheet of cardboard and cover one side with brightly colored wrapping paper. To securely connect these materials, use a glue stick.

The result is a sheet of thick cardboard with a print in the form of roses.

Now prepare your stencils. Images can be found on the Internet and printed on a printer. If you know how to draw well, then draw the silhouettes of a teapot (teapot) and a small cup yourself.

Trace each stencil 2 times, placing them on the colorless side of the cardboard.

Cut out the blanks and cover them with wrapping paper on the other side.

You get these 4 parts that are needed for subsequent work.

Cut 2 strips from the remaining cardboard. One should be 5.5 cm x 15 cm in size, and the second should be 2.5 cm x 9 cm.

Cover each blank with wrapping paper with a picture of roses, and then fold it twice.

Now you need to assemble all the parts into a single structure. First glue the stripes using a glue gun. Apply glue to one of the parts of the teapot and fix the curved strip, as shown in the photo. Glue a narrow strip to the cup.

Glue the second part of the teapot and cup to the strips symmetrically to the first.

You get 2 blanks with deep “pockets”.


Now the cup needs to be glued to the teapot.

The main work is done, all that remains is to decorate the stand. You can use pieces of braid, bows and flowers.

Glue bows to the central part of the craft, flowers to the lid of the teapot, and place strips of braid on the bottom and top of the teapot.

This is what the finished craft looks like.


You can put napkins in the large “pocket”, and tea or coffee bags in the small one.

Or this option: in a large “pocket” place tea bags with different flavors and coffee in sticks, and in the small hole of the cup there will be bags of sugar.


This original stand for bags of tea, coffee and sugar will become a real decoration for a tea ceremony. It will cause surprise and genuine interest among guests, and the tea drinking process itself will become twice as enjoyable.

Crocheted potholder for grandmother for March 8th
Another gift for grandma in the same red and white colors is an elegant potholder, which can also serve as a napkin for hot dishes, decorate the kitchen, and make it more comfortable. The potholder is knitted in two colors with single crochets using elongated loops. Leftover yarn can be used for knitting.

Materials and tools:
- inexpensive Karachay yarn in two colors;
- hook number 3.

Abbreviations used in the text:
- RLS – single crochet;
- Dc – double crochet;
- VP – air loop;
- runway – air lift loop;
- DC – double column.
We start knitting with sliding Amigurumi rings. We work with red yarn.
1 row. We place the free end of the thread in the left palm, and working thread wrap around index finger left hand. Insert the hook into the ring, pick up the thread and knit a loop, securing it to the ring.

2nd row. 3 runways, 15 SSN. Pull the ring tightly by the free end and knit a connecting loop into the third air loop rise.

In this row, together with the runway, you should get 16 CCHs. Next, we knit the entire fabric with single crochets.
3rd row. 2 RLS, * 1 RLS, DC (i.e., we knit 2 RLS in one loop of the previous row)* Repeat the pattern between the stars until the end of the row. The increase in the following rows will always occur above the last of the doubled columns, which will divide the circle into 8 sectors. We finished the row with a connecting loop.

4 row. 2 runways, * 2 sc, US. Repeat until the end of the row. We finished the row with a connecting loop.
5 row. 2 runways, * 3 sc, double the fourth column. Repeat until the end of the row. We finished the row with a connecting loop.

6th row. 2 runways, * 4 sc, double the fifth column. Repeat until the end of the row. We finished the row with a connecting loop. When knitting a connecting loop, change the color of the yarn to white.
7th row. We knit with white thread. 2 runways, * 5 sc, 1 US. Repeat until the end of the circle. We finished the row with a connecting loop.

When knitting a connecting loop, change the color of the yarn to red.
8 row. We knit with red thread. 2 runways, * 6 sc, double the seventh column. Repeat until the end of the circle.

We finished the row with a connecting loop. When knitting a connecting loop, change the color of the yarn to white.
9 row. We knit with white thread. 2 runways, * 7 sc, double the eighth column. Repeat until the end of the circle. We knit a connecting loop and change the color of the yarn to red.
10 row. We knit with red thread. 2 runways, * 8 sc, double the ninth column. Repeat until the end of the circle. We knit a connecting loop and change the color of the yarn.
11, 12, 13, 14 rows. We knit with white yarn.

We double one column in each sector. Otherwise we knit similarly to the previous row. Each sector should have 14 single crochets. When knitting the connecting loop of the fourteenth row, change the color of the yarn. We cut the white thread and fasten it. We won't need it anymore.

15 row. In each sector after the double stitch we knit 2 sc, the next stitch we knit with an elongated loop into the stitch of the thirteenth row, the next – into the stitch of the twelfth row, the next – into the stitch of the thirteenth row.
On each of the eight sides of the polygon there are two groups of loops different lengths. Between them we knit two sc, after the second group of loops we knit 3 sc. We finish the row with a connecting loop.

16th row. We continue to knit 15 sc each with red thread, doubling the sixteenth stitch. We knit this way in each sector.

17th row. We knit in the same way, doubling one stitch.
18th row. We finish knitting according to the same pattern, only after finishing the last circle, we knit a loop. We collect 16 VPs and, closing them in a ring, tie the ring with twenty single crochets.
Now you need to lightly steam the product using a damp iron, giving it a finished look. The potholder is ready.

The master class was prepared by Svetlana Chalkina
DIY crafts for a friend
If you want to give your girlfriend some jewelry or a scarf with flowers, but you think it’s not very interesting, then take it and make it yourself! Such a gift will be individual and will definitely not leave your friend indifferent. And you can put a piece of your soul into it, and at the same time show your imagination and love for your friend. In this master class prepared by Anna Moiseeva, we will crochet an easy necklace!

In order to knit such a necklace we will need:
- blue, light blue, white thread;
- hook 1.75 mm;
- scissors;
- needle;
- chain.
For knitting such a product, it is better to take fine yarn. The thinner the better. Our necklace will consist of 7 circles. 1 of them will be the largest and will be located in the center. The remaining 6 are 2 sets of 3. The sets will be the same.
Let's start knitting from the central one, that is, from the largest circle. We knit 12 sc in a slip stitch with blue yarn. We close the circle with a joint and tighten the ring.


We knit 1 row with blue yarn, adding every 2 stitches in the row. Closing the row, change the thread to white. We perform a row, adding every 3 loops of the row.

And we just have to knit the last row. In it we make additions every 5 loops of the row. The central circle is ready.

The next circle will consist of only 4 rows. First, we form a slip loop with blue yarn and work 12 sc into it. We will consider this to be the first row.
Then we change the thread again, but now to white. Add through 2 loops. Once again we change the thread to blue and knit a row, making increases every 3 loops of the row.

We knit 1 more exactly the same circle. We just have to connect the last 2 circles. These are the smallest parts of the necklace.
Again we knit 12 sc in a slip stitch with blue thread. Then we change it to blue. We perform a row with an increase through the loop.

We knit the same circle again. Now we just have to assemble the necklace. To do this, you first need to unfold it in order to understand how to sew the parts together.
Then we sew 2 smaller circles to the central large circle. Sew on different sides.

And then we sew others onto these parts. And at the end we sew on the smallest circles.

The last step will be the chain. We attach it to the loops of the circles. The crochet necklace is ready!

Craft - surprise “Candy message” for March 8
When there is no desire to give close friend a banal gift, the kind that others can give, your head is wracked with thoughts and wild fantasies, but nothing wise comes to mind, you can follow simple advice. The most The best decision in your situation - prepare a gift with your own hands! For example, you can give a gift “Candy Message”. It requires little investment and half an hour of free time.

In order to make this gift, you need to purchase a vase for candies and the candies themselves, which, naturally, must be tasty and beautiful in appearance. You can also use a decorative box, a satin bag, a basket for small items, and more as a candy dish (instead of a vase).
Also, to make a gift you will need several short satin ribbons glasses of any width (or thread) for winding scrolls and paper “scrolls” for wishes. Chains and beads, as well as various decorative elements, can be used as decoration and addition.

On the paper prepared for the scrolls, you need to write wishes, wrap the paper and tie it with ribbon or thread. The number and size of the scrolls should depend on the size of the vase and the number of candies. The color of the ribbons should be in harmony with the color of the candies and vase or be neutral.

Candies must be placed in a candy bowl, and scrolls with wishes should be beautifully placed between and on top of the candies. The gift is ready - stylish and fast!


Champagne with sweets
A traditional and at the same time banal gift for colleagues and teachers on March 8th is wine, champagne and sweets. In order not to change its essence, but to surprise with its design, you can create unique bouquet from sweets or decorate the bottle like this.

This one gift will contain champagne and goodies at the same time. It doesn’t matter what kind of candy you choose for this, chocolate or caramel, if you know the taste preferences of the woman to whom you will give such a bouquet - great! Well, if not, then it’s okay, take the most common ones and believe me, such a bouquet will definitely not leave anyone indifferent.
To work you will need colored corrugated paper, cardboard, a plastic yogurt jar, scissors, tape, ribbons for decoration, thread, champagne and 7 sweets.

Making a skirt for a bottle. Cut the corrugated paper to the width of the circumference of the bottle, two heights of the skirt. In this case, one edge should be 2 cm shorter.

Fold it in half and stretch the paper wide along the fold line. Using a short edge, glue the skirt to the neck of the bottle with tape.

We wrap the long edge with thread to match the paper.

Lid suitable size draw a circle on the cardboard - this will be the base of the hat. We use a yoghurt jar to make the top of the hat.


We wrap the blanks in paper and glue them together.


We cut out rectangles measuring 5 cm by 8 cm from corrugated paper, rounding the upper edges with them. Using your fingers, we stretch the petals wide along the upper contour, creating a gentle wave.

We begin to wrap the petals on the candies. One flower will need 5-7 petals.


We combine the blanks into a product. Tie a ribbon to the hat and glue a candy flower. Additional decoration if desired.

Glue flowers to the skirt in any order.

Petals made from green corrugated paper will look beautiful with flowers. Decorate the neck of the bottle with a lace veil. Original gift set ready.


A classic gift set for a woman can look like a real work of art. Such a gift will not leave any woman indifferent.


DIY postcards for March 8
As for the postcard, which does not require too much effort to make, you must use cardboard for its base, and the design can be done as appliqué, decoupage, scrapbooking or origami. It doesn’t matter what style such a card will be in, the main thing is that it should evoke tender feelings, be spring-like, bright, preferably with some flowers and contain nice words congratulations. Usually there are no difficulties with materials for such a gift.
A fluttering and weightless butterfly landed on a card intended to congratulate loved ones on their birthday. wonderful holiday– International Women's Day. This gift is quite possible for a child to make if he is already a schoolboy. Mom will be happy to receive this elegant product, and the child’s efforts will be appreciated. Since the card was made for congratulations on March 8, you can get a little creative and make the central figure not quite ordinary.
Let the butterfly’s wings remain chic and spreading, bright and eye-catching. But let the body itself be made in the form of the number 8. This is the main highlight of the proposed present. Not everyone will dare to play with a simple insect figurine like this, but the result will be truly beautiful.

To create the same bright and unusual postcard prepare:
- thick cardboard base;
- plasticine for creating a background, design, inscription and additional decoration;
- a toothpick that will allow you to draw on plasticine and also attach small balls.
Making a greeting card with your own hands
Take everything you need for work. A big plus is the brightness of the plasticine; the brighter and more attractive the color of the material itself, the more expressive the postcard will be. Selecting shades of plasticine is already half the success.

To begin, very carefully apply juicy green plasticine to the surface of the cardboard. Try to make the layer very thin and smooth the pieces in different directions. It doesn’t matter that the light surface of the cardboard will show through. This way we will create an unusual, slightly aged effect. In general, the craft will look harmonious.

Make a thin purple sausage. It should be long enough to form a number 8. Glue the ends together to make a ring, then cross over to create the desired piece. Make wings from bright orange plasticine. Knead the pieces of plasticine in your hands, then press them on both sides with your fingers, while simultaneously giving the wings a suitable carved shape.

Start assembling a beautiful insect. Of course, we only use the silhouette to decorate our wonderful card. Stick a figure eight in the center. Adhere to it on both sides of a pair of wings. Now we see a butterfly in front of us.

Roll out oblong white droplets from white plasticine. Make pairs of droplets of different sizes. These parts are intended to decorate the wings. Stick a few on each side.

Also, use a toothpick to glue red balls along the edge of the wings. Above the image of the insect, write “Happy Holidays!” In this case, there is no need to indicate March 8, because the number eight already appears on the postcard, so it is immediately clear what holiday the craft is dedicated to. Stick patterns on the corners to make appearance finished.

A beautiful gift does not have to be expensive. The main thing is to do it from pure heart and don’t spare your imagination. Pack the gift beautifully, tie a bow, and now present it with in beautiful words to your loved one.


Greeting card with roses made of plasticine
On postcards dedicated to the International women's day, it is customary to depict flowers. This is the most desired and most beautiful gift for the fairer sex. And even if you don’t know what to give, flowers will always help out, it’s a win-win option.
But in this lesson, prepared by Elena Nikolaeva, we will not talk about how to choose a beautiful gift, but how to make it with your own hands. We offer unusual volumetric version– a postcard decorated with a bouquet of plasticine. The central buds are roses, the additional branches are blue cornflowers. The card looks gentle and rich at the same time.

Materials for the postcard:
- thick cardboard;
- multi-colored plasticine: red, yellow, green, blue and white;
- thin toothpick.
How to make a beautiful greeting card with your own hands
There is a canvas in front of you. It doesn't matter what color it is. More attention pay attention to its density and size. Choose the size for your craft, as well as the background color that will perfectly match the buds in the bouquet.

Fill the background completely with bright plasticine. Since you need to independently apply bright plasticine in a thin layer to the surface, the color of the cardboard is not initially important.

A beautiful bouquet can be made rich and beautifully complemented with simple wildflowers, such as cornflowers. Florists often do this. For small graceful branches, prepare thin green threads and green leaves, small blue beads.

First glue thin green twigs with leaves under one side of the card.

Then press down each leaf with a thin needle to make the surface more realistic and textured.

Collect small flowers Vasilkov. To do this, combine 4 blue balls together, press with your fingertips to get petals. Insert a white ball into the center. Attach the resulting flowers to ready-made branches.

Make 10-20 blue wildflowers. Stick in different places. Press down the white bead in the center with a toothpick on top, and also press down each blue petal.

Now move on to the rose leaves. They should be much larger. Make green flat droplets. Draw veins on top with a thin tool.

Assemble several combinations of thin green threads and the resulting carved drop-shaped leaves.

Glue green leaves randomly over the field branches.

For beautiful roses, prepare red plasticine. Cut small pieces from the block.

Press and smooth each piece so that you get a flat, oblong petal.

Start twisting the petals into spirals to form beautiful red buds.

Form 3 buds. This will be enough to fill the picture.

Attach all the rose heads to the bouquet. Now you have a wonderful flower arrangement.

To make the inscription “Congratulations!”, stick a pink stripe somewhere on the side. Make an engraving with the sharp end of a toothpick.

If desired, fill the empty space with small multi-colored plasticine balls to create a rainbow-colored picture overall.

Beautiful greeting card ready with a bouquet of plasticine flowers.


Handmade gifts for any occasion are highly valued and arouse interest and tenderness towards them. Of course, you can’t say for sure that any woman will be happy with some small gift that you make with your own hands. After all, many expect chic and elegant gifts from their other halves. In such cases, a homemade gift can be given as a complement to the main and exquisite one.
A universal selection of gift ideas for any occasion and occasion. Surprise your friends and loved ones! ;)
Good day, dear readers of my blog! Today’s post is entirely devoted to the topic “Do-it-yourself gifts for March 8th,” because such a gift is always the best due to its originality.
I turned to Yandex and it found 146 million results for this query, which indicates the enormous popularity of the topic. Today we will touch on only a small part of the information presented on the World Wide Web! And we’ll start the review with the thing in which we usually receive gifts on March 8th...
DIY gifts for March 8th: the best ideas
You can’t even imagine what you can do for this wonderful day!
How to make a paper bag for March 8?
You can easily make a paper gift bag using the elegant models that we offer this collection.
It's simple: choose a ready-made template for the handbag you like, print it on paper (as thick as possible). Now all you have to do is cut out the resulting stamp and glue it strictly according to the instructions. The handbag is ready.
By the way, it is not necessary to choose a template with a ready-made design. There are also clean layouts; your child can design them.
As a result, we get original and practical items for gifts.
More interesting option paper handbag is this model:


Of course, you won’t go to the store with these, but it’s just right for giving a gift on International Women’s Day.
Wonderful tulip pencil holder
This gift is also easy to make with your own hands. you will need the following materials:
- thick cardboard;
- colored paper;
- scissors;
- glue.
At the first stage, we draw a template for our future pencil and cut out the details from it.
 Next, bend the template along the dotted lines.

Now you need to connect the sides with high-quality glue.

At the final stage we glue the bottom. This pencil holder can be given as a gift to teachers and kindergarten teachers.

Bookmark for a book - a simple and necessary gift
Also obtained from paper material. I will offer two options that are easiest to make. So, we need thick cardboard, preferably colored, bright wrapping paper, scissors, glue and everything else you want to decorate your craft with.
First option. We cut out a 10x10 centimeter square from our cardboard. Fold it diagonally 2 times. After this, cut the finished figure into 2 parts, as shown in the picture.

The resulting corner needs to be glued and decorated with sparkles, rhinestones, beads, ribbons or some kind of applique.
Manufacturing second option Even elementary school students can make bookmarks. First, a 10 cm strip with a width of 6 cm is cut out of cardboard. It is folded as shown in the pictures.
The ends of the resulting “envelope” are either left as they are, or cut out in a semicircle or in the shape of a heart. We connect the two halves using applique.

I think girls will like this bookmark.
Elastic band-kanzashi
They can diversify and decorate the everyday hairstyle of those with beautiful long hair. But you don’t have to buy hair ties in the store; you can make a unique thing yourself. It will be much more interesting. The beauty you see in the photo is made from scrap materials.

To sew an elastic flower we need:
- cardboard;
- textile;
- scissors;
- threads;
- rubber;
- beads;
- needle.
So let's get started. First, we make 3 types of cardboard circles with diameters of 5, 6.5 and 8 cm.
We apply the templates obtained in this way onto the selected fabric base, outline it with chalk and cut out the details - 5 circles of each type.

1) Now take one circle and fold it in half (see picture).

2) Repeat the procedure one more time, folding the previously obtained semicircle in half.

3) Now we have in our hands a part that resembles a petal. We need to stitch it from the bottom with the needle forward.

4) By analogy, we make petals from the remaining 4 circles of this type and collect them on our thread. Having finished, we tighten the thread and we get such a cute flower.

5) In a similar way, we make flowers from all the circles.
6) We connect the resulting 3 flowers together.

7) A regular one is sewn onto the large lower flower.
8) Decorate the small top flower in the middle with a bead contrasting color or a pebble.

A great gift for mom - a photo frame
Despite digital technologies, conventional photography is still popular. Agree, it’s nice to look at pictures on photo paper. And if they are, then it becomes double pleasure. Perhaps this is why a gift for March 8 in the form of a hand-made photo frame, which literally anyone can make, is relevant these days. The technology consists of two steps. It is also universal in terms of giving: it can even be used as a children's gift.
First you need to prepare a paper base - it should be dense, so it is better to prefer cardboard. You determine the size yourself, as well as the shape - the future frame and holes for pictures. The latter can be made completely different: a rectangle or a square, a rhombus or a circle, in general, any other shape.
Are you ready? Now use your imagination to design the base. The base of the photo frame can be wrapped with ribbon or colored fabric strips, or decorated with beads, buttons, shells or pebbles. By the way, any of these decorations can be painted over with gouache or watercolors, choosing an interesting color scheme.

When making a photo frame, do not forget to immediately decide on the issue of mounting - will it hang on the wall or stand on the table?
Double surprise - double the joy
A woman will be doubly pleased to receive a sweet gift if it is presented in an original frame. Even ordinary candies. For example, in such an amazing heart-shaped frame that resembles a pink bouquet.

To make it you need to stock up on the following materials:
- white hard cardboard;
- double-sided red or burgundy origami paper in A-4 format;
- candies that are to be framed;
- a regular toothpick;
- glue stick;
- narrow transparent tape;
- ruler and compass.
In the first stage, we prepare the base: carefully cut out a heart from cardboard - 20 cm in diameter is enough. On its reverse side we draw two straight lines - one divides the heart in half, the second is its height. We mark the intersection of lines with a dot. We take a compass and draw a circle 5 centimeters in diameter (marked with a dotted line in the figure). Stepping 1 cm down from the center, draw an arc - a diameter of 4 cm. The result is a figure like an oval.

Using this sketch, we also cut out the inner oval circle.
The next stage of work is preparing roses using the quilling method. We cut 30-centimeter strips of paper, half a centimeter wide, and screw them tightly onto a toothpick. It is necessary to produce 40 pieces.

We slightly loosen the resulting spirals so that they “move apart”, and glue the free end to the parallel side.

From the resulting blanks, we select 28 pieces and make “petals” out of them, squeezing closed spirals on one side. Then, from the remaining ones, we select 3 pieces and prepare “eyes” - the spiral is squeezed on both sides. In addition, you will need 6 more “closed” spirals.
We put these details on our heart - decide for yourself how. Try it different variants, and only after deciding, glue the roses to the cardboard.
Fur keychain is a cute and pleasant thing
To make a fur keychain, we need a small piece of fur, it’s great if it’s an arctic fox, a piece of leather or leatherette from old bag or gloves. You will also need fishing line, which is used when weaving beads, or strong threads, and a standard key ring. Tools include scissors and a needle.
- A piece of fur is folded with the fur inward, and the edges are stitched. Just leave a hole to turn the workpiece inside out.
- We use an identical method to make a leather strap. If you want to make a thinner strap, you can immediately sew the workpiece on the right side, bending its edges.
- We pass the strap through the ring.
- We need one more leather piece. Cut out a rectangle
- We also sew it by folding the right side inward. We fix the strap in it.
- The base of our bag needs to be folded inward with the edges.
- We return to the fur blank: we tighten it with threads on the base.
- Now you decide whether to use it or not decorative elements And you move on.
- Let's move on to the final stage. We place the fur ball in a bag and sew it on, at the same time attaching beads in case of decoration. Upon completion of the work, we hide the end of the fishing line (or thread) in a bag. Our keychain is ready.

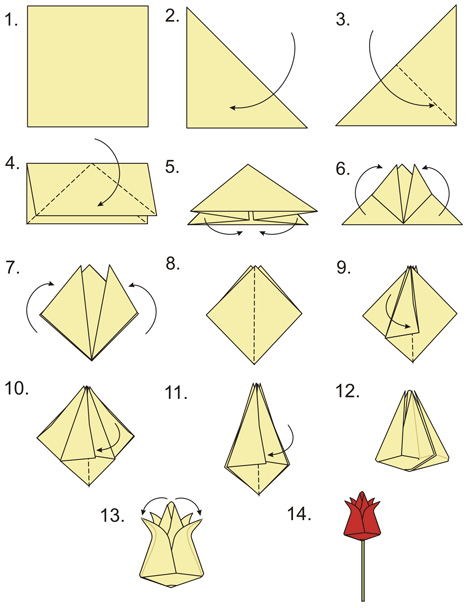
Origami - beautiful and touching
It’s quite easy to prepare holiday flowers for your mother or grandmother with your children. The Japanese technique of origami comes to our aid. How and what to do is clear from the following diagrams. 
Useful videos
Since I wasn’t able to cover many ideas, I finally decided to make links to useful videos that I wanted to write about in today’s review.
If you are interested in creating a topiary, a small original tree of happiness, then watch this video:
If you watch this video, you will quickly learn how to sew without sewing.
Sincerely, Anastasia Skoracheva
Hello everyone, hello!! How are you feeling?? Are you ready to welcome spring?! I'm definitely ready!! I really love watching how icicles appear on the roofs and begin to drip loudly in the bright sun, how all nature comes to life, and people come to life and become more beautiful!!
It’s probably no coincidence that Women’s Day is celebrated on the first spring month, because everything hints at congratulating the lovely ladies and once again remind them that they are the personification of beauty and beauty.
Certainly, important issue on International Women's Day, the question is. According to the classics of the genre, men give flowers and sweets, children prepare cards and crafts, and we buy various supplies for girlfriends and colleagues.
But today I invite you to show your imagination and all your handicraft abilities, and make a gift for March 8th with your own hands. And the presents collected into one whole will help you make your choice.
By the way, if your skills are at a high level, then you can even sell gifts; now such a business is popular on the Internet, so think about this idea. After all, original works are highly valued.
From the very beginning I want to show you various options so-called holiday ones, which are suitable for beginners and experienced needlewomen.
I scoured the Internet and found some interesting work:
- Flowers of course top the top of the pedestal. They are usually decorated in a bouquet and are most often made from sweets and corrugations.

I already talked about how to make such a gift from tulips, if you missed it, take a look.

- Symbolic figure eights made of satin ribbons and beads can serve as an excellent decoration.

- And flowers created using any technique can not only be collected into a bouquet, but also decorate chocolates and gift certificates.

- Well, where would we be without. They are probably on par in popularity with bouquets. Don't you think so??

- And look at this elegant shoe. Just great and original gift for the ladies!! We'll talk about this kind of work in detail a little later, so read on.

- Here is a perfect option for a decorative flower in a pot, for those who know how and love to sew.

- This is an excellent topiary, you already need to have certain skills and abilities.

- This gift is very easy to prepare. Bake cupcakes, decorate them gift paper and ribbons, print any text, attach with a stapler and the gift is ready. This product is very suitable for congratulating colleagues at work.

- A simple cardboard card, corrugated paper and candy with ribbons.

- Here are gifts for your favorite girlfriends or classmates. Looks great!!

- Well, we give this magical jar to those with a sweet tooth, and to all the girls, because we love treats!!

- And here's another very creative idea congratulations. Do paper cake, put a wish and a surprise inside each piece.

- And if you don’t know what to give as a gift and don’t know how to work with your hands)) although I certainly doubt it)) Then put on beautiful Balloons, having previously put the treasured pieces of paper there, let the lady buy herself what she wants. But the gift will still be personal, because you earned the money with your own hands))

- This is for tea lovers. Do beautiful packaging and print wishes and warm words on each bag and stick it on it. Your present is ready.

As you can see, all gift ideas are very simple and require inexpensive materials and very little time to make. But they will give any purchased product a head start. So don’t be lazy, but do something on your own, the recipient will be very pleased.
By the way, a great gift There will be perfumes, but not purchased ones, but made with your own hands. I came across an interesting article on this topic https://domovodstvo-kulinariya.ru/podarok-na-8-marta.html, take a look, I think the girls will be delighted!!
Master class on making a basket with sweets
And now I still want to dwell on flowers again. And I want to show you in detail how you can make a whole basket of edible flowers. I'm intrigued, then let's get to it.
You will need: green corrugated paper, corrugated paper for the flower (choose the color you want), small candy, floral wire, tape, strong thread, scissors, basket.
Manufacturing process:
1. From corrugated paper, cut out 6 petals 4 cm wide and 7 cm high. Then 5 more petals 6 cm wide and 7 cm high.


2. Round the edges of the petals.

3. Pull out each piece along its entire length, but do not touch the edges.

4. Cut out the sepals for the flower as shown in the photo. Stretch the middle from the edge to the top of each workpiece, and twist the edges a little.


5. Secure the candy to the wire with thread.

6. Take one of the wide petals and wrap it around the candy so that it is not visible.

7. Also wrap the remaining 4 wide petals tightly so that the height is the same.

8. Now wrap the narrower rose petals. Place them 2 opposite each other. They also need to be strengthened tightly.

9. Tape the sepals with tape.Make a lot of flowers and arrange them beautifully in a basket. By the way, you don’t have to buy a basket, but also make it yourself, for example from newspaper tubes, see below.

These are such beautiful roses!!
Look at what other beauty you can create:


Or you can complement the usual bouquet with champagne and a bottle of wine.

And also give more soft toy, which you can sew yourself, or buy.

And this work just won my heart!! Such tenderness!!

It is precisely these kinds of baskets that are very successful in making for sale; they are in special demand.
Making a present for colleagues from newspaper sticks
And now I have one small question for you. Do you like to read newspapers?? Or are you the proud owner of a stack of newspapers? You are probably already laughing and don’t understand why such questions are asked.
It turns out that you can make such wonderful gifts from ordinary newspapers that no one in life will ever guess what they are made of. Do you doubt it?! Then see what products you get.

- Pincushion

- Bottle rack

- wall decoration

- Candy bowl

You see how beautiful it is. And this is all done from newspaper tubes. If you are not yet familiar with this technique, then it’s time to understand all the nuances. A step by step wizard the class will help you in this matter. Let's learn how to make a vase.

You will need: tube from paper towels, scissors, PVA glue, pen refill, any decorative elements, colorless varnish for coating the product.
Manufacturing process:
1. You need to cut strips from newspaper.

2. Then roll them into a tube using the rod from the pen, while holding the rod at an angle.

3. At the end, the edge needs to be greased with glue so that the tube does not fall apart.

4. Make a lot of tubes in this way. Take the tube and cover it newspaper tubes round. Wait until the elements dry. You can trim the top of the vase evenly, or use your imagination.

5. When the product is dry, paint it with gouache in any color.


Like these ones beautiful products can be made from scrap materials.
Gift for March 8th from coffee
Now the main elements in preparing gifts for Women's Day will be real coffee beans. I won’t describe in detail what and how, since everything is clear.
I’ll give you ideas, and you can bring them to life.
The most simple work, which even a child can handle, a gift eight.

Here is a beautiful panel for my beloved mother.

Unusual coffee composition using a bowl.

Or this wish tree.

And here are the cute heart magnets.

Or how do you like this version of a wicker mug and a horseshoe for good luck??

And this is actually a great gift - homemade scented candles.

Or a version of a holiday card, and you can’t tell that you made it yourself, as if you bought it.

I think such works will captivate anyone. After all, it is not only beautiful, but also fragrant))
What can you give your mother by making it yourself?
Now let's see what we can come up with for our mothers. Maybe you already have a gift, please share, I would be grateful.
Of course, on this beautiful day of March 8th, daughters and sons congratulate their beloved mothers. Here are some ideas for you.
Beautiful congratulatory pots. Execution format: application.

Don't forget about the origami and napkin rolling techniques.


But what kind of newspaper can be made, isn’t it original?? And I think mom will be very pleased to see this in the morning. Moreover, such work can be done by everyone together, both dads and children.

And this is for those who know soap making techniques. Looks very elegant!!

Patchwork potholder, what do you think? In my opinion, she is a very bright kitchen assistant.

That's it simple craft: fabric napkins decorated with buttons. A great gift for mom from daughter.

A handmade family photo frame is always welcome and will definitely please you!!

Look at what cool vases you can make from ordinary bottles and decorative adhesive tape. You can even take colored electrical tape. Just wow!!

Or a version of a vase made of pencils. You can use cardboard as a base, then cover everything with pencils and you're done!!

I don’t know about you, but I really liked these products, they are bright, beautiful and not at all difficult to make.
Video on how to make a gift in the form of a shoe
Well, as promised, let’s return to the shoe. I decided to show you a short story on how to make such a cute present. So take a closer look, ask questions if you have any, and get to work!!
Here are a couple more photos of gift shoe options.
- The easiest way is to fold a cardboard craft and decorate it.

- You can take a finished shoe and simply decorate it with paper and flowers of your choice.

- Or a variation for children, made in the form of an applique.

Well, it turns out to be truly unearthly beauty!!
Interesting felt surprises for International Women's Day
And finally, holiday projects for those who love to sew. Let's take everyone's favorite material - felt, and start creating.
Well, where would we be without flowers, well, you simply can’t do without them!!

How do you like this spring photo frame?! The truth is lovely!!

These are very simple, but such amazing roses!!

Purse for storing sewing materials. I'll tell you about it a little lower.

Such a simple and delicate panel. Level of work - for beginners.

Or maybe you can make slippers yourself, for example for your mother or grandmother?! What do you think of the idea?!

And attention, what I promised. Now I’ll tell you how to make it yourself, or rather sew such a useful wallet.

You will need: multi-colored thin felt, 2 small buttons, thread, needle, scissors.
Manufacturing process:
1. First, cut out the organizer pieces from multi-colored pieces of felt. Sizes can be changed depending on your needs.

2. Now sew open and closed pocket, pocket for scissors. Sew a piece of felt for needles with a stitch “forward to the needle.”
3. Sew sheets of felt, on which all the pockets are already sewn, onto the base of the organizer. You can put cardboard rectangles between the elements of the parts, so the product will not lose its shape.
4. All that remains is to sew buttons on the pocket flap and to fasten the organizer, then cut the loops. And everything is ready.
That's all I have for today. Any other ideas?! Don’t be shy and write in the comments, because the more gifts, the more choice we will have for creativity. Wishing you all spring sun and warmth!!
One of the first spring holidays is March 8th. This is a wonderful reason to say “thank you!” to your family and friends! and give them gifts, warmed by the warmth of your hands.
Traditional shades of this spring holiday– red, green, pink, yellow. The main symbols and themes are flowers, sun, spring and the number eight. But before you start hand-made creativity, it is advisable to find out about the woman’s preferences: perhaps her potholder has gone bad, her apron has torn, her favorite vase has broken, or there is nowhere to hang her keys. Receiving a necessary and timely gift is doubly pleasant. Here are a few simple ideas:
1. Original bouquet
Instead of fresh flowers, which can quickly wither, on March 8, you can give an unusual bouquet made from scrap materials. Here are some simple options:
This technique is very popular and is actively used in home decor. Even children can easily master it. Using several sheets of colored paper you can “wind up” beautiful bouquet tulips.
Candies
You can attach candies to the petals of multi-colored paper flowers made using applique. In order for them to hold up well, the sweets should not be too heavy, and it is better to choose thick cardboard as the material for the flowers.
Textile
It is easy to twist beautiful tulips from soft colored felt, which can be attached to wooden skewers, also wrapped in green cloth. For the best effect, such a bouquet should be packed in a beautiful wrapper, like for real flowers.
Foot and hand prints
Any mother will be very pleased to receive as a gift a bouquet consisting of multi-colored hand and foot prints of her beloved children. In addition, making such a present is very simple.
Fruits
Fancyly carved fruits on skewers or whole bouquets of fruits look no less attractive than flowers. Bananas, strawberries, pineapple, dense pears, watermelon and melon hold their shape well. On sale you can find special devices for cutting fruits and vegetables into shapes, which can be an additional gift.
Topiary
One of the most popular souvenirs for this holiday. Exists different techniques its creation, among which it is quite possible to choose a simple method and master it. For example, pieces of foam rubber can be sheathed with multi-colored scraps of fabric, making voluminous flower petals from them. They fix it on a wooden stick or wire, wrapped in cloth and planted in a container with sand or stones.
2. Decorative vases
This home item is always relevant, especially on holidays, when women are given a lot of flowers. So that she doesn’t worry about where to put the next bouquet, you can give flowers along with an original hand-made vase. What should it be made from?
Any jar can become an elegant and beautiful vase if it is decorated in an original way. Options for its decoration: ribbons, beads, lace, buttons, colored paper and other available little things.
Colour pencils
An ordinary tin can (for example, from peaches) can be decorated with colored pencils tightly attached to each other using beautiful ribbon and glue. Thanks to the variegated shades, the pencils look very cheerful and spring-like.
Discs with photos
CDs are not very popular these days. But their boxes can be used to create an exclusive vase with photographs. You only need four packages and four photographs, which will especially please the woman. The boxes are then held together using glue or tape.
Pots with grass
Ordinary lawn grass of a lush green color refreshes the atmosphere of the room well and gives a spring mood. It is easy to care for and can be planted in almost any container. But containers decorated with photographs of children look funny and cheerful: the blades of grass will resemble the children’s constantly growing hair.
3. Calendar for memory
This gift is both useful and memorable. Each month you can decorate it with photographs or drawings dear to a woman’s heart, which will make the calendar an especially expensive and touching gift.
What woman doesn’t dream of getting breakfast in bed?! To add charm to this beautiful gesture, breakfast can be served on a homemade decorative tray. The basis for it can be ordinary cut boards or parts of old furniture. It is enough to decorate them, complement them with tiled decor, painting, decoupage techniques, etc. It is easy to attach handles from any furniture to the surface of the tray.
5. Holiday wreaths
They are relevant not only New Year or Christmas – beautiful decorative wreath can be an excellent gift for March 8th and a winning interior decoration. It will look good both on the door and on the wall.
Natural flowers
Wreaths made from numerous live tulips or mimosa branches look gorgeous. It is convenient to attach them to a dense round base made of several layers of cardboard.
Candies
Candies stick well to the same base, pre-wrapped with thick fabric. You can complete the composition with a contrasting satin ribbon.
Lamps
Used lamps can also be used. A wreath with them looks like a stylish design item for the home. It is better to choose colors for painting lamps that are well suited to a specific interior style.
Pompoms
Such a colorful wreath made of small multi-colored pompoms or balls, made using the felting technique, immediately attracts attention and lifts your spirits. You can complement them with a gift scarf or scarf.

It’s better to prepare gifts for March 8th with your own hands in advance, but if you just now remembered about the holiday, choose simple master classes from our selection.
Original ideas and simple handicraft techniques will help you make surprises for friends, mothers, grandmothers, daughters, granddaughters, work colleagues and other women whom you want to please. Don't be afraid to give crafts manual labor bosses, doctors and teachers. Such things are in price today, and if you think about the packaging, the gift will become even more valuable.
What to do on March 8 for colleagues
Let's start with making simple and small gifts on March 8 to colleagues. If the team is large, then you can make small souvenirs for everyone, and come up with something more substantial for close friends and bosses. But here it’s up to you - take into account the relationships in the team and traditions.
A win-win option is cup coasters. The easiest way to make such useful things is from felt. You can make several of these in one evening. You can do the same thing.

For colleagues with whom you have a closer relationship, sew felt keychains. This useful and cute accessory will appeal to women of any age.

Every girl needs a pincushion, even if she doesn't do needlework. The bright one will help keep dangerous needles in order.

Simple and very spectacular technique decoupage is also useful in making beautiful and useful gifts by March 8th with your own hands. If you need something inexpensive and easy to make, we recommend making it from blanks.

For large numbers of employees, try . Ideal for beginners.

You can give it to the team leader and let her hang it at the entrance to her office. Perhaps this accessory will improve the mood of both the boss and the employees called to the carpet.

Amuse your colleagues with delicious food. Wrap it beautifully in cellophane and give it to everyone on March 8th. They look like the real thing, but no one will get better from these!


From adhesive tape sleeves it turns out. The finishing is done with napkins. If there are no bushings, the base can be assembled from cardboard. In principle, this decor is suitable for any box.

Small coffee shops will help out when you have a lot of girlfriends. Sew one for each girl and complete it with a suitable design.

For your most beloved friend, you can spend more time knitting and threading. Delight is guaranteed, just don’t forget to take into account the size of your girlfriend’s gadget.


If mom long hair, then please her with a hair clip or hoop. Universal.