Today we offer you to knit such a wonderful warm cardigan, which was named with the uncomplicated name of Chinchilla. It really looks like this animal, thanks to the Asian spikelet pattern with which it is connected.
So, we start knitting such an almost fur coat.
You will need: thick bulky yarn 1.5-2 kg. (options: Lanagold 800 in 4 threads, Lanagold Fine, Angora Real, Angora Gold, Angora Ram, etc.), knitting needles number 5.5 or 6 (better circular, but straight lines are also possible).
Scheme... We knit the canvas with the "Asian spikelet" pattern. We have already laid out how to knit an Asian spikelet and a video tutorial.
Our spikelet will consist of two "grains": the first looks down, the second goes up. Knit 4 rows of front stitch between the grains!
For small sizes I recommend spikelet 6/12 (6 loops in 12 rows), for medium sizes: 8/14, for large sizes - 8/16.
Attention: For spikelets 8/14 (16), the set of loops is a multiple of 4, we pick up not 3 (as in the video), but 4 loops. Remove the first loop as an edge loop.
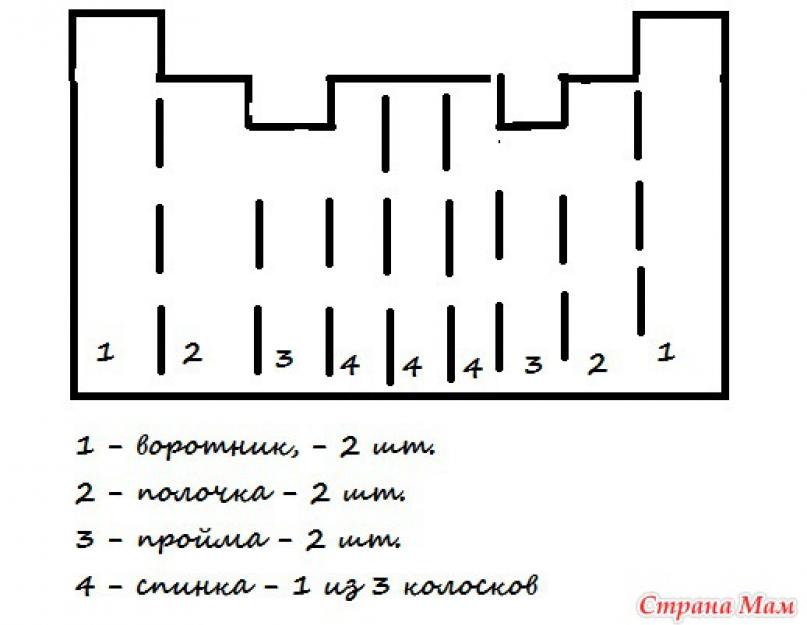
Pattern

Knitting goes vertically: from the collar through the carcass to the second collar.
In total, you will need to knit 9 full spikelets for the carcass, which can be knitted either as a whole cloth or in separate parts (after stitching, they will not allow the product to stretch down too much). The choice is yours! Also 2 spikelets for sleeves.
Description
We knit a sample and calculate the number of loops for a set.
Average data: collar - 27 spikelets -112 loops (mine - 28 - 122 loops)
shelf / back - 24 spikelets - 100 loops (my 25 - 104 loops)
armhole - 17 spikelets - 72 loops (mine - 18 - 76 loops)
sleeve - outer sleeve - 20 spikelets - 84 loops, inner sleeve - 14 spikelets - 60 loops.
The collar is sewn in half at the end. You can knit it separately from the carcass, then sew it, folding it in half.
Gradient
For such a cardigan, the following set of loops is offered: we dial half of the loops with the lower color, the other half with the upper. I made life easier for myself and knitted the first rows with a thread of the same color, since the collar will be hemmed and the typesetting row will not be visible.
A gradient of two shades of the same color looks good, then you can knit half (or slightly less / more) of the spikelets in one color, and the rest in another, without mixing the threads with each other.
The easiest way to knit a gradient is to pull on the wrong side.
Here is a photo of user soja from Osinka

The broaches are done very neatly, you can immediately see how good the gradient looks, connected by each color separately.
I knit without broaches as follows: when we knit 14 rows of spikelets (8/14) and go through these 8 loops for the last time ... here I knit only 4 loops of them, then a thread that I will no longer use (this is yellow) - I postpone! and I knit the remaining 4 loops with only 2 threads (I knit in 3 additions).
Then I get 4 more loops for a new spikelet, while picking up the thread from the previous row (which I also put off then). There are 3 threads in the work again, with a transition made.

When all the spikelets are tied, you can tie the "curved" center of the spikelets of the shoulder and sleeve line with the front stitch.
Then it remains to sew the side and shoulder seams, sew in the sleeve and the cardigan is ready!
Attention, according to the sample, it is not always possible to correctly determine the number of loops (since under its own weight, the canvas stretches downward and it is difficult to calculate this stretch). It happened to me. Then I separately tied the missing spikelets and neatly hemmed up to the existing ones, since this is a collar and it will fold in half, then the stitching place will not be noticeable!
My knitting: bobbin yarn in 9 ply (1600/100), needles 6.
Knitting of a spikelet begins from above, so we knit with the top color (who has a gradient)

Having reached the end, we knit 4 rows of the front surface, then knitting goes from bottom to top (on the seamy side)!
And closer

General view of half of the product


This is how it looks in the process: the armhole is already visible.

When I tied the carcass and tried it on, it turned out that it stretched out strongly: from 62 cm to 90 cm! Therefore, the volume of the braids is also lost, which means that the spikelets need to be tightened with an additional thread.
Carcass weight was 700 grams.
This is how it looks in the product.
One of the most fashionable patterns in knitting and crocheting is the "Asian spikelet". Otherwise it is sometimes called "Asian braid". It gained its unprecedented popularity due to the simplicity of execution, beauty of the form and the ability to embody the creative ideas of the master. Any products made using the technique are extremely interesting - voluminous, soft, textured. They look especially impressive on models.
In this article we will tell you about the features of the knitting pattern for an Asian spikelet. Having learned how to perform this element, you can easily create unique wardrobe items: fluffy scarves, voluminous cardigans, stylish stoles, hats and sweaters. We hope you succeed! Good luck!
Features of the motive of the volumetric braid

Let's look at the basics of performing a motive. To knit an Asian braid, you do not need an advanced level of knitting, but you need to know the basic elements. You need to be able to perform the front and back loops, since it is from them that it is formed. The knitting pattern of an Asian spikelet is based on a multiple (usually four or six) number of loops, and the edge loops must be taken into account when calculating. A feature of the element is its transverse knitting, because the spikelets are located vertically in the canvas. The volumetric braid is formed gradually, from one spikelet to another, which are knitted one by one.
We carry out a pattern in the "Asian spikelet" technique: knitting pattern, master class.
For work, we need any yarn and knitting needles of a suitable size. The knitting pattern for the "Asian spikelet" is shown in the following figure.

We collect a multiple of four the number of loops (for a small test sample, 36 loops are enough).
First, we knit "preparatory rows": remove the hem and knit the first row with the front loops, and the second with the purl.
Next, let's start creating the first braid element. We remove the hem and knit up to and including the eighth loop. Remove the first stitch, make eight knit stitches, and twist. Again, we throw the first loop onto the right knitting needle and knit the second row with purl. Then we continue to knit only these eight loops in rotary rows, remembering to simply remove the first one every time. We carry out fourteen rows. We knit the fifteenth row like this: remove the hem, knit the first section with the front knitting, and then remove four more loops from the left knitting needle, knitting them also with the front ones.

We continue the execution of the sample "Asian spikelet"
We make a turn and start creating the second element of our spikelet. We remove the first loop, knit from the second to the eighth loop with the purl, the remaining four do not touch. And then we continue to knit these eight loops of the second element by analogy with the first to the fourteenth row. We get the second section of the pigtail. By the same principle, we gradually carry out all the elements to the end of the loops. Having made the last section, we add the fifteenth row with the front ones and we get the finished half of the Asian spikelet on the right knitting needle.
The knitting pattern for the second part of the braid is not too different from the first. We turn the knitting and perform four full rows, the first of them with purl. Having connected the last row with the front satin stitch, we turn the sample over and start all over again, only from the seamy side.

Again we take eight loops and knit from them the first wedge with a height of fourteen rows. Then the second, third, and so on, in exactly the same way as the first half of our part. Having knitted all the spikelets, we knit the fifteenth row to the end, throwing all the loops onto the right knitting needle. Next, we knit a couple of rows - front and back.
So our Asian spikelet is ready! The knitting pattern, the master class is not too difficult, is it? We just have to close the loops. To do this, you can choose any convenient method.
Crochet braids
Let's look at another method for making volumetric braids, this time not with knitting needles, but crocheting. Of course, the pattern will differ greatly from the one made with knitting needles, but it also turns out to be beautiful, voluminous, and knits much easier and faster. For work we need a knitting thread and a hook.

We begin to knit with a chain of twenty-three air loops. We skip the first three, they will become lifting. We knit twenty double crochets. Again we collect three air loops, knit five columns with one crochet in the loops of the columns of the first row.
We collect a chain of twenty air loops. In the fifth column from the end we knit one double crochet. We carry out four more double crochets.
We begin to gently shape the Asian spikelet. The crochet pattern is as follows: we hook and pull the loops from the bottom up one by one. The result is a voluminous braid. Such an element will decorate any product, adding originality to it.
Create your own masterpieces! About creative knitting
Girls, this scarf, probably, has already seen everything. You can even buy it at the link below. But I'm not talking about buying, but about the approach! After all, the most common front and back loops are used here, and what an effect! Everyone is looking for a description, and some girls pick up the knitting needles and do it! Below there is a hat and a scarf with descriptions. The main thing is to want!
I want to ask girls who know Portuguese, can you tell me the names of the loops in the description of the scarf? Google did not pull at all!


Material:
3 novelos de Cisne Cetim na cor nº1539
Agulha para Tricô Corrente nº6
Execução:
Com 1 fio de cisne cetim colocar 52 pontos na agulha nº 6 e fazer 18 cm do ponto sanfona 1/1 (1tr, 1m).
A seguir fazer as carreiras abaixo começando pelo lado do direito:
- 20 pontos sanfona 1/1, 6 tr, aumentar 8 pontos, 6 tr, 20 pontos sanfona 1/1
- 20 pontos sanfona, 20 tr, 20 pontos sanfona
-20 pontos sanfona, arrematar 20 pontos, 20 pontos sanfona
A Seguir fazer 23 vezes as 8 carreiras abaixo:
1ª carreira: 20 pontos sanfona, recolocar os 20 pontos, 20 pontos sanfona
2ª, 4ª e 6ª carreiras: 20 pontos sanfona, 20 m, 20 pontos sanfona
3ª, 5ª e 7ª carreiras: 20 pontos sanfona, 20 tr, 20 pontos sanfona
8ª carreira: 20 pontos sanfona, arrematar 20 pontos, 20 pontos sanfona
A seguir para terminar o trabalho fazer da seguinte maneira:
- 20 pontos sanfona, recolocar 20 pontos, 20 pontos sanfona
- 20 pontos sanfona, 20 m, 20 pontos sanfona
- 20 pontos sanfona, 6tr, arrematar 8 pontos, 6 tr, 20 pontos sanfona
Fazer mais 18 cm de ponto sanfona 1/1 (1 tr, 1 m) e arrematar o trabalho.
Colocar franjas e passar uma argola por dentro da outra formando a trança, depois no final dar um ponto na ultima argola com um ponto invisível.

Materials: Angora RAM thread 1 skein 100 g / 500 m, 40% moheir 60% acrylic, needles N4, circular needles N3, crochet hook N2, 5 beads, sewing thread to match the knitting.
Description of work: cast on 45 loops on the needles.
1 row: knit 45
2nd row: purl 45
so repeat 6 more rows.
Next, we knit 3 front loops, close 18 loops, 3 front loops, close 18 loops, turn the work over. Then purl 3, dial 18 loops, purl 3, dial 18 loops. So knit the entire fabric, make "cuts" in the fabric every 8 rows. Make the resulting strips in the form of loops and connect them to each other, threading into each other (as the loops on tights are connected), so we get two braids.So we knit to the length we require, according to the circumference of the head. Do not connect the last two slots to the main canvas, this can be seen in the photo below:


Connect the strip with braids into a ring, trying to insert the initial and final loops into each other so that the junction is not visible. Sew.
From the side of our circle, cast on the loops evenly on the knitting needles (I typed like this: from one loop - 1 loop, from the next - 2 loops and repeat so). Knit 20 rows of elastic (knit 2, purl 1).
The bottom of the hat (crochet):
Connect 6 air loops into a ring and tie with single crochet posts.
1 row: 2 columns b / n in each column of the previous row
2 row: 1 column b / n in the column of the previous row, increase (2 columns b / n in the next column of the previous row); and so on until the end of the circle
3 row: 2 columns b / n in the next columns of the previous row in order, increase; and so on until the end of the circle
4 row: 3 columns b / n in the next columns of the previous row in order, increase; and so on until the end of the circle
5 row: 4 columns b / n in the next columns of the previous row in order, increase; and so on until the end of the circle
6 row: 5 columns b / n in the next columns of the previous row in order, increase; and so on until the end of the circle
7 row: 6 columns b / n in the next columns of the previous row in order, increase; and so on until the end of the circle
8 row: 7 columns b / n in the next columns of the previous row in order, increase; and so on until the end of the circle
So knit, making increments and increasing the number of columns between them with each row by one, until you reach the desired bottom diameter.
Sew the bottom into our hat.
Crochet 5 flowers (whatever you like) with N2 crochet (yarn in one thread). Sew flowers on the edge of the hat bottom. Decorate the flower cores with beads.
Our hat is ready!


Another master class on this topic (added on 05/10/12):
Knitting pattern "Asian spikelet"very popular. The fabric knitted in this technique turns out to be voluminous, lush and well suited for a scarf. After studying the master class of knitting an Asian spikelet, you can use this pattern to knit scarves, stoles, sweaters and hats.
To knit a scarf, you will need about 150-200 grams of woolen yarn and circular long knitting needles.

Volumetric spikelets in the fabric are located vertically along the product, therefore, the main part must be knitted not along, but across, therefore, to knit a scarf, it is necessary to dial loops to its desired length.
Spikelet pattern knits sequentially from ribbons with a width of 10 loops for example, but you can knit them with a width of 8 or 6 loops, and also experiment with their length.
For a scarf 1.5 meters long, repeat the rapport 50 times, the number of loops for the set will be: 5 * 50 + 5 \u003d 255
Having typed the loops, knit the first row (purl) all loops with the purl.
From the second (front) row, start sequentially knitting ribbons, which, when connected, will be inclined in the direction of knitting. To start knitting the first ribbon, knit the first 10 loops with the front loops, turn the work and knit the second purl row of the ribbon with purl loops. So knit a ribbon with the front stitch to a height of 18 rows.


* In the 19th row, knit the ribbon loops with the front ones and continue to knit further 5 more loops with the front ones. Turn the work and knit back 10 loops on the wrong side with purl loops, 5 loops of the first ribbon fall out of work and remain on the right knitting needle.


Turn the work over and knit 10 loops - this will be the 3rd row of the second ribbon. So knit the second ribbon up to the 18th row *, and in the 19th row knit the ribbon loops with the front ones and then the next 5 loops for work. Turn the work and knit back on the wrong side of 10 purl loops, the last 5 loops of the second ribbon are out of work and remain on the right knitting needle. Knit third ribbon 18 rows high and repeat from * to * to end of row.


Having connected the last ribbon, knit 4 rows of the front surface, starting from the purl row, and thus connecting the tops of all ribbons.

The second part of the spikelet also consists of ribbons directed in the opposite direction. To do this, you need to knit them on the wrong side in the opposite direction.
For the first ribbon, starting from the wrong side, knit the first 10 loops with purl loops and knit up to 18 rows. In the 19th (purl) row, knit the loop of the ribbon with the purl and the next 5 loops for work also with the purl. Turn the work over and knit 10 stitches back (the last 5 stitches of the first ribbon are out of work and remain on the right knitting needle). Turn the work again and knit 10 loops with purl - 3rd row of the second ribbon. Knit a ribbon to the 18th row and on the 19th row, make a transition on the wrong side to knit the next ribbon.
Not all beautiful and voluminous knitting patterns are performed using complex elements, for the execution of which you need special skills. Having studied the technique of performing facial and you can proceed to such a pattern as an Asian spikelet. In some sources, it has a different name, replaced by an Asian braid, but this is the same element with the same scheme and design.
Where to apply?
The pattern of the Asian spikelet, due to its uniqueness, has found application both in accessories and in household items. An uncomplicated technology with a volumetric beautiful result is very popular. The product made with this technique looks luxurious and direct. An Asian braid is used for scarves, ponchos, jackets, sweaters, as well as plaids, rugs, etc.
Pattern features
Unlike the classic version of knitting, in which the fabric is knitted completely, and the patterns are formed due to elements such as yarn, closure, crossing of loops, the Asian braid has its own characteristics. One way to do it is to partially knit the rows. That is, some loops remain on the knitting needle unchanged or closed, while others are knitted in a certain sequence. According to another technology, an Asian spikelet with knitting needles is formed by closing and typing loops in one row, and the pattern itself is performed after the end of knitting of the main fabric. The knitting process is carried out by alternating the usual front and back rows.
Execution technique
As mentioned above, the pattern can be performed in two different technologies, while in the end the resulting structure will differ from each other. The first method of execution is the simplest option than the second. Therefore, the training should begin with a simpler Asian spikelet pattern, the master class of which we bring to your attention.
Execution method No. 1

The dimensions of the finished pattern can vary depending on the number of loops to be dialed and the number of rows that will be located between the slots in the canvas. First of all, we are talking about the width of the product. It should be borne in mind that after the final execution, this parameter of the pattern will be reduced by about one and a half times. This happens due to the fact that the ribbons obtained by closing the loops will intertwine with each other, thereby compressing the working canvas. This must be taken into account if you plan to carry out the product yourself, without ready-made diagrams and descriptions. The number of side loops from the pattern and those that will be closed to form the pattern may also change. Consider knitting, in which an Asian spikelet is formed in the first way.
The knitting sequence of the first method
Cast on 40 stitches.
We knit six rows with the front stitch. This number can be changed, the fewer rows, the more elegant the spikelet will be. indicates that odd rows are knit, and even rows are purl.
Seventh row. We make the closing of the central 20 loops. To do this, knit 6 front loops. Then we start to close in this way:
- we put the working thread on the left knitting needle before knitting;
- remove the 11 loop from the left knitting needle to the right;
- we throw 12 loop, so that the working thread is between the loops;
- close pulling 12 loops through 11 and remove the thread for work;
- we close the remaining loops, we carry out this process by pulling the next loop through the previous one, without using a working thread.
Turn the knitting over to the wrong side and cast on 20 loops.
We stretch the working thread between the knitting needles, turn over the knitting and finish the seventh row with the front stitch.
Turn over the knitting and perform the eighth row with purl loops.
We repeat rows from the first to the eighth to the required length of the product.

Loop set technology
The set can be done in any way that involves knitting, the Asian spikelet better supports this technique:
- push apart the two outer loops on the left knitting needle;
- we pull the working thread between them;
- we put the thread on the left knitting needle and get the first loop;
- in the same sequence we collect 20 more loops;
- the dialed loops must be connected to the main canvas, for this we use 21 loops, remove the extreme loop from the right knitting needle to the left one and put 21 loops on top of it;
- return the outer loop back to the right knitting needle.
This stitching technique will give a tighter base for the Asian spikelet pattern than a regular set.
Spikelet assembly according to the first execution method
When the fabric is knitted to the required length, we proceed to create the spikelet itself.
Turn the knitting over, the Asian spikelet will form on the seamy side.
We take the outermost first and second strips and twist them twice around each other, as a result we get the first loop of the spikelet.
Pull the next strip into the resulting loop and get the second loop.
We repeat such manipulations to the end of the canvas; during the formation process, it is necessary to stretch the loops to the base to get a beautiful spikelet.
We straighten the Asian spikelet, sew the beginning and end of the pattern so that it keeps the correct shape. If you knit a circular product, you can fasten the spikelet at the same time, or sew a button under the last loop, with which you can separate the product if necessary.
Execution method No. 2
The length of the typesetting row will depend on how many loops one blade of the spikelet will knit from. The number of loops to be dialed will be a multiple of this figure. The standard blade size is 6 loops, which means that the number of loops should be a multiple of 6. But if desired, it can be varied. The number of loops in one element can be 4, 8, or 10, it mainly depends on the thickness of the yarn. in this case they are not additionally added, but are included in the total number of typesetting. Consider an Asian spikelet (knitting needles), the knitting pattern of which is shown in the figure.

Making the front side of the spikelet
We cast on the needles 18 loops.
We prepare the base: we knit the first row with the front, and the second with the purl.
In the third row, we start the Asian spikelet with knitting needles, the diagram describes the execution of the first blade, which will consist of 6 loops in width and ten rows in height. Remove the hem and knit 5 knit loops.
Turn over the knitting and knit 6 purl loops.

Until the end of the blade element, we knit eight more rows in this technology. The first element is ready.
To go to the next element in the thirteenth row, we knit 6 loops on the right knitting needle plus 3 loops of the main fabric located on the left knitting needle.
We turn the knitting over and in the fourteenth row we knit 6 purl loops, 3 loops remain untied on the needles. Next, we do the work again only on 6 loops.
We knit 8 rows, alternating the front and back rows.
On the twenty-third row, we finish the second element and proceed to the third.

Then we continue to work by analogy with the previous rows, and completely complete all the elements of the pattern. When we reach the end of the canvas, on the left knitting needle we will have the last 6 loops, we knit them all with the front ones, connecting them with the main work. The first side of the Asian spikelet pattern is ready. The diagram further describes the execution of intermediate rows. The first one according to the scheme will be the purl row, which will unite the elements of the blades into a single whole. After it, we perform the front row. You can stop at the execution of only these two rows, or you can perform an additional two more, as shown in this diagram. First we knit another purl and then the front row.
Making the seamy side of the spikelet
We proceed to the second half of the spikelet, for this we turn the product over to the wrong side, from which we will begin work. This is done so that the blades of the spikelet of the second row are directed in the other direction and the correct Asian spikelet is obtained with knitting needles. The knitting pattern provides the same sequence as for facial work.
At the thirty-eighth, we begin to perform the first element, remove the edge and knit 5 purl loops.
Turn knitting over and knit 6 stitches.
Until the end of the blade element, we knit eight more rows in this technology, alternating the seamy and front sides. The first element is ready.
To go to the next element, in the forty-eighth row, we knit 6 loops on the right knitting needle plus 3 loops of the main fabric located on the left knitting needle in a purl.
We turn over the knitting and in the next row we knit 6 loops with the front ones, 3 loops remain on the knitting needle not knitted. Next, we do the work, only on 6 loops.
We knit eight rows, alternating purl and front rows.
By completing these rows, we finish the second element of the Asian spikelet pattern with knitting needles. The diagram shows that further we leave 3 loops on the knitting needle and carry out the transition to the third by knitting 6 purl loops.
By repetition of rows 38-48, we continue to perform the remaining elements, their number will be the same with the number obtained in the first front part.
Having reached the end of knitting, on the left knitting needle we will have the last six loops, we knit them all with the purl, connecting with the main work.
We connect all the elements with the front and back rows. The second side of the spikelet is ready.
With proper adherence to the technology, each of the branches will look in different directions. If in your pattern the Asian spikelet is repeated many times, we begin to knit the next one again from the front side of the product.


