05.11.2015

Seamless knitted vest for baby 6-9 months
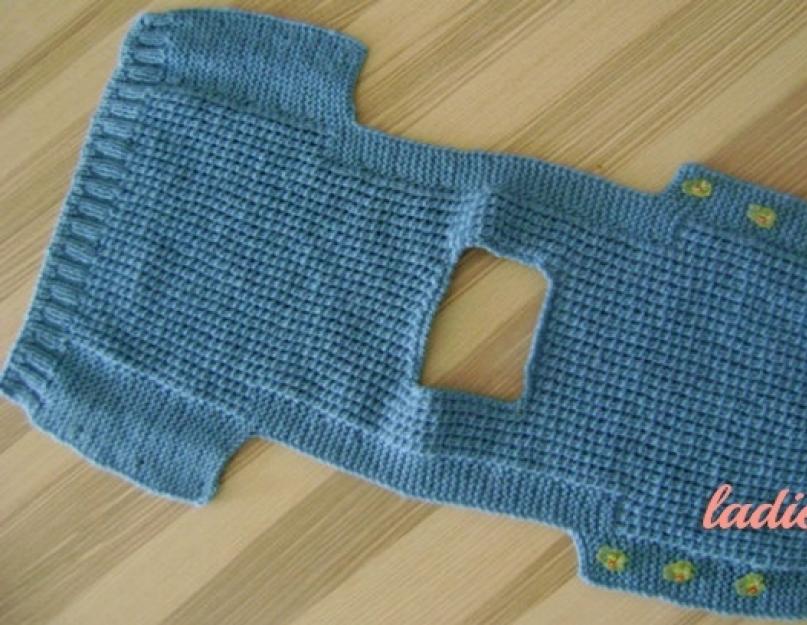
The model of a one-piece comfortable sleeveless jacket for a baby is made of dark blue semi-woolen yarn with a simple embossed pattern. Thanks to the double-sided fastening with buttons, it is easy to put on the child. The versatile seamless vest knits quickly and easily. It will suit both a boy and a girl.
Age: 6-9 months.
The size:
68-74.
Measurements: height - 68-74 cm; chest girth - 49-51 cm; waist circumference - 47-49 cm.
Required:
100 g of dark blue Gazzal yarn (Turkey) "Baby Wool" (40% merino wool, 20% cashmere, 40% acrylic, 175 m / 50 g); knitting needles number 2.5 and number 3; buttons - 8 pcs.
Abbreviations:
p. \u003d loop;
persons. \u003d front (loop);
out. \u003d purl (loop);
chrome. \u003d edging (loop).
Elastic band 2x2: in the front rows, knit alternately 2 persons. and 2 out; in the purl rows of the loop, knit according to the pattern.
Garter stitch:
knit faces in all rows. loops.
Wicker Pattern:
1 row: 1 chrome .; * 1 yarn; 2 persons. (moreover, pull the yarn over with the left knitting needle and throw it over 2 persons.); repeat from * to the end of the row; 1 chrome.
2 row: purl loops.
Repeat from 1st to 2nd row.
Column without crochet:
insert the hook into the loop of the chain or bottom row and pull out a new loop, then grab the thread and knit 2 sts on the hook in one step.
"Rachy step": without turning the work, knit single crochet
in the opposite direction from left to right (insert the hook under both edges of the loop away from you, hook the thread from below and pull it out so that it is in front of the loop that is on the hook, then knit both loops together).
Button holes:
1 buttonhole \u003d knit in the front row: 1 yarn, 2 stitches together with the front; in the next seamy row, knit the yarn over the pattern - front. Perform the first buttonhole 3 cm from the beginning of the armhole, the rest - every 5 cm.
Attention! The front and back are knitted with one fabric.
※ Before
On knitting needles number 2.5, dial 66 sts and for a start (so that the bottom does not stretch) knit 3 rows with a double elastic band: remove 1 person. (thread at work), 1 out. (and so on to the end in each row).
Next knit regular elastic band 2x2.
At a height of 3 cm from the typesetting edge in the purl row, evenly add 6 p. (\u003d 72 p.)
Go to the needles number 3 and knit, distributing the loops as follows: 1 chrome .; 7 p. garter stitch; 56 p. pattern "wattle"; 7 p. garter stitch; 1 chrome.
At a height of 17 cm from the typesetting edge (1 cm before the armholes), knit a garter stitch bar at the beginning and at the end of the row no longer in 7 p., But in 15 p.
At a height of 18 cm from the typesetting edge for armholes close on both sides for 7 p. (\u003d 58 p.) Continue knitting: 1 chrome; 8 p. garter stitch; 40 p. pattern "wattle"; 8 p. garter stitch; 1 chrome.
At a height of 5 cm from the beginning of the armholes for neck cut
close the middle 22 sts and then knit each part separately from two skeins of yarn.
※ Backrest
After 7 cm from the beginning of the neckline, dial the missing 22 sts and knit, combining both parts.
At a height of 15 cm from the beginning of the neckline for armholes add 15 points on both sides and include them in garter stitch \u003d 88 p. Do not forget to perform holes for buttons
.
After 1 cm from the beginning of the armholes, knit in the following order: 1 chrome .; 15 p. garter stitch; 56 p. pattern "wattle"; 15 p. garter stitch; 1 chrome.
After 15 cm from the beginning of the armholes in the last purl row, evenly subtract 6 p. (\u003d 82 p.)
Go to needles number 2.5 and knit 3 cm elastic band 2x2ending with 3 rows of double elastic.
Close the loops at a total height of 56 cm.
※ Assembly
Moisten the finished canvas, straighten it and let it dry. Crochet the neckline with a crustacean step. Sew on buttons.
※ Sizes for pattern

The voluminous "braid" immediately draws attention to the pale pink waistcoat. Knitted vest for a girl of 2 years old with a description and diagram.
SIZE: 62/68 (74/80) 86/92
YOU WILL NEED: yarn (100% superfine wool; 105 m / 50 g) - 200 (250) 300 g pink; knitting needles number 4 and 4.5, circular needles number 4; 2 light gray buttons.
Plank pattern (garter stitch): knit front and back rows with front rows.
Basic pattern (pearl pattern, needles No. 4.5): alternately 1 front, 1 purl. In each row, shift the pattern by 1 loop.
Scythe pattern (width approx. 11 cm): knit according to the pattern. It shows only the front rows. In the purl rows, knit all loops according to the pattern. 1-12th p. repeat constantly.
Knitting density: the main pattern - 19 p. x 34 p. \u003d 10 x 10 cm.
BACK:
On needles number 4, cast on 52 (60) 66 loops and knit 5 r. pattern for the plank. Then switch to knitting needles No. 4.5 and knit, distributing the loops as follows: chrome, 4 sts in garter stitch, 42 (50) 56 sts in basic pattern, 4 sts in garter stitch, chrome.
After 17 (20) 23 cm from the initial row, close on both sides for armholes in 3 p., While the garter stitch is extended further by 3 p. In each next 2nd p. also emphasize to subtract 3 (5) 5 x 1 p. on both sides.
For emphasized decreases, knit at the beginning of the front row the last garter stitch together with the 1st st. Of the pearl pattern with a tilt to the left (\u003d 1 st. Remove, as in the front knitting, pull 1 front loop and the removed loop through it), as well as the last loop knit the pearl pattern together with the front one from the 1st p. garter stitch \u003d 40 (44) 50 p.
After 26 (30) 34 cm from the initial row, close the middle 12 (12) 14 points for the neckline and finish both sides separately. First, continue to knit 14 (16) 18 sts along the left edge \u003d end of the row and at the beginning of each next front row close 1 x 4 sts and 1 x 2 sts.
After 28 (32) 36 cm from the initial row, knit another 1.5 cm for the strap on the remaining 8 (10) 12 stitches in garter stitch, then close all the loops. Further
continue to knit 14 (16) 18 sts on the right edge \u003d beginning of the row and at the beginning of each next purl row close another 1 x 4 sts and 1 x 2 sts.After 28 (32) 36 cm from the initial row, close the remaining 8 ( 10) 12 p. Of the shoulder.
BEFORE:
On needles number 4, cast on 54 (62) 70 loops and knit 5 r. pattern for the plank. Then switch to knitting needles No. 4.5 and knit, distributing the loops as follows, while for the "Braid" pattern, evenly distributing, add 2 sts each: chrome, 4 sts in garter stitch, 9 (13) 17 sts in the main pattern, 30 p. with "Braid" pattern, 9 (13) 17 p. with the main pattern, 4 p. garter stitch, chrome. \u003d 58 (66) 74 p.
After 17 (20) 23 cm from the initial row, close on both sides for armholes in 3 sts, while extending the garter stitch by another 3 sts. In each next 2nd p. Emphasize to subtract 3 (5) 5 x 1 p. on both sides.
For accentuated decreases at the beginning of the front row, knit the last garter stitch together with the 1st stitch of the pearl pattern with a tilt to the left, as well as the last stitch of the pearl pattern, together with the 1st stitch of the front garter stitch \u003d 46 (50) 58 sts.
After 22 (26) 30 cm from the initial row, close the middle 14 (14) 16 points for the neckline and finish both sides separately. First, continue to knit 16 (18) 21 sts along the left edge \u003d end of the row and at the beginning of each next front row close 1 x 4 sts, 1 x 2 (2) 3 sts and 2 x 1 sts.
After 28 (32) 36 cm from the initial row, close the remaining 8 (10) 12 p. Of the shoulder. Then continue to knit 16 (18) 21 sts along the right edge \u003d beginning of the row and at the beginning of each next purl row close another 1 x 4 sts, 1 x 2 (2) 3 sts and 2 x 1 sts.
At the same time, after 26.5 (30.5) 34.5 cm from the initial row, continue to knit for a garter stitch and, after knitting 2 more rows, evenly distributing, make 2 holes for buttons (\u003d 2 p. Knit together the front one, 1 yarn) ... In the seamy row, knit yarn overs. After 28 (32) 36 cm from the initial row, close the remaining 8 (10) 12 p. Of the shoulder.
ASSEMBLY:
Stretch the details, pin on the pattern, moisten and allow to dry. Make the right shoulder seam and side seams with a mattress seam. For the neck strap on the needles No. 4, dial 76 (76) 84 sts along the edge of the neckline and knit with a pattern for the strap. After 1.5 cm, freely close all loops. Sew on buttons.
A children's sleeveless jacket is a must-have item in the wardrobe, because it not only looks great, but also keeps the child warm. Today we will tell you how to knit a sleeveless jacket with knitting needles.
Sleeveless shirt for girls with needles
For knitting you need to prepare:
- Acrylic yarn 260 g;
- Needles number 4;
- Scheme.
Knitting pattern for a sleeveless jacket for a girl:
![]()
The knitting density should be 23 p \u003d 10 cm.
Back
Cast on 78 loops and knit three centimeters with an elastic band. Add 8 stitches evenly on the last row. Continue to knit with a pattern. Having knitted 39 cm from the elastic, close 28 loops for the neck and 29 loops for the shoulders.
Before
Before you need to knit, like a back, only after knitting 36 cm from you need to close twelve loops in the center to cut the neckline, then four loops on both sides, then 2 loops and 2 times 1 loop each. After 42 cm is knitted, you need to close 29 of both parts.
The master class on how to knit a sleeveless jacket for girls with knitting needles is almost over, it remains only to collect all the details.
Product assembly
Sew a seam along one shoulder. On the neckline, cast on 72 loops, knit 5 rows with an elastic band, double elastic band 2 rows, then close the loops. Sew the product at the seams. Knit the cuts of the sleeves in the same way as the neckline.
Children's sleeveless jackets for girls can be knitted in different styles. Below is a selection of several sleeveless models.


We will analyze the last sleeveless jacket in the master class. This option is suitable for a girl of 2 years old.
Sleeveless jacket for a 2-year-old girl
For work you will need:
- Mohair yarn 130 g;
- Spokes number 2;
- Circular knitting needles number 2.
Work description:
The knitting density should be: 34 stitches? 38 rows \u003d 10? 10 cm.
Here is a pattern for this model:

With this pattern, you can knit a sleeveless jacket using any pattern you like, or you can pick up a pattern.
Back
You need to dial 107 loops and knit with an elastic band of three cm. Then knit in the following sequence: hem loop, nine rapports in 25 patterns, six first loops of 25 patterns and edging. Having knitted 31 cm, you need to close 7 loops for the armholes on both sides. Close all loops by knitting 47 cm.

Before
Knit in the same way as the back, only after knitting 32 cm you need to close 1 loop in the middle for the neckline, then close 1 loop 12 times from the inner edge in every fourth row. Having knitted 47 cm, you need to close the remaining loops of both sides.
Assembly
Sew along side and shoulder seams. Cast on 130 stitches around the edge of the neckline and knit with an elastic band three centimeters. In each row of the middle of the front, you need to knit four loops like this: 2 front loops together, 2 front loops with a crochet to the left. Close the loops. Cast on 120 stitches around the edges of the armholes and knit with an elastic band 2 cm. Then close the stitches.
The size for this sleeveless jacket is 116 cm, which means that it can be suitable for a girl of 3 years old, because all children are different.
Imagine, come up with new options for knitting vests and sleeveless jackets, reduce or increase the existing patterns and then your baby will be dressed stylishly, beautifully and uniquely.
Video selection for our dear readers
Knitted vest for girls: knitting master class (photo)
Knitted vest for girls: knitting master class (photo)
Knowing how to knit allows you not only to add variety to your wardrobe. There is always an opportunity to get the right model on time. A vest for a girl with knitting needles is a great option to protect a child from coolness and a slight breeze. Helps out at any time of the year. A stylish vest can be combined with a sweater, jacket and even a jacket. Girls love a sleeveless duo with a denim shirt or turtleneck. Babies feel comfortable in a beautiful fashionable new thing and have free hands. 


A knitted sleeveless jacket can be done in several ways:
- dense satin stitch;
- embossed or openwork pattern;
- with the addition of ornament;
- combining different styles and materials.
Any model of a vest is knitted from two halves, which are then simply sewn together. For novice craftswomen, this will not be difficult. For the first time, it is better for a girl to knit a vest with knitting needles with a regular front or seamy stitch, so as not to be distracted by knitting a pattern. Before starting work, you need to prepare yarn and knitting needles, take measurements and tune in to the creative process.
Knitting vest stages
The rules for knitting sleeveless jackets for children are a little easier than for adults. You will need to take less measurements, and a vest pattern for a girl will not even be needed if the child is small. But, the basic rules of knitting will have to be followed. Before starting work, take the basic measurements:
- the volume of the hips (chest). These measurements are taken separately if the girl is already an adult and the parameters are different. For babies, it is enough to fix one volume;
- shelf length to armhole. Measured on the side of the armpit to the desired length of the vest;
- armhole height is the length from underarms to shoulder in inches. Measurement is taken in a straight line, without bends;
- total length of the finished product. This is a line from the base of the neck to the desired length.

You will need a few tools and materials:
- yarn of the desired color and thickness. Leftovers from other products may come up if a color palette is planned;
- needles of two different diameters. The elastic will keep its shape well if knitted with thinner knitting needles, This will allow the sleeveless jacket to look more aesthetically pleasing;
- needle or hook for stitching parts.
For beginner craftswomen, first of all, it is better to knit the back of the sleeveless jackets. This technique will help out if you need to expand the product a little or there are not enough threads. In the first case, you can add up to 4-6 loops to the front of the girl's vest, in the second - yarn of a different color or a suitable fabric. The back of the knitted vest does not have to be tied.
Video: Vest for baby
Getting to work

In order for the children's vest to fully match the size, you will have to carry out the necessary mathematical calculations. Basic measurements are taken from children without tolerances. Correction is carried out during the calculation of the loops. To determine the width of a knitted sleeveless jacket, take the value of the volume of the hips and divide it in half. For example, if the volume of the girl's hips (chest) is 64 cm, then 32 cm is the width of one shelf of the tank top. The calculations take into account the thickness of the knitting needles and yarn.
First, knit a sample to calculate the total number of elastic loops. A small canvas measuring 10 x 10 cm will be enough. Then, measure the exact width of the square, calculate the number of loops in one centimeter. The result is multiplied by 32 cm - the width of the shelf. 2 P (edging) are added to the final figure. Now you can knit the total number of loops for knitting the bottom of the sleeveless jacket. 
Start with a set of stitches on thinner knitting needles to start knitting the elastic.
The type of elastic and the height is determined depending on the model. For babies, it is not necessary to knit it wide and voluminous. It is better to decorate a small product for a girl with a combination of purl and front loops (1x1), openwork or double elastic. Its maximum length for a children's vest is 10 cm.
After knitting the elastic, the thread, in the process of knitting a row (further reduction - P), is transferred to the needles of a larger diameter. For older children, 6-8 loops are evenly added in the first P. Then they continue to knit an even fabric to the armhole.
To design the line, the armholes are closed 1-2 loops (further in the text, the abbreviation P is used) on both sides of the canvas. It is better to do this at the beginning of R. The total number of closed loops is no more than 6 on each side. Continue to work up to the shoulder without subtraction. Having reached the desired length, all Ps are closed in one R. The thread is carefully cut and fixed to prevent the product from unraveling. 

Knitting the front The process of knitting the front half of the vest for a girl is similar to knitting the back. A little difficulty for inexperienced knitters is the design of the neckline. The easiest way is to make a Y-shape. The place of the beginning of the neck is determined in advance. Then you need to be careful not to miss the target length. Having tied up to the desired P, divide the P in half, mark the middle of the canvas with a pin or thread of a contrasting color. From this mark, P. 

Now knit separately each half of the front. Having knitted the front P to the mark, close one P and finish the row. The purl P is tied to the mark and transferred to the front one. Close one P. again. So continue to the shoulder line. Close the remaining Ps and proceed to knitting the second half of the front. All knitting steps are repeated in a mirror image.
Assembly and design 
Each knitted part is washed, carefully steamed. If the children's vest is knitted with a relief pattern, then the iron should be wrapped in a damp cloth and brought as close as possible (without touching) to the product. This way, the pattern will retain its bulge.
You can sew parts of a vest for a girl with a thread or using a crochet. Treat the neckline and armhole with an elastic band. To do this, measure the desired length, knit an elastic band according to this size. Height - no more than 4cm. Sew on neatly, and you can try on.
In this way, the simplest version of a vest for a girl is knitted. Experienced craftswomen will add an intricate neckline, original pattern, edging with leather or fabric. Any knitted model will bring joy to the girl, because it is made with love. 

Video: Knitting a baby vest for beginners
Comments
Related posts:
 Footprints on two needles without a seam: knitting master class (photo)
 Knitted booties: a step-by-step master class (photo, video lesson)
In cold weather, parents always think about what kind of clothes could warm the child as much as possible and at the same time do not hinder his movement. In this case, a knitted sleeveless jacket is the best solution! Knitted from high-quality threads, it will reliably retain heat and at the same time provide air circulation, preventing overheating. In addition, knitting sleeveless jackets for children is a very exciting and uncomplicated activity. You can choose the model that suits you - for walking, for school or for sports. The appearance of the sleeveless jacket is also very important, because children love beautiful things. We offer you some interesting options for sleeveless jackets.
Pink vest for girls
Size - for a 4-year-old child.
We will need:
- yarn, 100% merino wool, (50g by 105m) - 200g;
- auxiliary thread in a contrasting color;
- knitting needles number 3.5 and number 4;
- buttons to match the color of the yarn - 2 pieces.
Patterns and techniques:
- out. smooth surface: in persons. R. knit all loops with purl, in. R. - facial;
- rice pattern:
1p .: * 1l., 1i. * - from * to * repeat on all loops;
2p .: according to the picture;
3p .: * 1i., 1l. * - from * to * repeat on all loops;
- braid pattern: see fig. 1;
- diamond pattern: see fig. 2;
- italian set of loops: we collect the required number of loops with an auxiliary thread, we knit 1p. facial. Then we knit 1p with the main yarn. out. n. and 4p. hollow elastic band (1l., 1i. remove, without knitting, the thread before work). We will weave the auxiliary thread further.
Density: out. smooth surface 23p. at 32 p. equal to 10cm by 10cm.
Description
Back
We start knitting with an Italian set with knitting needles No 3.5 87p. We knit 6p. pattern "rice". Then we go to the cn. No. 4 and knit: 1cr., 15p. out. Ch., 10p. "Rhombus", 1i., 2l., 2i., 9p. "Scythe", 5i., 9p. "Braid", 2i., 2l., 2i., 10p. "Rhombus", 15p. out. ch., 1cr. According to this scheme, you need to knit with knitting needles 22cm. The diamond pattern needs to be finished at the top of the second diamond, in the last faces. R. knitting instead of 2 crossed persons. p. 2p. in 1L. At the same height, 22cm, we finish the "braid" pattern and further these 9p. we knit with the front stitch.
For the raglan line, close on both sides in 3p. and then in every even p. we make decreases 23 times in 1p .:
right side - 1cr., 1l., 2i., 2p. in 1i .;
left side - for 6p. until the end of the river: 2p. in 1i., 2i., 1l., 1cr.
We close the remaining items.
Before
We knit this part of the sleeveless jacket for children in the same way as the back. At 35cm for the neckline, close the central 11p. and we finish each of the parts separately. On the cutout on each half, we close in even rows 1 time in 3p., 1 time in 2p., 1 time in 1p.
Sleeve
We start knitting with an Italian set with knitting needles No 3.5 53p. They need to tie 2p. pattern "rice". Then we go to the cn. # 4. We continue knitting: 1cr., 1l., 2i., 2p. in 1i., 5i., 2l., 2i., 9p. "Scythe", 5i., 9p. "Braid", 2i., 2l., 5i., 2p. in 1i., 2i., 1l., 1cr. For the "braid" need to knit only one rapport, then continue the faces. satin stitch. In every trace. even p. make reductions for the raglan according to the description of the back 18 times in 1p. The remaining 17p. close.
Putting together a baby sleeveless jacket
Stitch side seams and ragged seams. For a roll-out collar with knitting needles No. 3.5, we raise the loops, performing an overlap of 4p on the raglan line of the right side. Knit collar at 7cm height. We pass to cn. No4 and continue knitting another 7cm. At the desired height, we make loops for the buttons, knitting through 3p. from the edge 1 yarn over, 2p. in 1p. Sew on buttons.
How to tie a children's sleeveless jacket: video master class
Sleeveless jacket with a kitten
For children 2-3 years old.
We will need:
- yarn, not less than 50% wool, (100g per 200m), yellow - 100g;
- the same mustard color - 50g;
- some black yarn for embroidery;
- cn # 4;
- hook number 3.
- persons. smooth surface: in persons. R. knit all loops with the front, in. R. - purl;
- elastic band: 2 l.x2 life;
- pearl pattern:
1p .: * 1l., 1i. * - from * to * we repeat;
2p., 4p., - according to the drawing;
3p: shift the pattern by 1p. - over persons. we knit out., over out. - facial.
We repeat from 1p. 4p.
Description
Back
We start knitting the back of sleeveless jackets for children with a set of mustard-colored yarn 70p. Next, 4cm you need to tie an elastic band. Then we move on to yellow yarn and faces. smooth surface. At 17cm from the bottom, close for the armholes on each side of 6p. and continue to knit the children's vest for exactly another 12cm. We close the central 22p. and then we knit both sides separately. To round off the rollout, close it in the next. 2nd river 1 time for 1p. At 15cm from the bottom of the armholes we close all the items. The second half of the back of the sleeveless jacket for children must be mirrored.
Before
We start knitting the front of sleeveless jackets for children with a set of mustard-colored yarn 70p. Next, 4cm you need to tie an elastic band. We continue with a pearl pattern by 5cm. Change the yarn to yellow, and knit further according to the description of the back. Close the central 18p at 10cm from the bottom of the armholes. and we finish each part separately. To round off the cut, close it in every even p. on the inside 1 time in 2p and 1 time in 1p. We close the remaining p. At the height of the previous part. We tie the second half of the front in a mirror.
Putting together a baby sleeveless jacket
On the shoulders of the back, we lift it with yellow yarn and knit an elastic band by 2 cm. Lift the shoulders of the front with mustard yarn and knit an elastic band by 2 cm. We make holes for buttons on each of the shoulders, closer to the neck: 2p. in 1p., 1n.
Sew the sides, short sides of the elastic bands on the shoulders along the edges. We tie the armholes and the neckline with mustard yarn. We embroider the kitten with black yarn according to the loop-to-loop stitch pattern.
Knitting children's vests (sleeveless jackets): video mk for beginners
Selection of schemes


