Very often, the hobby for knitting on a machine occurs spontaneously. I wanted to knit a beautiful knitted dress, and you decided to buy a knitting machine in order to learn how to knit on a machine and knit this beautiful dress. Or they simply decided to master my mother's knitting machine, which has been in the closet for a long time. The first task is to figure out how to knit the first row on the machine.
Knitting machine instructions are usually lost. And even if there is a book like "We knit by car ourselves", then it is very difficult for an untrained person to understand an incomprehensible technical language. After reading a few pages, there is a strong desire to buy a ready-made dress, but do not rush to conclusions.
Of course, you will have to work hard to learn at least the basics of knitting on a machine, but on the other hand, these efforts are compensated by the pleasure of creativity and the opportunity to have unique, original, machine-related things.
Video of the formation of the initial row on knitting machines. The most common way is to wind the needles with yarn by hand.
It can also be noted that buying a knitting machine is an expensive pleasure and prices for new knitting machines can reach 100 thousand rubles or more. However, the price of a used knitting machine is also rather big. For knitting machines such as Silver, Brother, 15-50 thousand rubles, this is a very reasonable price. And a little lower for Neva, Veritas cars. All this, including the fact that the operation of the machine requires great knowledge and skills, makes you take the purchase of a knitting machine quite seriously.
In this section of the site, we will try to help you master the first step - preparing the yarn for machine knitting. In the future, you can complete knitting courses on a machine or independently deepen your knowledge from books and the Internet and learn to knit beautiful and unique knitted clothes.
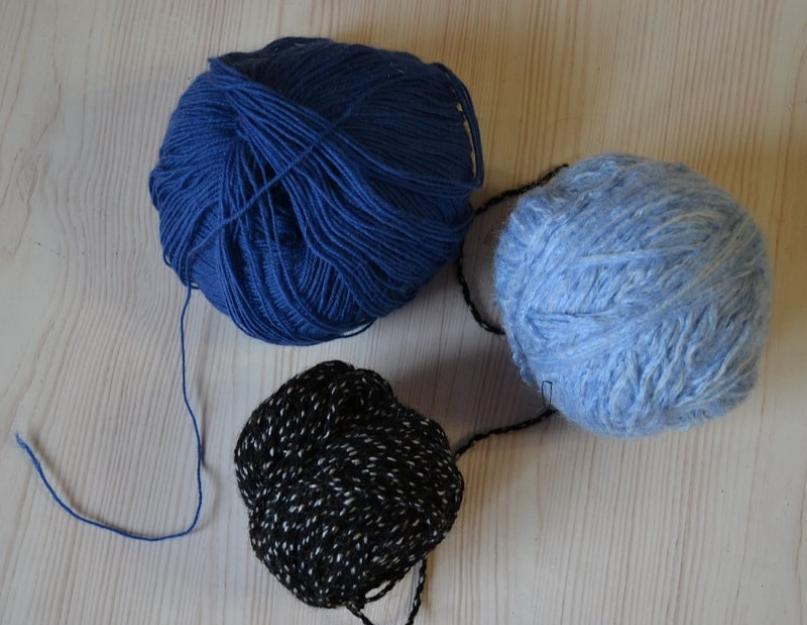
1. Knitting on the machine begins with the preparation of the yarn

The first thing to do before you start learning to knit is to prepare the yarn. If the yarn is knitted or not suitable for this type of machine, then it will seem to you that the knitting machine is broken, and the desire to knit on it will quickly disappear.
Having prepared the yarn, learn how to type the first row of the canvas and first knit your first scarf from multi-colored horizontal stripes.

For machine knitting, special threads are produced on huge bobbins. They are thin enough to be stacked (3-5) together. This thread is ideal for a knitting machine, the product is smooth and even. But you will start your first steps with a regular yarn used for hand knitting, which is not very suitable for machine knitting. The main thing is not to use very thick yarn.
For too thick yarn, there are other classes of knitting machines and knitting needles. These knitting machines have not 200, but 100 needles (a total of 5 classes of knitting machines).

A wide variety of yarns can be used with machine knitting, including synthetic yarns. However, when using it for the first time by beginners, especially right after purchasing the clipper, you should first use a soft woolen yarn of medium thickness.
2. The yarn must first be prepared and rewound

The yarn must first be prepared and rewound. This makes knitting easier and of better quality. The machine knits evenly and softly, without jerks and gaps, or, as knitters say, dumps. The figures show the types of yarn winding.
A - conical type, B - cylindrical type. These skeins are ready and suitable for machine knitting.
C, D, or E - such skeins of yarn need to be rewound.
3. A special device is used to rewind the yarn.

To rewind the yarn, a special device is used, without which no knitting machine can do. When rewinding, the yarn is placed in the skein so that the thread is removed from the skein evenly, without effort. Or at least with the same effort.
If you knit from balls on a typewriter, the tension will "jump", constantly change. And two knitted sleeves of the same yarn, with the same number of rows and knitting density, will have different lengths and widths. We'll have to loosen and knit them again.
It is important to understand that the thread coming into the carriage in jerks will affect the knitting density of the fabric. Therefore, be sure to purchase such a device or buy yarn already rewound into skeins designed specifically for a knitting machine.
A piece of paraffin softens the yarn, making it smooth and elastic. As a result, the machine makes less noise when knitting and the load on the needles and carriage is reduced.
Factory-wound skeins are sometimes too tightly wound. If possible, it is better to rewind even factory balls.
You need to start using the thread from the inner end of the skein.
5. Do not use tangled or knotted yarns
Better to untangle or cut the tangled yarn and make a new skein. Knots can cause the carriage to jam and even break the needle, not to mention dropping the loop in the fabric while knitting.
The inner end of the skein should be used as the starting end. Make sure that when the yarn comes out of the skein, the skein does not bounce. If the yarn does not come off smoothly, but in jerks, then you can try using the other end of the thread (outside the skein).
Be sure to rewind the skeins of type E using the yarn holding device or holding it in your hands, as shown in the illustration.
Use only suitable yarn, rewound, elastic and not too thick. This will make the first steps in learning how to use a knitting machine easier. Once you learn how to machine knit with regular yarn, you can switch to more complex yarns, which sometimes require knitting through a needle.
How a single-loop knitting machine works and works. Detailed instructions for the knitting machine Neva-5.
It is impossible to learn to knit on a machine without understanding how it works. You can easily eliminate many defects in knitting on a knitting machine if you understand the reason for their appearance.
For beginners to learn to knit, it is best to start learning on simple and inexpensive knitting machines such as the Neva-5. Once you have fully mastered the knitting techniques on such a machine, you may think about how to learn how to knit on more complex and expensive knitting machine models.
Sometimes it is mistakenly believed that in order to knit a beautiful and complex dress, a knitting machine of the latest model is needed. On any machine, even on Severyanka, you can knit any patterns and ornaments if you learn how to knit them by hand transferring loops.
Knitting on the machine involves the use of special yarn. Hand knitting yarn differs from machine knitting yarn in the thickness of the thread and the way the thread is laid into a skein. To learn how to knit on the machine, use a thin and elastic yarn rewound on a special device for training.
You can learn to knit by car, but how do you learn how to repair a knitting machine? Repairing a knitting machine is difficult and only an experienced craftsman can do it. But it is good if you live in Moscow or another large city where there are knitting machine repairmen. But what if you cannot find such a master in your city?
The double knitting machine is not only a hobby, but a way to make money. The use of two fountains, and in fact two separate machines, expand the possibilities of knitting infinitely. The only limitation is your imagination. Learning to knit on such a knitting machine will be much easier if you have already learned to knit on a single-loop machine.
Greetings! Today I will reveal a few "Secrets" of knitting on a machine. I think this information will be very useful for those who are just going to do machine knitting.
In particular, we will talk about yarn that can be used when knitting on a machine. And also, about some important points of the knitting process that open up over time, as a result of numerous mistakes and many hours of searching.
- What yarn is needed for knitting on a machine?
- Why are loops dropped?
- How do I change a spoke in a weight holder?
- How to rewind threads?
I am sure that many people who take up a knitting machine for the first time have similar questions.
The word "secrets" in this case is rather arbitrary, because no one specifically hides such information. Simply, over time, you begin to learn the true meaning of the expression that "smart learns from other people's mistakes." Indeed, this allows not only to save time, but also to save nerves, which are spent a lot in the first days of mastering the intricacies of machine knitting.
Therefore, I offer this article to beginners as information for thought and an opportunity to avoid some problems when knitting on the Silver Reed 840 machine.
Read also the next article in this series « »
__________________________________________________________
The article is structured in the form of an "interview", since the reason for writing it was some questions that came to the mail. If you also have new questions, please ask them in the comments, since I do not always have time to answer in a personal. And here the answers will be available to other visitors as well.
___________________________________________________________
The first one. Is it possible to knit on a machine with the same yarn that is knitted and crocheted?
Yes, the machine can knit not only with special yarn - in bobbins. But also with threads intended for hand knitting. They look like this, i.e. sold in skeins.

But, this requires a winder. When we first assembled our knitting machine, of course, we immediately began to look for information about what thread to knit. Almost everywhere it was written that threads should be used industrially collected in bobbins. The store where we first chose yarn was also told that we should buy a whole bobbin. To the question, how can we knit in several threads from such a large bobbin, we received the answer that it is possible to order, and they will rewind the required amount. Or, you need to purchase a winder.
It turned out that we had to constantly make an order in advance. Moreover, at that time we had no idea how many threads were spent on products, etc. Moreover, we could not even imagine how the ball should look like when it was rewound. Well at least in the store itself there were such tangles ready-made. So, at the first rewind, we already had some idea of \u200b\u200bwhat should be the result.
The second one. What are the winders? And where to buy such a rewinder?
As far as I know, there are different types of reels, including electric ones. But today we are quite satisfied with the device for manual rewinding from the "Camma" company, which we immediately bought in the "Verbena" store (Ufa). Then, in 2012, its price was 1000 rubles. I was very happy about that, because I saw them on the Internet for 1500 rubles. Now, that is, in November 2014, I saw 1,300 rubles in a shop.
I will not give any special advice about where to buy them, since everyone lives in different regions. One thing I can say from personal experience is that of all the shops where we buy yarn, we found them only in "Verbena".
In addition, I saw that these are exactly the ones offered on the Odnoklassniki social network, also at a very reasonable price. True, I can't give you a link, I don't remember who I saw it. But, if someone needs it, I can search.

I will quote part of the text from the specified page:
“Correct preparation of the yarn for knitting is very important. This will make the knitting process easier and more enjoyable. In addition, the quality of your products will noticeably improve. Knitting with thread from a skein or from a ball wound by hand is impossible. We recommend using a winder to rewind the yarn into balls suitable for machine knitting. "
Now, when we need to knit with a thread in two or three folds, we rewind from the main bobbin, that is, we prepare more skeins. And we knit, for example, in two threads, like this.

The third. How to rewind knitting threads on a machine correctly?
To knit with yarn for hand knitting, it MUST be rewound. This can be done, for example, using a hand winder.
I must say that this is another difficult moment that we had to overcome. It turned out that it was not enough to buy a coiler. It was necessary to figure out how to wind the strings on it. The store did not explain this, they said that there is an instruction, they say, everything is clear in it.
Yes, everything was clear, except for one thing - so what to reel on? If, when you remove the resulting ball, directly onto the cone of the winder, it does not hold its shape, it strives to fall onto the barrel. Although, in the photo in the Instruction, which I showed earlier, it seems like the end of the thread is pulled out from the middle.
It was then that an idea came up that would seem strange to the uninitiated into the action of machine knitting (to say the least :). They began to use toilet paper rolls as a base on which the thread is wound. And, thanks to which it perfectly holds the whole ball.
If necessary, see the detailed photo-MK, which showed:
- what a hand reel looks like,
- how to use bushings as cones,
- how a skein should look like, ready for knitting on a machine, etc.
Fourth. Why put yarn in saucepans?
One day a letter came with such a question. The girl wondered why on some sites it was recommended to put threads in pots during knitting.
We were very familiar with this feeling of surprise, since an unfamiliar kind woman advised about the same thing in a store when we, being completely newbies, were engaged in the selection of yarns: "Put the skeins in two saucepans and knit for yourself.".
The idea is not what to put the skeins in. It often happens like this: when the thread in the ball ends, this ball begins to "jump and jump" when passing the next row. And, it can even fly off the table.
When the skein is full, the thread quietly slides off it, the bobbin will not even budge. But when the thread runs out in the skein, it becomes very light. The carriage passes quickly, the thread should also unwind rapidly, that is, the cone rotates at high speed, rushes around the table. When "flies" off the table, picking it up is troublesome.
To avoid this, we put small tangles and incomplete bobbins in some kind of vessel in advance. For example, in a cup (with a volume of two to three liters). Then, when rotating, they hit the edges, but do not fall. Accordingly, they do not interfere with knitting.
Fifth. What yarn can be knitted on the Silver machine?Is it true that cotton is not suitable for him?
I will answer briefly here. The Silver Reed 840 is a great car. We knit on it with acrylic, semi-wool (half-wool), linen thread, cotton.
Cotton knit perfectly as a bobbin, and intended for hand. elm (for example, "Coco", "Pelican"). Kulirny smooth surface, lace, elastic bands - everything works out. The main thing is to select them correctly according to the thickness (density), which the machine "takes". More on this below.
Sixth. Can I use hand knitting thread on the Silver Reed 840?
To find the answer to the same question, at the very beginning of our training we had to “shovel” a lot of different Internet resources. As for the yarn in bobbins, designed specifically for machine knitting, there were no particular problems. In online stores selling threads, it is easy to read all the data on the threads: composition, density, etc.
There was very little information regarding knitting with yarn intended for hand knitting. As a result, I had to find out empirically. They bought different yarns intended for hand knitting and started knitting.
And found out that for our machine Silver Reed class 5 yarn is suitable in the range of 300 - 600 m / 100gr. Let me remind you that such threads are pre-rewound before knitting. Now we are constantly knitting hats, scarves, shirt-fronts with such threads.
We also tried thicker threads, 220-250 m / 100 g. The machine knits, albeit with difficulty. But, the canvas turns out to be not very attractive, it is worth a stake.
Seventh. What if the loops come off the edge of the canvas all the time?
So that the thread along the edge of the canvases does not fly off the needles, every 10 rows we hang and outweigh the edge weights.

We do it like this. When 20 rows are tied, from two edges, in turn, grope for the beginning of knitting and carefully pull it down. At this moment, you need to look not under the typewriter (you still can't see anything there), but at the needles of the place where you are doing the quickdraw. It is immediately evident that they are aligned and the thread "lies" in the groove of the needle. They pulled it off by hand and hung the load. Repeated on the right side. I usually knit while standing, so I squat down. If I'm sitting on a chair, I just lean to the left, then to the right.
The above applies to double knitting. Naturally, with one pattern it is easier to observe what happens during the knitting process. And it's easier to outweigh the loads.
It can seem troublesome to do all these extra body movements with outweighing. Yes, this is an additional load on all muscles. But, on the other hand, now we have practically forgotten about the dropped loops at the moment when part of the canvas is connected. Happens, but rarely.
By the way, we showed one more "secret" in the video lesson "". It seems like a simple question, but they ask often.
Eighth. Why hang loads?
At first, we also could not understand in any way what the meaning of this action was. Why is it necessary to immediately hang the comb, and then - and the weights? And what will happen if you do not hang?
Now, of course, we understand that if this is not done in a timely manner, the loops can (and will) jump out of the needles. In general, knitting will not work. Above this has already been said, when it came to hanging edge weights, I will not repeat myself.
But, since we are talking about a mounted comb, I want to add some more information from personal experience.
The spokes can be changed in the load carrier comb. They are sold in some stores. Let's say we bought it at Verbena. Sellers call this spoke simply - "bar".
The fact is that as a result of our experiments with a thick thread, our bar quickly lost its shape, all bent. As a result, we have a serious problem. Each time, putting it into the comb, I had to suffer. The needle stuck in anywhere, did not want to go through the holes. Especially at the end of the line, when there were 7-10 centimeters left.
It would seem that it is easier - to replace all the cases. But it was not easy to buy it. Firstly, because they are not sold in all stores where we took yarn. Secondly, a couple of times when we came to the store, where they can still be found on sale, and asked about the knitting needle, we heard that “they are already sold out”. Recently, I finally managed to buy these precious rods (they took two at once, 120 rubles each) and breathe freely.

So, the conclusion is that it is better to handle the needle in the tensioning comb with care. It seems like a trifle, but it turned out not at all.
____________________________________________________________________
That's all for today. Thanks for your attention. I hope the article will be useful to those who are at the beginning of their creative path in machine knitting.
Best regards, Saule Vagapova
we knit EVERYTHING with the help of CV
Crewneck
To start decreasing the loops to form a round neckline, we make the following calculation:
a) we determine how many loops in a segment equal to 7.2 cm according to the construction of the drawing: 3 loops X X7,2 and 22 loops;
b) we calculate how many rows will be knitted at a distance of a segment equal to 8.2 cm: 4.2 rows X 8.2 and 34 rows.
Consider decreasing the neck loops when knitting a one-piece front (for a sweater, cardigan, dress). We calculate the reduction of loops for one half of the neck.
In our example, you need to subtract 22 loops in each half of the neckline. We decrease the loops in approximately the following sequence: the first time we decrease 6-8 loops to the right and left from the middle of the neck, the second time - 3-4 loops each (can be repeated two or three times), the third time - 2-3 loops each (you can repeat three to four times). Decrease the remaining loops one at a time.
We distribute the decrease, regardless of the number of loops, to the middle of the depth of the neckline, that is, at a distance of the first 3-4 cm.
In our example, we subtract 22 loops at a distance of 16-17 rows in eight steps (6, 4, 3, 3, 2, 2, 1 and 1 loop). We knit the remaining 17-18 rows exactly.
We begin to decrease the loops on the front side of the work (fig. 271).
271 (fig. 271) Scheme of decreasing the loops of the neckline with a round cut
Having tied along the pattern to the neckline, we divide the entire number of loops into two equal parts and then we knit in the following sequence:
1st row (front side) - from the beginning to the middle of the row we knit with the thread of the main ball. In the center of the neck, we attach a thread from an additional ball, close 6 loops with a pigtail (as when fixing the sample) and tie the front row to the end;
2nd row (seamy side) - knit according to the picture. From the side of the neck, we knit the last two loops together with the purl (to get a smooth line for decreasing the loops), leave the thread of the additional ball, take the thread of the main ball, close 6 loops with a pigtail (purl loops) and tie the row to the end;
3rd row (front side) - after tying to the neck, we knit the last 2 loops together with the front one, leave the thread of the main ball, take the additional thread, close 3 loops with a pigtail and tie the row to the end;
4th row (wrong side) - knit to the neck, knit the last 2 loops together, leave the thread of the additional ball, take the main thread, close 3 loops with a pigtail and tie the row to the end;
5th and 7th rows - from the side of the neck, we knit 2 loops together with the main thread, and then close 2 loops with a pigtail with a thread of an additional ball;
6th and 8th rows - from the side of the neck, we knit the last 2 loops together with a thread of an additional ball, then close 2 loops with a pigtail with a thread of the main ball.
So gradually subtract 22 loops on each side of the neckline. Then we knit exactly.
The reduction of the neck loops in the shelves, which are knitted simultaneously with the bar, is performed in the same way as indicated in the calculation for the whole front, but in the first row we close all the loops of the bar with a pigtail in one step. We reduce the rest of the loops, counting them from the center of the plank according to the pattern.
Decreasing neck loops can be done with partial knitting. In this case, open loops are kept along the neckline for further knitting of a stand or a one-piece knitted collar.
Consider reducing the loops in each half of the neck by partial knitting:
1st row (front side) - at the beginning we knit the loops of the right half of the front, on the left knitting needle we leave the loops of the left half untied plus 6 loops from the right half of the neck. We turn the work to the wrong side and knit according to the pattern;
3rd row - at the beginning we knit the loops of the right half of the front, on the left knitting needle we leave the loops of the left half of the front untied plus 10 loops (6 loops + 4 loops) from the right half of the neck. We turn the work to the wrong side and knit according to the pattern.
So gradually on the left knitting needle we leave all the loops intended to form the cutout of the right half of the neckline untied, i.e. 6, 4, 3, 3, 2, 2 and 1 loop. Further from the side of the neck, we knit exactly 17-18 rows. Having finished knitting the right half of the front (when all the loops along the shoulder bevel will be reduced), proceed to knitting the left half. To do this, pull out new loops with the right knitting needle from the edge loops of the flat part of the neck. In the even part of the neck, 18 rows were knitted, which formed 9 pigtail loops along the side edge (18: 2). Therefore, we pull out 9 additional loops along the side edge and get 31 loops in the right half of the neckline (22 loops 4-9 loops). We knit all the loops to the end of the row and from the seamy side of the work with partial knitting, we begin to perform the left half of the cut. We knit the left half in the same way as the right one. Having finished knitting the left half and having received 31 loops on the knitting needle, we knit all the neck loops (31 loops + 31 loops \u003d 62 loops). We finish knitting with an auxiliary thread or transfer the loops to a spare knitting needle.
When making the neck of the product without a fastener, you should increase the neckline by 2-3 cm around the entire circumference. For this shape of the neck, it is recommended to distribute the reduction of loops along the entire length of the oval. In this case, loops are reduced at a distance of 34 rows, i.e. for 17 receptions, which means that the reduction of the loops will need to be done not in each row, but after a certain number of rows.
In our example, we need to reduce 22 loops in the following sequence: 7, 5, and 3 loops through a row and seven times, 1 loop in each 4th row.
Reduction of loops along the line of okat of a head of a sleeve
Having tied up to the armhole line, we expect the reduction of the loops along the ridge line of the sleeve head. To correctly calculate the reduction of the loops of the sleeve head, divide the height of the sleeve head into three equal parts (Fig. 272).
272 (Fig. 272) Scheme of reducing loops along the line of okat of the head of the sleeve
According to the construction of the drawing, the segment is 16 cm: 16 cm: 3 \u003d 5.3 cm.
We get points K and K1. Through point K1 draw a horizontal line. The intersection points with the line of okata are denoted by the letters K2 and K3 (see drawing). Section KCHK3 - control line. We determine how many rows will be knitted in each part: 4.2 rows X 5.3 ~ 22 rows.
The size of the HCH2 segment (sleeve width along the armhole line) is 36 cm, or 108 loops (3 loops X 36 cm \u003d 108 loops). Consequently, 108 loops should be reduced along the line of the sleeves of the sleeve. We calculate the reduction of the loops of the sleeve head for each half separately.
Consider the reduction of loops from the back, i.e., to the left. In the finished drawing, we measure the value of the K2K segment: K2K1 \u003d 8.1 cm, or 3 loops X 8.1 "24 loops.
The line G, G is equal to 54 loops (108 loops: 2). We determine how many loops must be reduced from the armhole line to the beginning of the third part, i.e., to the control line K2K3. To do this, from the number of loops in segment D, subtract the number of loops in segment KK1: 54 loops - 24 loops \u003d 30 loops.
Thus, it is necessary to distribute the reduction of 30 loops at a distance of 44 rows (the number of rows of the first and second parts).
First, we reduce the number of loops from the armhole line, which is equal to the first 4-5 decreases made along the lower edge of the armhole (segment G1G2). In our example, in the left half of the head of the sleeve we will decrease: 5, 3, three times, 2 and 10 times, 1 loop in each 2nd row, i.e., through the row. and then three times, 1 loop in each 4th row. We begin the reduction of loops at the beginning of the back row.
Consider the reduction of loops along the line of okatka of the sleeve head from the front, i.e., to the right.
The G2G segment is equal to 1/2 of the G1G2 segment or 54 loops (108 loops: 2).
The section of CCF when measured is 6.9 cm: 3 loops X 6.9 "21 loops.
Therefore, on the right we reduce 33 loops (54 loops - 21 loops). First, we reduce the number of loops from the armhole line, which is equal to the first 3-4 reductions made along the lower edge of the front armhole. In our example, in the right half of the sleeve head we will reduce: 6, 4, 3, 2 loops and 17 times, 1 loop in each 2nd row. We begin the reduction of loops at the beginning of the facial row.
We expect the reduction of loops in the third part. On the K2K3 line we have 45 loops (24 loops + 21 loops), which must be reduced at a distance of 22 rows.
It is recommended that you leave an even part (8-12 loops) at the top of the okat, which means that you need to reduce only 37 loops (45 loops - 8 loops).
On the left, we decrease the loops in the following sequence: seven times 1 and three times 4 loops in each second row, and on the right eight times 1, two times 3 and once 4 loops in every 2nd row, we close the remaining 8 loops in one touch pigtail.
Additional tuck in the armhole
Starting from the 48th size (in cases where the product is knitted with stocking knit), we recommend that you make an additional tuck in the armhole. The length of the tuck for all sizes is within 3-5 cm, and its depth does not exceed 1.5-2.5 cm. We perform the tuck by partial knitting in elongated rows, which we knit from the middle of the fabric to the outer edge of the armhole.
To perform tucking, we perform the following calculation:
a) determine how many loops will be along the length of the tuck: 3 loops X 5 \u003d 15 loops “16 (round to an even number);
b) calculate the number of rows by the depth of the tuck. A tuck depth of 2 cm is 8 rows (4.2 rows X 2), or 4 phases;
c) determine how many loops we will extend each row when knitting an extra tuck: 16 loops: 4 \u003d 4 loops.
Consider knitting an extra tuck in the right shelf.
The width of the shelf along with the strap for the fastener is 29 cm, or 87 loops (3 loops X 29 \u003d 87 loops).
We start knitting an additional tuck after the first 4 decreases (phases) are made along the lower edge of the armhole, i.e. when 15 loops (6, 4, 3, and 2 loops) are not knitted on the left needle at the end of the front row, and 8 rows will be knitted from the armhole line (Fig. 270). Then we knit like this:
9th row (front side) - we knit 45 loops, the remaining 42 on the left knitting needle are not knit. We turn the work to the wrong side. Thus, all the loops of the lower edge of the armhole and loops intended for additional tucking (26 loops + 16 loops \u003d 42 loops) remain loose on the left knitting needle;
10th row (wrong side) - we knit 45 loops in a pattern;
11th row - we knit 49 loops (45 loops + 4 loops), we do not knit the remaining 38 loops on the left knitting needle. We turn the work to the wrong side
270 (Fig. 270) Scheme of reducing loops in the armhole and knitting an additional tuck
Performed the 1st phase of partial knitting in elongated rows);
12th row - we knit 49 loops in a pattern;
13th row - we knit 53 loops (49 loops + 4 loops), the remaining 34 loops on the left knitting needle are not knit. We turn the work to the wrong side (completed the 2nd phase);
14th row - we knit 53 loops in a pattern;
15th row - we knit 57 loops (53 loops + 4 loops), we do not knit the remaining 30 loops on the left knitting needle. We turn the work to the wrong side (completed the 3rd phase);
16th row - we knit 57 loops in a pattern;
17th row - we knit 72 loops:
Thus, on the left knitting needle, 15 loops remain untied, as before the start of knitting an extra tuck.
From this row, we continue the interrupted reduction of loops along the lower edge of the armhole. At the end of the front row, we leave it untied seven more times in 1 loop (see “Reducing loops along the lower edge of the front armhole”). When 22 loops are not knitted from the armhole on the left needle, we knit the front row, and at the beginning of the next we close 22 loops with a pigtail.
Next, we knit strictly according to the pattern and according to the calculation, we reduce four more loops of 1 loop in each 4th row from the side of the armhole, that is, 26 loops on the lower edge of the armhole are reduced.
When knitting an extra tuck, you can reduce the distance from the armhole line to the beginning of the shoulder bevel by 1 cm.
Thus, when knitting the front for products of large sizes, you can use any type of tucks. It is possible to combine lateral tuck and additional, lateral
and horizontal, but the full length of the finished product should be taken into account.
We calculate and reduce the loops along the shoulder bevel as we do when knitting the back.
Reduction of loops along the lower edge of the armhole of the front
The reduction of loops along the lower edge of the armhole is performed on the segment G6G7. The size of the segments is determined in the same way as when calculating the back. If you need to reduce a small number of loops (16-18 loops) along the lower edge of the armhole, we do this in the same way as when knitting the back. But when knitting large items along the lower edge of the armhole, it is necessary to reduce a larger number of loops - from 25 to 45 loops, depending on the density of knitting and the size of the segment. In our example, the size of the segment is 8.5 cm: 3 loops X 8.5 ~ 26 loops.
The size of the segment G7PA is 8.5 cm, or: 4.2 rows X 8.5 "36 rows.
Therefore, it is necessary to reduce 26 loops at a distance of 36 rows, or in 18 receptions (phases).
You can reduce loops using partial knitting in shortened rows or closing them with a pigtail, as at the end of knitting, i.e., the same as in the back.
We decrease the loops in approximately the following order: the first time we decrease by 6-7 loops, the second time by 4-5 loops, the third time by 3-4 loops (you can repeat two or three times), the fourth time by 2-3 loops (can be repeated two to three times). We reduce the remaining loops by closing 1 loop each time, i.e., knitting 2 loops together.
In our example, we reduce 6, 4, 3, 2 loops, seven times 1 loop in each 2nd row and four times 1 loop in each 4th row.
Closing the loops of the last row, you can tighten the last row or knit 2-3 loops together to get a small fit of the fabric along the lower edge of the armhole.
From the shoulder bevel line at a distance of a segment, we add from 4 to 6 loops (if required by the pattern). The addition of loops is calculated in the same way as when knitting the back (at the distance of the segment). In some cases (very narrow shoulders) we reduce the loops from the armhole line to the beginning of the shoulder bevel.
The formation of a horizontal (beam) tuck
When knitting products with a sewn-in sleeve of small sizes, we extend the shelf extension, as in a jacket with a raglan sleeve. If we knit a large product, starting from the 50th it is recommended to use a horizontal tuck.
Such a tuck is obtained by partial knitting in elongated and shortened rows (it is recommended to use the second method of partial knitting). A tuck line is located at a distance of 4-6 cm from the armhole line. To proceed with the tuck, the following calculation should be made:
a) determine the depth of the tuck. In our example, the depth of the tuck is 3 cm (see "Calculation of the balance of the product");
b) determine the length of the tuck. We set the length of the tuck in the same way as when knitting a jacket with sleeves
raglan (see "Horizontal Tuck"). In our example, the tuck length is 15 cm. We calculate the number of loops along the tuck length: 3 loops X 15 \u003d 45 loops;
c) we establish how many rows need to be knitted at a distance of 3 cm (depth of tuck): 4.2 rows x 3 ~ 12 rows (round to an even number of rows).
Tucking is carried out by two types of partial knitting. We distribute for each type of knitting 6 rows (12 rows: 2 or 3 phases.
Determine how many loops we will lengthen or shorten the row in one phase: 45 loops: 3 \u003d 15 loops.
Consider the technology of knitting horizontal tucks in the right shelf (Fig. 269). The first half of the tuck is made in elongated rows from the middle of the canvas towards the side line, and the second half in shortened rows from the side line to the middle of the canvas. The width of the shelf along with the strap is 29 cm, of which 25 cm (3 loops X 25 cm \u003d 75 loops) are knitted with the pattern of the shelves and 4 cm (3 loops X 4 cm \u003d 12 loops) - with the pattern of the strap. For the entire width of the shelf, we collect 87 loops (3 loops X 29 cm \u003d 87 loops).
Having tied up to the tuck line, we begin to knit in elongated rows:
1st row (front) - at the beginning of the row we knit 57 loops according to the pattern (of which 15 are loops intended for tucking), the remaining 30 loops on the left knitting needle are not knitted to the end of the row. We turn the work to the wrong side;
269 \u200b\u200b(Fig. 269) Pattern knitting horizontal tuck
2nd row (wrong side) - we knit 57 loops in a pattern;
3rd row - at the beginning of the row we knit 72 loops according to the pattern (of which 30 loops are intended for tucking), the remaining 15 loops on the left knitting needle are not knitted to the end of the row. We turn the work to the wrong side;
4th row - we knit 72 loops in a pattern;
5th and 6th rows - we knit all the loops of the row to the end.
We knit the second half of the tuck in shortened rows;
7th row - at the beginning of the row we knit 72 loops according to the pattern, we do not knit the remaining 15 loops on the left needle to the end of the row. We turn the work to the wrong side;
8th row - we knit 72 loops in a pattern;
9th row - at the beginning of the row we knit 57 loops, the remaining 30 loops on the left knitting needle are not knitted to the end of the row. We turn the work to the wrong side;
10th row - we knit 57 loops in a pattern;
11th row - at the beginning of the row we knit 42 loops, the remaining 45 loops on the left knitting needle are not knitted to the end of the row. We turn the work to the wrong side;
12th row - we knit 42 loops in a pattern;
13th row - we knit all 87 stitches of the row to the end.
Shoulder bevel line formation
To determine in what sequence it is necessary to perform the reduction of loops along the shoulder bevel PHA2, we perform the following calculation:
a) according to the finished drawing, set the value of the segment Pha: P ^ a \u003d 14 cm, or 3 loops X 14 \u003d 42 loops;
b) determine how many rows will be knitted in the segment A ^ a equal to 5.8 cm (height of the shoulder bevel): 4.2 rows 5.8 ~ 24 rows;
c) we make the loops on the shoulder bevel, closing them with a pigtail, as at the end of knitting, or using partial knitting in short rows. In any case, we perform the reduction of 42 loops in 12 steps, or 12 phases (24 rows: 2);
d) determine how many loops you need to reduce in one go: 42 loops: 12 \u003d 3.5 loops. When dividing, we get a fractional number, so we will decrease by alternating 3 and 4 loops.
Using the technique of fastening loops with a pigtail, at the beginning of each row we close 2 loops, in the next decrease - 3, and at the end of each row we will knit the last 2 loops together. As a result of such a decrease, we obtain a smooth line of the shoulder bevel.
When loops are reduced by partial knitting, at the end of each row on the left knitting needle we leave unbroken 3 times, another 4 loops - until 42 loops remain unbroken on each side. Then we knit all the loops along the shoulder bevel and close them in a row with a pigtail.
We perform the reduction of the loops of the sprout in the same way as when knitting a jacket with raglan sleeves.
Product balance calculation
A good fit of the product depends on the definition of balance, i.e. differences between the length of the back to the waist and the actual length of the front to the waist.
In our example, the length of the back to the waist is 39.5 cm. The length of the front measured from the 7th cervical vertebra (Fig. 255) is 53.5 cm. [More ...] To more accurately establish the actual length of the front to the waist, subtract from this value the distance along the curve from the 7th cervical vertebra to the highest point of the neck, i.e. the size of the segment AA2 (it is measured according to the drawing with a centimeter placed on the edge): AA2 \u003d 7.8 cm.
Therefore, the actual front length will be equal to: 53.5 cm - 7.8 cm \u003d 45.7 cm.
Now, to establish the amount of balance, subtract the back length from the actual front length: 45.7 cm - 39.5 cm \u003d 6.2 cm.
Thus, the front should be 6.2 cm longer than the back.
We check what the length of the front to the waist in the drawing is equal to. The proposed construction provides for an increase in the shelf for all sizes by 3.5-4 cm. This value includes 1 cm (allowance to the length of the back for the convexity of the blades) plus the height of the sprout (segment A1A2), equal to 2.5-3 cm. Therefore, the length the front in the finished drawing is equal to the length of the back to the waist (39.5 cm) plus an increase (1 cm + 2.5 cm \u003d 3.5 cm): 39.5 cm + 3.5 cm \u003d 43 cm.
In order to determine the amount by which it will be necessary to lengthen before knitting, the value taken to increase the shelf when constructing the drawing should be subtracted from the balance of the product. In our example: 6.2 cm - 3.5 cm 3 cm.
Therefore, when knitting, it is necessary to extend the front by 3 cm. The obtained value can serve as the depth of the tuck.
The tuck depth can also be set in another way: from the actual front length to the waist, subtract the front length obtained when drawing: 45.7 cm - 43 cm \u003d “3 cm.
The second way to reduce the loops of the armhole
The reduction of loops along the lower edge of the armhole can be done by partial knitting in short rows. To do this, at the end of each row, leave the loops untied in the following sequence: 5, 3, 2, and 1 loop, i.e., the number of loops, which, according to the calculation, we reduce in each row.
To finish partial knitting, first on the front side of the work, and then on the wrong side we knit all the loops to the end of the row, and at the beginning of the next one we close 14 loops with a pigtail. The remaining loops that still need to be reduced (in our example 4 loops, i.e. 18 loops - 14 loops), we reduce 1 loop in each 4th row. In total, we reduce 18 loops on each side of the back.
We knit further, adding loops along the G3P line (if this is required by the shape of the pattern). To determine how many loops you need to expand the back to the beginning of the shoulder bevel, on the back drawing, designate the point of intersection of the start line of the shoulder bevel with the vertical line A3G, letter P.
268 (Fig. 268) Scheme of reducing loops along the lower edge of the armhole of the back
The size of the PXP segment is measured according to the finished drawing. In our example, P1, n \u003d 1.7 cm, or 3 loops X 1.7 "5 loops. Also, according to the finished drawing, we measure the size of the segment G3n: G3i \u003d 13.6 cm, or 4.2 rows X13.6 ~ 57 rows.
Determine how many rows we will add loops: 57 rows: 5 \u003d 11 rows.
Therefore, in each 11th row on both sides we will add 1 loop.
The first way to reduce the loops of the armhole
Consider in detail the reduction of 18 loops at a distance of 25 rows (Fig. 268). We begin the reduction of loops from the front side of the work:
1st row (front side) - at the beginning of the row with front loops we close 5 loops with a pigtail, as at the end of knitting, and we knit the row to the end;
2nd row (wrong side) - at the beginning of the row with the wrong loops we close 5 loops with a pigtail, and at the end of the row we knit the last two loops together on the wrong side;
remember that if when loops are reduced at the end of each row 2, the last loops are knitted together, then at the beginning of the next row, one loop less than is indicated in the calculation.
So, for example, at the beginning of the 3rd row we close with a pigtail not 3, but only 2 loops. As a result of such a decrease, we obtain a smooth line of reduction of loops.
3rd and 5th rows (front side) - at the beginning we close with a pigtail 2 loops, and at the end of the row we knit the last 2 loops together with the front;
4th and 6th rows (wrong side) - at the beginning we close 2 loops with a pigtail, and at the end of the row we knit 2 loops together on the wrong side;
7th and 9th rows - at the beginning and at the end of the row we knit 2 loops together front;
8th row - at the beginning and at the end of the row we knit 2 loops together on the wrong side;
10th row - at the beginning we knit 2 first loops together with the wrong ones.
Thus, 15 loops were reduced in 10 rows on each side, therefore, 3 more loops should be reduced:
a) on the front side of the work in the 13th, 17th and 21st rows, we reduce 1 loop, knitting at the beginning of the row 2 first loops together front;
b) on the wrong side of the work in the 14th, 18th and 22nd rows, we also reduce 1 loop each, knitting the first 2 loops together on the wrong side at the beginning of the row.
Reducing the loops on the bottom edge of the armhole
According to the construction of the drawing, the size of the segment G, G2 (the lower edge of the armhole) is 6 cm. We determine how many loops to reduce in the segment HCH2: 3 loops X 6 \u003d 18 loops.
The reduction of the loops is performed at a distance of the segment HCH3 equal to 6 cm. We determine how much will be
knitted rows: 4.2 rows x 6 \u003d ~ 25 rows.
Therefore, at a distance of about 25 rows on each side, we reduce 18 loops.
The reduction of loops along the lower edge of the armhole (when knitting any size) is carried out approximately in the following sequence:
a) the first time we reduce (close with a pigtail, as at the end of knitting) from 4 to 6 loops;
b) the second time - 3 loops (this decrease can be repeated 2-3 times);
c) in the third and fourth times - 2 loops (can be repeated 3-4 times). We reduce the remaining loops by closing 1 loop in each second row (or through 3 rows in the 4th).
In our example, 18 loops are reduced in the following sequence: 5, 3, 3, 2, and 1 loop in each second row, i.e., through the row. The remaining 4 loops are reduced by 1 loop through 3 rows in the 4th.
Knitting is not an easy process, requiring creativity and imagination. With the help of a knitting machine, you can create things that no one will have. How to knit on a knitting machine, how to choose yarn for future masterpieces? Find out in this article.
Photo and video knitting machine
If there are children, then the knitting machine is an indispensable assistant to mom. They grow rapidly, new clothes are needed every year, but it is not always possible to update the wardrobe. Parents can be sure that things are not only beautiful and unique, but also safe for health.
Benefits of Using a Knitting Machine
Knitting on modern machines is a fascinating and uncomplicated matter, models equipped with computer control are especially popular. Photos of knitting machines of this type can be viewed on the Internet and choose the perfect option. Work will be a pleasure.
How do they work? It is only necessary to make a finished drawing from the disk and set the program for the machine. She will do all the work herself, it will only be necessary to monitor the process. Reviews on knitting machines, which needlewomen with pleasure share on topic forums, will help you choose reliable equipment.
How to knit on a knitting machine
How to master this wonderful technique? Consider the main stages of work:
1. Preparation of yarn. In order for a thing to turn out to be of high quality, it is important to approach the choice of threads responsibly. If you are working on a typewriter for the first time, the choice should be stopped on a yarn of medium thickness. If it is unwound, then it is necessary to wind it into a ball so that the thread runs smoothly.
2. Insert the inner end of the yarn into the carriage.
3. Start knitting with the selection of the first row. It is better to use the method of twisting the needle. After mastering this method with others, you will cope easily; then you need to insert the thread into the tensioner so that its end is fixed near the tripod.
4. Using a comb, tighten the desired number of needles and begin the process of weaving them with yarn. Winding is necessary against the clock hands, supporting with your fingers; when the last needle remains, you will need to install the thread in the thread guide.
5. Use the comb to return the needle to its original position. It is important to control the fiber: it should not be lowered or tightened tightly.
By date ▼ ▲
By name ▼ ▲
By popularity ▼ ▲
By difficulty level ▼
The forum is the property of the magazine of the same name devoted to machine knitting of products from various types of yarn. The difference between a forum and a regular site is that here you can not only find out useful information on a question you are interested in, but also discuss it with like-minded people. For example, in various topics are discussions of technology, features, patterns, secrets and current models for machine knitting. Join the participants with a simple registration.
http://lubodelo.getbb.ru/viewforum.php?f\u003d1On the portal you will find many interesting workshops on knitting using a special machine. The lessons will help you not only learn about the various models and types of products, but also introduce you to the features, techniques, secrets of machine knitting in principle. All articles are illustrated with step-by-step photographs in high resolution. In addition, interesting and high-quality video lessons are presented here, which clearly show the process of creating a particular work.
http: //www.livemaster.ru/masterclasses/vyazanie/ma ...By clicking on the link, you will find a lot of educational literature on machine knitting, presented in electronic format. When downloading it to the device, you will receive the most useful information regarding how to knit correctly, telling about the features of this type of needlework. Here you can find interesting models of clothing and patterns for them. The main condition: to download most of the files, you need to register on the forum and become a regular user.
http://www.forum.softweb.ru/showthread.php?t\u003d21474The forum is one of the sections of the site dedicated to different techniques and styles of creating clothes and accessories. They also include machine knitting - here you can discuss with like-minded people all your questions by choosing the right topic: types of knitting machines, especially needlework, interesting models and patterns for them. To communicate freely with other users, you need to register on the site by submitting an application in the appropriate form.
http://club.osinka.ru/forum-81The site is a kind of club for lovers of machine knitting, who in most cases use a knitting machine of one particular company. Despite this, the portal will be very useful to other lovers of this type of needlework - there are various useful articles, interesting discussions, and schemes for making beautiful modern models of clothes and accessories are posted. Registering is not necessary - just log in from one of the social network accounts in which you are registered.
http://sireed840.ucoz.ru/On this portal you can find many useful tips that simplify the life of a needlewoman engaged in the technique of machine knitting! Here are articles on how to knit, what decorative elements are, how to change threads, combine and select them, and also count the number of stitches in a row. In addition, you can read about various types of knitting machines and learn how to choose the most suitable model for yourself.
http://vilushka.ru/mashin/mashin.htmlThis portal contains many interesting video tutorials on the technique of machine knitting. You have the opportunity to familiarize yourself with various analytical and educational articles, backed up by good illustrations in high resolution. The materials contain information about different types of knitted elements, descriptions of patterns and patterns for implementation, useful tips, subtleties and tricks. In addition, certain sections of the site are devoted to crocheting and knitting.
http://www.knit.com.ua/category/machine-knitting

Want to learn how to knit using a typewriter? Then rather read the articles on this site! From them you will learn how to correctly type, reduce and add loops in a knitted product, you will find descriptions of patterns and patterns for their implementation, you will understand the principle of machine knitting. Separate materials will help novice needlewomen figure out which one is better to buy a machine and yarn. For detailed instructions, see the special section, Knitting Machines.
http: //www.sewing-master.ru/mashinnoe-vjazanie.htm ...


