Children always love to do origami; they are ready to sit all day long and make some origami crafts and show them to their relatives. Any child would like to learn new origami crafts, for example, making the simplest paper boats with their own hands. Below in our master class we will teach you how to make this easy and also complicated paper sailboat with your own hands.
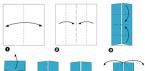
1. The most common version of a DIY paper boat
For the lightest boat, of course, we only need 1 sheet of A4 format. The following ten steps show you how to make origami.
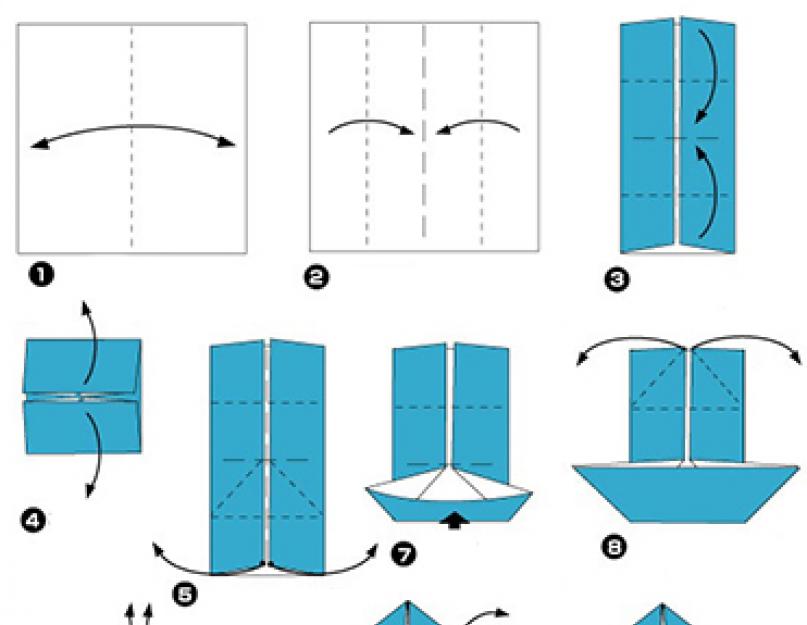
You can also try to make another origami, a paper boat using a slightly more complicated pattern. As always, we will need a regular piece of A4 paper.
2. Scheme of a sailing boat.
First, we take our workpiece and bend it in half like a “book” (picture.1). Then both sides, fold them in half too (Fig. 2). Mentally divide the folded sheet into 4 parts (you can use a gray pencil), then fold the top and bottom half towards the middle (picture.3). Then we turn back the previous step (Fig.5), The result was a blank with three fold lines. Then the second half needs to be unscrewed and folded along the fold lines as on the template (Fig.5). And then fold the bottom half of the paper up (Fig.7). Do the same with the top half of the craft. (image.8). Then unfold the first folded part up (digit.9), must
look like the picture (Fig. 10). Then turn the product over to the reverse side, in front of you is a large square and four small triangles (Fig. 11). Then fold the square with opposite corners from top to bottom (under number 11). So we assembled a beautiful sailboat (Fig. 12).
3. Step-by-step instructions for origami sailboat

4. Scheme for making a paper steamer
A simple way to make a boat, an easy option in 10 minutes. 
How to make a boat out of paper detailed instructions photo
To make a boat we will need a thin sheet of A4 paper.
1. Find the middle of the workpiece. We bend it in half.

2. On the resulting rectangle, bend one corner to the middle.


4. We turn the remaining parts of the craft upward, first the front part.

5. Then, similarly to step 4, fold the other part of the paper.

6. We tuck the corners over the folded workpiece.

7. We also accurately turn the remaining corners over.

8.
Next, we take the lower corners of the triangle and connect them together. We have a big diamond .

9.
You should see a large diamond unfold .

10. Z Then we bend the lower corner of the front side of the diamond to the upper corner, and similarly with the back side.

11.
You should get three triangles.
12.
Then we connect the lower side corners to each other (the origami is folded into a small rhombus with equal sides).
13.
We take hold of different sides (the upper corners of the triangle) and begin to move them apart.
And now you have a beautiful boat with a large deck. Collect a collection of different ships on your table, made according to various designs. 
Many people remember that glorious time when we didn’t need a brand new smartphone or a modern laptop to be entertained. Snowballs, tag, Cossack robbers, tag are the childhood games of most modern parents that they will never be able to forget. One of these many fun things is to launch homemade boats along streams of water during rain or spring thaw.
Sometimes whole hordes of children gathered over the puddles to make a boat out of paper or other improvised materials and send it to compete with others. The winner usually received the glory of the coolest shipbuilder in the yard! So how to make a boat out of paper? You will read about this in our article.
Are there puddles outside after the rain? It's time to remember your fun childhood and launch a boat you made yourself or teach your own children this activity! Get away from the TV and computer! You don’t need much to do this; just have a sheet of paper torn from a notebook on hand, and you can make a boat out of paper.
If your miracle is not satisfied with a ship that is the same as everyone else’s, then invite him to make his own galleon from any other material. Most materials that do not sink in water are suitable for this.
Previously, children could use for this purpose:
- Styrofoam;
- Plastic bottles;
- Plasticine;
- Tree.

This can make incredibly beautiful products, but don't limit yourself to them! Maybe you can make something amazing out of a walnut shell or a wine cork. Don’t force yourself and your children into any limits and don’t be afraid to fantasize! In this article we will tell you in more detail how to make a paper ship step by step.
Methods for making paper ships
If a child comes up to you and asks you to teach how to make a paper boat with your own hands, and you have long forgotten about such games, our article will help you remember forgotten knowledge. Read it a couple of times, practice, and you can show off to your child different variations of your paper destroyer - from ordinary notebook paper, cardboard, milk cartons or matchboxes.
Classic of the genre - origami
This is a classic version of a paper ship. Most kids made toys like this during boring school hours. If you have forgotten some points, look at the drawing, this is a diagram of a paper boat. Remember!

Manufacturing plan:
- You will need a rectangular piece of paper. Both an ordinary sheet from a notebook and printer paper will do.
- It needs to be folded in half and the tops bent towards the center at a right angle.
- Fold the remaining edges of the sheet up (on both sides).
- We wrap the free corners inward. The result should be a triangle.
- We bring the corners of the base of the triangle together so that we get a square.
- Bend the bottom corners upward (both sides). Now you should have a triangle again.
- Bring the corners of the triangle's base together. You have a square again, take it by the corners and stretch it to the sides.
- Pull until you get the ship shown in the last picture. Smooth out the sides, this will make it more stable.
Happened? Now you can make a simple origami paper boat for children. Repeat the experiment a few more times and you can safely teach your baby! At the end, the finished product can be decorated and, depending on the child’s wishes, floated on water or placed in a visible place at home - a shelf in the nursery or a sideboard in the living room are perfect for this role.
Two-pipe paper boat (motor ship)
Let’s say you and your children can already make a paper boat yourself. If you are no longer satisfied with such a primitive vessel, it’s time to start exploring new options. This article presents several ways to fold the original boat. Below are step-by-step instructions for a paper boat. It differs significantly from the previous one in its appearance, and if the children liked it, hurry up and start studying!

The procedure for assembling a two-pipe paper boat:

Now you know the second way to make an origami boat out of paper. If this item is going to be used for swimming, try dipping it in beeswax or paraffin to make it waterproof. You can also use paper that does not absorb water so quickly, so that the ship remains afloat as long as possible. For this purpose, cardboard, for example, will do. Ready? Launch your frigate!
The third version of a beautiful paper boat for children and adults. Why for adults? He's very attractive! Such a ship can be made of any size, and it will become the highlight of your interior.
However, unlike the two previous options, you should not send it sailing. When it hits the water, the boat falls on its side, which reduces the chances of its further use as a toy.
After all, what child wants to watch his ship sink? If you decide to make a sailboat as an interior element or a land toy, we will help you!
The procedure for assembling a sailing boat out of paper with your own hands:
- Need a square sheet. You can take a regular A4, fold it in half and cut off the extra strip.
- Fold the leaf diagonally twice. Now in front of you is a square with clearly defined lines and a center.
- Bend the top of the sheet at an angle towards the middle.
- Repeat this with two more tops to create an envelope.
- Bend the bottom corner in the other direction, retreating about 1 cm.
- Fold the workpiece in half so as to break the middle diagonal in the opposite direction.
- Now the most difficult part: you need to fold the product so that the center is inside.
- All that remains is to tuck the lower edge of the sailboat so that it can stand.
- Decorate the craft as you wish.

So you have learned another diagram of a paper boat. If your child likes origami, then several hours of pleasant pastime are guaranteed!
We present to your attention another way to make a paper boat for children, in which we will need: matchboxes, cardboard, PVA glue. This option is more labor-intensive, but the result is appropriate!
Schematic of a matchbox boat:
- You will need three boxes. Glue them together - two together, one on top. You can use almost any glue, but it is better to use regular PVA.
- Now take an A4 piece of paper and cut a strip the width of the box along the long side of the sheet.
- We paste over our blank with a cut strip.
- Take a sheet of cardboard and cut a strip a little more than 1 cm wide along the long side.
- We bend this strip in half and glue it to the boxes, forming the bow of the ship.
- Place the ship on the cardboard and draw an outline. This is the bottom of our vessel - cut it out.
- Glue the bottom to the ship.
- Almost everything, but the ship needs a mast! Take an A4 sheet of paper and roll it tightly diagonally.
- You need to make a hole in the top box, coat the mast with glue and put it in place. Let it sit for one minute until it sticks.
- Sail. To make them beautiful, use a sheet of colored paper. Make two holes at a time (you can use a hole punch or a stationery knife) and let your child decorate the sails as he wishes.
- Put on the sails and glue the flag, it will prevent them from slipping out.

And one more ship in your harbor. Decide for yourself what to do with them, and in the meantime we will share several more options for such ships.
Cardboard ship
A cardboard ship can come in a variety of sizes. You can make it miniature for spring fun, or you can make it huge for any other purpose. Such a boat turns out to be incredibly beautiful, and its creation requires a minimum of consumables.
Pirate ship
So, here's a list of everything you need:
- Cardboard;
- Scotch;
- Glue;
- Paper;
- Two thin sticks;
- Water;
- Coarse thread;
- Fabric and scissors;
- Brush and paints.
You can safely get to work!

It is not necessary to strictly follow the instructions, repeating the design one to one! Create as your imagination allows you.
Cute sailboat
Ships can be very different. For example, here's another idea for inspiration!
Its manufacture will require even less materials than the previous variation. You only need:
- Cardboard;
- Scissors;
- Glue;
- Colored paper;
- Pencils;
- Scotch;
- Ruler.

Execution order:

The simplest option. All you need for it is an empty milk carton, colored paper, thread, stick, cloth, thread.
Execution order:
- Buy milk in a cardboard box, drink it.
- Trim the box so that the remainder resembles a boat.
- Cover it with colored paper.
- Attach the stick (mast) to the middle of the vessel.
- Hook the sail onto the mast and tie it to the bow with a thread.
As a result, you might end up with something like this:

You already know how to make a paper boat, but how to decorate it? This is especially true for origami boats, because without decoration they look quite simple. As an option, let your child paint the craft with colored pencils, paints or felt-tip pens.
Otherwise, you can try using professional origami paper (patterned, foil, decorated, etc.) or improvised materials.
On a note! When choosing a material, take into account its weight, otherwise your vessel will simply lose balance. In this case, not only will you not let it float on water, it will not even be able to stand upright.
Another idea is to decorate origami in the following ways:
- Textiles;
- Painted paper;
- Colored napkins;
- Tree leaves.
It might look something like this:

Perhaps you will come up with something more interesting, it all depends on your mood and flight of fancy. Good luck with your creativity!
Elizaveta Rumyantseva
Nothing is impossible for diligence and art.
Content
If you don’t know what to do with your child, then make him a craft in the shape of a boat. You can create a toy like in childhood overnight, and the baby will get great pleasure. To make a vessel you only need a sheet of paper and dexterity of your hands. A little effort and a new fun for the child will be ready.
How to make a paper boat with your own hands
There are several options for how to make a ship out of paper. The manufacturing process will take no more than two to three minutes. To create a toy you will need a sheet of plain A4 paper or cardboard of the same size. Glue, scissors and other additional tools are not needed, because the origami technique will be used for the ship craft. You can make a paper boat using the easiest design, or try to make a steamboat using a photo or video as a guide.

Simple DIY paper boat
Even a child can master a diagram of how to make a paper boat of the simplest variation. To build a toy water transport, you will need a minimum of available materials: instructions and a landscape sheet to make the product large, durable and stable. Such a vessel will last a long time on the water, delighting its owner. The paper can be either white or colored - each option is good in its own way.
You need to fold the craft according to the step-by-step instructions:
- Fold the prepared paper sheet in half.
- The folded side should be folded in half again upward.
- Bend the corners at right angles to the central part.
- Bend each free edge upward on both sides, and tuck the free corners into the inside, forming a triangle.
- Then bring the corners at the base of the figure together, getting a square.
- Fold the corners of the square from below to again make a triangular shape.
- Bring the corners at the base of the triangle towards each other, forming a square.
- Take the resulting figure by the upper corners and slowly pull it to the sides until the product opens, turning into a boat.

How to make a paper boat using origami technique
Using the origami technique, you can create any existing object. How to make a paper boat from a single sheet, giving birth to ships, boats, twin-tube steamers, the Titanic and other vessels? It’s very simple, for example, a great idea for launching would be a miniature yacht, created step by step with your own hands. You can take a sheet of one-sided colored paper so that the boat itself is brightly colored and the sail is white.
Following the steps step by step, you will learn how to make an origami boat:
- Roll an arrow from a square sheet, bending it towards the opposite edge.
- Fold the resulting figure in half.
- Bend the hull of the vessel, forming a right angle of ninety degrees between it and the sail. Unbend the created figure.
- Press the fold lines on both sides inward and make the front part of the boat sharp.
- Bend the pointed bottom inward for balance.

How to make a paper boat with a sail
If you are interested in how to assemble a paper boat, then its diagram will not seem complicated if you have mastered the technique of a simple master class on how to make a craft step by step. A spectacular vessel can serve as an original gift not only for a child, but also for an adult who is attracted by the sea and everything connected with it. There are several ways to make a ship with a sail, here is how one of them is done step by step:
- We make a square from an A4 sheet, cutting off the extra piece.
- Bend the resulting paper figure in the center and diagonally to form sixteen small squares.
- Bend the sheet at the four corners in the central part and connect the two edges to each other and to the center. Do this action for all corners.
- Turn the figure over and bend it in half diagonally.
- Connect the triangles that are on the right side of the product to each other. They will be the sails.

How to fold a paper boat into a checkered pattern
It is easy to make a boat not only from a landscape sheet, but also from thinner notebook paper or newspaper. Such a product will be less durable, but you can play with it for a while. The ease of making a boat allows you to make such crafts in any free moment, for example, during a break at school, in order to pass the free time intended for relaxation in an exciting way.
How can you make a paper boat? Everything needs to be done step by step:
- Take a square piece of paper and fold it in half.
- Mark a line and bend the piece in half again.
- Bend the corners, but only of the layer that is on top, bringing it closer to the intended line. Perform similar actions on the other side.
- Bend the bottom corners towards you, going inward.
- Fold the top layer in half.
- Place the product in the middle, creating two folds.
- Unscrew the two corners and unfold the created workpiece.

How to make a paper steamer - step by step instructions
A paper steamer can be an excellent alternative to a traditional ship. It’s not very difficult to make, so you can try creative work on making a boat with your child. Yes, such a steamship is not capable of sailing on the water for a long time, but it can perfectly navigate the fictional sea, competing with ordinary boats. A beautiful craft will definitely interest a child with its original appearance.
Step by step the steamboat is made like this:
- You need to take a square-shaped leaf.
- Fold each of the four corners towards the central part.
- Then you should turn the resulting workpiece over in the shape of a square and again bend all the corners to the center.
- Turn the resulting figure over again and bend all four corners to the center again.
- Turn the square over again and fold the corners to the central part of the product again.
- Turn the workpiece over again, but begin to gradually bend and open two opposite squares.
- The remaining couple of squares remain to be pulled little by little by the corners in different directions.
Check out other DIY paper crafts like:
How to make a ship out of paper? Every child and his parents were interested in this question. Now we will answer it in detail.
Who didn't let paper boats sail in spring streams? Overcoming many obstacles, they finally reach a huge puddle, where they can calmly drift under the guidance of a little captain. Is this a familiar picture?
But even today, not all children and adults know how to properly make a ship out of paper. There are several ways that allow you to quickly make any model from a regular sheet of paper.
The first option is the simplest
We will now tell you how to make a ship out of paper. You need to fold the sheet in half to form a rectangle, mentally find the middle of the fold and fold both edges to form a triangle. Next, you need to bend both lower edges of the rectangle up, each to its own side. Now bring the ends bent in this way together and tuck them into each other. You will get a rhombus. Raise its lower corner up. Turn the boat over to the other side and do the same. The result is a triangle. Its two sharp corners need to be raised up and folded in the center. And again in the hands of a paper diamond. By carefully pulling the edges of the figure, they should be moved apart and formed into a boat. Now all that remains is to add volume for stability and you can set sail.

Another variant
The next version of the paper boat is not so well known. The model turns out to be more original and stands out against the general background of simple boats. So, how to make a ship out of paper? You need to take a square sheet and fold it diagonally to mark the folds. Then unfold it again and bend the top corner towards the center.

Then lift the tip up and bend the corner of the resulting small triangle down again. Now fold the entire figure lengthwise diagonally. Turn both bottom sides out and fold inward. The result was not just a boat, but a real boat. All that remains is to paint the side and draw the windows.
The pinnacle of skill for a child is to make a boat with two sails. To do this, take a square sheet of paper and fold it in half twice. Then, the upper left corner and the lower right corner of the resulting square should be folded towards the center. Then fold the figure in half again. Mentally divide the resulting rectangle into two squares - left and right. On the left side, fold a triangle, bending the top towards the center, and on the right, bend the corner away from you and up. Fold the side wings down on both sides. In the resulting rhombus, fold the right triangle down and return it back up, but with a depth of 1 cm. Fold the bottom corner inward.
Having mastered the simplest techniques, you can build a ship from modules. Such a craft will not be allowed to sail, but it will be perfect as a gift for a friend.
In kindergartens and elementary grades, children enjoy making boats in the form of Many examples can be found in children's books and magazines. During classes, you can tell your child about different ones and invite him to choose from them. Thus, over time you will get a whole collection of applications.
How to make a ship from paper and scrap materials?
But the most interesting type of home shipbuilding is making models from improvised materials - matchboxes, toilet paper rolls, walnut shells. Anything your imagination suggests will do here. To make the simplest boat you will need three matchboxes, a cocktail tube, colored paper, glue, a sheet of cardboard and markers. The skeleton of the ship needs to be formed from three boxes - two glued together, and the third glued on top of them.
While they are drying, you can cut out the food from colored paper - a strip whose width is equal in height to the first two glued boxes. The third box should rise above it in the form of a captain's bridge. When cutting out a strip, you need to remember that it should be several centimeters longer, since it will also have to be used to form the bow of the ship. Having glued the boxes and made the nose, the workpiece should be turned over and the bottom made of thick cardboard should be glued.
Now you can start making sails. To do this, you should put two paper sails, previously painted with felt-tip pens, on the cocktail tube. They can be either the same or different sizes. Glue a flag on top and secure the finished structure in the upper matchbox.

Such activities with the baby will bring pleasure to every parent. After all, many of us, at least mentally, return to our childhood, when we easily ran barefoot through summer puddles and launched boats, hoping that at least some of them would sail all the way to the sea.
Conclusion
Now you know how to properly make a ship out of paper. We offered several options. Although every day more and more new ones are appearing from paper. Therefore, practice, improve your skill.