I know a lot of options for weaving various Rings from rubber bands. In this article I will show you how to make the simplest of them. This is my daughter's favorite ring.
What you will need


You will need:
- Machine – 1 pc.
- Elastic bands - 12 pcs. (I used: 4 light pink, 6 hot pink and 2 red)
- Clip (C or S) – 1 pc.
- Hook – 1 pc.
And also patience and attentiveness 😀
Let's start weaving


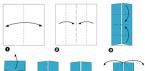
As you can see, I have a machine with four rows of pegs (this is for weaving complex patterns), you most likely have a machine with three rows of pegs. Therefore, I will describe everything as if I were using a three-row machine.
Place the machine with the slots facing away from you. Stretch a light pink elastic band between the first and second pegs on the middle row. Add another light pink elastic between the second and third pegs on the center row. Remember, each subsequent elastic band goes on top of the previous one.
We continue weaving


Now from the middle row we move to the left and change the color of the rubber bands to bright pink.
Stretch the elastic between the third peg in the middle row and the third in the left row. Then add elastic to the third and fourth pegs in the left row. Next, we return to the center, stretch the elastic band between the fourth (left row) and fifth (center row) pegs.
Closing the circle

It is necessary to mirror the element performed at the previous stage.
Start again with the third peg in the middle row. It should be like a vicious circle.
Adding elastic bands

Add two light pink elastic bands between the 5-6-7 pegs on the middle row. Remember, each next rubber band is on top of the previous one.
Pattern


The central part in our scheme is a kind of pattern for the ring. For the pattern we will use two red elastic bands.
Pull one of them between the fourth peg in the left row and the third peg in the right row. Place the second elastic band between the fourth peg in the right row and the third peg in the left. They should look criss-cross.
We weave elastic bands


Start by facing the machine with the slots facing you.
After the machine is deployed, our starting point changes. We count in the same way from the first central peg, but now it is a peg on the other side of the machine.
Remove the light pink elastic from the second peg on the middle row and place it on the third peg. Then remove the hot pink elastic from the third peg on the middle row and place it on the third peg on the left. Next, remove another bright pink elastic band (stretched between the third and fourth pegs in the left row) from the third peg and put it on the fourth. Move the next rubber band from the fourth on the left to the fifth on the middle.
Repeat all these steps with the “pattern” on the right side.
Finishing the weaving

After all the elastic bands in the pattern are intertwined, we just have to finish with the part that will wrap around the finger.
All the action is in the middle row. Remove the light pink elastic from the fifth peg and place it on the sixth. Move the next rubber band from the sixth to the seventh.


It's difficult to comment on anything here. In the second photo, I deliberately pulled the elastic to the side so that the clip could be seen better. Using it we will fasten the ring.
Removing from the machine


Sequentially remove all the rubber bands from the machine. Start removing from the side where you already hung the clip.
When it remains to remove from the two outer pegs, fasten the ring with a clip and finally remove it from the machine.
Read the article. It contains different methods - from the most basic to complex. Choose the ideas you like, master weaving techniques, combine color combinations. This way you can make original jewelry from the popular rainbow loom bands for yourself and your girlfriends.
Materials and accessories
To learn how to weave rings from rubber bands, you should immediately prepare the necessary materials and consistently repeat all the steps in practice. So, you will need the following:
- Multi-colored rubber bands.
- Slingshot.
- Hook.
- Machine.
- A lock for those rings that will not be connected using the loops themselves.

It's easy to buy everything separately or order a whole set.
Work technology
If you already know, the ring won't be a problem. The principles for creating patterns are the same. The beginning of the product and the slipping of the loops are the same. Some options are created completely similar to bracelets, only of shorter length. Using more complex patterns, you can use a machine to make a whole set of jewelry - a ring and a bracelet with the same decor in the form of flowers.
If you decide to learn how to weave rings from rubber bands, then you want to turn this interesting activity into your hobby. Having mastered the basic methods of weaving, you will be able to develop your own versions of products. Most often, rings are woven with flowers, simple or complex, single-colored or variegated. Jewelry with spiders and those woven simply like bracelets are also popular.
Use your fingers
If you are immediately interested in the question of how to weave a ring from rubber bands without a machine, then know: all the options that are woven on two posts of a machine or slingshot can be made on your fingers. Some schemes are easy to implement, others are possible, but inconvenient. It is worth saying that it is always better to use some kind of device to free your hands. If the work is carried out on a slingshot or machine, you can always postpone it for some period and then complete it. It's more difficult with fingers.
Homemade instrument
If you study instructions on how to weave a ring from rubber bands on a slingshot, but you don’t have one, and it’s very difficult to make such a decoration on your fingers, you should make something like a slingshot with your own hands. To do this, just take two identical sticks, such as felt-tip pens or pencils. Secure them at an angle and place a regular eraser between them. You can fasten the parts, for example, with tape.
How to weave a “Flower” ring from rubber bands (the simplest option)
You can make a five-petal flower in literally two minutes. Use a slingshot or a machine with two posts, although it is quite possible to get by with your own fingers. The sequence of work is as follows:
- Place one rubber band in color #1 on the right horn and twist it three times.
- Place a pair of color #2 rubber bands onto both horns without crossing or twisting.
- From the right horn, hook the element of the first color to the middle between the columns.
- Transfer the second color element (top right double loop) to the left post.
- Repeat the sequence of steps 1 to 4 the required number of times (according to the number of petals), for example five.
- Place another rubber band of color No. 2 on both horns without crossing and use a hook to transfer the elements made on the left column to the center between the horns.
- Place another elastic band of the second color on top of both horns and throw the loops of the lower elastic band over the top behind the slingshot.
- From the right horn, transfer the loop to the left, from the left - to the middle.
- Remove the last loop from the left column and pass through the center of the resulting flower.

All is ready. Place the loop on your finger and wear the ring.
Ring with a bead on a slingshot
In this option, a base is made, and any bead is used as decoration. In the previous diagram, it is assumed that one loop is put on the finger, and the decoration itself is woven. The operating principle used here is called "fishtail". If you have made bracelets this way, making a ring will not be difficult.
So, read how to weave a ring from rubber bands on a slingshot using beads. The sequence of work is as follows:
- Place the first rubber band in the shape of a figure eight on the slingshot.
- Put on another pair of elastic bands without crossing them.
- Throw the loops of the lower elastic through the top to the middle.
- Repeat steps 2 and 3 sequentially until the middle of the ring.
- Thread one elastic band, folded in half, through the prepared bead.
- Place an elastic band with a bead on the slingshot horns and slip the bottom loops over the top to the middle.
- Continue weaving, repeating step 4 until the desired length of the ring.
- Drop the top loops also to the middle.
- Place the remaining top right stitch onto the left post.
- Thread another elastic through the loops on the left post and secure
- Pull out the first loop of the ring and pull the last one through it. Secure the remaining tail of the last elastic band by crocheting it successively through the elements of the ring. Another option is to use a clip to connect the braided strip into a ring.
All is ready. It's time to try it on.

Using the same technology, you can make several other rings, for example, without a bead or with several decorative elements. In the latter option, the main thing is to correctly calculate the number of loops between the beads so that they are located at an equal distance.
We weave a ring with a flower on the machine
Using the technology described below, you can create different types of jewelry. To do this, just change the colors of the rubber bands that form the petals. If you use white rubber bands, you will get a daisy, if you use blue or blue ones, you will get a forget-me-not.

So, read how to weave a ring from rubber bands on a machine. Work like this:
- Prepare the machine. You will need six pins arranged in two rows of three. Take elastic bands of three shades: two for the petals, for example blue and blue, and brown for the middle and base. Place one brown elastic around the perimeter of all six posts.
- Remove the edge of the elastic from the corner post towards the middle and wrap it around the post in a loop. Do the same with the remaining corner posts, and then with the rest. As a result, inside the six columns you should get a rectangular outline.
- Lower the outline.
- Place two blue elastic bands along the diagonals of the rectangle and stretch one across the two central posts.
- Place white elastic bands in the second row in the same pattern.
- For the third row, put on the blue ones in the same way.
- Take another brown elastic band and put it around the perimeter of six posts.
- On each of the six posts, hook the bottom brown elastic to the top, placing it on the post.
- From one middle column, transfer the brown loop to the second central one.
- Also transfer all the other brown loops from the other posts to this one. First, shoot from those farthest in relation to the one you are putting on, then from the neighboring ones. All brown rubber bands end up on one pin.
- Take another brown elastic band and carefully thread the crochet hook through all the other elastic bands of the same color. As a result, you will get two loops, one on the left side of the ring made of all brown elastic bands, the second on the right. Now you can remove the flower from the posts without removing it from the hook. Start working with the corner petals, and remove the middle petals last.

The flower is ready. Now use this element instead of a bead when weaving a bracelet according to the instructions from the previous section.
How to weave a “Spider” ring from rubber bands
Prepare elastic bands in black, gray or two-color, for example, black and transparent. The sequence of work will be as follows:
- First make the blanks for the legs. Take a pair of elastic bands and place the edges on top of each other. Intertwine them by tightening the knot. As a result, you will get a detail that looks like a bow.
- Repeat the previous step with two more pairs of elastic bands.
- We move on to weaving on a slingshot or mini-loom with two posts. Take one rubber band and place it between the tips of the slingshot. This rubber band will be used later.
- Place a second elastic band on the right post and twist it four times.
- Put another elastic band on, but now on both ends, twist it twice.
- Take the hook and throw the elastic band, twisted in four times, over the top of the post to the middle between the two.
- Take the first pair of legs prepared earlier and put the loops of the workpiece on the tops of the slingshot. Lower the parts down, securing them under the roundings of the slingshot to make it more convenient to work further.
- Do the same with the second and third pair of legs.
- Place the next rubber band on both tops of the slingshot, twist twice.
- Throw the first top elastic band on the right column over the top to the middle.
- Throw the very first elastic band left in stock over the left side, through the top to the middle.
- Throw the left side from the top pair of legs over the top to the middle.
- Remove the top loop from the right horn to the left, and move the one that was on the left to the right to the center between the horns.
- Carefully cut all the loops of the legs with scissors.
- Remove the last remaining loop on the left horn onto the hook and tighten the knot tighter.

All is ready. Place the loop on your finger and admire the wonderful spider.
So, you have learned how to weave rings from rubber bands. It's not difficult at all. Choose simple methods first, then, when you master them, move on to working with a machine and weaving more original things.
Jewelry made by yourself is valued much higher than purchased jewelry, as it helps to complement an image in an original way and goes harmoniously with any clothing. Rainbow bracelets from Rainbow Loom have become especially popular today, which can be woven not only by adults, but also by small children. In addition to bracelets, you can make an original ring from rubber bands. In this article you will learn how to weave a ring from Rainbow Loom elastic bands on a loom and on a slingshot.

To weave a beautiful ring with your own hands, you will need a professional three-row machine. Take 5 rubber bands and put them on the columns of the middle row (one rubber band connects two columns). After this, another elastic band is put on so that it captures not two, but three columns. From the edge of the last elastic band, count the third column and place two more elastic bands perpendicularly on the nearby ones. Add more elastic bands to create a square around the last elastic band. Place five more elastic bands from the square to the left, which will grab two adjacent posts.
Weaving rings from rubber bands video
Start weaving on the right side. Hook the bottom elastic band and throw it over the post. Do this not only to the square, but along it too. Now free one middle column in the square. Throw the bottom elastic bands around the square around the perimeter through the posts and go out onto five elastic bands on the left side. Now you need to put a hook on the outer elastic band. After this, you can completely remove all the rubber bands from the machine. The ring is ready!

You can easily weave this ring using a slingshot. First, take one rubber band and wrap it around one end of the slingshot, turning it over three times. After this, take two elastic bands and pull them onto the posts. It turned out that there are a lot of rubber bands on one slingshot; hook the bottom one and throw it over the post. Throw the remaining elastic band over to the other end of the slingshot. Wrap the rubber band around the free end again three times, pick up the bottom one and throw it over the slingshot post. The remaining elastic band is transferred to the other end of the slingshot. You need to do this five times in total.
Useful video: how to weave a ring - a flower from rubber bands without a machine
Then put one rubber band on the slingshot in the usual way and from the left edge (from where all the rubber bands were thrown) begin to throw the rubber bands to the center. You should have one elastic band left at the ends of the slingshot on both sides. Put on the last elastic band, pick up the bottom one and throw it over the top one. What's left is to throw the bottom elastic band over from the left column and the ring is ready!
Rainbow Loom rubber band rings can be made in any color scheme and combined with a rubber band necklace and bracelet. Maybe over time you yourself will be able to figure out how to make a beautiful ring from rubber bands. Also look at the section on our website.
Weaving from rubber bands has won the attention of many needlewomen. Such products are not afraid of water and do not require maintenance. To bring joy to a loved one, all you need to do is purchase some simple details and spend a little time. A rubber band ring is a very popular decoration that does not require much training.


 You can weave a ring using:
- fingers;
- slingshots;
- forks;
- pencil;
- using a special machine.
How to make a ring from rubber bands without using a slingshot or machine? Of course, with the help of your fingers, using rich shades.
Two hands are involved in the work process - the main and auxiliary. For a right-hander, the main one is the right, for left-handers, accordingly, the left. Another suitable item to use would be a hook. With its help it is good to pick up the lower elastic bands. The minimum number of colors is two. If you want to add color, take any number.
The first of the selected rubber bands is put on the finger and twisted in a figure eight. The resulting second loop of the figure eight is put on the other finger. The figure eight is moved down, and an elastic band of a different color is put on top without twisting. The bottom one is removed through the top and left in the center of the stretched elastic band of the second color.
 The next elastic band is put on both fingers simultaneously without twisting. Now a similar action is repeated - the lower elastic band is removed through the top and left in the middle of the second. The colors change alternately.


Continue weaving until the desired length of the chain.
 At the end of the work, you need an S-shaped fastener, which you can make yourself from thin wire. With one end they hook the first loop of the ring, with the other - the last one at the same time by two loops. The formed ring is secured and removed.

Video: Weaving jewelry on a machine
Weaving a ring on a fork
How to weave a ring using improvised means, for example, on a fork? Such an item can be found in any home. The weaving technique is very simple. With this method, two tines of a fork serve as one finger, and two more serve as the second. Put on the elastic in the same way as when braiding on your fingers.
 A hook is very useful with this method. It makes it easier to pry the rubber band and throw them over the teeth of the fork.
 The number of colors is optional. You can quickly tie a ring of the desired length using a fork.
 If you continue further, you will get a bracelet. Connect the ends of the chain in the same way as in the first option.

Weaving rings on a slingshot
Another convenient way is slingshot weaving. In this case, the ring will be more voluminous. The weaving technique is no different from the previous one. The elastic band of the first color is twisted and put on the two protrusions of the slingshot. The next one is put on without twisting.
 The lower one is hooked from both protrusions and transferred to the center of the second.
In this master class I will show you how to weave a ring from rubber bands. Irises are an excellent material for making a wide variety of rings. You can make such a ring very quickly, because it is not at all difficult. You will need rubber bands, a fork machine or your own fingers and a little time.
How to weave a ring from rubber bands

I will show you how to weave a flower ring from rubber bands of 2 colors, but you can experiment and take single-color rubber bands or combine your own colors. Rings also work well from corrugated Rainbow Loom rubber bands.
What you need for weaving:
- 11 rubber bands of the same color for the petals,
- 5 rubber bands for specks,
- fork machine,
- hook.
Take a fork machine (you can fasten 2 pencils if you don’t have a machine). We wind a rubber band onto one clove, twisting it 3 times.

Take 2 rubber bands of a different color and put them on both teeth of the fork.

Using a crochet hook, remove the blue rubber band from the right tine of the fork. The blue rubber band ends up on the red rubber band.

Remove the red rubber band from the right tine of the fork and transfer it to the left tine.

On the left tine of the fork there was one petal from a flower. We need to make 5 of these petals. Let's repeat the previous steps and all 5 petals end up on our left tooth.

We put one rubber band on both tines of the fork. It should be the same color as the petals. I have a red rubber band.

Now remove all the rubber bands from the left tine of the fork with a crochet hook. They find themselves in the middle. The photo shows the fork on one side and the other. Please note that on the other side, 5 petals with specks are already visible.

We have 1 rubber band left on the tines of the fork. We transfer the right rubber band to the left tooth.

We remove the bottom rubber band from the tine of the fork. Remove the remaining rubber band and tighten it well.

All that remains is to slightly move the rubber band, which will be put on the finger, towards the center of the ring. We made such a cute ring made from rubber bands.