Dimensions: S / M / L / XL / XXL
You will need: 4/5/5/6/6 skeins of white Coco (22493) yarn Bergere de France Coton Fifty (50% cotton, 50% acrylic, 140 m / 50 g); 2/2/3/3/3 skeins of white Irise (51777) yarn Bergere de France Lunele (77% metallized polyester, 23% polyester); knitting needles number 4,5.
Knit with double thread: Coton Fifty + Lunele. Prepare skeins in advance so that the color is uniform. Facial surface: faces. R. - persons. n., out. R. - out. P.
Decrease 1 point at a distance of 2 points from the edge: at the end of the row, when 4 points remain on the left knitting needle, tie 1 broach (remove 1 point as individuals., 1 person. And stretch it through the removed loop), 2 persons ., at the beginning of a row to tie 2 persons., 2 p. persons together. and knit a row to the end.
Knitting density. Facial surface: 19 p. And 23 p. \u003d 10 x 10 cm.
Back: dial 86/94/100/110/120 p. using a pre-prepared skein. Knit faces. stitch.
After 27/28/28/29/30 cm (\u003d 62/64/64/68/70 p.) From the dialed edge for the armholes, close on both sides in each 2nd p.: 1 x 3 p., 1 x 2 p., 4 x 1 p. / 1 \u200b\u200bx 3 p., 1 x 2 p., 5 x 1 p. / 1 \u200b\u200bx 3 p., 1 x 2 p., 5 x 1 p. / 1 \u200b\u200bx 3 p ., 2 x 2 p., 6 x 1 p. / 2 x 3 p., 2 x 2 p., 6 x 1 p. \u003d 68/74/80/84/88 p.
After 44/46/48/50/52 cm (\u003d 102/106 / 110/116/120 p.) From the typesetting edge, close on both sides in each 2nd p. 2 x 6 p. And the remaining 44 p. (6 p. For shoulders and 32 p. For neckline cutout) / 1 x 6 p., 1 x 7 p. And the remaining 48 p. (7 p. For shoulders and 34 p. For neckline) / 2 x 7 p. And the remaining 52 p. (8 p. For shoulders and 36 p. For neckline) / 1 x 7 p., 1 x 8 p. And the remaining 54 p. (8 p. each for the shoulders and 38 p. for the neckline) / 2 x 8 p. and the remaining 56 p. (8 p. for the shoulders and 40 p. for the neckline).
Before: dial 86/94/100/110/120 p. using a pre-prepared skein. Knit faces. stitch. After 27/28/28/29/30 cm (\u003d 62/64/64/68/70 p.), Perform armholes, as on the back, at the same time to cut the neck, divide the work into two parts and knit further separately, reducing the edges of the cut at a distance of 2 p. from the edge: in each 4 r. 3 x 1 p., In each 2 r. 13 x 1 p./in each 4th p. 3 x 1 p., In each 2 r. 14 x 1 p./in each 4th p. 4 x 1 p., In every 2 r. 14 x 1 p./in each 4th p. 4 x 1 p., In every 2 r. 15 x 1 p./in each 4th p. 4 x 1 p., In every 2 r. 16 x 1 p.
After 44/46/48/50/52 cm (\u003d 102/106 / 110/116/120 p.) From the typesetting edge for bevels of the shoulders, close on both sides in each 2nd p. 3 x 6 p. / 1 \u200b\u200bx 6 p., 2 x 7 p. / 2 x 7 p., 1 x 8 p. / 1 \u200b\u200bx 7 p., 2 x 8 p. / 3 x 8 p.
Sleeves: dial 47/51/55/59/63 p. using a pre-prepared skein. Knit faces. smooth surface, adding on both sides at a distance of 2 p. from the edge: in every 10th r. 2 x 1 p., In each 8th p. 4 x 1 p./in every 10th p. 3 x 1 p., In each 8th p. 3 x 1 p. / In each 8th p. 7 x 1 p. / In each 8th p. 4 x 1 p., In each 6th p. 4 x 1 p. / In each 8th p. 4 x 1 p., In each 6th p. 4 x 1 p. \u003d 59/63/69/75/79 p.
After 27/28/28/28/28/28 cm (\u003d 62/64/64/64/64 p.) From the dialed edge for the sleeve, close on both sides in each 2nd p.: 1 x 3 p., 2 x 2 p., 9 x 1 p., 2 x 2 p., 1 x 3 p. / 1 \u200b\u200bx 3 p., 3 x 2 p., 7 x 1 p., 3 x 2 p., 1 x 3 p. / 2 x 3 p., 2 x 2 p., 8 x 1 p., 2 x 2 p., 2 x 3 p. / 1 \u200b\u200bx 4 p., 1 x 3 p., 2 x 2 p. , 9 x 1 p., 2 x 2 p., 1 x 3 p., 1 x 4 p. / 1 \u200b\u200bx 4 p., 1 x 3 p., 2 x 2 p., 8 x 1 p., 2 x 2 p., 2 x 3 p., 1 x 4 p.
Close the remaining 13 points. Assembly: connect 18/20/22/23/24 points of the bevels of the shoulders, leaving 32/34/36/38/40 points for the neckline of the back. Stitch sleeves. Make side seams and sleeve seams.
Size: 38/40
You will need:
500 g. Americano green yarn (100% cotton, 120 m / 50 g)
straight knitting needles No. 4
hook number 3
The diagrams of both patterns show only faces. R.
In out. R. knit all the loops according to the pattern, the crochets - out. Loosen from 1 chrome., Repeat the rapport loops, end with loops to the arrow and 1 chrome.
Pattern A: the number of loops is a multiple of 10 + 6 + 2 chrome. Knit according to the scheme 1. Repeat from 1st to 4th p.
Pattern B: the number of loops is a multiple of 20 + 16 + 2 chrome. Knit according to scheme 2. Repeat from the 1st to the 24th p.
Wrong surface: faces. R. - out. n., out. R. faces. P.
Special Reductions: from the left edge knit the sixth and fifth loops from the end of the river. together out., 3 p. out. smooth, chrome .; from the right edge: chrome., 3 p. out. smooth, 2 p. knit together
Knitting density:
patterns A and B: 23, 5 p. and 29 p. \u003d 10x10 cm.
Three Quarter Sleeve Pullover Description
Back:
Dial 118 p. And tie 1 out. R. persons. (this p. is not taken into account in further calculations). Then knit with a pattern A. Through 32, 5 cm \u003d 94 p. from the typesetting edge continue work with pattern B. After 9.5 cm \u003d 28 p. from the end of pattern A, close on both sides for armholes 1 x 10 p. \u003d 98 p. After 27.5 cm \u003d 80 p. from the end of pattern A, close on both sides for bevels of the shoulder 1 x 6 p., then in each 2nd p. 3 x 6 p. Simultaneously with the 1st decrease for shoulder bevels, close the middle 30 p. To cut the neckline and finish both sides separately. To round the neckline, close from the inner edge in every 2 r. 2 x 5 p. After 30 cm \u003d 88 p. from the end of pattern A, all loops should be closed.
Before:
Knit as a back, only with a V-neck. For this, after 12 cm \u003d 34 p. from the end of pattern A, close both middle loops and finish both sides separately. For the bevel of the neckline cut, close from the inner edge 24 x 1 p. In each 2 r., Performing special reductions.
Sleeves:
Dial 58 p. And tie 1 out. R. persons. Then knit with a pattern A. At the same time add on both sides for bevels, starting from the set edge, 6 x 1 p. In each 8th p. and 8 x 1 p. in each 6th p., including added loops in the pattern \u003d 86 p. After 37 cm \u003d 108 p. close all loops from the set edge.
We knit a fashionable sweater with knitting needles with our own hands, and let the winter be warm!
Prices in boutiques for the new collection “bite”, and you go to knit a fashionable sweater yourself? You have come to the address! For you, I have collected many relevant and new models of knitting sweaters with knitting patterns and diagrams. Imagine with the color of yarn, pick up an interesting pattern, and your wardrobe will have a new and unique thing to all friends to envy.
Stylish pullover knitting or crochet
If you work in the office or prefer a classic style in clothes, then a strict restrained pullover (sweater without fasteners and a collar) must be in your wardrobe. Knitted pullovers will never go out of fashion ever, so feel free to knit several pullovers with different patterns and wear things with pleasure for more than one season. On the Hummingbird website you will find many interesting ideas on how to knit a pullover with knitting needles or crochet, with a description in Russian.
I wish you easy eyelets, and enjoy your work with!
A very nice female pullover that will serve you well for more than one cold season. Patterns are standard braids. Therefore, you will not have any difficulties in the process. The glove is long, one-piece, and very comfortable. This is a model for those who do not like the high gate. You can tie a scarf to it, or a stylish snood in European ...
Thin, light, airy, like a flower petal, an openwork blouse “Pink Dreams” will be a wonderful addition to your own hand-made collection of clothes. It is worth paying attention to the used Kiwi yarn. It is completely natural, and contains organic cotton (30%), possum wool (30%) and another 40% merino wool. Such yarn has a lot of advantages. ...
The beautiful Savannah blouse will look stylish with jeans and a full boho-style skirt. It is light, but at the same time, wearing it, you can be sure that you are not afraid of the breeze, and in the evening it will be as comfortable as in the afternoon. The feeling of wearing it ...
So, before us is a difficult, but extremely interesting task. You need to knit a set of a warm pullover and a cute hat decorated with patterns of braids. Raglan pullover has a very original design. Braids organize an interesting transition between the main part and the short sleeve. The pullover itself is very warm. But even if the weather suddenly makes you a surprise, its features ...
Starting to knit similar things, many women make a grand discovery for themselves. They can look fashionable at any time of the year, spending 10-20 times smaller amounts on it and getting clothes that fit perfectly, looks great and does not differ much from what the modern market of stylish clothes offers and ...
Such things require lightness, the ability to pass air well and not to accumulate particles of moisture between the fibers. So you get the best option for a spring-summer elongated pullover that looks equally good with trousers, jeans and a skirt of various styles. The neckline is decorated with a classic braid pattern, knitting which will not cause difficulties even for lovers who don’t ...
Knitting is like a spell. You weave patterns, creating whole worlds, complex, or simple, but always - mysterious and beautiful. This sweater is also a miracle, you will not name. Take a look at how beautiful, delicate, delicate he is. In the center it is decorated with beautiful openwork patterns. They walk along the neckline, dropping down to the elastic. On the sleeves ...
Novice knitters are often afraid to take it on their sleeves. In fact, nothing is impossible in this. This article shows you some simple ways to knit your sleeves yourself using knitting needles.
Let's start with the easiest way to knit a sleeve, which is very convenient for children's models. Such sleeves can always be tied to the desired length. An approximate pattern is given in this photo:
The photo shows that the back and shelf fit like a simple rectangle, without tying out the armhole. After joining the shoulder seams, we collect loops directly from the edge loops along the armhole line: half the sleeve width along the shelf, half along the back. It should be borne in mind that in the set of loops from each edge, two loops are dialed, one for the front wall, the other for the back. If the pattern is very voluminous, then you can alternate the set: from one edge two loops, from the other one. Then the armhole will neither gather nor stretch.
Well, if you are messing around with sleeves there is no desire, and please yourself with a light and warm product.
Learning the correct calculation of rows for reduction
The number of rows for reducing the sleeve width can be calculated by the finished shelf or back. Mentally place the pattern on a shelf or back. The sleeve cuffs will fall on the elastic of the main part. Measure the required length of the sleeve and half its width with a ruler. Now connect the intersection point of these lines to the start of the cuff. You will immediately see how many rows you need to reduce the loop.
Exactly the same calculation will be for knitting from the bottom, from the cuff. Only the loops will need to be dialed, not reduced. So that there are no holes, it is better to knit an additional loop from the loop of the previous row, rather than a crochet.
Knit sleeves using raglan knitting needles
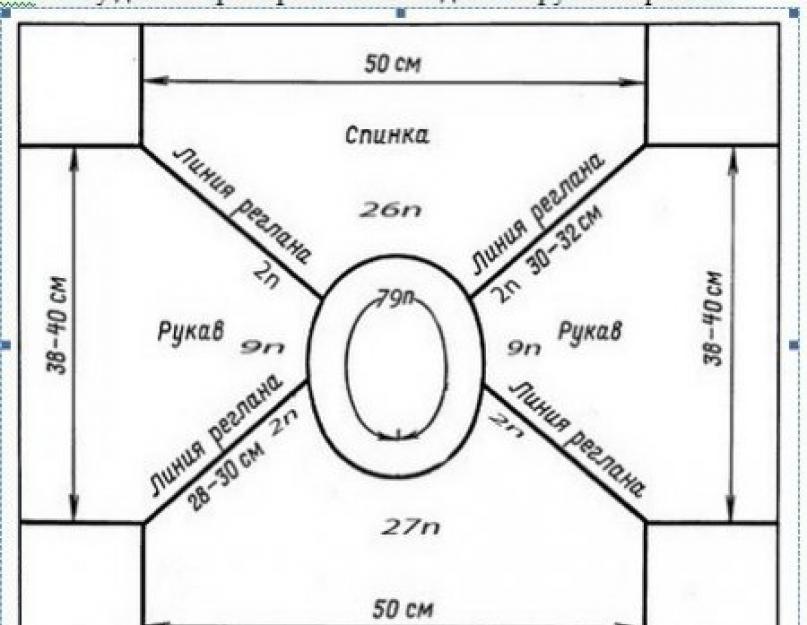
Quite simply, you can tie a raglan sleeve on top. This method allows you to try on the product as it is knitting: the place of armpits, sleeve length, product length. The figure below shows an approximate diagram of a product with a raglan sleeve:

Based on the pattern, calculate the number of loops needed for the neck. If there is no fastener, then you can start knitting on knitting needles for socks. As you add the number of loops, switch to circular ones. If the model has a fastener, then you can knit on straight knitting needles.
Divide the number of loops drawn by 4; a raglan line will pass through these loops. If the knitting of the sleeve is on straight knitting needles, then divide one of the parts even in half under the fastener.

Mark the loops of raglan lines with colored threads or pins so that you do not skip them at the beginning of work. This photo shows very clearly how to knit sleeves with knitting needles from above:

If knitting is circular, then additions are made in each odd row. If knitting is carried out on straight knitting needles, then do the addition in the front rows, knit the wrong rows according to the drawing.
If you want the raglan line to be clearly visible, then always mark the marked loops with the front, and make additions before and after them, as shown in the photo:

The addition of loops can be done both double crochet, and knitting two loops from one. Nakida give holes in the pattern, but the knitted loops keep a flat, smooth canvas. Depending on the selected pattern, you can choose one or another method of adding loops.
Thus knit to the armpit level. Further, the hinges of the sleeve are removed for additional knitting needles or pins. Continue knitting the main parts of the raglan sleeve to the required length.
Such sleeves are used when, because it is a complex and painstaking technique.
Seamless knitting and detailed fabric
There are two ways to continue manufacturing the sleeve: a seamless and unfolded fabric, which is then sewn together.
For seamless knitting, the removed hinges of the sleeve are typed on knitting needles for socks or circular. Mark the loop that will be the reference point for reducing the width of the sleeve. Regardless of the pattern, the thickness of the yarn and knitting needles, the size of the product, there is a general rule for reducing (adding) the width of the sleeve.
For hands of normal thickness and length, reduction (addition) of loops is done in each 6 row. If the hands are full and short - in each 4 rows. With thin and long arms, reduction (addition) of loops is done in each 6-8 row. In children's models, when the required sleeve length is reached, the excess width can simply be collected before knitting the cuff by reducing the loops 2-3 in the last row together. Count how many loops you need for the cuff and how many are left in the row in front of the cuff. Determine the difference of the loops and evenly distribute in a row, calculating how many loops you need to make reductions.
We try to hide the raglan line with our own hands
If you want to know how to hide the raglan line, then we answer - adding loops in the first row is done by knitting three of the marked loop: front, crochet, front. The next row fits into the picture. In the third row, the addition of loops is also made from crocheted double crochet: front, double crochet, front. Thus, the raglan line will always run along the double crochet. The photo below clearly shows that the place of adding loops is almost invisible.

This original method allows you to create the appearance of integrity of the canvas, it is more suitable for openwork patterns, with a large number of yarn. This will hide the raglan line.
This type of sleeve is perfect for even a beginner to knit.
Schemes describing the creation of a curly armhole
And finally, it was the turn of the description of how to knit a sleeve with a curly armhole. Since the article is designed for beginner knitters, for the first products I would advise you to choose models from magazines with a detailed description of the sequence of knitting parts. Once you understand the principle of knitting various lines, you can begin to create your own models.
The good things done by yourself are their originality. Therefore, each model has its own sleeve shape and the calculation of additions-decreases is also its own. But still I will give several ways to knit the okat of the set-in sleeve.
As in the previous methods, the set-in sleeve can be started from above and from below. One of the ways to knit the okat from below is shown in the figure below:

- The principle of expansion of the sleeve remains the same as in previous methods of knitting the sleeve with knitting needles.
- The figures for the sleeve’s circumference show how many loops need to be reduced in each row.
- In the first row of the okata, immediately close (do not knit together!) 4 loops. We knit a row to the end.
- We turn to the wrong side and here we close the same 4 loops.
- In the next row we already knit together 3 loops on each side.
- And so on according to the knitting pattern.
- The designation 1x18 indicates that in the next 18 rows you need to reduce 1 loop.
- In the last, top row, the remaining several loops are closed immediately.
Knitting the original model without using a pattern
If you decide to knit your model without a pattern, then this method of knitting the okat of the set-in sleeve may be suitable.
- In the first row of okat, close 3 loops.
- All reductions are done in the front rows.
- In the 3rd and 5th rows, we reduce 2 loops from each edge, i.e. we knit 3 loops together.
- In the next 12 front rows, we reduce 1 loop each (we knit 2 together).
- Then 2 times 2 loops (3 together), once 3, once 4 loops.
- The remaining loops are closed in one row.
Product Creation shortened rows quickly and easily
If you know how to knit in short rows, then you can use the following method of knitting an okat of a sleeve.
- In the first row we close the same 3-4 loops.
- And each front row does not tie to the end as many loops as indicated in the previous method.
- Those. without tying the desired number of loops to the end of the row, turn the work and go back.
- It is better to write down the reduction scheme, so that in the second sleeve again not to calculate.
- If you have enough threads, it is better to run both sleeves at once in parallel.
It’s a little harder to knit from above, but you don’t have to sew it. Therefore, it is better to watch the master class in the video below.
If you still have not mastered the technique of knitting sleeves, try to do it yourself.
Video for beginners
We hope that things connected independently will please you and your loved ones for a long time.
XS (S, M, L, 1X, 2X, 3X)
Chest: 85 (95, 105, 115, 125, 135, 145) cm
Product length: 60 (60, 63, 64, 65, 66, 68) cm
Materials
Yarn Berroco Elements (51% wool, 49% nylon, 140 m / 50 g) 6 (6, 7, 8, 9, 10, 11) skeins. Knitting needles 4 and 5 mm
Knitting density
18 p x 25 p \u003d 10x10 cm front surface, spokes 5 mm
28 px 32 p \u003d 10x10 cm elastic 2x2, knitting needles 4 mm
Description
Pattern: the number of loops is a multiple of 4 + 2.
1 row: out. P.
2 row: persons. P.
3 row: 2 persons. p. * 2 n., 2 persons. n. *, repeat to the end of the row
4 row: 2 out. p. * 2 persons. n., 2 out. n. *, repeat to the end of the row
Back
On knitting needles 4 mm dial 118 (134, 146, 162, 174, 190, 202) p. Starting with 2 knitting knit 8 cm with a 2x2 elastic. Go to the 5 mm knitting needles. In the next row, evenly reduce 40 (48, 52, 56, 60, 68, 72) p. Next, knit a pattern to a height of 38 (38, 39, 39, 40, 40, 40) cm from the set edge. To form the armholes of the sleeves, reduce from 2 sides in the next 2 rows 5 (5, 6, 6, 7, 7, 8) p. And another 2 p. In the next two rows - 64 (72, 78, 90 , 96, 104, 110) p. Next, make reductions as follows:
Persons. p.: 1 persons. p., 2 p. together, knit to the last 3 p. - remove 1 p. as a face on the right knitting needle, remove one as a face on the right knitting needle, thread the left knitting needle into two removed and take them off, knit both loops together as face for back arches of loops, 1 persons. n .. Wrong side knit according to the drawing. Repeat these 2 rows 4 (7, 6, 10, 11, 13, 13) times - 54 (56, 64, 68, 72, 76, 82) p. Knit the armhole to a height of 19 (19, 20, 21, 21, 22, 24) see. For the formation of shoulder slopes, close on both sides first 2 (2, 3, 4, 5, 5, 6) sts in the next 4 rows, then 1 (2, 4, 4, 4, 6 , 7) p. In the following 2 rows. Move the remaining 44 items to add. knitting needle.
Before
Knit as well as the back. When the height of the armhole of the sleeves is 10 cm, start knitting the neckline as follows: on the left side, knit 14 (16, 18, 20, 22, 24, 26) sts (transfer the remaining loops to an additional spoke) until the height of the armhole of the sleeve is length 16 (16, 17, 18, 18. 20, 21) cm. In the next row, close for the neck 5 p., then close 1 p. 4 times, there will be 5 (7, 10, 12, 14, 16, 19 ) p. Tie up on the armhole height of the sleeve 19 (19, 20, 21, 21, 22, 24) cm. For the shoulder slope, close 2 times for 2 (2, 3, 4, 5, 5, 6) p. and in the next close the remaining 1 (2, 4, 4, 4, 6, 7) p.
For the right side, transfer 40 (40, 46, 48, 50, 52, 54) stitches to working knitting needles (5 mm) and close 31 stitches in the front row, tie the row to the end. In the next row for the neckline, close 4x1 p. 5 (7, 10, 12, 14, 16, 19) p. Tie up the armholes with a height of 19 (19, 20, 21, 21, 22, 24) cm and for the shoulder slope close 2 times in 2 (2, 3, 4, 5, 5, 6) p. and in the next row close the remaining 1 (2, 4, 4, 4, 6, 7) p.
Sleeves
On knitting needles 4 mm, score 70 p., Knit with a 2x2 elastic band to a height of 8 cm. Go to the knitting needles 5 mm and in the next wrong row evenly reduce 24 p. Knit with a 3 cm pattern and then every 5 (3, 2.5, 2, 1, 1 , 1) cm, make an increase on both sides 3 (5, 7, 10, 12, 14, 16) times, knitting the loops from the broach of the bottom row. On the knitting needles 54 (58, 62, 68, 72, 76, 80) p. When the sleeve length is 30 cm for okat on both sides in the next 2 rows close 5 (5, 6, 6, 7, 7, 8) p. and another 2 p. in the next 2 rows. Next, close 1 point in each 4th row 2 (0, 1, 0, 0, 0, 0) times, then in each row 1 point 10 (14, 12, 15, 15, 17, 17) time. In the next 2 rows, close on both sides 2 (2, 2, 3, 4, 4, 3) items. The remaining 12 (12, 16, 16, 16, 16, 20) items should be transferred to add. knitting needle.
Assembly
Sew in front and back, complete all seams and sew in sleeves. For the neck of the knitting needles 4 mm dial 136 p., Knit 1 row out. p. and in the next row close all the loops.


