Absolutely anything can break. Often people encounter such a problem as the formation of a hole in a leather jacket.
Repairing a leather jacket is a painstaking job. If the material is torn apart, then the person is required to have a minimum experience in owning sewing tools. When these skills are absent, it is better to abandon such an undertaking, since you can only make things worse.
What methods of gluing leather items exist and what is required to complete the job?
Methods for repairing leather products
At the present time, there is a huge selection of materials for gluing surfaces.
To glue the product imperceptibly, the glue must have a number of characteristics, these include:
- elasticity;
- good viscosity;
- fast drying;
- heat resistance;
- resistance to water, fats and oils.
Most of all, under these characteristics, the universal glue "Moment" is suitable. In some situations, you can use rubber glue, which is used to repair shoes.
Other materials are used much less frequently: PVA, nairite glue, liquid skin.
What to choose, you need to decide for yourself. But before performing the procedure, you must read the instructions.
The use of glue "Moment"
Often there is a situation where outerwear a piece of material comes off and a hole is formed. It is possible to correct the situation.
How to seal leather jacket at home?

To repair things you will need:
- glue "Moment", which is used for gluing shoes. They call it rubber. It is considered elastic, so it will fit well on the skin;
- a piece of leather or suede. They can be taken from an old and unnecessary glove;
- scissors;
- tassel;
- several pieces of toothpicks;
- solvent. It will help to degrease the glued plane;
- paint for leather products;
- hammer.
You can sew a jacket with glue according to the following scheme:
- First you need to take a patch and fix it on the wrong side of the jacket, providing an approach to the torn part.
- It is better to find a place in the lining where you can tear the fabric and get to the damage.
- Is taken old glove. A small piece is cut out of it and glued to the inside of the damage. We glue the patch, but in order for it to be well fixed, it is necessary to put a heavy object on it, for example, a hammer. It is worth noting that a piece of skin can be any color, as it will not be visible anyway.
- Once the patch dries, you can do the front side. Here it is necessary to select suitable shade shred. It is cut out exactly the same shape as the hole itself. The edges must completely converge with each other. To match them, glue is used for alignment.
- Once everything is glued, the patch needs to be tinted. This will help make it less noticeable. For such purposes, paint for leather products is used.
- The final step is sewing up the lining. The fabric must be sewn with the same threads that were used when making the stitches.
Repairing a cut on a jacket in this way will be difficult for a beginner. Therefore, it is better to choose an easier method.

Repairing a cut on a jacket
A cut on a leather jacket very often appears after a hook on a nail. Many believe that after such an incident, clothes can no longer be repaired.
But how do you fix a hole in a leather jacket? Everything can be fixed with gluing.
If the thing is torn, then the following recommendations should be followed:
- First, outerwear made of leather is turned inside out. Then the lining fabric is carefully examined. This is necessary in order to find the place where the seam was broken.
- After identifying it, you need to cut the stitches, and use your hand to find a cut.
- Now we need to prepare the patch. To keep it well, the rupture area must be degreased with a solvent.
- A piece of leather or suede is selected. Its size should be several centimeters larger than the cut itself.
- WITH inside the edges should be treated with glue. The same composition must be applied to the patch.
- The glue should dry a little. This will take about 10-20 minutes.
- This procedure can be repeated again.
- As soon as the glue dries, the flap is applied to the torn surface. In order for it to be well fixed, it is necessary to press and put a heavy object.
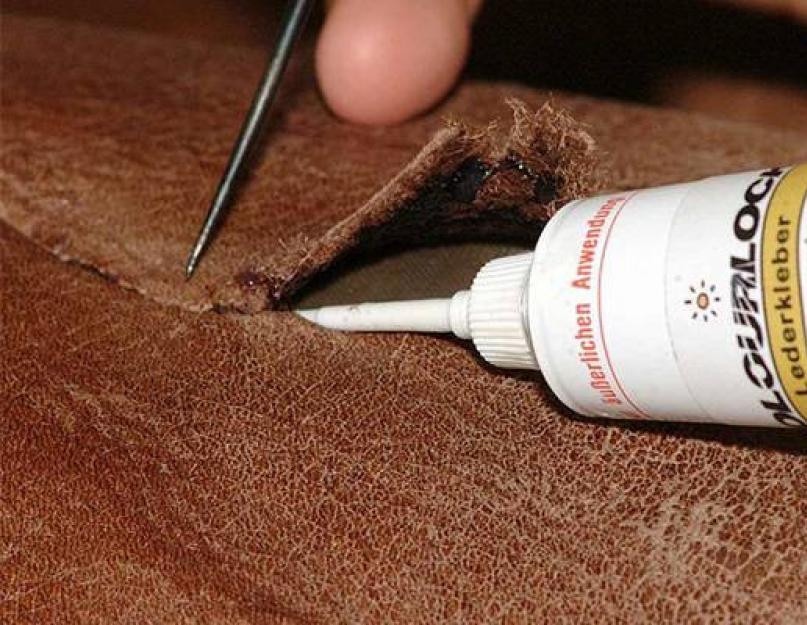
- After two or three minutes, the jacket is turned inside out. The cut edges must be pulled closer to each other. A toothpick lubricated with glue will help with this.
- Once everything is dry, paint can be applied.
- The final step is the careful stitching of the lining.
Don't worry about the hole reappearing. If you use this repair method, then the jacket will no longer tear in this place.

Application of liquid skin
This method is good when there are small cracks on the jacket.
How to glue a leather jacket with your own hands using liquid leather? Do-it-yourself leather jacket repair is done with a bandage and a small spatula.
The second item can be easily made from the old bank card. A strip about one or two centimeters wide is cut out, and then the end is slightly pointed.
The following diagram will help glue the hole:
- A small piece is made from the bandage. It should be slightly larger than torn fabrics.
- On the front side with a homemade spatula, apply liquid skin. A piece of bandage is placed on top and adheres well.
- The area to be glued must dry. This will take about 7-10 minutes. The procedure is repeated again. Only liquid skin is applied to the bandage flap.
- The repaired item must dry completely. This will take two to four hours.
This method allows you to repair a leather jacket yourself. But the problem may arise in the acquisition of liquid skin. The material is not sold in all sewing stores.

Leatherette repair
Manufacturers are currently offering a wide range of jackets that are made of leatherette. They are no worse than leather, but much cheaper.
But how to fix such a thing? You can repair it in exactly the same way.
It is worth noting that not any glue is suitable for repairing such products. If you close the hole with "Super Glue", then this can lead to damage. What to do then? We remove the glued place and repair the jacket in a safer way.
Non-woven tape will help remove damage. This material is very thin, so it will lie unnoticed.
The procedure must be carried out according to the following scheme:
- Locate the hole on the wrong side. Open the lining along the seam and make free access to the damage.
- Glue the non-woven tape to the inside. Place gauze on top. Walk with a hot iron.
- When the material sticks, the gauze can be removed.
- Sew up the lining on the inside with a neat seam.
This method is considered easy and simple. The tape, when exposed to steam, is firmly attached to the surface. Thus, an imperceptible patch will be obtained.
If a person does not know how to sew a jacket, then you can watch training videos. As soon as you repair a thing, you need to let it dry for two to three hours. When gluing, it is worth considering all the recommendations experienced housewives.
Products from natural materials valued for their beauty and consumer qualities. The leather jacket is no exception. However, you need to know how to take care of it, and in case of loss of integrity, return it to its previous appearance. Of course, removing a hole in the skin is not the easiest way to restore, but sometimes you can’t do without it. There is only one thing left - to glue it. At home, a leather jacket, like any other product, can be easily repaired by yourself. To do this, you need a pair of hands, a little imagination, patience and free time.
In our age, gluing any two surfaces is not a problem. Therefore, at home, like suede or leatherette, using glue is also possible. Moment, waterproof PVA or nairite are often used as adhesives. All of them have properties without which repair would be impossible:
- quick drying of the layer;
- plastic;
- resistance to high and low temperatures;
- viscosity;
- resistance to fats and water.
In order to connect leather surfaces, glue from Henkel is most often used. The famous "Moment" can be found in almost any store, but you need to choose the one that says "universal" or "for shoes" on the tube.
The second most popular is waterproof PVA glue. In addition, viscous nairite glue perfectly grasps the surface, and liquid skin allows you to work with the layer for as much as twenty minutes.
When is Moment useful?
You can repair a leather jacket if it is torn. Restoration of a lost skin fragment is effectively carried out using "Moment" for shoes - rubber glue. It has excellent plasticity, and during the operation of the product, the adhesive layer will naturally stretch and shrink along with the base. It's also good to stock up on:
- Solvent. Needed for degreasing treated surfaces.
- Leather or suede patch.
- Small sticks (matches), toothpicks.
- With a brush.
- Skin paint.
- Scissors.
- Small weight or hammer.
The restoration process itself is quite simple. However, it requires some order to be followed. What should you do if your leather jacket is torn?
Working with liquid skin
It is very convenient to work with this material, because it is an alcohol-based polymer substance. The structure is somewhat similar to glue. However, it should be used carefully so that the products are neat.
Subject to certain conditions in work, the polymer layer is completely connected to the restored surface and becomes indistinguishable from it.
The polymeric mass can also be conveniently used if the damage to the leather layer is insignificant, for example, in the event of a cut. To eliminate it, the following materials are needed:
- Small spatula. It should be no more than 1 cm 2 in area. You can make it from an old credit card or a plastic bottle.
- Medical bandage. You will need a small piece of it.
- Jars with liquid skin. If the product being restored has a complex shade, it is possible to mix several colors of the polymer.
 A small part is cut off from the bandage, corresponding to the size of the cut. Using a spatula, a little liquid skin is applied to the surface of the jacket. It is worth noting that the polymer should be smeared exactly along the damaged edges. This should be done carefully, the excess can be removed with a regular sponge for washing dishes.
Then the glued and dried bandage is completely covered with a thin layer of polymer. After drying, the resulting surface will be almost indistinguishable from the outer layer of the jacket. The time for complete drying of the layer is approximately three hours.
There is another method to eliminate the cut. However, it can also be used in the case when a hole has already formed on the product. To do this, you will have to use a leather or suede patch. It is glued on the inside of the jacket, spreading the lining in the right place. Then, a layer of liquid skin is applied to the pasted flap from the wrong side. Let it dry completely and then apply another one. As a result, the scratch will be completely eliminated.
Leatherette repair
 Along with products from genuine leather, similar leatherette products are widely represented on the market. However, artificial leather is not durable and can crack over time, and even simply tear. Repairing it is as easy as patching a hole in a leather jacket. The only difference is that the usual rubber “Moment”, and any other glue, is indispensable here. It can damage the fragile surface of the material and lead the product to an even more deplorable state.
Therefore, as an alternative to glue for leatherette products, it is customary to use non-woven tape, which adheres to the layer under the influence of heat. To repair a hole, crack or scratch, you will need an iron and the following materials:
- non-woven tape;
- liquid skin;
- a piece of cotton fabric or a regular medical bandage.
The lining material of the jacket is ripped in the right place along the seam. Having gained access to the wrong layer of leatherette, a non-woven patch is applied to it, and a layer of fabric is added on top. The fabric is ironed with a hot iron along with non-woven fabric, which from this is connected to the leatherette base. On the front side of the jacket, the patch must be patched with liquid leather in two layers. Each such layer must dry separately.
How to sew a jacket
With your own hands, a leather product can be repaired not only with the help of adhesives, but also with the help of a thread with a needle. This method is suitable for those people who can and know how to work with a sewing machine. So, for work you will need:
- glue;
- leather and fabric shreds;
- skin needle;
- threads to match the jacket.

 If the jacket is torn through and through, then in order to prevent the edges of the hole from spreading even more during its operation, you need to glue a piece of plaster on the wrong side. It will hold the edges together and keep them from fraying.
Then, if the damage is significant and it is impractical to use a combination of glue with liquid leather for repair, you need to get a sewing machine, prepare a leather patch to match the jacket.
The skin flap should be similar in shape to the area of the tear, but be slightly larger. The patch is sewn on a typewriter directly on the front side of the product or from the inside. In the first case, it is recommended to use a "zigzag" seam, and in the second - a "line".
In some situations, it is worth "beating" the patch so that it becomes a kind of decoration for the product. To enhance this effect, you can cut another hole in the skin and sew it up in the same way as the first hole.
Read about how to put a patch on a bologna jacket
Read about how to put a patch on a bologna jacket
07.02.2018 3 5 450 views
The leather jacket has become a part of everyone's wardrobe. These things are loved for durability, practicality. At the same time, they emphasize individual style. But sometimes missteps happen and clothes are torn. Consider how to seal a leather jacket at home?
Experts will skillfully cope with this task. But it is not always possible to contact the studio. If the hostess does not have a minimum experience, the patch will not be as accurate. In doing so, the process will provide knowledge that can be applied to other products. Gluing the skin on a jacket is not very difficult, if you follow the algorithm step by step and be careful, anyone can do it.
Why can leather on a jacket tear?
The error occurs in different reasons- a hook for a nail, inaccurately putting a hand in a pocket. The most common types of damage are:
- tearing out a piece of skin;
- break in the form of an angle.
Based on this, the ways of repairing things differ. A qualitative result will be obtained if these factors are taken into account.
What tools and tools are needed to repair?

You will need the following tools:
- toothpick;
- a piece of leather for the patch and backing (you can use an old glove);
- glue;
- scissors;
- hammer or heavy object;
- brush;
- dye;
- solvent for degreasing.
If the tear occurs in the form of an angle, the fabric often remains on the jacket. When pulling out completely, you need to choose a small piece with a similar texture, thickness and the same size. If you manage to save the material that has come off, the task is simplified.
In the absence of suede and leather, you can use a dense fabric. It should be noted that it will be more difficult to glue it.
Gluing the skin with superglue and certain types of "Moment" is not worth it, since when they harden they become hard. Best to apply it classic version(rubber, for shoes), as it has the necessary plasticity after drying.
How to seal a hole in a leather jacket?

step by step algorithm do-it-yourself repairs:
- Glue a patch inside the product so that the torn area is accessible from the inside.
- Find an area where you can rip the material a little and get to the hole.
- Cut a piece out of the glove, glue it inside over the gap, put a heavy object on top. You can choose any color for the patch, as it will be noticeable.
- After the patch has dried, you need to process the front side. It is advisable to choose a shade to match the jacket, but you can apply paint. The shape of the piece of leather should be identical. For the best result, it is worth pouring a small amount of glue and pulling the edges.
- Wait until it dries completely, apply skin paint to the patch.
- Sew up the lining.
Liquid skin can also be used to treat a cut. Thanks to this method, it will be almost invisible. Action algorithm:
- Cut a piece from a medical bandage slightly larger than the hole (a few mm).
- Apply liquid skin to the front part of the injury with a spatula, press the bandage firmly. It will need to be pulled all over, applying the product in a small amount.
- Wait 10 minutes, then make another layer.
- Hold for 3 hours until dry. After this period, the cut will become invisible.
Things from faux leather done in similar ways. In this case, you need to approach responsibly the choice of glue. "Superglue" is not suitable for leatherette, as it risks new damage due to surface corrosion. It is best to use non-woven tape.
Step by step algorithm:
- attach a cobweb inside the jacket;
- put a gauze bandage in the upper part;
- treat with an iron.
Because of the steam, the interlining straightens out, sticks to the material. A patch is formed, which is almost impossible to see.
corner break
Often, when clinging a nail and pulling the hand sharply, a cut is formed. You can very carefully seal the gap so that no one will notice. The process should take place on a carefully lit surface. It is important that there is enough free space. Step-by-step algorithm of actions if the leather jacket is torn with a corner:
- Turn the thing inside out, carefully examine the lining. Find the area where the outer seam is located.
- After ripping and using your fingers to find a hole inside the product.
- For a good fixing of the patch, carry out the degreasing procedure with a solvent.
- Prepare a piece of leather or suede a few cm larger than the hole.
- Apply glue to the inside around the cut and to the patch.
- Wait until completely dry (approximately 20 minutes).
- Repeat the action again.
- Attach a piece of skin to the area with the applied “Moment”, press.
- Turn on the front surface, pull the edges of the cut as close as possible, use a toothpick to lubricate with glue.
- Align the part of the jacket with the patch on the surface of the table, put a heavy object on top, wait 24 hours.
- Apply paint after Moment has completely dried.
- Sew up the lining with the utmost care.
If everything is done according to the algorithm and carefully, there will be no more tearing in this area.
It is important to check that the adhesive has dried well before applying the next layer. Otherwise, the connection quality will be much worse.
Breaking off a whole piece
To seal a torn leather jacket, you can use the following method:
- Carefully use tweezers to insert the torn piece into the hole and attach the adhesive tape.
- Turn the thing inside out, get to the gap with your fingers, after opening the stitched-out seam on the sleeve. Put the jacket on the illuminated surface of the table, apply a degreasing solvent to the hole.
- Attach the patch not to the joint, but to a piece of skin.
- While the glue has not dried, it is possible to move the fabric. Carefully unscrew the thing, remove the adhesive tape. Fix the patch with your hands, press hard, wait until dry.
- Repair lining.
To sew the material, it is better to use a special needle for leather things. When using a standard needle and sewing machine, there is a risk of damage to the device and garment. Excess glue must be removed with a dry cloth - it is forbidden to wet it, as this can lead to the fact that additional seams will disperse, it will be necessary to apply another layer. In this case, the thing will look sloppy.
Restoration of a jacket is a painstaking process, almost a jeweler's. On the network you can find both photos and videos detailing how to fix a leather jacket yourself. But the recommendations are not always feasible - either special equipment or skills in working with specific material are required. If you decide to take on the repair of leather goods with your own hands, check out the following important tips. They will help you successfully solve this problem.
How to fix the gap with your own hands
It is believed that leather is a fairly durable material, but it can also tear. Although, of course, holes on such products appear less frequently than on fabric and canvas ones. If this has already happened, then the instructions for bringing the jacket into proper shape depend mainly on what form the damage has formed. There are situations when the material is torn in a “corner”, and such when a piece of skin flies off completely.
In the first case, the sequence of actions is as follows:
- Provide access to the tear from the inside of the leather. It is necessary to open the lining of the jacket along one of the seams.
- Gently, as far as possible, smooth out the torn off corner. Now you need to fit it back and fix it with tape with front side.
- We glue a patch made of leather, dense fabric or suede from the inside. We make sure that the lining is more space gap and stood for each of its edges by 10-15 mm.
- Having smoothed the surface from the inside, we install something heavy on the front side. Leave the load until the patch is completely dry.
- We take off the tape. We apply a thin layer of glue along the entire joint of the gap from the outside (for this it is convenient to use the tip of a toothpick).
- We mask the damaged area with a special paint for the skin to match the product or a regular cream.
- Sew up the inner lining.
Important: Please note that the tape you take is initially very sticky. It can leave marks on the surface of the jacket. It is better to "weaken" it. To do this, glue it to the surface of your leg, peel it off, and then use it for its intended purpose.


In a situation where the hole on the jacket is obvious, and the piece of material is completely torn out, the repair of the product is somewhat different.
- We rip the lining from the inside in order to get to the place where the skin was torn.
- We level the damaged area as much as possible, glue the patch from the inside, and place a load on it.
- After the glue has completely dried, we repair the front of the product. If the “native” torn piece is lost, you need to cut another one from a piece of leather, which, in terms of characteristics, is as similar as possible to the material of the jacket. We make sure that it is identical to the shape of the hole. We put this piece in the hole.
- The resulting joint is carefully filled with glue around the entire perimeter of the outer patch.
- After everything dries, paint over the damaged area. Sew up the ripped lining.
If the gap is large and in plain sight, then fixing it with your own hands will be quite problematic. It is better to contact the studio for help from qualified craftsmen. If the skin area is to be replaced, specialists will be able to select the most suitable flap and carefully stitch it in the right place.
Advice: alternatively, you can seal the jacket yourself and apply leather patches. Special attention should be given to masking the damage. For example, you can install additional decor in this place. This approach will not only hide the traces of the gap, but also give the jacket originality.


How to sew up holes and cuts
In order to stitch the product, you will need a sewing machine, a special strong needle, a prepared leather patch and threads that match the color. This largely determines how carefully you can deal with the elimination of defects on the jacket at home.
Restoration of a leather web consists of several steps:
- We get to the place of the gap from the inside of the jacket (to do this, we unzip the lining).
- We cut the edges of the hole, making them as even and smooth as possible. We prepare a fabric patch, which we apply in this place. We take into account that the flap should protrude beyond the edges of the "wound" by 1.5-2 cm.
- A piece of skin, which is slightly larger than the damaged area, is applied from the outside. We make sure that both patches are exactly located in relation to the hole.
- Using a sewing machine, attach the patches.
Important: make sure that the needle is strong enough and suitable for working with the skin. Otherwise, you can not only ruin the jacket, but also damage the sewing machine.


How to fix a collar
If this section of the web is torn, then damage can be repaired using any of the previously described methods.
The owners note that one of the most common problems with which they encounter - the appearance of traces of greasy on the collar. This happens if the product is worn for a long time and is not cleaned in time. There is a way to deal with this problem:
- Areas of skin that have lost their attractive appearance, processed with gasoline. Let the material dry and check the result. If necessary, repeat this manipulation several times.
- After removing all traces of fat, a special paint will restore the original color of the skin. Using a sponge, carefully paint over the collar. We make sure that the agent lies evenly over the entire treated area.
Remember that at home there is always a risk of spoiling the product with inaccurate actions. To prevent this, test the described method in an inconspicuous place. And only then feel free to get to work, restoring the proper appearance of the collar.
The question remains: if the skin on the jacket is cracked in this area, what should I do? To eliminate such defects, it is advisable to use special dyes that are suitable in color. In this case, it is better not to use those that are available in the form of sprays. Such funds are usually sprayed from a distance of 30-40 cm, due to which the coloring matter goes beyond the collar and enters a larger area.


Liquid Skin Repair
Today, there is a wide range of products on the market that greatly facilitate the repair process. Particular attention should be paid to such a tool as liquid skin. It allows you to quickly and easily eliminate diverse damage to the main fabric, pockets, collar and cuffs.
Important: before working with this tool, the damaged area must be cleaned of dirt, degreased and dried thoroughly. Otherwise, the actions taken to restore the product may be ineffective.
By choosing liquid leather to match the jacket, you can cope with both deep scratches and through cuts. The only difference in the repair is that in the second case, from the inside it will be necessary to glue a piece of fabric or leather that completely covers the incision. Otherwise, everything is simple:
- Apply 1-2 coats (depending on the depth of damage) to the edges of the scratch. Make sure that liquid skin does not fall outside the cut. If this happens, remove the excess with a dry sponge.
- Before the mixture begins to dry out, blot the damaged area with a clean cloth. This will somewhat eliminate the differences in the textures of the surfaces of the jacket and the applied product.
Carefully follow the instructions for using liquid leather and repair outerwear at home without resorting to the services of professionals.


How to glue Moment
It is very important to be able to choose the best means for the restoration of a damaged leather jacket. The right decision would be to stop at Moment rubber adhesive for shoes. The main advantage of this tool is its plasticity (the rest harden strongly when dried). detailed instructions for installing patches using glue is described above.
How to repair a leatherette jacket
Leatherette is a rather difficult material to repair. Therefore, if damage is detected, it is better to transfer the thing to specialists for restoration. They will be able to eliminate defects, successfully mask the place of repair and even replace the eco-leather section if necessary.
Of course, it is not always possible to take the product to the studio and you have to think about repairing it yourself. Find out which repair tools are appropriate for each specific situation. So, if cracked, what to do - the question is always relevant.


When the scratches are shallow and shallow, then good decision problems will be the use of an aerosol bottle with a dye. The main thing is to choose a tone identical to the product. And then, following the instructions on the bottle, it will not be difficult to give the jacket a fresh look and mask the damaged area.
Important: spray it from a safe distance (minimum 30 cm) and apply in a thin layer. This will help prevent the formation of streaks on the canvas.
For more noticeable scratches, it is better to use dyes that penetrate deeper into artificial material. Such substances with pigments are applied to the jacket with a soft sponge or a special brush and evenly distributed over the surface. After 30-40 minutes, the paint layer dries, and the jacket regains its attractive appearance.
If punctures or deep cuts form on the canvas, you can deal with them yourself by applying liquid skin. The instructions for its use in this case are similar to those described above for the restoration of leather products.


How to restore a worn jacket
Excessive use or failure to wash with harsh detergents may cause the leather jacket to peel off. If the damaged areas are small and not in the most visible places, special dyes can be used to mask them. Having managed to choose the most suitable color, you can hide the defects that have appeared and extend the life of the leather product.
A shabby area can be masked by gluing decorative elements on top that match the style of the jacket. Such modernization not only restores a pleasant appearance, but also improves it, making it unique.
Advice: it is better to avoid washing the jacket at home. Regular dry cleaning carefully removes diverse contamination, while maintaining a presentable appearance of the leather product.
Using the above tips and tricks, you can ensure high-quality care for your outerwear. If the leather jacket is worn or cracked, you now know what to do. The main thing is to notice the defect in time, react and apply the right remedy.
Rate the article
Yes! Gotta fix it
cook necessary materials and tools:
- Glue for working with leather and fabric. Use "Moment" or any shoe glue. About which composition is better and will suit you for the price, read our special article. "The Best Shoe Glue".
- A piece of thin leather or suede. Choose a material in the same color as your favorite product. The size of the patch should be larger than the torn area or cut by 2 centimeters on each side.
If you have torn the material with a corner, then follow the following workflow to repair a leather jacket.
- Turn your leather jacket inside out.
- On the lining of one of the sleeves, find the overstitched seam and open it.
- Lay the jacket on a flat, well-lit surface (such as a kitchen table).
- Put your hand inside, get to the place of the gap from the wrong side.
Treat the torn area well with a solvent to degrease.
Prepare a piece of leather or fabric patch. The size of the patch should be 1.5-2 cm larger than the area of the gap on each side.
- Coat the surface of the patch with glue.
- Walk with a brush or cotton swab with glue around the break.
- Do not lubricate the gap itself.
- Let the glue dry for 20-30 minutes (see the instructions for using the glue).
- Apply another thin layer of glue.
- Wait until dry.
- Gently glue one side of the gap.
- Align the edges and glue the patch over the cut completely.
- Press firmly on the junction of the torn area.
- Turn the jacket inside out.
- Bend the skin along the tear line so that the junction of the edges separates.
- Using the tip of a toothpick, gently apply a little glue between the edges of the gap.
- Move them tighter.
- Lay out the jacket on the table.
- Press down the glued place with a load for a day.
If necessary, touch up the bonding line with cream paint. suitable color.
Step 10
Sew up the lining.
If you rip out a piece of leather, then follow the instructions below to easily seal a leather jacket at home with your own hands.
Your actions:
- Using tweezers, carefully insert the torn piece into the hole and seal with tape.
- Turn the jacket inside out and get to the rip from the wrong side, as in the previous case (steps 1, 2, 3).
- Glue the prepared piece of fabric not on the joint, but on a piece of skin.
- As long as the fabric has not stuck, it can be moved, so carefully turn the jacket inside out and remove the tape. Use your fingers to straighten the patch, press it down, and let it dry.
- Sew up the lining.
If you decide to repair the product yourself, then you should take into account the fact that the work is scrupulous, you need to do it very carefully. Depending on the chosen method, you may need the following inventory.
- Convenient workplace;
- Glue that is designed to work with leather;
- Surface degreasing solution - you can use a nail polish remover without acetone;
- Toothpicks;
- Bristle brush;
- Threads in color;
- Needle;
- Wide tape;
- Paint for working with leather;
- Gloves;
- Patch.
To date, there are the following ways to repair leather products with your own hands:
- Sealing. In this embodiment, the damage is sealed with a special glue. At the same time, the wrong side is also glued in order to “strengthen” the place of damage.
- Sewing patches. Here, due to mechanical damage, the hole is sutured with a patch. The disadvantage of this method is its complexity and the future appearance of the product, since the repaired area cannot be hidden.
- Complete replacement of the damaged area. This is a very complex method, which is used if the damage cannot be repaired using the first two methods. Therefore, if you do not have basic sewing skills, then it is better for you to seek help from a professional.
Getting started, it is very important to consider the location and shape of the damage. The most common are the “angular” incision, and when a piece of skin is completely torn out.
How to fix a gap in the form of a corner?
- Turn the jacket inside out.
- Carefully undo the seam that is located at the junction of the sleeve with the product.
- Treat the gap with a degreasing solution on both sides.
- Aligning the edges of the gap, glue a piece of adhesive tape on the front side.
- Prepare a patch of the required size, use glue to attach it to the wrong side at the gap.
- Leave the product for 30-40 minutes to dry the glue.
- On the front side, the gap should be bent along the edges of the hole.
- Gently apply glue to the joint with a toothpick.
- Level the surface and press down with a load. Leave for a day.
What to do if a piece of skin is torn out?
In order to close a hole in a leather jacket, you need to do the following:
- Using tweezers, carefully insert the torn piece of leather into place, fix it with tape.
- Turn the product inside out, get to the place of the gap in the same way as in the previous method (point 1, 2, 3).
- The prepared piece of fabric must be glued directly onto a piece of leather.
- Remove the tape from the front of the product.
- Leave the product for a while so that the glue seizes and dries.
- Sew up the lining.
Repairing with liquid skin
Today, in addition to the standard methods of repairing leather products, there are also new methods, for example, the use of liquid leather. Its main advantage is ease of use.
In order to repair a cut on a leather jacket with liquid leather, you need to clean and degrease the product. The following work steps depend entirely on the shape and size of the damage:
- Small cuts. To do this, you need to apply a small layer of the mixture on the edges of the torn hole. This should be done very carefully so that the agent does not go beyond the boundaries of the damage. Gently blot the mixture with a sponge to complete the look and texture of the damaged skin area.
- Through cuts. In this case, you first need to place the patch from the inside. In this way, you will avoid deformation of the material during operation. After the patch is glued, then apply 2-3 thin layers of the mixture on top of it, add texture with a sponge.
- Cuts with jagged edges. If the edges of the damage are uneven, then they need to be leveled with a blade. Next - from the inside it is necessary to glue a patch, after which several layers of liquid skin are applied.
Should I sew up a hole in a leather jacket?
If the hole is not small and looks more like a hole, then in this case it needs to be sewn up.
In order to sew a leather jacket with your own hands, you need to do the following:
- Rip the lining at the seam.
- Trim the edges of the hole so that they become even.
- Apply the patch on the wrong side of the product.
- From the outside, apply the second patch.
- Sew patches to the product.
The repair algorithm for leatherette products is similar to genuine leather. The only difference is that when gluing, you need to choose a special glue that will match the material. This is very important point, since the adhesive mixture and leatherette are products of inorganic production. Therefore, an incorrectly selected tool can not only not help, but also significantly spoil the product.
To do a good job, you will need the following:
- Glue. The main thing is not to use Superglue, or the work will have to be done again.
- Sharp scissors.
- A patch on a leather jacket of a suitable color and size (should be 1-2 cm larger than the hole).
- Solvent suitable for degreasing the material.
- Toothpicks.
- Hard bristle brush.
- Cream paint for leather (or suede) products.
We told you how to glue the skin on the jacket. This means that you can quickly and effectively solve the problem of cuts on the product if they occur. Most importantly, carefully read our tips, which will make the defect invisible!
- Tools
- Method 1
- Method 2
How to carefully seal a cut or hole on a leather jacket with your own hands at home? – useful tips and step-by-step instructions with video
However, even such a thing is easy to spoil by negligence. It is enough to accidentally catch on a carnation or inaccurately put your hand in your pocket - and a hole of different sizes may appear on a leather product. At the same time, such absurdity can happen even with a new jacket.
Do not throw it away because of one flaw.
Leather clothes are very easy to mend. In this case, the torn place can be sealed by contacting a professional studio for this or relying on your own strength. In this article and in the video, we will consider the latter option and tell you how to repair a leather product with your own hands.
Sealing a leather jacket at home
In order to completely seal a torn leather jacket at home, you need to prepare high-quality glue. In this case, the classic "Moment" is well suited, since it remains plastic even after drying. You can also use any shoe glue to repair the leather.
Such tools also have the necessary characteristics. But superglue or PVA for sealing a cut or hole on a leather product is not recommended. This is due to the fact that the first substance hardens quickly enough, which causes inconvenience during operation.
PVA glue leaves behind a noticeable white film, which as a result spoils the appearance of the jacket.
Before we tell you how to seal a leather jacket at home, we suggest understanding how it can be damaged in general.
In fact, the item of clothing described can be torn in any way, but most often the tears look like a torn corner or a completely torn piece of skin. In these two situations, as a rule, apply different methods jacket patches. We propose to consider them in more detail.
Situation one. Before you lies a leather jacket, on which there is a gap in the form of a corner (see photo). So that this damaged area becomes invisible, and the leather product again has good view, repair the thing with your own hands according to the below step by step instructions.
- Turn the torn jacket inside out. We find a seam on one of the sleeves and unzip it. We lay out the leather product on a plane and through the ripped area we reach with our hand to the torn place, which we treat with any degreasing agent.
- Then we prepare a piece of leather, which will later act as a patch for the jacket. Attention! The patch should be slightly larger than the gap itself. When the material is prepared, grease one side with glue. Also brush it around the torn corner. There is no need to apply glue to the cut itself. After that, the adhesive must dry out, so at this stage we leave it for twenty or thirty minutes. After the specified time, the procedure with the application of glue is repeated and we wait a few more minutes.
- When the layer of adhesive sets, you need to glue one edge of the torn area, and then connect it to the other side of the gap and apply a patch over the resulting layers.
- Next, we press the glued place well, turn the jacket inside out, bend the repaired section of the thing so that it does not stick out during the drying process. In order for the patch to be less noticeable, its edges must be additionally treated with glue using a toothpick.
- We straighten the sealed jacket on a flat surface, press it down with a previously prepared heavy object and leave it for twenty-four hours. If necessary, the glued area can be painted with paint of the desired color.
- The next day, the leather product will be restored and ready for use again. The only thing that remains to be done is to sew up the ripped sleeve from the wrong side.
Situation two. If the jacket is completely missing a piece of skin. In this case, the thing can also be saved at home with the help of improvised materials. In addition to the basic set of tools mentioned at the beginning of the section, you will also need to prepare tweezers and tape.
To carefully hide a hole in a leather jacket, take tweezers and use it to attach a torn piece of skin to the torn area, which then immediately fix with tape.
Then turn the product on the wrong side, spread the sleeve and through it get to the damaged area, on which glue the fabric patch. After that, return the jacket to its previous state, remove the adhesive tape, and correct the patch and leave to dry.
Today, “liquid” leather is often used to repair leather products. With the help of this gel-like product, it is very easy to hide many imperfections, including cuts on the described material. In use, such a substance is practical and convenient.
First, “liquid” skin is applied to the damaged area on the front side, a patch cut from a conventional medical bandage is applied over it. Then the fabric layer is leveled and lightly lubricated with a liquid agent.
Note! If a jacket made of leatherette (leatherette) is torn, it is recommended to use non-woven tape to repair it. It is attached to the material with an iron.
In order to glue a torn leather jacket with your own hands as efficiently and beautifully as possible, consider the following: helpful tips and recommendations.
- Test the adhesive tape on an inconspicuous area of the leather before sticking it to a leather item. If everything is in order with stickiness, you can safely use the material at hand for its intended purpose.
- While repairing a jacket, it is undesirable to be distracted, so it is better to learn the above instructions by heart.
- Under no circumstances should the first layer of adhesive be allowed to dry completely, as this usually causes difficulties when applying the second adhesive layer.
- For sleeves, use a needle specially designed for leather. Ordinary needles can ruin a thing and even break a sewing machine.
- If you're worried that the homemade patch will somehow stand out from the background of the jacket, you can make a few extra patches in other places. So you will not only repair the jacket, but also decorate it artistically.
- Try to apply glue only within the cut or gap. If the adhesive gets outside the desired area, immediately remove it with a dry cloth. Never spray your jacket with water.
In the event that you doubt your abilities and are afraid to completely ruin the leather item, do not save on money and seek help from specialists.
Having repaired the jacket in this way once, you will no longer worry about your leather wardrobe, because you can already carefully repair it yourself at any time.
Before using adhesive tape on a damaged area, you need to make sure that it is sticky in an invisible area. Otherwise, there is a chance that the adhesive tape will only remove the top layer on the leather jacket.
In order to sew up a leather jacket, you need to use a special needle for leather, otherwise you can damage the product and the sewing machine.
If the patch made stands out and spoils the appearance of the product, then you can use your design skills and decorate the jacket by sewing on several additional leather elements.
If drops of glue get on a leather jacket, you need to carefully remove them with a dry cloth, but in no case should you wet the surface itself.
Also interesting: how to clean a cat's ears
How to restore leather goods
The most common types of damage are:
- "Corner" break
- A piece of skin was torn off.
Step 10
Sew up the lining.
If it so happened that you accidentally broke the product, do not be nervous - act decisively by carefully studying our article before doing the work.
The first thing to do is to buy a regular band-aid, you can even use it in tape, so as not to waste money. Seal the cut with a piece of plaster from the inside. This will avoid further spreading of the fabric, which is especially important if you do not have the opportunity to work on the restoration of the product right now.
Alas, even the highest quality genuine leather products lose their appearance. If you really love your autumn jacket or boots, heed our following recommendations for restoring the appearance of products made from this material.
So, to restore the elasticity of the material, treat it with glycerin or boiled warm milk. To refresh the product, a soapy solution with the addition of ammonia is suitable, then wipe the surface of the material with petroleum jelly. If your jacket is wet and you hang it up to dry, then treat the skin with a mixture of 1 egg white and 50 ml of castor oil - just whisk the ingredients and apply the composition to the jacket.
Leather is an elastic material, and therefore it often happens that your favorite jacket begins to stretch over time. To solve this problem, you will need wax - first wax the jacket, then immerse it in a basin of warm water for a couple of minutes. Finally, dry the product on a flat surface.
Leather is also great at absorbing odors. Vinegar will help you here - soak a sponge in it and walk through the material. Grease stains can be removed with a mixture of refined gasoline and flour.
Without a minimum amount of experience in mending a leather jacket, your patch may look a little less neat than a tailor's, but doing your own patching will not only save you money, it will also give you the knowledge you can use to mend other leather items. .
Tools
For both methods of repairing a jacket with your own hands, you do not need anything special: leather for a patch and for a backing, glue and a toothpick.
- If a piece of leather is torn at an angle, the patch material usually stays in place. If the piece is completely torn out, then you will have to pick up a small piece of similar thickness and texture, equal in area to the hole formed, unless, of course, the piece that has come off is not preserved.
- For the substrate, you can use not only leather and suede, but also dense fabric, although the latter sticks worse.
- It will not work to glue a leather jacket with any glue: super glue and some variations of Moment harden when solidified. Use the classic "Moment": it has sufficient plasticity after drying.
Method 1
The first method of gluing the jacket with your own hands is more suitable if you need to repair the gap in the corner, however, in it you will need to add a small piece of adhesive tape to the tools.
- In order to repair the jacket at home, we need access to the gap not only from the front, but also from the wrong side, which means that we will have to break the integrity of the lining. You can rip it along the seam in any convenient place, but it is best to do it along the sleeve in the place where the factory outer seam is located.
- So, for starters, we fix the gap on the front side with adhesive tape so that the torn piece fits back as neatly as possible.
Very sticky tape can leave marks when removed, so stick it to your hand before the tear is sealed to loosen the stickiness a bit.
- Now from the inside we glue a patch of fabric, leather or suede according to the instructions for the glue. It is important to spread the material as evenly as possible so that wrinkles do not form at the time of gluing. Despite the fact that when gluing "Moment" it is important to apply force, not time, place a load on the already glued area to avoid deformation and smooth the area as much as possible. By the way, the patch should extend at least 1 cm beyond the edges of the gap in order to completely close the hole.
- When the patch is completely dry, remove the tape and use a toothpick to apply glue along the junction of the torn area. Glue will require very little: all excess must be removed with a cloth before drying.
- The last step in repairing the jacket with your own hands will be tinting the patch with liquid leather, special paint, or at least an ordinary skin cream to match the product.
Method 2
You can also repair the jacket with your own hands using another tactic: first close the hole from the inside, and only then glue it on the front side. The second method is more suitable for repairing a jacket with a completely torn piece of leather.
- Provide access to the gap from the inside in advance, as in the first method.
- Glue the patch from the inside in the same way as in the first method, pressing the gap with something heavy.
- After the inner patch has completely dried, repair the front side by gluing the outer piece of leather. The most difficult step will be cutting out a piece of skin that is as similar as possible to the outline of a hole. It is important that the piece should not go beyond the edges of the gap, but at the same time, places where the edges do not fit tightly can be filled with a small amount of glue.
The inner patch can be any color, and even for the front patch you can use a piece of a different color if you paint over it with paint or liquid leather. But if you are going to use only cream, then the color of the outer patch should be selected as close as possible to the color of the jacket.
- When the outer patch has dried, you can start painting the repaired area.
These methods differ only in the sequence of actions and will have the same neat result if you approach the repair process with patience and accuracy, which will make the patch almost invisible. And yes, don't forget to sew up the lining!
It is very difficult to tear a thick and rough leather jacket. However, the soft and thin leather that a light jacket or spring jacket is made of can be torn.
If you find a hole or a cut in a leather jacket, first of all, cover the place of the gap from the inside with a band-aid. Then the material will not spread further, and after that you can begin to restore the product at a convenient time for you. In this article, we will learn how to seal a leather jacket at home.
When can I sew a leather jacket
If the hole is large and resembles a torn piece of leather, it is better to sew up the jacket using a sewing machine. To do this, you need to turn the product on the wrong side and open the lining at the seam, then carefully and evenly cut the edges of the hole.
Pick up two pieces of fabric. One will be located on the inside and at the same time should go beyond the edges of the hole by two to three centimeters. For the outer side, choose an identical piece of fabric made of natural or artificial leather or eco-leather that matches the color of the jacket and the size of the cut.
We apply a fabric piece from the inside, a leather piece from the outside and sew it on a typewriter. Choose a strong needle that is suitable for working with leather. Otherwise, damage the product and the sewing machine. You can not sew up, but seal a hole in a leather jacket.
What do you need to seal a jacket?
To close a hole in the skin, take a quality glue "Moment" or rubber glue for shoes. The adhesive composition must be elastic and viscous, resistant to high temperatures and water, oils and grease, must dry quickly.
Do not take "Superglue" or PVA. The first will not be able to glue the product for a long time. And the second one, after drying, will leave a translucent film that will ruin the appearance of the clothes.
You will also need toothpicks and a solvent to degrease the material. As a rule, acetone, gasoline or special remedy. Without solvent treatment, the patch will not last long. Now let's look at how to properly glue the skin.
How to glue leather
- Turn the jacket inside out, carefully remove the lining and treat the edges of the cut on both sides with a solvent;
- Prepare a patch of genuine leather or leatherette, depending on the type of material from which the jacket is made;
- Spread glue on the patch and the place of gluing. Gently and thoroughly smear the composition with a brush;
- Leave the composition for forty minutes and then apply a second layer. When it dries slightly, glue both parts to each other;
- To get a reliable result, it is recommended to first glue one side of the gap, then match the edges and glue the patch completely;
- Place a hard object in place of the bonding and leave for five minutes;
- Turn the product inside out and bend the material so that the edges are slightly apart. Apply glue to the edges of the fabric with a toothpick and slide so that they are as close to each other as possible;
- Lay out your clothes on a flat smooth surface and level the material, press down the glued place with a load and leave for a day;
- In conclusion, treat the skin with a cream or paint of a suitable color and sew on the lining.
Seal the jacket with liquid leather
If a leather jacket is torn, liquid leather is often used. This is a modern and easy-to-use material that effectively eliminates defects and allows you to restore the skin. Damage to the jacket will be invisible! In addition, liquid skin does not harden for twenty minutes, which allows you to correct flaws and get the maximum result.
For work, in addition to the main material, you will need a bandage and a small spatula with a sharp end and a width of about a centimeter. From the bandage we cut out a piece slightly larger in size than the cut. We process the front side of the hole with liquid skin, which we apply with a spatula. Then tightly apply the prepared piece of bandage on top.
- With sharp scissors, cut off too damaged edges, as well as threads. From the wrong side, clean the junction of the damage with the patch with soft sandpaper.
- To prevent the edges of the hole from moving, they must first be fixed on the front side with tape. Thus, it will not only be more convenient to repair the jacket, but also leave the damage site as invisible as possible.
- The next step is to prepare the patch. Be sure to match the size of the hole and the piece of leather. The patch should be a little more. Cut off the edges from the inside with scissors or rub with sandpaper. Next, apply a layer of glue on the wrong side to keep it better. Be sure to keep the time specified in the instructions. This will take approximately half an hour.
- Lubricate the place of the gap on the jacket with glue. It is best to use a brush that evenly distributes the adhesive over the entire surface. Put a patch on the place of the gap, align everything with tweezers and press along the entire perimeter with your fingers.
- Let's start processing the hole on the outside of the jacket. First, carefully remove the adhesive tape. Using tweezers or a toothpick, slightly unscrew the edges of the gap. Apply a little glue with a thin brush. Align the edges so that no damage is visible, and press with your fingers. Remove excess glue with a rag. Attention: the leather should not be smoothed too much, as after drying it will stretch and may tear near the repair site. Also, make sure that a tubercle does not form, which will be too noticeable.
- Leave the jacket for the glue to dry completely. If the product is made of thick leather, then it should be placed under oppression for a while.
- A leather jacket can be given a second life with metal studs, buttons, chains or colorful patches. The thing will gain creative look and will be different from their "brothers".
- A small hole can also be decorated with machine embroidery.
- After repairing the damage, sew up the lining of the jacket. Pick up the threads to match the lining, make the seam inconspicuous.
- When the glue is completely dry, paint the place of the gap, and paint the entire jacket with a special paint for leather things.
- Before using adhesive tape, make sure it is sticky on a piece of leather that is not visible. Most things are currently dyed using special films. In this situation, you can not seal the leather jacket, but remove the surface layer of the dye.
- Make sure that you memorize the instructions well before work, because during work you should be focused on the goal and not be distracted.
- The adhesive should not dry before you repair the gap, as it will be difficult to apply a second coat of adhesive and the bond will deteriorate.
- To sew the lining, use a needle designed for sewing leather. Otherwise, you may damage both the machine and your clothes.
- If you are embarrassed that the patch will be visible, then use the design solution - sew a couple more pieces of leather over the entire surface.
- If during operation the glue got outside the hole, then carefully remove their traces with a dry cloth. The material itself must not be wetted in any case.
- Before work, first check that the glue, adhesive tape do not leave marks on the material, and the paint perfectly matches the color of your product.
In order for you to succeed and the result pleases you, we bring to your attention a few tips:
- Check the quality of the adhesive tape before using it. To do this, you need to stick a small piece to the area of \u200b\u200bthe skin that is not visible when worn.
- The work must be done very carefully and quickly. Therefore, in order not to be distracted, it is better to remember the algorithm of work or write it down on a separate piece of paper, which will always be in front of your eyes.
- Make sure that the glue layer does not dry before you repair the gap.
- So that the patch is not very conspicuous, you can sew a few more of these over the entire surface of the product.
- The skin must not be wet. Work only with dry rags.
As you can see, the situation with the damaged thing is not pleasant, but it is completely solvable. Carefully study all the tips and instructions and this will help you repair your favorite wardrobe item quickly and efficiently.
Leather products are very expensive and not everyone can afford to buy a new thing in case of damage to the old one. Therefore, in order for your favorite jacket to last a few more seasons, you can fix it yourself. And if you follow our advice and recommendations, the work will be done quickly and efficiently.