Modern parents begin to engage in the development of the child literally from the first days of his life. Pediatricians and psychologists recommend paying special attention to fine motor skills, as it is directly related to the formation of speech. Toy manufacturers have long picked up this idea and brought it to life, releasing numerous educational toys. But many of them can be done with your own hands.
Why you need to develop fine motor skills
Many are aware of the need to develop fine motor skills in young children. However, not everyone understands why this is necessary and what such activities are.
Fine motor skills are the ability to perform precise actions with hands and fingers. It is coordinated by the nervous, muscular, skeletal and visual systems. Its development begins in the first months of a child’s life by looking at their own fingers and pens. Then the baby gradually learns to master them, taking toys. Motor skills have a positive effect on manual dexterity, the formation of the future handwriting of a student, and on the speed of reaction.
It is established that the level of development of the child’s speech directly depends on the degree of formation of the movements of the fingers. In the human brain, the centers responsible for speech and motor skills are located nearby. Thus, when stimulating one site, another is also activated.
DIY toys for the development of fine motor skills in children
Shelves for children's stores offer a wide range of educational benefits. It's no secret that their cost is quite high. It will not be difficult for interested mothers to make toys for fine motor skills with their own hands. And the main thing will remain uniqueness - because they will be executed with great tenderness.
Touch bags
Sewing sensory pouches with your own hands is a snap. You will need a dense fabric of different colors and textures and a filler, which can be used as:
- pasta (spirals, shells, bows, straws);
- cereals (millet, buckwheat, barley, rice, oats);
- flour and starch;
- legumes (beans, peas, soybeans, beans, corn);
- sweets;
- nuts
- natural materials (acorns, chestnuts, shells, pebbles);
- erasers of various shapes;
- cotton wool or synthetic winterizer;
- buttons and beads.
Safety regulations
Natural materials must be washed and dried thoroughly before use, and toys with food must be stored in a dry place - pasta and cereals are afraid of moisture. The bags should be sewn or tied in such a way that the baby could not, under any circumstances, get their contents.
Video: how to make touch pads with your own hands
Photo Gallery: Homemade Touch Pouches
Such bags are easy to make on their own, even without a sewing machine.  The filler can be put not only into the fabric: dense balloons are suitable for this. Tactile perception can be developed not only with the filler, but also using fabrics of different textures.
  Bags can be of different colors and sizes.
Touch cube
Such a toy is a cube, on the sides of which volumetric objects of various shapes and colors or applications from various materials are located.
How to make a cube for the development of fine motor skills
In order to make a touch cube with your own hands, you will need:
- small pieces of fabric of different textures and colors;
- sintepon or foam rubber as a filler;
- non-woven;
- decorative elements (buttons, ribbons, ropes, rings, fabric residues, thermal stickers);
- threads
- iron;
- sewing machine.
From shreds of fabric (it can be cotton, silk, velvet and others), you need to cut 6 squares with the same size faces.
From non-woven fabric, you need to cut out squares with a side 1-1.5 cm smaller than from fabric. Non-woven blanks are superimposed on fabric and ironed - both parts are glued together, get a rigid structure and will keep their shape well.
Each square is designed in accordance with the idea: it can be figures of animals and birds, geometric figures of fur or felt, thermal stickers, buttons, locks and much more.
When the design is finished, you need to sew 4 squares in one strip.
Two remaining blanks are sewn to one of the squares above and below.
Sutures are made along the contour of the non-woven faces, after which they are fixed. Next, the scan is sewn in such a way as to make a cube.
On the last face in the corner you need to leave a small hole and carefully turn the cube through it. The toy is filled with foam rubber or synthetic winterizer and flashed with a hidden seam. Together with the filler, it is also possible to place rustling paper or a bell in a cube.
Video: how to make a developmental cube with your own hands
Tactile pillow
Sensory (tactile) pillows are suitable for babies from 2-3 months to 3 years. It all depends on the set of elements that are placed on it. For the smallest, a small amount of simple materials is suitable. Before giving such a toy to a child, you need to make sure that all the elements are firmly fixed: if the baby pulls one of them in its mouth, it should not come off.
For children from 1 year old, you can pick up and sew more diverse and complex developmental items: zippers, buttons, lacing, Velcro, bows and cords that can be tied and pulled. You can make such a toy using a ready-made pillow and stitching a pillowcase for it with decorative elements.
Photo Gallery: Touch Pads in Various Shapes
 Such a pillow is suitable for babies from 2-3 months. For the image on each of the squares, you can use a different texture fabric
  This pillow is suitable for children from 1 year. It presents more complex elements: buttons, ribbons, bows, Velcro, lock
  Such a turtle has several faces, on each of which different developmental elements are placed: a carbine, lacing, buttons. It is suitable for children from two years
DIY cushion for fine motor skills
You can sew such a pillow at home.
For its manufacture you will need:
- fabric - green (53 × 30 cm) and blue (83 × 20 cm);
- non-woven (53 × 50 cm);
- fabric for the back side (50 × 55 cm);
- felt of different colors and threads of floss in tone;
- 50 cm zipper;
- velcro, buttons, braid, ribbons, hat gum;
- whatman, paper, pencil;
- scissors;
- threads, needles and pins for sewing;
- pillow 45 × 50 cm.
Before you start sewing, you need to make a sketch of the future pillow in full size. Stencils can be used for this.
The blue fabric is cut into two strips (the first is 30 × 20 cm for the pocket, the second is 53 × 20 cm for the base). A piece of green fabric and a blue flap prepared for the base are duplicated in size by non-woven fabric. The cut for the pocket folds in half.
The sun is made of yellow felt and ribbons: a circle with a diameter of 10 cm and 7-8 strips of 10 cm each.
The felt sun with folded in half rays-ribbons is pinned to the blue fabric prepared for the pocket.
The parts are sewn on the sewing machine or manually with small neat stitches.
Elements of the main part (blue and green) and a pocket are connected together.
The base of green fabric is located below, from blue - on top. A pocket with a sun is applied to the upper left corner
Then, the base and the non-woven substrates are connected with pins, and then stitched.
Elements from the drawn sketch are cut from felt.
"Felt waves" are interconnected. For each fish you need two parts (you can have different colors) and an elastic band 10-15 cm long
Erasers with knots tied at the ends are placed between the elements of the fish and sewn together. Waves are laid out on the base (deviating from the edges 1–1.5 cm for allowances for seams).
Colorful fish are placed between the waves and fixed. Elements of the river are sewn together first at the bottom, then around the entire perimeter.
The next element is a tree. For each of them you need two crown blanks, one trunk and several apples or pears. Details are stitched together, while the fruits are located inside between two crowns, and the trunk remains on top.
The blank for the railway is made of gray felt. Her size is 53x5 cm.
The railway is placed on a green meadow, which already has a river and trees.
For the manufacture of a steam locomotive and a trailer, two elements are also needed. Front details are made using felt of various colors (wheels, windows, pipe). Parts are stitched on top. A small button is attached to the rear edge of the engine, and a small ribbon loop is attached to the trailer. A 50 cm long ribbon is threaded through the un sewn edge, at the ends of which knots are tied. The structure is located on the railway and is fixed.
Clouds are made of blue felt - also two elements each. Through them, as through a train, a braid is passed, the ends of which are sewn to the blue part of the base.
From felt of different colors, flowers are cut out, for the middle of which Velcro is used, and placed on a green meadow next to the river. The seam is made along the edge of the Velcro, and the petals remain free.
Following the example of fish, a butterfly and a bee are made. Velcro is sewn onto the back of each figure - this way insects can sit on flowers.
A lock is sewn into the middle of the piece of fabric that was chosen for the back side of the pillowcase.
The front and back of the pillowcase are folded with their faces inward and stitched around the perimeter, leaving allowances for the seams (1-1.5 cm on each side).
At will, you can make figures of animals that will ride on the train. They can draw muzzles with a marker.
The pillowcase is ready. The kid can play with her, placing animals in the trailer, rolling the train on rails, planting insects on flowers, looking for fruit on the trees.
Testoplasty
Effectively promotes the development of motor ability of fingers. Plasticine, which all parents have known since childhood, is dangerous to give a one-year-old baby, because he tastes everything. An ordinary dough comes to the rescue. It can be prepared independently from safe ingredients.
Modeling Dough Recipe
For it, finely ground salt and water (one part), flour (2 parts) will be needed.
- Combine salt and flour in a deep bowl, add water.
- Mix well.
- Knead the mass to the consistency of soft plasticine.
If, after cooking, the dough sticks to your hands, you can add salt and flour to it (observing the proportion). In case of obtaining a crumbly texture, it is enough to increase the amount of water.
If the baby likes to sculpt, you can immediately do a lot of dough. You need to store it in the refrigerator, plucking the "working" pieces as needed. But such a material should not be stored for a long time - over time, the dough loses its elasticity. For older children, you can add food coloring in the cooking process. After drying, the figures from the dough become solid and durable. They can be painted and used for games.
Photo Gallery: DIY Handmade Dough Figures
 You can create such a basket together with your baby - this is a fascinating, creative and useful activity.
  From the test, you can mold figures of your favorite animals
  Dry crafts can be painted with acrylics
  From the figures you can make whole pictures and use them to design a children's room
Collapsible elements
A game with fine details is very good at developing motor skills.
Felt coats
All large parts on such samples (pockets, sleeves and even a collar) are removable. The child will be able to create interesting models by combining colors. Such toys are suitable for babies from two years old.
Math strings
When the baby begins to show interest in numbers, you can offer him mathematical strings. They not only develop fine motor skills well, but also help to learn the score.
Video: didactic games with skins
Lacing
Such devices are excellent for improving the motor activity of fingers and pens. After all, a multi-colored rope should not only be taken - it should fall into a small hole.
Simple lacing can be made from any safe surface: a wooden plank, a plastic cover or ordinary thick cardboard. On them using a screwdriver heated on a candle or an awl, you need to randomly make holes with a diameter of 5 mm.
An even simpler way to keep your child busy with lacing is to use a colander.
More complex lacing can be done in any form. This will require a little more time, imagination and material.
Sorters
Sorters, in addition to fine motor skills, allow you to develop assiduity, attentiveness and quick wit in the kid. Making them yourself is also possible, although a little more complicated than lacing or math strings.
For the sorter you will need a cardboard box and several small toys of various shapes. On one side of the box, you need to cut holes corresponding to the shapes of the selected items, only a little larger.
Photo Gallery: DIY Sorters
 Round holes cut a little larger than plastic caps
  Such an original large sorter is suitable for kids who already know how to walk
  For the simplest version of a homemade sorter, you will need a box and cardboard blanks
Developing stands - universal didactic devices
The developing stand can combine elements of all described objects and games.
To make such a board, you can attach any objects that are in the house to a fiberboard sheet or an unnecessary worktop:
- latches,
- locks
- sockets with plugs attached to them,
- switches of various sizes and shapes,
- door hooks
- deadbolts
- coat hooks
- old disk telephone
- bell on a rope
- glockenspiel.
Over time, existing items can be changed to new ones, while maintaining the child’s interest in the game.
Educational books
Developing books are a great pleasure for kids of any age from the moment when the child is able to sit on their own.
You can make a book based on your favorite baby fairy tale
Video: handmade educational books
Massage foot mat
Fine motor skills are the development of not only hands, but also toes. Orthopedists talk about the positive effect of walking a child barefoot on different surfaces. In the summer it is easier to do this - you can walk on the sand, grass, pebbles. And in other seasons, wonderful rugs come in handy: small flat pebbles, plastic bottle caps, buttons, and much more are sewn or glued onto a dense fabric.
Photo Gallery: Homemade Massage Mats
 This rug combines materials that give different sensations to children's legs
  Pebbles glued to the base of kavrolin
  You can make a massage mat from many materials, including plastic covers
The development of fine motor skills in a child is possible without expensive store toys. There will always be many objects in the house that are interesting to children. Joint family creativity gives an amazing sense of closeness, and even more delight the delight and success of the child.
Educational games for kids do-it-yourself
Author: Korelova Irina Vladimirovna, teacher - psychologist, MBOU secondary school No. 7 Branch of DOU No. 5 of the city of Nyandoma, Arkhangelsk region.Dear colleagues, I present to your attention educational games that you can do with your own hands for children of early and younger preschool age. They are very simple in execution, but multifunctional in application. This material can also be used by parents to play with children at home.
"Massage mitten"
Purpose:
The development of fine motor skills, tactile sensitivity, development of color and shape.
To make a mitten you will need: a glove, buttons of different colors and shapes, threads and a needle.
Manufacture:
Sew in a chaotic manner to the button mitten.
What is the meaning of the game ?!
1. Children love when they are given a massage, they specially substitute their backs, and they also like to do an adult massage on their own. All actions are performed through clothes.
2. On the glove buttons are sewn round, square and triangular in shape, in different colors. Using a glove, you and your children can work out the color and shape by asking, “What is the color of the button,” “Find all the buttons of red or any other color,” “Find all the round (square, triangular) buttons” (or similar to a circle, square, triangle).
3. Show the child a button, suppose it is yellow, and ask him to remember, “What happens is yellow when I give you back massage.”
"Children's finger simulator"
Purpose:
The development of fine motor skills, tactile sensitivity, the formation of the correct grip of a pea with three fingers.
You will need: a glass with a screw cap, I bought one at the pharmacy, peas (more secure) or bullets for the gun, awl.
Manufacture:
In the cup lid, make holes with an awl, adjust the size to peas or bullets, but so that you need to make some effort to push the pea into the hole.
The meaning of the game is that children train grasping peas with their fingers, which, in turn, forms the correct holding of a pencil and pen in the future. Then, the children make certain efforts to push the pea into the hole, this trains large and fine motor skills. And with older children, you can calculate how many peas fell into the jar.
I can tell from experience that kids can’t be torn away from such an activity, even overly active ones.

The game "Lay out by color and shape"
Purpose:
Testing colors and shapes, developing the ability to listen to an adult.
You will need: jars for loose with multi-colored lids, a knife, cubes or balls of color caps.
Manufacture:
Cut a hole in the lid of the jar to the size of the cubes or balls.
Game progress:
Put out and mix all the cubes (balls) on the table, the task of the children is to arrange all the objects by color in banks.
This game teaches children to keep instruction, i.e. perform the task as directed by an adult. Children often forget how to arrange the cubes, being carried away by the process, and mix the colors in the bank, but after several visits they complete the task without errors.

The game "Beads" and "Colored tubes"
Purpose:
The development of color perception, visual memory, fine motor skills.
You will need large beads of different colors or cases from felt-tip pens, soft wire or laces, a jar for beads and cases.
Game progress:
1. Have the children assemble the beads the way they want.
2. Suggest to assemble beads (cases) of the same color on wire or lace.
3. Beads or cases of different colors.
4. String beads or cases, alternating the color, for example, white - yellow, then gradually adding a third color.


If you are already familiar with the game “Colorful Lids” posted on my blog, then these games are their predecessors, which laid the foundation for a series of games with colored caps from lemonade.
The game "Miracle Balls"
Purpose:
The development of fine motor skills, tactile sensitivity, fixing the names of the filler.
You will need: a box for storing a “miracle of balls”, ordinary inflatable balls, a filler (semolina, peas, beans, buckwheat, small horns).
Manufacture:
Fill the balls with a different group, legumes, pasta tightly enough and tie the tail with thread.
The meaning of the game:
1. Children pick up balls, feel and sort out the filler (develop fine motor skills)
2. Children are first allowed to touch cereals, beans, pasta, and then balls with filler. Task: you need to guess what is in it. Acumen, development of fine motor skills, tactile memory.

The game "Most Accurate"
Purpose:
The development of sleight of hand.
You will need a plastic bottle, scissors, an awl, self-adhesive for decoration, a cord, a container from the kinder surprise.
Manufacture:
Cut the plastic bottle in half, make a hole with an awl in the bottle cap and in the base of the kinder, insert the cord at one end into the hole in the cap and tie a knot, insert the other end into the hole in the kinder and also tie the cord. Then glue the edges of the cut bottle with self-adhesive and gently ennoble its walls. The last thing to do is screw the cap onto the bottle.
Game progress:
We hold the bottle with the cut end up, the string comes down with the kinder at the end. The child picks up a bottle by the neck, the goal: to catch the kinder in the bottle.


Game "Blow a Goal."
Purpose:
You will need: a cover from any shoe box, self-adhesive, 2 jars of sour cream, yogurt or modeling dough, a knife, a piece of fleece (polystyrene, feather, etc.)
Manufacture:
Glue the lid of the box inside with self-adhesive, make a marking, as on a football field, make the gates out of jars, slightly cutting them into the box.
Game progress:
Children can be told that they are soccer players and they need to blow a goal into the opponent’s goal, a piece of cotton wool, foam rubber, a feather and other lightweight materials can play the role of the ball.


Game Avoid Obstacles
Purpose:
The development of respiratory and articulation.
You will need: juice tubes or cotton buds, a shoe box cover, a piece of cotton wool or pea, self-adhesive.
Manufacture:
We glue the lid on the inside with self-adhesive, glue or sew on straws from under the juice or cotton buds on the bottom.
Game progress:
The child is invited to blow a piece of fleece or a pea and circle them around obstacles in the form of tubes (sticks).


Dear colleagues, you have familiarized yourself with self-made educational games. I would be glad if someone comes in handy these ideas for work! Thanks for your attention.
For kids of any age are very important. And for children 4-5 years old, all the more so, since it is at this age that basic skills are rooted, which are very important for life and adaptation in kindergarten, school, and communicating with peers. Currently, the market is very diverse, producing developing ones, but, unfortunately, sometimes the prices for this type of product are such that not everyone can afford them ... And that is why we suggest you look at a small selection that we think will help you make toys for your baby. Here is a very simple and inexpensive, made from wooden clothespins.  On each clothespin a strip of a certain color is glued.
  The toy will help to learn not only the colors, but also their smallest shades.
  Such a game of clothespins will contribute to the quick learning of words, thereby teach to read.
  Children's art.
  Here you just need to stock up on different pieces of fabric, cut them into squares. Collecting such a pyramid by color is very interesting even for children 5-7 years old.
  From the disks, you can make homemade watches with spinning hands with your baby, which will definitely help to study the time.
  And if you run small round balls into such a transparent hose, then this will probably delight not only the baby, but even the adult.
  If on the cardboard from the box you can draw felt-tip pens figures and cut them out of dense material, you get an interesting analogue of an expensive game.
 If you take toilet paper rolls and decorate them with your child, give them a wire or a thick rope, you can make the most unusual beads in the world.
  For boys, you can very quickly make such a constructor called "Put everything in its place yourself."
  Cardboard towel roll, scotch tape, box, how small balls, what could be more interesting?
  You can pour rice, buckwheat, peas, beans into a plate, and offer these wonderful pens to arrange the cereals in plates, like Cinderella.
  An unusual mosaic can be created from a colander with holes, pots and chopsticks.
  See more ideas for educational toys for kids.
  And such chic planks, created by skilled dads, will not leave anyone indifferent! Kids will be delighted with these locks, hooks, latches, screws, numbers, chains, jars, electrical switches, sockets, buttons, wheels and so on. In a word, there is no limit to imagination!
  In short, fellow parents, grandparents, creating
If you think that making toys from improvised means is the lot of those who are not able to buy the best for their child, you are deeply mistaken! DIY toys made from improvised materials are a great way to arouse even the smallest children 's interest in design, which means to help kids develop their thinking. When a normal object suddenly turns into a fascinating toy in front of a child, you look like a real magician, endowing a seemingly completely unsuitable thing for this with a new meaning.
You can play with anything. There are many universal ways to turn simple household gadgets and “household garbage” into something useful and exciting. Do not rush to get rid of the empty bottle-boxes, because they can do you an excellent service. You can learn how to make toys from improvised materials by reading this material.
What toys can be made from small boxes
This section of the article is devoted to what toys can be made from boxes of shoes, sweets, milk, pizza, etc.
Box - This is an item that can be anything. They are easy to paste over or paint, and then turn them into a variety of toys. Below are a few options, although in fact there are many more.

Doll Crib - Put a mattress and a pillow made of pieces of cloth at the bottom of the box and cradle the stalls.

Machine (trolley) - make a hole in the end of the box and tie the rope. The kid will “carry” his important “loads” from this small box in this toy.

Garage for cars - cut a part of the side wall of the box so that a door is obtained; turn the box upside down. Now the little cars will have their own "house".

House - take bags of milk, kefir, juice (do not forget to thoroughly wash from the rest of the contents!), etc. You can even build a whole city, you just need to draw or paste windows and doors. And you can make toys - “skyscrapers” from improvised materials if you put the packages on top of each other.

Cubes - From the same packages you can make light cubes and use them in "building" games.

Puppet show - take the pizza box, open it completely. To make such a toy from improvised materials with your own hands, in the resulting screen, cut open the “windows” with curtains from pieces of fabric. Now you can play performances or simply raise any toy above the "screen" and talk to the baby with a "toy" voice.
How and what toys can be made from plastic bottles
You already know that plastic cups help in games. And how to make toys from plastic bottles (washed and dried)? A small note: if you need to cut a hole in a bottle or cut it into pieces, treat the edges with tape so that the baby does not cut himself. And you can iron the edges through the paper with a hot iron, they will easily melt and become smooth.

Animal toys - the most diverse! Usually a bottle serves as a “body”, toilet paper rolls will completely replace “limbs”, and a “muzzle” can be drawn and glued. By the way, you can paint such toys from bottles made by yourself in any color.

Transport - not only a machine, of course. You can make a toy airplane and a rocket for children from improvised material. Add the necessary “details” (wheels, tail, wings can be cut out of cardboard and attached with tape).


House for the "fairy" - a home for small dolls. Plastic bottles of an unusual shape are well suited - from under the foam for the bath, from under the shampoo, as well as white opaque bottles. Cut the “door”, decorate the walls (you can paint with paints, stick on sequins, beads). Place furniture from matchboxes inside the house.


Robot: the body is a two-liter bottle, the legs and arms are half-liter bottles, the head can be made of some round-shaped plastic jar. Fasten it with tape, “paint” your face with paints - the robot is ready.

Catamaran boat - cut out part of the wall for two bottles; these will be the “sitting places” of the dolls. Fasten bottles with adhesive tape or tape (holes should be on top). Attach a mast mast between the bottles. Now you can send such a toy from plastic bottles, made by yourself, to swimming.

Raft - on rafts from plastic bottles some adults even manage to build islands and dwellings, this plastic container has such good buoyancy. The main thing in the construction of such a raft is that the bottles should be tightly closed and well fastened together. If you make two layers of bottles, buoyancy will increase, and the "area" of the raft depends on the number of bottles: the more there are, the more "load" the raft.

Feeder - cut a part of the side wall from a large bottle, attach a rope to the twisted lid so that the feeder can be suspended. Pour the food and hang it out somewhere in the park. And you can set a feeding trough in front of the window and watch the "feathered guests". Just remember to sprinkle food regularly.

Bowling alley - empty bottles will completely replace the pins for the game. Such children's toys from improvised materials can be knocked down with a ball, as in a real bowling alley, rolling the ball on the ground.

Target - And in winter, you can arrange a competition for accuracy, who will knock the bottles more by throwing snowballs at them.

Vase, pencil - From the lower parts of the bottles you can make vases, or pencils, or containers for small things. It is only necessary to decorate them, paint them or make an application of paper, beads, pebbles, pieces of fabric - the child will completely cope with the decor himself.

Bilboke - The simplest toy to manufacture, developing dexterity and coordination. Cut off the upper part from a large plastic bottle to make a “cup”, insert the end of a rope or string about 40 cm long into the neck and tightly tighten the cap. To make such a developmental toy from improvised materials, insert the other end of the rope into a small plastic case from under shoe covers or kinder surprise and close it tightly. Now toss the "ball" and try to catch it with the "cup". You can play in turn, each hit is a point. Agree on how many points you play. Whoever scored the first number of hits, he won.


Nesting dolls - cut several bottles of different sizes in half (for example, two-liter, one and a half liter, liter and half liter), take only the upper parts. They should be easily placed one on top of the other. Draw with acrylic paints the “faces” of the nesting dolls.

Ded Moroz and Snegurochka - From small opaque white bottles (0.5 ml, 0.3 ml or 0.2 ml from under children's dairy products) you can make fairy-tale characters. "Put" on such toys, made with your own hands from improvised means, paper coats, draw or paste faces, a beard, a pigtail.

Sea in a bottle - a home-made sea can be made from a transparent small smooth bottle, for example, from under mineral water. Pour about half the volume of water into the bottle, add a drop of blue food coloring and mix well. Gather a handful of beautiful small pebbles, shells, starfish and other "sea" little things, put them in a bottle. If there is, add a little sparkle. Now the most difficult thing is to carefully, slowly add any vegetable oil to the very top. Screw the bottle tightly and lay it on its side - the sea is ready. Water does not mix with oil, so the border of the "sea" and the "bottom" with shells and pebbles will be clearly visible. And if you move the bottle a little, you get waves, and then you can see the "storm at sea".
Now you know what toys can be made from a bottle, and why are plastic caps useful?
What toys can you make yourself from plastic bottle caps
The first thing that comes to mind is to make wheel covers for makeshift cars from wheel covers. But this is just one of the ideas! Different in size, color caps from plastic bottles are used for countless interesting crafts and games, so many mothers collect them.
If there are a lot of caps, you can:
- sort them by color, size;
- give the child a couple of empty bottles with different mouths, let them pick up suitable caps for each;
- count, compare, which are more, which are less;
- lay out the track, starting with large covers and ending with very small ones, and “drive” along the path of dummies, “drive” in cars.
Labyrinth - from the covers you can lay out a small maze and spend a small typewriter, trying not to touch or slide a single cover.
Ski Track - turn the labyrinth into a ski run. Give the baby “skier” inventory - two caps. Let him put his index and middle fingers in the inverted lids and, moving his fingers, as if skiing, will pass the track. You can’t bring down other covers, otherwise the baby will leave the race!

Spider bugs. To make such a toy, draw black dots and antennae on the red cover - here you have a ladybug. You can also arrange other covers with bugs, spiders, bees.

Refrigerator magnets - paint covers with funny faces, faces of animals or write letters, numbers. Attach a magnet inside (with the help of plasticine) - and play performances on the refrigerator stage. Or, while you are preparing dinner, the kid will learn to read and count, laying out the "cap" letters and examples.
Projectiles - Arrange competitions for accuracy hit lids in a small plastic container. Who will make the most successful shots from one meter? And with two or three?
"Let’s give it up" - the lid can play the role of a ball or a puck in an “air match” - blow it with a straw from a juice or cocktail into the “gate”. Such a toy made of do-it-yourself lids can also be simply “puffed out” on the table to each other - this is a good exercise for ventilation of the lungs and development of breathing.
Walls, towers, pyramids - walls, towers, pyramids can be built from covers of different sizes. If there is a lot of “building material”, give a task related to a certain color (for example, to build a “blue tower”) or size (for example, to assemble a pyramid of three large, four medium and five small covers). Such educational toys, made by hand from improvised materials, perfectly train fine motor skills.
Bulldozer - Using a toy truck, or a scoop (shovels), or even just a flat cardboard, quickly collect all the lids into a box. The game can be held "for a while" when you need to collect a lot of small toys, including removing the covers in place.

Spinning top - From the lid and toothpicks you can make a simple top. Make a hole in the middle of the plastic cover so that you can insert a toothpick. Make sure that the hole is not wide, otherwise the toothpick will not hold and will fall out. Insert a toothpick so that its small tip “peeks out” from the flat (outer) side of the lid, and the long one is from the inside. Now put the spinning top on a small tip and unwind it with your fingers over the long part of the toothpick. To keep this toy from the plastic cover spinning for a long time and smoothly, experiment with the length of the “leg” on which the toy rotates.


Laying out figures - From the covers on a flat surface, you can lay out a variety of shapes. For example, geometric or silhouettes of animals, vehicles. It turns out very unusual and interesting, a kind of mosaic of covers.

Painting (mosaic, panel) - if the patterns laid out from the covers are pleasant and you want to save them, stick the “picture” on a thick sheet of cardboard. Such a mosaic toy for children, made by hand from improvised materials, looks very good and delights not only the child.

Tic Tac Toe - the rules are common, only instead of drawing tic-tac-toe, lids of two colors are used. And you can even play on the tablecloth in the box.
"Remember" - put a few different covers, let the child remember the location, color, size. Then ask the baby to turn away and change something: remove any covers, move or add. The task is to do as it was. Such a developmental toy from the covers perfectly trains visual memory.
"Find differences" - put the lids in two identical rows and make one or two differences (in color or size). Let the baby determine how the rows of caps differ. For the very young, start with three or four caps in a row, for older children you can lay out not only rows, but also supposedly “identical” patterns, pictures. In this case, playing with such a toy from plastic bottle caps will be more difficult, but also more interesting.

"Small and large" - Ask the child to lay out some large and several small covers - the amount depends on his age. You can lay out in a row, you can scatter. Give the baby a box or jar with the rest of the lids unfolded. Now turn on the stopwatch! On command, the child should find in the box other lids that are suitable in size: cover the small ones with the large ones, and put the small ones on the large ones. How many seconds did it take to complete the task on the eye, attention and coordination?
Below is described what else you can make toys with your own hands.
Toys made by hand from improvised tools at home
Remember how in childhood you sometimes wanted to climb into your own house. Below are the options for a "home" in which your baby will play with dolls or soldiers, arrange "darkness" (unconsciously relieving himself of many fears), and he can just be alone for a moment with his thoughts, relax, dream and even sleep if got tired. For such a rest in the "house" lay on the floor an old blanket or thick blanket, bedspread.
The simplest version of such a toy from improvised homemade tools is to throw an old sheet or blanket on the table so that the fabric reaches the floor. But this is not always convenient, since the table is often used frequently.

Another option is a cardboard box from under some large household appliance, equipment. In it you can cut through the “windows”, make a “door”, decorate the walls with drawings. Do not forget to only strengthen the corners and joints of the box so that it does not accidentally form and fall on the child.
If there is no box of a suitable size, you can make such a children's toy with your own hands from such improvised materials as pieces of cardboard, firmly fixing them with tape and PVA glue. And bending a large sheet of cardboard in half and putting it on the floor with the fold up, you can get a cozy "hut". Just strengthen the walls so that they do not "part".
Another “budget” version of a toy made from improvised means is to throw the blanket with one edge on the back of the chair, and the second, for example, on the armrest of the sofa. For the baby, even the narrowest space will seem cozy, because this is his "real house".
You can use an ordinary stepladder, putting it in working condition and covering it with any cloth, the same sheet. The ladder is good because it has ready-made "shelves" for toys - steps.
What else can you make toys with your own hands?
The “soft” option is a “house” made of a large piece of rectangular foam rubber or a propylene tourist rug. Only foam rubber is preferably sheathed with a fabric cover. Bend the foam rubber in the form of an arc, here is the "house". To "dwelling" is not straightened, attach the "walls" to the "floor".
If dad makes a frame of four light aluminum tubes of sufficient length, fastens all four tops together, and firmly sets the legs on the floor or on the base of the same aluminum tubes, you will get a “skeleton” of an Indian wigwam or northern yaranga. Mom will only have to use the fabric to make the walls. By the way, the frame can be made of tightly twisted and glued old newspapers! However, if dad is a craftsman, he can make a wooden frame from processed bars or planks.

You can cover the old playpen with a blanket and cut out a “door” in one of the narrow side walls - a beautiful “house”. But this option is possible if you do not plan to have kids anymore and use the playpen for its intended purpose.
Even a sheet hung on an extended rope can be a hut. To do this, just pull to the sides and fasten the edges of the sheet so that they do not “collapse”.
Your baby will be happy to hide and play in his "house", and sometimes invite you to visit!
Look at the selection of photos that depict DIY toys made from improvised materials:


Article read 13,714 times (a).
Educational toys for children from 0 will help him in understanding the world, acquiring the first skills. For you - workshops on the manufacture of toys from threads, fabric, cardboard, slingobus.
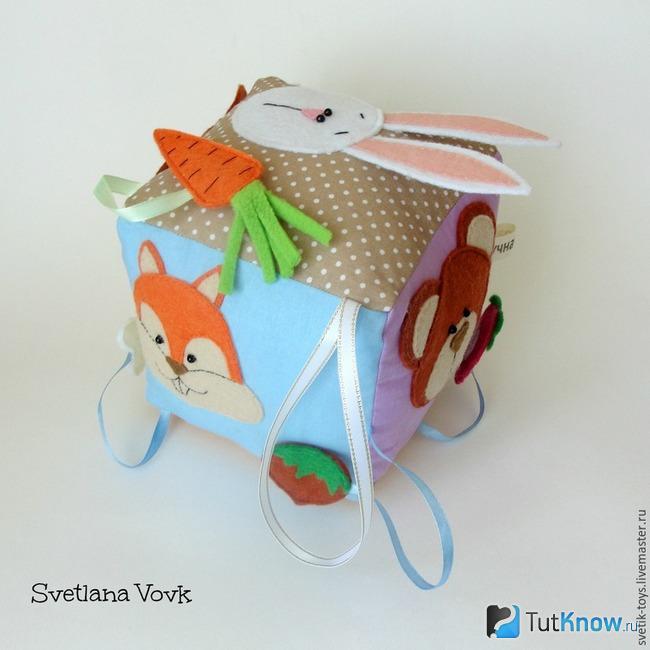
How to sew a developmental cube for children from 0?
As soon as the baby is born, he begins to explore this world. By the age of three months, his gaze becomes concentration, he intensively absorbs everything he sees. By this age, a developmental cube can be sewn for him, with which the baby will play more actively when it already learns to sit.
But even at a very young age, such a thing is very useful for the baby, especially if you name objects that are depicted on a cube. The child will learn them, understand how each object and animals look.
This cube is soft and pleasant to the touch, so the baby will not get hurt about it.
It is important to take environmentally friendly materials and firmly sew the elements of the cube so that the child cannot tear them off.
To make such a developmental toy, you need to take:
- cotton fabric (shreds can be used);
- felt;
- non-woven;
- soft filler;
- velcro
- disappearing marker;
- pins
- buttons or beads for the eye;
- scissors;
- satin ribbons;
- pieces of green fleece;
- floss;
- rattle elements.

Using the presented patterns, print them, and then transfer to felt and cut.
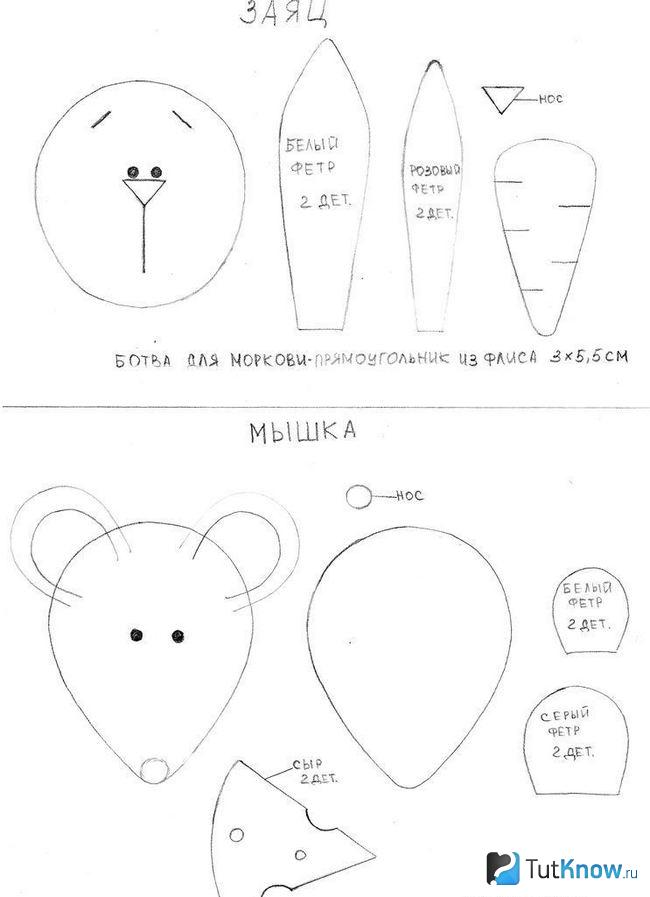
The bunny has a round head, the markings of his face are given on the template. Each ear consists of two parts - from white and from inside pink. Make the carrot orange, and the tops for it will need to be cut from green fleece. To do this, cut it out from a 5.5 x 3 cm rectangle.
Make the mouse out of gray material, and white semicircles need to be sewn to the inside of the ears. Cheese made from yellow felt.

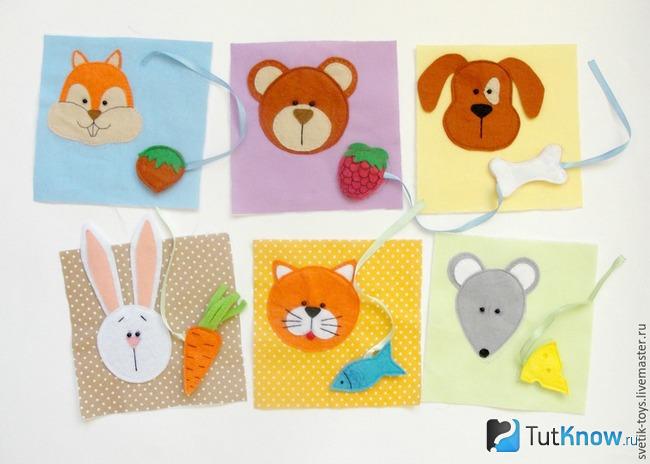
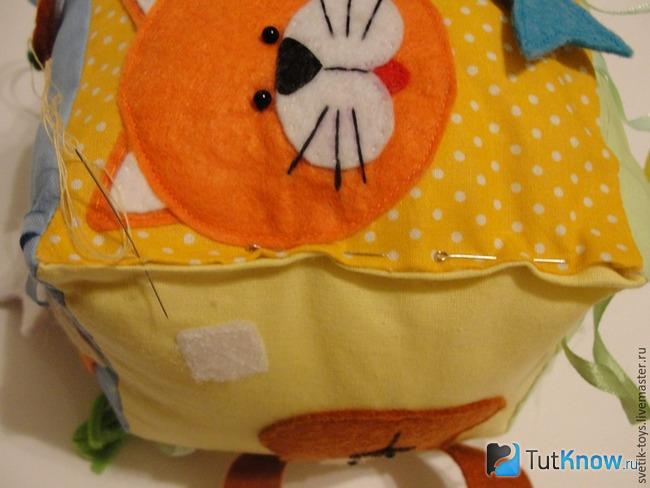
Now proceed to open the next couple - a bear and a cat. The patterns are the names of the colors that you need to use. The next are the dog and the squirrel.

The dog will have a bone in his hand, and the squirrel will have a hazelnut. When all parts are cut from felt of the appropriate color, you can proceed to stitch them.
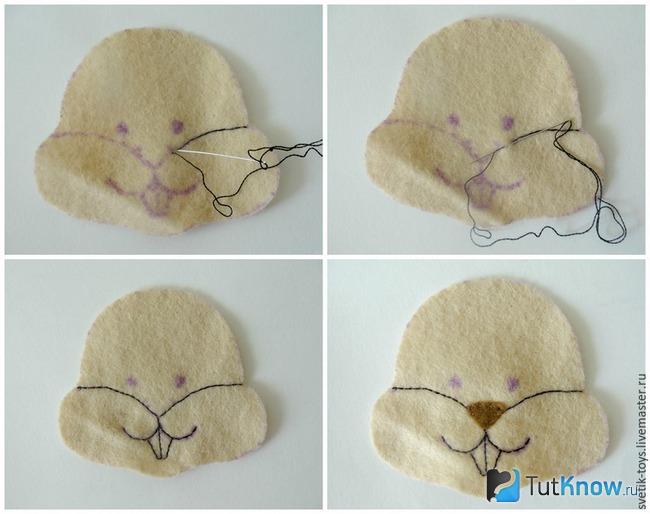
Draw the features of the face with a water-washable marker. Now embroider them on the bunny’s face. To make these parts denser, put glue non-woven on the back and iron it, let it stick. On the nose of the hare attach a triangle of black felt and sew it.
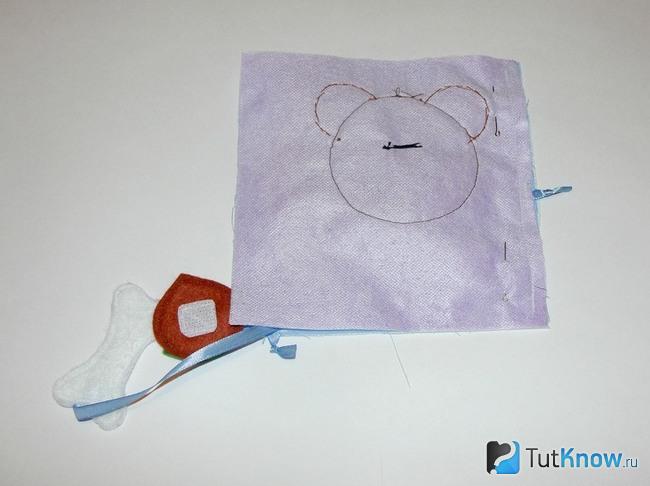
Draw a muzzle and bear ears on one side of the cube with a disappearing marker. Sew here double ears first, and then a muzzle, to which the nose and eyes are already attached.
Raspberries are so semicircular. Embroider the scales on it with black thread, and then sew the green tail up. Raspberries will be double, first press the Velcro to the back side, and then sew the Velcro to the cube itself.
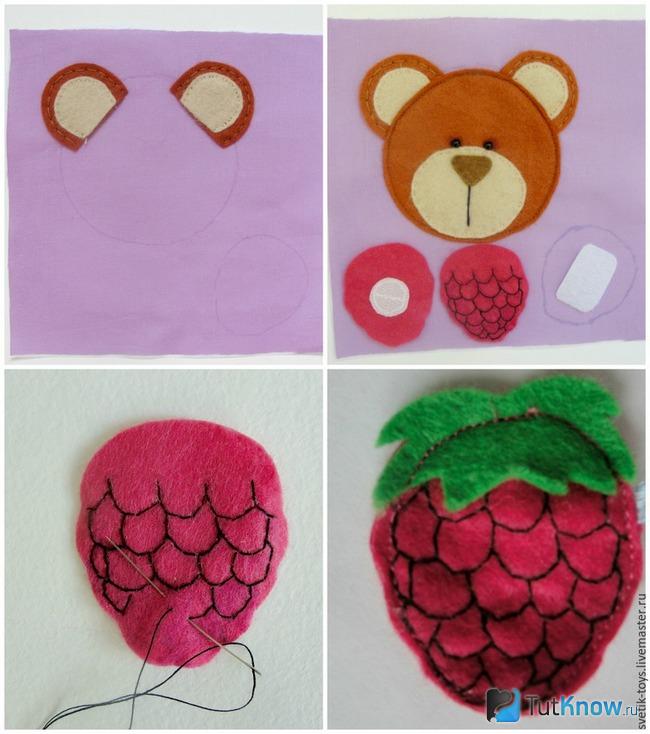
The child will be able to stick raspberries in place. In the same way he will attach a carrot for a bunny. But first, you will need to put between the two halves of the carrots, greens from felt and a ribbon.
To make greens, cut a fringed fleece rectangle on one side.

All characters and food for them are created in the same way. Cheese, carrots, raspberries, fish, nuts, stones must be attached next to the animal for which this food is intended. The child will learn the names of animals and will know what each animal eats.
Now this toy for the baby should be assembled as follows. Sew the sides of the cube together, first connecting the four sidewalls. Then sew the bottom and top to them.
To make the child later more interesting, arrange food for each animal not only next to this character, but also near another animal.

The child will quickly master this science, will be able to "feed" the food of that particular animal for whom it is intended.

See how to assemble a developmental cube.
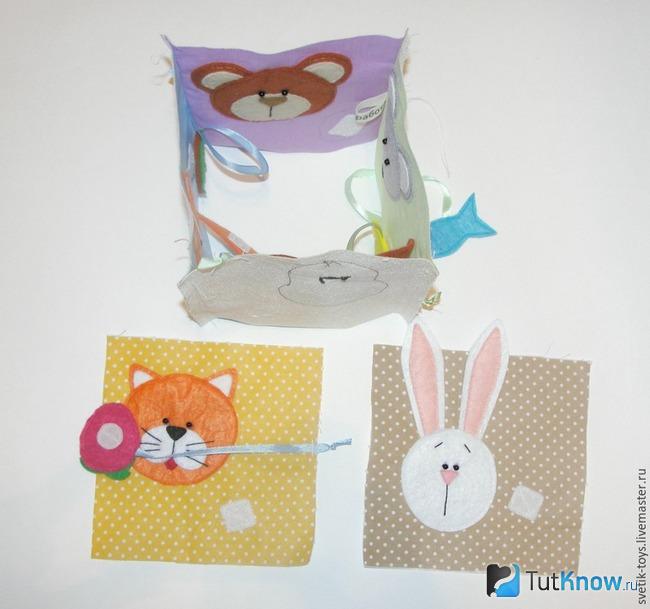
This photo shows how the four sides should be connected together, and the top and bottom are left free for now. This is how you grind these elements.

Such educational toys for children from 0 will allow them to learn the names of the animals that are on the cube, to get initial knowledge about them. Now fill the cube with syntepuhe or another soft filler through the hole still left. To make the baby more interesting, put here rattle elements that will make a funny noise.
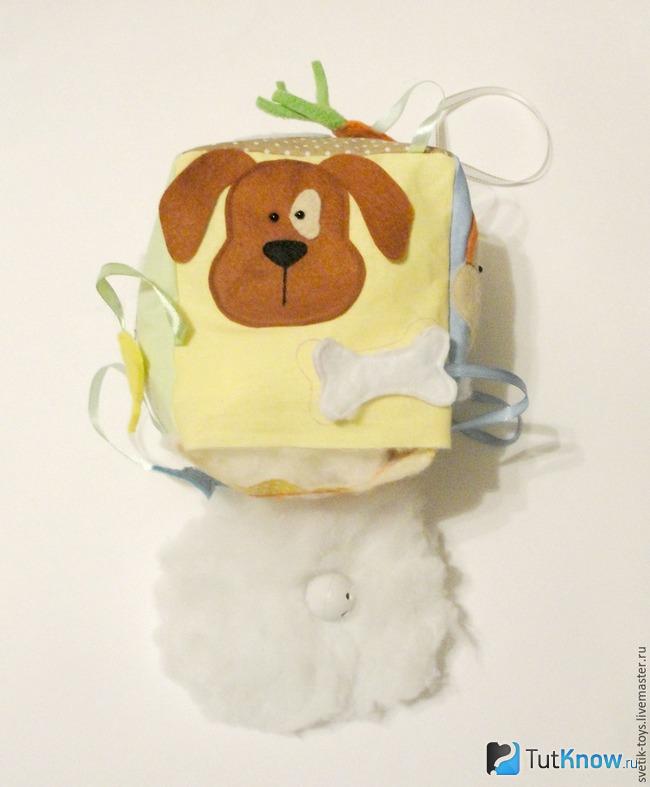
Stitch this free edge with pins and grind its sides using a blind seam.
Here are some educational toys for children from 0 to sew with their own hands.

If you were invited to visit the baby, then you can very well sew such a developmental cube to give it to the child's parents.
If you have even a little sewing skills, then you can create other entertaining and informative things for the baby.
Educational toys for children from 0 - do-it-yourself soft garland
Help your child get to know the world around him. Create such a soft garland for him.

To make it, you will need:
- pieces of tissue;
- satin ribbons;
- strong rope;
- large buttons;
- beads.
To sew these toys, for children from 0, you do not even need a sewing machine. Connect the paired parts and sew them with a seam over the edge.
Take a sufficiently dense and soft cloth that does not frizz, such as felt or fleece.
Leave a small gap at the bottom of each item to fill the toys through these holes with filler and then sew here. At the bottom of the cloud, leave three holes, in each of which you will put a ribbon bent in half, and in the middle of each will be located a button.
Then you will need to tell the child that it is raining, and the buttons are big drops. A month is decorated with a ribbon, an elephant with two eyes and a tail, and a star with tassels on its rays.
Sew a loop to the top of each item, tie them to a rope that needs to be placed above the bed or above the baby's stroller.
For the child, you can make not only a developmental cube, but also a ball. Here, animals, the sun and other objects that you can introduce the baby to because of its age will also be sewn. You can tie a flower that has petals of different colors. Introduce the child gradually with the name of each color. A developmental mat will also be a great gift and help for young parents.

Such educational toys can be created with your own hands and not spend big money on their purchase.
In order for the child to improve fine motor skills, you will make entertainment for him out of the means at hand. For the following you will need:
- color cardboard;
- pencil;
- lace;
- scissors;
- awl.
If you get small holes, then make them larger with a hole punch.
Now the child will match the holes on the mushrooms and thorns of the hedgehog and attach the trophies of the animal to his back with a cord.

The baby's teeth are cut up to a year, so during this period, children prefer to scratch their gums on various objects. Slingbuses are sold to help young parents, but they can be made by yourself, moreover, from improvised materials.
How to make do-it-yourself slingobus for children from 0?
To craft them, take:
- cotton threads;
- a suitable size hook;
- beads;
- plastic ball - a container from a small toy.

Then in the same way you will need to hide a bead and a small skein of thread.

Now you need to string these beads of different sizes on a very strong thread or rope. To do this, make two opposite holes with an awl in a plastic container. And when you tie the frame, start it with 8 loops so that the holes remain. Place the large beads in the center, while the smaller ones can remain as they were - wooden.

If you do not know how or do not want to knit, then you can buy individual beads from wood and make rodent beads from them. Such toys for children from 0 will be very useful for them, especially when teeth are being cut. But observe a number of safety measures:
- The beads should not be coated with paint or varnish, because the child will take them in his mouth, and these dangerous materials can enter his body.
- Use a very dense and strong thread so that it does not tear.
- Take large beads so that the child cannot swallow them.
Educational tactile toys for babies

If one sock is lost or they become small for a child, make such a beautiful caterpillar. Take:
- sock;
- filler;
- buttons for the eye;
- thread with a needle;
- rope or tape.
As a filler, you can use peas, buckwheat, rice, beans, acorns or other similar materials.
The caterpillar consists of several segments. To make the first, pour the selected filler into the toe, tie this segment with a rope or ribbon. In the same way, you need to create all the other segments of the insect. Sew on buttons or ready-made eyes for animals.

Also, making eyes, you can entertain the child by gluing them to the toe. It will be interesting for the kid to follow the plot and the hero of such a puppetry, which you put directly on your hand.
Other tactile toys are also pleasant to the touch and will help the baby develop. You will create such a snake from a piece of fabric. Attach the threads to it as hair and buttons, which will become the eyes and decoration of this character.

When a child's teeth are cut, he will need not only slingobusy, but also soft rings. You will make them if you wrap metal or plastic rings with thread. It is only better to take white yarn that is not dyed. You can sew a fleece ring on the blank and cut its edges into strips so that the child has another toy.

A kid at this age is interested in throwing various objects and watching how they fall, and what happens to them at this time. Of course, beating and heavy can not be given to him, so sew such pads here.

For each, you need to fold the fabric in half, sew up almost all the edges and put the filler inside. Then you need to close the remaining sidewalls. You can sew cartoon characters or numbers on the pillows of the characters, so that the child gradually learns to count.
Such tactile toys can be touched not only with your hands, but also crossed over with their legs when the child already learns to stand, holding on to the edges of his crib.
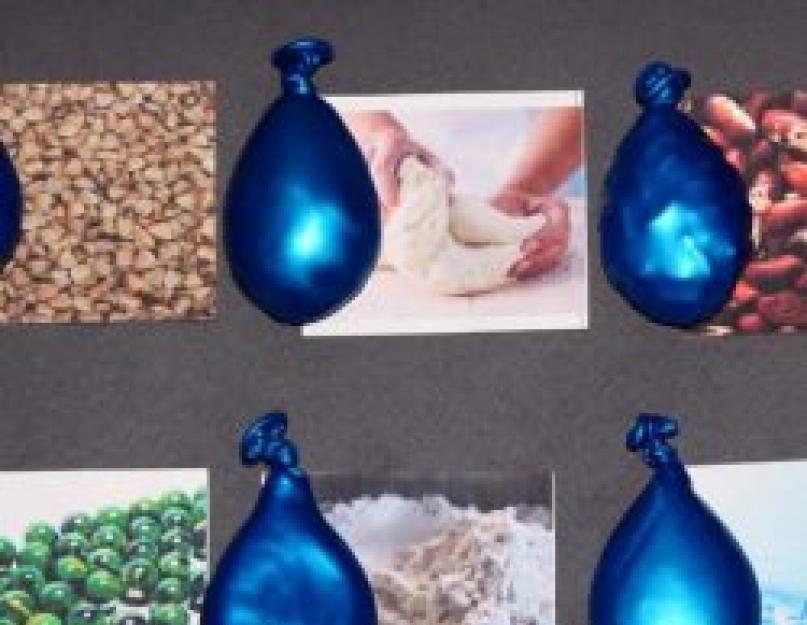
Touch pouches made from balloons are also great fun for your baby. They need to be filled with salt or flour, so that the child is pleased to feel such objects.
But here are the safety measures that will need to be followed, and what you need to pay attention to:
- Pour pasta or other similar objects into the balls that do not have sharp edges.
- Take balloons only with heavy rubber so that the child does not bite them and these last longer.
- You can sprinkle here not only small grains, but also a couple of beans. The child will be pleased to feel them.
- A ball of shreds will help the baby to master the crawl. Watch a master class that explains how to do it.
How to sew a ball for children from 0?
So beautiful it will turn out.

Such a ball is called Amish. This name is given by the name of some Christians who formed unusual villages and decided to live here the way their ancestors lived. Amish women sew beautifully, they have many quilts in their homes. From the remnants of fabrics, they sew various toys, including balls for babies.
Such educational toys for children from 0 bring a lot of benefits, in particular, such things:
- Develop fine motor skills of the crumbs; They teach the baby to crawl, as he tries to reach a bright object.
- Help develop his attention. After all, you can hide the ball nearby, so that the child coaches his eyesight - looking for him with his eyes.
- Develop hearing and attention, as the elements of the ball are ringing, and the child will follow these sounds.

As you see, it will be necessary to carve out three types of elements, from small to large. Cut them out from rags of several colors or from two, as in this example. There are 24 petals that will be located inside, they have one color. And 12 more are outside.
Take two petals, fold 1 and 2 in half and match their folds. Lay these two blanks on top of the third.

Stitch these elements together, but to leave a small gap through which you fill this cooking with a soft filler.

Sew 12 of these pieces, fill them with filler and put a small bell in each pillow. Then you need to sew holes.

Further, for such a toy for children from 0, it is necessary to start composing these elements. In this case, the front side of the workpieces should be outside. First, take the three parts and sew them together.

Now collect these bagels in a ball. Take three such blanks and connect their tops, stitching those. Now it remains to sew the fourth stitch. The technology of this work is shown in the following photo.

Everything, you can give the developing ball to the baby so that he plays with him in plenty.
From the remnants of fabric and thread, you can also create very good toys for babies. The next workshop and step-by-step photos will teach this.
Educational toys for children from 0 from threads and fabrics

To make such an octopus, take a piece of fleece and cut its corners so that you get such a cross.

Cut the edges of this workpiece with a fringe, now fill the whole square with filler and connect the edges. They just need to be firmly tied with a thread. Now weave braids from the cut elements and tie them with yarn. It will remain to embroider the smiling mouths of the octopuses and firmly sew them buttons that will become eyes.
Various dolls of motanka will also be great educational toys for children from 0. But here's how you can use leftover thread.

To make horses of this type, you will need:
- tight threads;
- bright threads;
- rectangular sheet of cardboard;
- scissors.

Cut them to the right and left, and on top tie them with the same yarn.

Take the top down and bandage a small segment so that you get such a round piece on top.

To make the horse’s ears, wind the threads around the middle and ring fingers and tie them in the center.

Divide the threads in half, lift on one side and put the ears there.

To make the horse's mane, wind the threads across the cardboard.

Trim them on one side and the other, then wrap the horse’s neck with this blank and fix it with a bright thread.

Now you need to make the legs for the horse. To do this, divide the threads of the main workpiece in half and wrap them with threads almost to the bottom. Then fasten.

Wind the threads again across the sheet of cardboard, but cut only on one side. These will be the front legs. Therefore, cut off the excess and rewind them with thread. That's how you should get it.

Divide the remainder of the threads on the horse itself in half and put the legs here. And from the thread itself, form a tail.
Rewind the bottom of the legs with red thread, tie a bundle on the tail to fix it.

This is such a wonderful horse. If you want to see what else you can create educational toys for children from 0, then you can do it right now.
You will be convinced that for this you can use even unnecessary materials that are usually sent to the bin.
The secrets of how to keep a child under one year old and what the video blogger will share with you.
![]()


