Even if there is a cold winter outside, each of us has the opportunity to arrange a real spring in our cozy home, and a beaded lilac made with our own hands will help in this. The branches of this graceful plant, placed in a decorative vase, will remind you of the warm season and cheer you up and your loved ones.
Weaving lilac flowers
For work, you will need beads of two colors - lilac and green, wire, as well as green floss threads.
When creating a lilac twig, you need to master the looping technique, which is quite simple.
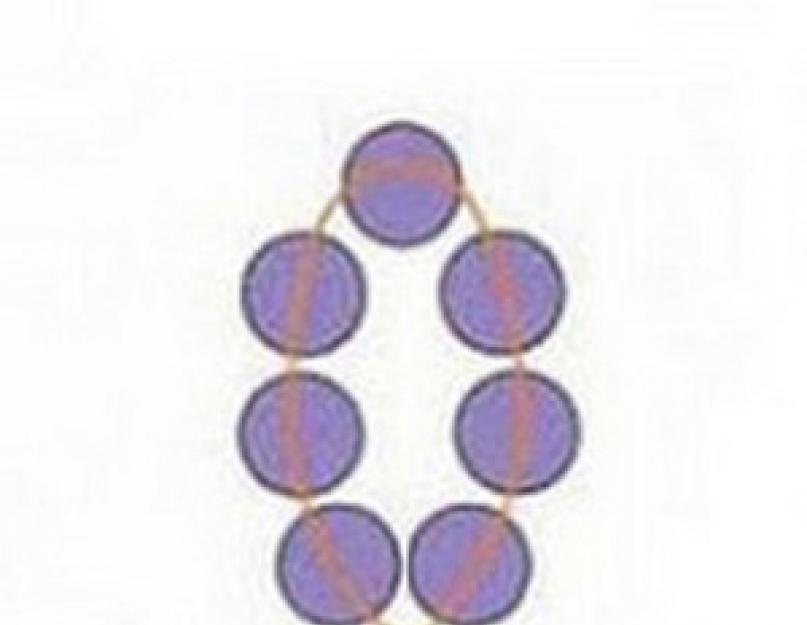
In fact, this is a set of beaded loops, which are made according to the following scheme:

Beaded flower weaving pattern
To make your branch of lilac as similar as possible to the natural prototype, it is advisable to choose a matte cut (oblong beads) of a soft lilac color and wire to match it.
So, if you decide to weave lilacs from beads, the scheme for creating it is quite simple. First, you need to make several branches on a wire, the length of which is about 20-30 cm.
If the branch consists of 5 loops, a twenty centimeter length is enough, but if from 6-7, a longer wire will be needed - from 25 to 30 cm. 5 beads should be strung on each loop. To make the finished product look harmonious, it is recommended to weave branches with 5, 6 and 7 loops.

Weave individual branches of lilac
Finished loops must be squeezed and lifted up as in the photo.

We tighten the loops and make the bud volumetric

We make blanks of twigs with flowers
The process of assembling lilac flowers
Connect blanks-twigs 3 pcs. with a different number of loops, fastening them with threads, starting from top to bottom, gradually weaving new blanks and winding them.

Getting started assembling inflorescences

We get a bunch-twig of lilac from beads
The result should be a bunch like this.

We form the volume of our lilac twig
It is necessary to make several bundles, each of which has a different number of branches with a different number of loops.

We connect several bundles into a fluffy twig
Weaving lilac leaves
The leaves are created using the technique of French or the so-called circular (arc) weaving.

We start to weave leaves
At the beginning of work, you should string green beads one after another, as shown in the photo, and then form leaves from them. It is better not to cut the edge of the wire, since it is impossible to predict in advance how much of it will go to create a leaf.

We string beads one by one

Closing the first circle
Twist the wire in the center for 13-15 turns, while leaving an end 5 cm long. Put 4-5 beads on it and braid with arcs around the loop formed by the working part of the wire with the beads strung earlier.

We twist the wire in the center
On the first arc there should be 1-2 beads more than it was strung at the tip - 6-7 pieces. beads. Make 1 turn around the wire, and then make a second arc, which should also have 1-2 beads more than the previous one.

Weave the next arc
The sheets should be woven so that the arcs fit snugly together, and do not sag.
The remaining piece of wire should be carefully cut to a length of 3-4 mm, and then bend to the inside of the finished sheet. By the way, you can not trim it, but simply thread it into the adjacent beads and only then trim it. Thus, you will be able to more carefully hide what should be hidden from prying eyes.

Leaf for a bouquet of lilac from beads
The sheet is now ready. We made a twig with nine leaves. While creating your creation, you can reduce or increase their number as you wish.
If you decide to make lilacs from beads, the photos presented in this article will help you. Before you start creating this or that part, carefully consider the order of the work.
So that the leg of the future twig, on which the inflorescence is held, does not sag, it is necessary to make it thicker. To this end, add 1-2 wires to one of the sheets, and then wrap the resulting bundle with floss threads.

Weave the required number of leaves
Next, each wrapped sheet should be alternately connected with other leaves. Do not forget to “mask” the wire with green threads so that the beaded lilac looks as close as possible to the one that we can see in nature.
The final stage of creating a branch of lilac from beads
The final stage is no less important than all the previous ones. The realism of the finished product will depend on how carefully you collect all the details.

We proceed to the final assembly of a bouquet of lilacs from beads
All parts are connected around a bamboo stick, which can be replaced with regular wire.

Collected branch of lilac
There are many other options for creating a spring flower. To make such a beautiful lilac from beads, the diagram below will help.

From individual branches we collect a lilac bush from beads

The scheme of weaving lilac from beads on a fishing line
Unlike the previous version of the work, here the lilac brush is created on the line, which should be well stretched.

Weave leaves
Tassels can be made from one row of loops - small, medium from two, and large from three. If desired, the number of beads in the loop can also be increased, this will help create a voluminous bunch.
Spring can always be with you if your home is filled with small elements of it, such as flowers. You can make artificial flowers from beads, looking at them, even in winter you will have a good mood and warmth in your soul. Let's learn how to make these lovely flowers with our own hands together.
How to make beaded lilacs at home?
To weave lilacs, we need beads of two colors, purple and green, as well as wire and green floss thread.
In order to make a sprig of lilacs, you need to know the looping technique. It is very simple, everyone can handle it. This so-called set of beaded loops is made according to the following scheme:
Let's start!
1.
We take beads and a piece of wire 20-30 centimeters long and start weaving. Depending on the size of the beads, the number of beads will be different, we got 5 pieces. on one branch. We make 5 to 7 loops on each branch. We twist the wire into one piece.

2 ... Then, bend all the loops to the top.

3 ... In the same way, we make many more blanks, because 3 pcs. this is just the beginning!


5. We stick them randomly so that they look like a real lilac. You can make several of these blanks, and then connect everything together.

Here we have such a twig!
6. Now, let's start weaving the leaves. We will make them using the French weaving technique (the technique of lowering by arcs).

Here is the weaving pattern:

We begin to weave a sheet of lilac, for this we string beads on the wire and make a small circle on the edge (see photo).
We do about 15 turns.
7. We put on several beads at the end of the wire and wrap it with a working wire.


9 ... Cut off the piece of wire that remains.

10.
We repeat the same with the rest of the leaves. Then we fasten them together with a thread.
Good day! Today I bring to your attention MK lilac... I will be very pleased if it is useful to some of you.
Lilac is an unusually beautiful and extremely diverse flowering shrub. Spring and its thriving flowering prompted me to make this tree. You can also try to make this lilac, it will decorate any home, office or it can be a good and pleasant gift!
For work we need:
Beads green (you can have different shades),
- lilac beads,
- wire 0.3mm (if you have the opportunity, it is better to take the same colors as the beads),
- copper wire (for the formation of branches),
- aluminum wire for the barrel,
- florenta,
- gypsum,
- PVA,
- self-hardening clay (if you do not have one, then you can do it without it, below I will describe how),
- paints (I have gouache, you can take oil or acrylic),
- varnish (I have a regular one for nails),
- a mold for planting (I have an old pot).
Let's get started.
First, I put a lot of beads on the wire, it's more convenient for me. You can, of course, count down by picking up the required number of beads loop by loop.
We retreat from the edge of 10 centimeters and make a loop of 15 beads. We retreat from it 0.5 - 0.7 cm and make the next loop of 13 beads. Then 11, 9, 7, 5, and 3. The more you step back from loop to loop, the longer the branch will be and not very thick. If you make the distance too small, then it will be short, but lush. At first I adhered to these 0.5-0.7, and then between the first loops I made the distance smaller, rising to the top, slightly increasing it.


Having reached 3 beads, we begin the countdown: 5, 7, 9, 11, 13, 15. And we twist our two sides.

Here's a twig we get.

We twist them in two together. I got 27 of these branches. You can make more or less, the splendor of your tree will depend on the number.


We start making leaves. I also collect a lot of beads first. Again I step back from the edge of the wire 10 centimeters and make a loop of 9 beads and make another loop around it. You can count the number of beads on the second loop, doubling it, but I do it by eye. Somewhere the leaf turns out a little more, somewhere less. It's even better for me.


We make the next double loop in about 1 cm. We make 7 of them. We bend our twig in half and twist. Then gently squeeze the top of our leaves with our fingers, making them sharp. The number of leaves on a branch and the distance between the loops can vary as you wish. I got 35 such branches.


Then we take our lilac and green twigs and twist them together.


We attach each such twig to a copper wire and wrap it with floor tape.


We take our aluminum wire and begin to form thicker branches of our tree, wrapping them with floor tape.


I paint the thinnest twigs on the tops. To do this, I breed PVA with brown paint. Their thickness was fine for me, so I did not want to thicken them with the mortar that the barrel did.
So, as I wrote above, for those who do not have clay, we make the trunk like this: we dilute PVA and gypsum (about 3: 1) and cover the tree with this thin solution, reaching and even slightly grabbing our painted branches from the edge. When everything dries up, we make a thicker solution and begin to make the trunk, gradually thickening it. You can do the grooves along the way with a brush or then with a toothpick.
Now, as I did. She took small pieces of clay, gently glued them, forming a trunk. I read in some MK that it is impossible to work with clay, it does not attach and immediately disappears, but it disappears if you do everything quickly. I slowly straightened it, pressed it to the trunk with a sushi stick and it stuck well and after drying it keeps very well. After drying, the clay shrinks and cracks may appear. But then they are well sealed.
After the trunk has solidified, we dilute gypsum with water, pour it into the prepared mold and plant our tree there.
Lilac is one of the most fragrant spring flowers. For many, this scent is associated with the freshness and pleasant smells of spring. Perfumers love to add notes of lilac in their works, which gives an incredibly charming result. In addition to the pleasant smell, lilac flowers grow like bunches along the branches and attract the attention of artists and simply lovers of natural beauty and naturalness. Today we will weave a twig of this beautiful plant. The scheme for weaving a lilac branch quickly and easily from beads is presented in several versions, we will consider one of them in this master class. After reading it, even the most novice needlewomen learn how to weave such a composition from beads.
We deal with weaving according to the pattern of a lilac branch made of beads
In order to weave such a twig, we need:
- Wire 0.3 mm;
- Beads of lilac color (lilac or white);
- Green beads;
- Thread for sewing or floss.
Wire of this thickness is sold at craft stores, or in stores or flea markets with goods for radio amateurs. Beads need to be bought in a round shape, so our flowers turn out to be more voluminous and close to natural in shape. Although the lilac made from the felling also looks quite lush and voluminous. So the choice is yours.
The composition of lilac is made up of individual branches. The branches are drawn from flowers. More details on how to weave branches are described later in the master class.
The flowers are loops of 7 beads strung on a wire and fixed there.
From such loops we form branches with flowers, collecting small garlands of beads.

After that, you need to weave the branches and wrap them with green thread. We weave and wrap them 3 pieces together. We make several such bundles together, you can experiment with the number of loops, so you get a more voluminous craft. For lilac, in addition to flowers, you also need to weave leaves. We will weave them using the French weaving technique. We string the beads on the wire one by one in the form of a chain. And then we start forming the leaves. We advise you not to cut the edge of the wire, since it is very difficult to guess the exact amount of how much it will take, and when building up, knots will turn out that will interfere with weaving.
In the center of the wire we twist 13-15 turns, leaving the end about 5 cm in size. String the first 4-5 beads and braid them with the first arcs, which we increase by 1-2 beads. We make one turn with the working wire around the base.

We also increase the second arc by 1-2 beads than the previous one.
Weave the leaves tightly so that each arc adjoins the previous one, and does not sag. If the arc sags, the leaf will turn out to be "full of holes" and ugly, as if the caterpillars were chewing it.
The remaining piece of wire can be cut to 3-4 mm and bent to the inner side, or you can push it along the passing beads and only then cut it, so it will be less noticeable, this will add neatness to your work.
The leaf is ready. We use 9 leaves in our work. You can use more or fewer pieces of paper in your work. Since each person has their own imagination and their own view of the finished product, for someone 9 leaves will be few or many. Experiment and you will have the best lilac branch.
In order for the leg of the leaf to be dense and not sag, it is necessary to make it thicker. To do this, you need to add 1-2 wires, and then wrap the leg with floss threads of a suitable color, in our case green.

Then connect each wrapped sheet to each other, forming bundles. The pieces will now need to be secured around the bamboo stick or Japanese food stick. You can, of course, simply weave all the wire into one thick leg, and decorate it with a brown thread. At this stage, you just have to give the craft the correct appearance by fixing the beaded composition on it in such a way that it looks like a branch of lilac.

A sprig of lilac is ready. You can diversify the color scheme by just adding different shades of the same color, so the twig will look more like a natural one. But do not experiment with colors over a wide range, this will result in a too colorful picture. By making a few of these branches, you can form a beautiful bush that will look beautiful on your table, or on the wall, depending on your imagination. Well, to supplement our material, I suggest that you familiarize yourself with a video selection on weaving with beads, you can steal a little creativity from it, and spy on the basic techniques of beading.
Video selection on the topic of the article
People have been engaged in embroidery and weaving from beads for several millennia. This type of needlework does not require the use of special tools. All you need is needles, threads, scissors and beads.
Round beads are the most popular because they are easy to use.
It is mainly exported from:
- Czech Republic - not very large, flatter beads in the form of an oval with a small hole;
- Japan - beads of a square shape, large with a large hole.
Due to the different sizes, textures and shades, beads have gained their popularity. This material allows you to make great things: embroidery, wood, flower, decoration. You can find a suitable product diagram on the Internet.
For beading, only the imagination of the needlewoman serves as a limitation, but it is impossible to combine beads of different shapes and sizes in one product!
Beads come in different shades of colors. Release it and with various coating optionsgiving the finished product uniqueness:
- transparent (made of transparent glass, has the ability to transmit light);
- translucent (made of milk glass, has the ability to transmit light partially);
- opaque (does not have the ability to transmit light);
- with a line of silver color (the hole is covered with a mirror dusting of silver, silver-plated, copper, bronze or gold shades);
- with a line of a different color;
- silk (glass is covered with grooves, it is compared to silk or "tiger's eye").
You can make embroidery from beads, or you can weave various products. As an example, you can use the master class "Lilac from beads".
Gallery: beaded lilac (25 photos)


About composition
 When spring comes, nature comes alive. This wonderful time of the year is rich in amazing colors: the first leaves bloom, green grass breaks through, the sky becomes clear and blue, spring flowers appear, including lilacs.
This is a very beautiful bush with various shades of delicate flowers. Therefore, with the arrival of spring, many needlewomen begin to make such a tree that will decorate the interior and become an excellent gift.
Many patterns of embroidery and beading have been created now. Such schemes are not very complicated, so beginners can use them, the main thing is to be patient and finish what they started!
There are also various master classes on how to make beaded lilacs.
What is required to make beaded lilacs?
The technique of weaving a tree from lilac beads has several differences from how to make branches of other plants using the beading method.
A master class on weaving lilac from beads requires availability of the following items:
- beads for embroidery of lilac petals of purple, light purple, white or white-pink color with a glossy or matte finish, but not transparent;
- green beads (you can use a dark and light shade to create interesting color blotches) for weaving leaves;
- thin wire of normal and green shades;
- a vase or a ceramic pot to place the finished lilac from beads there (it will be decided to use a pot, then to fix the product you will have to use plaster or polymer clay, as well as artificial moss and small pebbles to decorate the area around the branches).
The process of creating beaded embroidery lilac
 A special scheme to create a lilac from beads, the master class for which is presented below, is not required. The whole process of making flowers, branches and leaves is very easy.
First you need embroider (form) inflorescences. Then you need to create leaves, then all the elements must be brought together.
Cast on 5 or 6 beads and twist the wire to form a loop. The amount of scrolling is 1 centimeter. Then you need to make similar loops to one side of the resulting loop. But the number of beads will be different (from 5 to 7 pieces), this is necessary in order for the flowers to be realistic.
A scheme is suitable where the size of the loops decreases at the top of the inflorescence and increases towards the center.
When all the loops are created, then you should gently bend and twist the wire together between the hinges. This process should be carried out until all the loops are placed opposite each other. Then you need to direct all the loops with your hands to the tip of the inflorescence so that they "look" up. The first inflorescence will form. It can be more lush by adding a similar element in a smaller size.
Petals are made similarly to inflorescences, but the loops themselves twist tighter and do not direct (they "look" from the central wire).
The entire composition will be assembled with the tips of the branches and you do not need to cut them. When the study of the elements is completed, the length of the wire should be from 30 to 40 centimeters (a margin is needed!).
According to the scheme of this master class, one branch will consist of 15 embroideries (blanks) of inflorescences. The stalk needs to be processed (choose the appropriate option):
- glue with brown adhesive tape;
- wrap with green wire;
- wrap with green wire;
- wrap with green embroidery threads (floss).
When processing blanks, you should collect them together, creating a twig.
 Further, following the simple scheme of this master class, need to prepare leavesusing the technique of weaving in a circle. It is necessary to create from 7 to 9 leaves and completely collect the twig, not forgetting to also wrap the stems with floss strings before that. As a result, you will get beautiful lush bunches of the product.
The finished tree made of lilac beads must be put in a vase or pot. For the second option, you should use plaster, diluted with water, and pour it over the entire base in the pot. You can decorate the resulting composition, namely, the area around the resulting lilac bush, with a previously prepared decor (moss or pebbles), put it in a prominent place in the room and enjoy the view of this wonderful handmade product.


